
Checking Power Settings on Windows
Power-saving mode is a useful feature that helps conserve battery life and reduce energy consumption on Windows computers. However, there may be instances where you want to disable this mode to ensure optimal performance or usage of power. Here’s how you can check and adjust the power settings on Windows:
- Open the Control Panel by clicking the “Start” menu and searching for “Control Panel.”
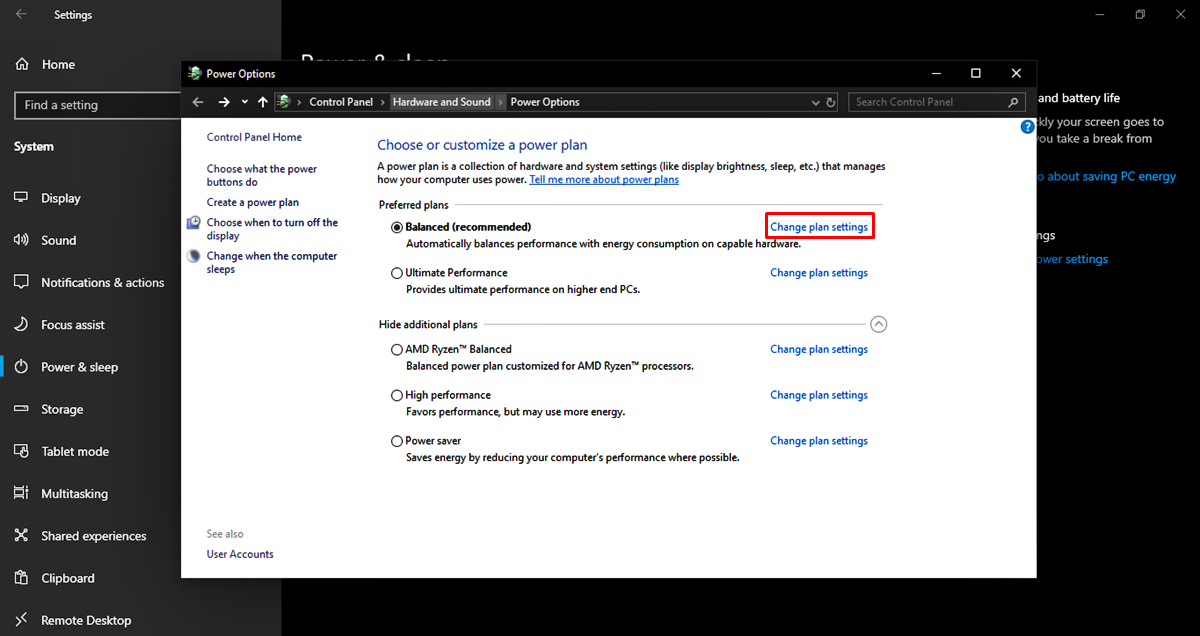
- In the Control Panel, select “Power Options.”
- You will see a list of available power plans. The plan that is currently active will be indicated with a tick mark. Click on the corresponding “Change plan settings” link next to the selected plan.
- In the next window, click on “Change advanced power settings.”
- A new window will open, displaying a range of power options and settings. Here, you can customize different aspects of power management, such as the duration of inactivity before the computer goes to sleep or the brightness level when running on battery power.
- Scroll through the settings and make any necessary changes to suit your preferences. Click “Apply” and then “OK” to save the changes.
It’s important to note that some Windows devices may have additional power-saving options specific to their hardware or manufacturer. In such cases, you may find an additional tab or options in the Power Options menu with further settings to modify.
By following these steps, you can easily check and adjust the power settings on your Windows computer, allowing you to disable power-saving mode or make customized changes to suit your specific requirements.
Adjusting Power Options on Mac
Mac computers offer a range of power-saving options that allow you to optimize battery life and manage energy consumption. If you want to adjust these power options or disable power-saving mode, here’s how you can do it:
- Click on the Apple menu in the top-left corner of the screen and select “System Preferences.”
- In the System Preferences window, click on “Energy Saver.”
- You will see two tabs: “Battery” and “Power Adapter.” The “Battery” tab contains power-saving settings when your Mac is running on battery, while the “Power Adapter” tab has settings for when your Mac is connected to a power source.
- To make changes to the power-saving settings, click on the respective tab and adjust the sliders and checkboxes according to your preferences.
- On the “Battery” tab, you can customize settings such as the time before display sleep, the time before the computer goes into sleep mode, or even uncheck the “Enable Power Nap” option if you want to disable this feature.
- On the “Power Adapter” tab, you can modify settings like the display sleep time, the computer sleep time, or select the “Prevent computer from sleeping automatically when the display is off” option if you want to disable sleep mode.
- Once you’ve made the desired changes, close the Energy Saver window.
Keep in mind that adjusting power options on a Mac can help extend battery life or enhance performance, but it’s essential to strike a balance according to your needs. Disabling power-saving mode entirely can result in increased power consumption and reduced battery life, so it’s advisable to make selective changes based on your requirements.
By following these steps, you can easily adjust the power options on your Mac and customize the power-saving settings to suit your preferences and optimize energy usage.
Disabling Power Saving Mode on Android Devices
Power-saving mode on Android devices is a feature that helps extend battery life by reducing performance and limiting certain functions. However, there may be instances where you want to disable this mode to fully utilize the capabilities of your device. Here’s how you can disable power-saving mode on Android:
- Swipe down from the top of your Android device’s screen to open the notification panel.
- Look for the battery icon or battery percentage in the quick settings section and tap on it.
- This will open the battery settings menu. Here, you may find a “Battery saver” option or a similar setting related to power-saving mode. Tap on it.
- In the battery saver menu, you will typically have the option to toggle the power-saving mode on or off. Swipe the switch to the off position to disable power-saving mode.
Alternatively, the steps to disable power-saving mode may vary slightly depending on the device manufacturer and Android version. In some cases, you may need to navigate to the device’s Settings menu, select “Battery,” and disable power-saving mode from there.
Once you have disabled power-saving mode, your Android device will no longer restrict performance or limit specific functions to conserve battery life. However, keep in mind that disabling power-saving mode may result in faster battery drain, so it’s recommended to use it sparingly or when you need the full capabilities of your device.
By following these simple steps, you can easily disable power-saving mode on your Android device and enjoy all the features and performance without any restrictions imposed by power-saving settings.
Exiting Low Power Mode on iOS Devices
Low Power Mode on iOS devices is a useful feature that helps conserve battery life when your device is running low on power. However, once your battery is sufficiently charged, you may want to exit Low Power Mode to restore the full functionality of your device. Here’s how you can do it:
- Open the “Settings” app on your iOS device. It’s usually represented by a gear icon.
- Scroll down and tap on “Battery.”
- In the “Battery” menu, you’ll see the “Low Power Mode” toggle switch. If it’s enabled and the slider is green, it means that Low Power Mode is turned on.
- To exit Low Power Mode, simply tap on the toggle switch to disable it. The slider should turn gray, indicating that Low Power Mode is no longer active.
Once you’ve disabled Low Power Mode, your iOS device’s performance and functionality will return to normal. Keep in mind that exiting Low Power Mode can result in faster battery drain, so it’s recommended to enable it only when your battery level is low or when you need to conserve power.
If you have an iPhone with iOS 13 or later, you can also exit Low Power Mode by accessing the Control Center. To do this, swipe down from the top-right corner of your screen (or swipe up on iPhone models with a home button) to open the Control Center. Look for the battery icon and tap on it. The Low Power Mode button should be there, and you can tap on it to disable it.
By following these simple steps, you can easily exit Low Power Mode on your iOS device and enjoy full functionality without power-saving restrictions.
Turning Off Power Saving Mode on Smart TVs
Power-saving mode on smart TVs is a feature designed to reduce energy consumption and extend the lifespan of the TV. However, there may be times when you want to disable this mode to optimize the picture quality or avoid any limitations imposed by power-saving settings. Here’s how you can turn off power-saving mode on your smart TV:
- Grab your TV remote and press the “Menu” button. This will open the TV’s settings menu.
- Navigate through the settings menu using the arrow keys on your remote or the directional buttons on your TV.
- Look for the “Settings” or “Picture” option and select it.
- Within the settings or picture menu, you should find a “Power Saving” or “Energy Saving” option. Click on it.
- In the power-saving settings, you’ll typically have the option to toggle power-saving mode on or off. Choose the “Off” or “Disable” option to turn off power-saving mode.
- Save the changes and exit the settings menu. Your smart TV will now operate without any power-saving restrictions.
It’s important to be aware that the steps to turn off power-saving mode may vary slightly depending on the brand and model of your smart TV. If you’re having trouble finding the exact settings or options mentioned above, refer to your TV’s user manual or look for specific instructions on the manufacturer’s website.
By following these steps, you can easily disable power-saving mode on your smart TV and enjoy improved picture quality and unrestricted usage without any energy-saving limitations.
Changing Power Saving Settings on Gaming Consoles
Gaming consoles often come with power-saving settings to help conserve energy and increase the lifespan of the console. However, there may be instances where you want to change these settings to ensure optimal performance or customization. Here’s how you can change the power-saving settings on gaming consoles:
- Turn on your gaming console and navigate to the main menu or home screen.
- Look for the console’s settings menu. The location may vary depending on the console, but it is typically represented by a gear or cogwheel icon. Select it.
- Within the settings menu, look for the “Power” or “System” option. Select it to access the power-saving settings.
- You should see various power-saving options, such as sleep mode duration, automatic turn-off times, or power-saving profiles. Explore the available options and select the ones that suit your preferences.
- If you want to customize the power-saving settings further, select the “Custom” or “Advanced” option. Here, you may have additional options to adjust the console’s behavior when idle, disable sleep mode entirely, or modify other power-related settings.
- Save the changes and exit the settings menu. Your gaming console will now operate according to the updated power-saving settings.
Remember that the steps and options for changing power-saving settings may vary depending on the gaming console you own. If you’re unsure about the specific steps or options available on your console, consult the user manual or refer to the manufacturer’s website for detailed instructions.
By following these simple steps, you can easily change the power-saving settings on your gaming console and customize the power management to enhance performance or meet your specific requirements.
Bypassing Power Saving Mode on Laptops
Power-saving mode is a feature commonly found on laptops that helps conserve battery power by reducing system performance and limiting certain functions. However, there may be occasions when you want to bypass this mode to maximize your laptop’s performance or access certain features without any limitations. Here’s how you can bypass power-saving mode on laptops:
- On your laptop, click on the battery icon located in the notification area of the taskbar. This will open the battery settings menu.
- In the battery settings menu, you may find an option called “Power Options” or a similar label. Select it to open the power options settings.
- Within the power options settings, there should be a power plan selection. Choose a power plan that is optimized for performance or high performance.
- If you can’t find a power plan that suits your needs, you can create a custom power plan by selecting the “Create a power plan” option in the power options settings. Customize the power settings to maximize performance and minimize power-saving features.
- Save the changes and exit the power options settings. Your laptop will now operate in a power plan that prioritizes performance over power-saving.
It’s important to note that bypassing power-saving mode can result in increased power consumption, which may lead to reduced battery life. It’s recommended to use this option sparingly and revert to a power-saving mode when you require longer battery life or when power is limited.
Keep in mind that the steps to bypass power-saving mode may vary depending on your laptop’s brand and operating system. If you’re having trouble finding the exact settings or options mentioned above, refer to your laptop’s user manual or visit the manufacturer’s website for detailed instructions.
By following these steps, you can easily bypass power-saving mode on your laptop, allowing you to enjoy optimized performance and access all features without any limitations imposed by power-saving settings.
Disabling Power Saving Features on Smartwatches
Smartwatches are equipped with power-saving features that help conserve battery life and extend usage time between charges. However, there may be instances when you want to disable these features to access all the functionalities of your smartwatch without any restrictions. Here’s how you can disable power-saving features on smartwatches:
- On your smartwatch, swipe down from the top of the screen to access the quick settings or notifications panel. The location might vary depending on the smartwatch model and operating system.
- Look for the battery icon or power-saving mode indicator. Tap on it to access the battery settings.
- In the battery settings, you may find an option to enable or disable power-saving mode. If power-saving mode is currently enabled, tap on the option to disable it.
- In some cases, you might have granular control over specific power-saving features. Check if there are options to disable features such as screen timeout, ambient display, or background app synchronization.
- After making the desired changes, exit the battery settings.
It’s worth noting that the exact steps to disable power-saving features may vary depending on the smartwatch brand and model, as well as the operating system it runs on. If you’re unsure about the specific steps or options available on your smartwatch, consult the user manual or visit the manufacturer’s website for detailed instructions.
By following these steps, you can easily disable power-saving features on your smartwatch, allowing you to enjoy uninterrupted access to all the features and functionalities without any restrictions imposed by power-saving settings.
Exiting Power Saving Mode on Wireless Routers
Power-saving mode is a common feature found on wireless routers that helps conserve energy by reducing power consumption during periods of inactivity. However, there may be situations where you want to exit power-saving mode to ensure uninterrupted and optimal connectivity. Here’s how you can exit power-saving mode on wireless routers:
- Open a web browser on your computer or mobile device that is connected to the wireless router.
- In the address bar of the web browser, enter the IP address of the router. This IP address is specific to your router model and can usually be found in the user manual or on the router itself.
- Press Enter or click Go to access the router’s administrative interface.
- Enter the username and password to log into the router’s administrative interface. The default login credentials can also be found in the user manual or on the router itself.
- Navigate to the wireless settings or power-saving settings section of the router’s administrative interface. The location and labeling of this section may vary depending on the router brand and model.
- Look for the power-saving mode option or any settings related to reducing power consumption. Toggle the switch or select the option to disable power-saving mode.
- Save the changes and wait for the router to reboot if necessary. Once the router has restarted, it will be operating in normal mode without power-saving restrictions.
It’s important to note that the steps to exit power-saving mode on wireless routers may differ between router models and manufacturers. If you’re unsure about the specific steps or options for your router, consult the user manual or visit the manufacturer’s website for detailed instructions.
By following these steps, you can easily exit power-saving mode on your wireless router, ensuring uninterrupted connectivity and optimal performance without any power-saving limitations.
Turning Off Power Saving Mode on Portable Speakers
Power-saving mode is a feature commonly found on portable speakers designed to conserve battery life and extend usage time. However, there may be instances when you want to disable this mode to maximize the volume or prevent any limitations imposed by power-saving settings. Here’s how you can turn off power-saving mode on portable speakers:
- Locate the power button or the mode button on your portable speaker. The location of the buttons may vary depending on the speaker model.
- Turn on your portable speaker by pressing and holding the power button for a few seconds until it powers on.
- Once the speaker is powered on, check if there is a mode indicator or a power-saving mode indicator on the speaker itself.
- If the power-saving mode indicator is lit up or blinking, it means that power-saving mode is currently enabled on the speaker.
- Press the mode button on your portable speaker to cycle through the different modes until you reach the mode that disables power-saving mode.
- Pay attention to any changes in the indicator’s behavior. If the power-saving mode indicator turns off or stops blinking, it means that power-saving mode has been disabled.
It’s important to note that the steps to turn off power-saving mode may vary depending on your portable speaker model. If you’re unsure about the specific steps or options mentioned above, refer to the user manual that came with your speaker or visit the manufacturer’s website for detailed instructions.
By following these steps, you can easily disable power-saving mode on your portable speaker, allowing you to enjoy maximum volume and uninterrupted playback without any power-saving limitations.