
Why you might want to turn off auto brightness
Auto brightness is a feature commonly found in modern operating systems, including Windows, that aims to adjust the display brightness automatically based on ambient lighting conditions. While this feature can be convenient for some users, there are several reasons why you might want to turn off auto brightness:
- Consistency: Auto brightness can sometimes result in inconsistent brightness levels, especially when moving between different lighting environments. This can be distracting and disrupt your workflow.
- Accurate color representation: Auto brightness may not always accurately represent colors on the display, and this can be a concern for professionals who work with graphic design, photography, or video editing. Turning off auto brightness allows you to have better control over the display settings and ensure accurate color representation.
- Battery life: Auto brightness adjusts the display brightness based on ambient lighting conditions, which can consume additional battery power. If you are trying to maximize your laptop’s battery life, turning off auto brightness can be a practical solution.
- Personal preference: Some users simply prefer to have control over the brightness settings and manually adjust it according to their preferences, regardless of the lighting conditions.
By turning off auto brightness, you regain control over the display settings and can tailor them to your specific needs. Whether you require consistent brightness, accurate color representation, or want to extend your device’s battery life, disabling this feature gives you the freedom to customize your viewing experience.
How to turn off auto brightness in Windows 10
Windows 10 offers a straightforward method to disable auto brightness. Follow these steps:
- Open the “Settings” app by clicking on the Start menu and selecting the gear icon.
- In the Settings window, click on “System.”
- Select “Display” from the left-hand menu.
- Scroll down to the “Brightness and color” section.
- Under the “Brightness and color” section, toggle off the “Change brightness automatically when lighting changes” option.
Once you have completed these steps, the auto brightness feature will be disabled, and you will have full control over the brightness settings. You can now manually adjust the brightness level according to your preference.
It is worth noting that disabling auto brightness might vary slightly depending on the specific version of Windows 10 you are using. However, the general process described above should be applicable to most Windows 10 installations.
By disabling auto brightness in Windows 10, you can ensure consistent brightness levels, accurate color representation, and even potentially extend your device’s battery life. It allows you to have better control over your display settings, ultimately enhancing your viewing experience.
How to turn off auto brightness in Windows 8/8.1
If you’re using Windows 8 or Windows 8.1, you can easily disable auto brightness using the following steps:
- Open the Charms bar by moving your mouse to the top right corner of the screen or by swiping in from the right edge if you’re using a touchscreen.
- Click on the “Settings” charm, which looks like a gear icon.
- Click on “Brightness” in the Settings pane.
- Under the “Adjust screen brightness” section, locate the “Automatically adjust brightness” checkbox.
- Uncheck the “Automatically adjust brightness” checkbox to disable auto brightness.
Once you’ve completed these steps, the auto brightness feature will be turned off, giving you complete control over the display brightness settings. You can now manually adjust the brightness level as per your preference.
Note that the process for disabling auto brightness in Windows 8 and Windows 8.1 may vary slightly depending on the device manufacturer or specific version of the operating system. However, the general steps outlined above should apply to most Windows 8/8.1 installations.
By turning off auto brightness in Windows 8/8.1, you can ensure consistent display brightness, accurate color representation, and potentially even conserve battery life on your device. Taking control of the brightness settings allows you to personalize your viewing experience and optimize it to your liking.
How to turn off auto brightness in Windows 7
If you’re using Windows 7, you can follow these steps to disable the auto brightness feature:
- Click on the “Start” button located in the bottom left corner of the screen.
- Open the Control Panel from the Start menu.
- In the Control Panel window, click on “System and Security.”
- Under the System and Security section, click on “Power Options.”
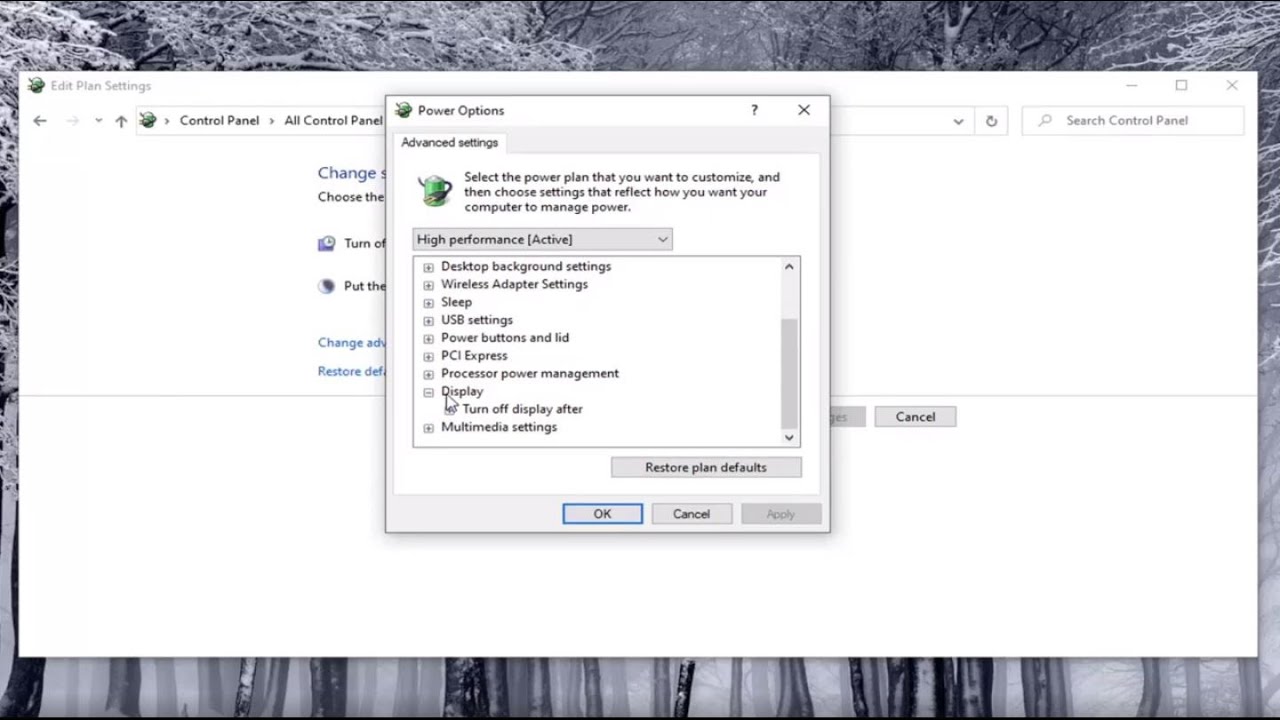
- In the Power Options window, click on “Change plan settings” next to the power plan that is currently selected.
- On the following screen, click on “Change advanced power settings.”
- In the Power Options dialog box, scroll down and expand the “Display” option.
- Next, expand the “Enable adaptive brightness” option.
- Change both the “On battery” and “Plugged in” settings to “Off.”
- Click on “Apply” and then “OK” to save the changes.
After completing these steps, the auto brightness feature will be disabled on your Windows 7 machine. You now have manual control over the display brightness settings, allowing you to set it to your preferred level.
It’s important to note that the exact steps for turning off auto brightness in Windows 7 may vary slightly depending on your specific system configuration. However, the general instructions provided above should be applicable to most Windows 7 installations.
By disabling auto brightness in Windows 7, you can ensure consistent brightness levels, accurate color representation, and potentially prolong your device’s battery life. Taking control over the display settings allows you to personalize your viewing experience and tailor it to your specific needs.
Troubleshooting common issues with auto brightness
While auto brightness can be a helpful feature, it’s not without its quirks. Here are some common issues that users may encounter with auto brightness and some troubleshooting steps to resolve them:
- Inconsistent brightness adjustments: If you notice that the auto brightness feature is not adjusting the brightness level accurately or is being erratic, try restarting your device. Sometimes, a simple restart can fix temporary software glitches that may affect auto brightness.
- Display flickering: In some cases, auto brightness may cause the display to flicker. This can be distracting and uncomfortable for users. One solution is to manually adjust the brightness level to a comfortable setting and then disable auto brightness. This will ensure a consistent brightness level without any flickering.
- Unresponsive auto brightness: If the auto brightness feature is not responding or does not seem to be functioning at all, check if your device has the latest graphics driver installed. Outdated or incompatible drivers can interfere with the proper functioning of auto brightness. You can visit the manufacturer’s website or use Windows Update to download and install the latest driver version.
- Inaccuracy in low-light environments: Auto brightness may struggle to accurately adjust the brightness level in low-light conditions. If you find that the display is either too bright or too dim in such environments, consider manually adjusting the brightness level to a comfortable setting and disabling auto brightness altogether.
- Battery drain issues: While auto brightness aims to optimize screen brightness based on ambient lighting conditions, it can consume additional battery power. If you’re experiencing significant battery drain, consider disabling auto brightness and manually adjusting the brightness level to conserve battery life.
If none of the troubleshooting steps above resolve the issue with auto brightness, you may need to contact the manufacturer’s support or seek assistance from a qualified technician who can diagnose and address the problem.
By troubleshooting and resolving common issues with auto brightness, you can ensure a smoother and more comfortable viewing experience on your Windows device. Whether it’s addressing inconsistencies in brightness adjustments or minimizing battery drain concerns, understanding and troubleshooting these issues can help you make the most of your device’s display settings.