
Understanding VHS Tapes and Digital Conversion
Understanding VHS Tapes and Digital Conversion
VHS tapes were once the go-to format for recording and watching movies and home videos. However, as technology has advanced, VHS tapes have become obsolete, and many people are left with a stack of tapes that they can no longer play. Fortunately, it is possible to transfer VHS tapes to a digital format, preserving the memories captured on these tapes for years to come.
VHS stands for Video Home System, and it was introduced in the 1970s as a consumer-level analog video recording and playback format. VHS tapes use magnetic tape to store audio and video signals in an analog format. However, unlike modern digital formats, VHS tapes degrade over time due to factors such as heat, humidity, and magnetic interference.
To preserve the content on VHS tapes, it is essential to convert them to digital format. Digital conversion involves transferring the analog signals from the VHS tapes to a digital format that can be saved, edited, and played on modern devices such as computers, smartphones, and tablets.
There are several reasons why converting VHS tapes to digital format is important. Firstly, VHS tapes are prone to physical damage and deterioration over time. By digitizing them, you can safeguard the content against potential loss or damage.
Secondly, digital formats offer numerous advantages over analog tapes. Digital files are easier to store, can be easily duplicated, and are not vulnerable to the same degradation issues as VHS tapes. Additionally, digital files can be easily edited, allowing you to enhance the quality of the recordings and even add special effects or captions.
To convert VHS tapes to digital format, you will need some basic equipment, including a VCR (Video Cassette Recorder) and a digital capture device. The capture device allows you to connect your VCR to your computer and transfer the analog signals to your computer’s hard drive.
Once you have the necessary equipment, you will need to prepare your VHS tapes for conversion. This involves inspecting them for any physical damage, cleaning them if necessary, and organizing them based on the order you want them in the digital files.
In the next section, we will discuss in detail the equipment required for VHS to digital conversion and how to properly prepare your VHS tapes. So let’s dive into the process and start preserving those precious memories!
Gathering the Necessary Equipment
Gathering the Necessary Equipment
Before you can start transferring your VHS tapes to a digital format, it’s important to gather the necessary equipment. While the specific equipment may vary depending on your setup and preferences, here are the essentials you’ll need:
- VCR (Video Cassette Recorder): The VCR is the device that plays your VHS tapes. If you don’t already have one, you can look for used models online or at local thrift stores. Make sure the VCR is in good working condition and has the necessary audio and video outputs.
- Digital Capture Device: A digital capture device acts as the bridge between your VCR and computer. There are several options available, including USB capture devices that connect directly to your computer’s USB port, as well as internal capture cards that you install inside your computer tower. Choose a capture device that is compatible with your computer and offers good video quality.
- Cables: You’ll need audio/video cables to connect your VCR to the digital capture device. The specific cables required will depend on the outputs of your VCR and the inputs of your digital capture device. Common options include RCA cables and S-Video cables. Ensure that you have the appropriate cables and that they are in good condition.
- Computer: You’ll need a computer with enough storage space to save your digital video files. Additionally, make sure your computer has the necessary processing power and software capabilities to handle video capture and editing.
- Software: Depending on the capturing device you choose, it may come with software for capturing and editing videos. If not, there are various free and paid software options available that you can use to capture and edit your VHS recordings.
Once you have gathered all the necessary equipment, it’s important to familiarize yourself with how everything connects and functions together. Read the user manuals for the VCR and digital capture device to ensure proper setup and configuration. Make sure you have the correct drivers installed for your capture device, and if needed, download and install the appropriate software for video capture and editing.
Taking the time to gather the right equipment and set it up correctly will ensure a smoother VHS to digital conversion process. It’s essential to have everything ready and functioning properly before proceeding with the actual tape transfer.
In the next section, we will discuss how to properly prepare your VHS tapes for conversion, including inspecting and cleaning them. So let’s get everything in place, and we’ll be one step closer to preserving your cherished memories in a digital format!
Preparing Your VHS Tapes for Conversion
Preparing Your VHS Tapes for Conversion
Before you start the process of transferring your VHS tapes to a digital format, it’s important to properly prepare your tapes to ensure the best possible conversion results. Here are the steps to follow:
- Inspect your tapes: Carefully examine each VHS tape for any physical damage such as mold, mildew, dust, or sticky residue. If you notice any issues, it’s essential to address them before attempting the conversion. Refer to the manufacturer’s guidelines or consult a professional if you’re unsure about how to handle damaged tapes.
- Clean your tapes: Dust, dirt, and debris can cause playback issues and affect the quality of the captured video. Use a soft, lint-free cloth to gently clean the tape’s exterior and the inside of the cassette housing. Be cautious not to touch the tape itself, as it is sensitive and can be easily damaged.
- Organize your tapes: Determine the order in which you want to convert your tapes and create a clear labeling system. This will help you keep track of which tapes you’ve already converted and maintain a logical organization for your digital files. Consider creating a spreadsheet or a list to keep track of important details such as tape names, dates, and contents.
- Choose the correct playback speed: VHS tapes were typically recorded and played back at different speeds, such as Standard Play (SP) or Long Play (LP). When converting your tapes, it’s recommended to use the same playback speed at which the tapes were originally recorded to avoid any loss in quality. Check the labels or refer to the original recording equipment’s settings to determine the correct speed for each tape.
During the preparation process, it’s important to handle your VHS tapes with care and avoid exposing them to extreme temperatures or humidity. Storing your tapes in a cool, dry place can help preserve their integrity and prevent further deterioration.
By inspecting, cleaning, and organizing your VHS tapes before the conversion process, you’ll ensure an optimal quality transfer. Taking these steps will help minimize any potential issues and improve the overall outcome of your digital conversion.
In the next section, we will discuss how to connect your VCR to a digital capture device and set up the necessary software for the conversion process. So let’s move on to the next step and get closer to digitizing your cherished VHS memories!
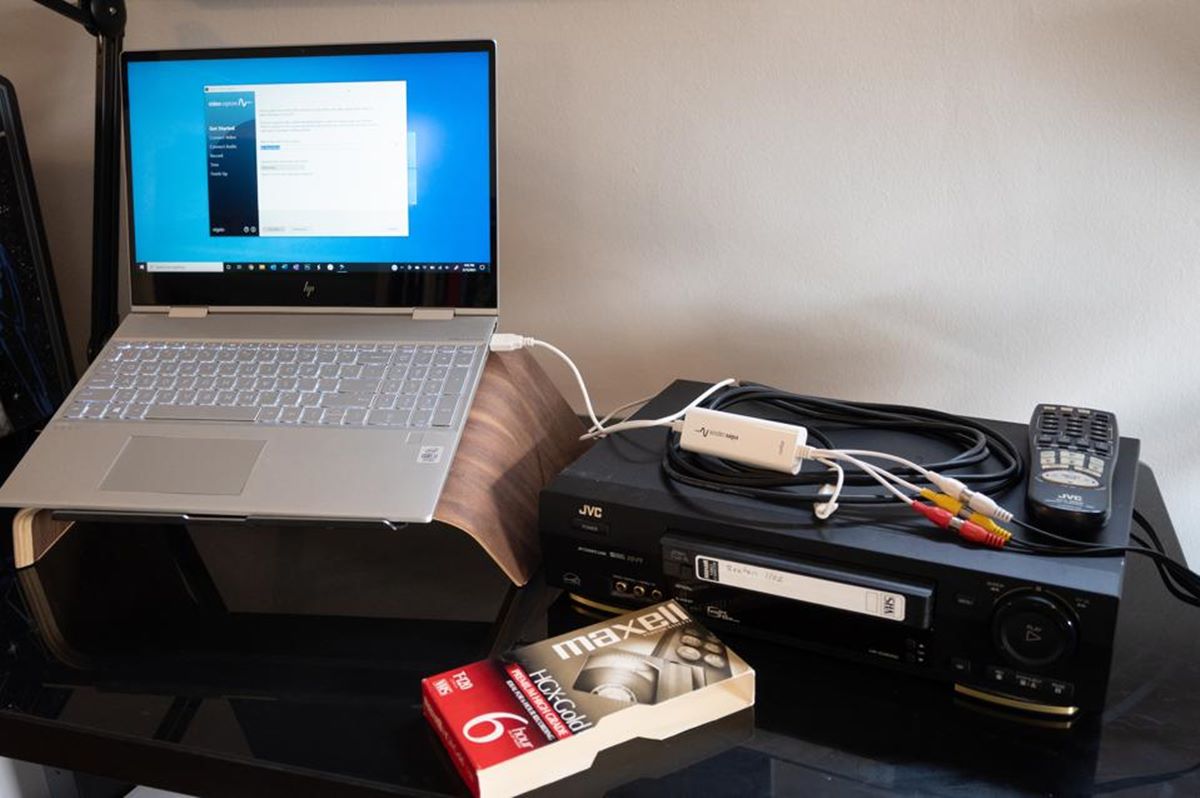
Connecting Your VCR to a Digital Capture Device
Connecting Your VCR to a Digital Capture Device
Once you have gathered the necessary equipment and prepared your VHS tapes, it’s time to connect your VCR to a digital capture device. This step is crucial in transferring the analog signals from your VCR to a digital format that can be saved on your computer or other digital storage devices. Here’s how to do it:
- Locate the audio and video outputs on your VCR: Most VCRs have RCA audio/video outputs, which consist of yellow, red, and white connectors for video and audio signals respectively. Some VCRs may also have an S-Video output, which provides a higher-quality video signal. Identify the appropriate outputs on your VCR.
- Choose the appropriate audio and video cables: Depending on the outputs of your VCR and the inputs of your digital capture device, you’ll need to select the correct cables. Common options include RCA cables for composite video and stereo audio, or an S-Video cable for improved video quality. Ensure that the cables are in good condition and match the required connectors.
- Connect the cables: Connect one end of the audio and video cables to the corresponding outputs on your VCR. Make sure to match the colors of the connectors (yellow for video, red and white for audio). Then, connect the other end of the cables to the corresponding inputs on your digital capture device. Use the appropriate audio and video inputs on the capture device (e.g., composite or S-Video).
- Power on your VCR and digital capture device: Ensure that both your VCR and digital capture device are powered on. Double-check the connections to ensure a secure fit. Test the setup by inserting a VHS tape into the VCR and verifying that you can see and hear the video and audio on your computer screen or preview window of the capture software.
It’s important to note that the specific steps may vary depending on the make and model of your VCR and digital capture device. Always refer to the user manuals for detailed instructions and troubleshooting tips specific to your equipment.
Once you have successfully connected your VCR to the digital capture device, you are ready to move on to the next step: choosing the right software for the conversion process. In the following section, we will discuss the available options and how to select the software that best suits your needs. So let’s continue the journey toward preserving your VHS memories in a digital format!
Choosing the Right Software for Conversion
Choosing the Right Software for Conversion
Now that you have successfully connected your VCR to a digital capture device, it’s time to choose the right software for converting your VHS tapes to a digital format. The software you select will play a crucial role in capturing and editing your video files, so it’s essential to choose wisely. Here are some factors to consider when making your decision:
- Capture and editing capabilities: Look for software that provides solid capturing capabilities, allowing you to record your VHS tapes smoothly. The software should also offer basic editing features such as trimming, cutting, and adjusting audio and video settings. Depending on your preferences, you may require more advanced editing features like adding text, transitions, or special effects.
- User-friendly interface: Consider software that has an intuitive and user-friendly interface. This will make the conversion process easier and more enjoyable. Look for software with a simple drag-and-drop functionality and clear controls for capturing, editing, and exporting your video files.
- Compatibility: Ensure that the software you choose is compatible with your operating system. Whether you are using Windows, macOS, or Linux, make sure the software is compatible and can run smoothly on your computer without any compatibility issues.
- Video file formats and quality: Check the supported video file formats of the software. It’s important to select software that can save your converted files in a format that can be easily played on various devices. Additionally, consider the quality of the captured video. Look for software that offers options for capturing in high-definition (HD) or standard-definition (SD) formats.
- Additional features: Some software may offer additional features, such as DVD burning capabilities, batch processing, or the ability to add chapters or menus to your converted files. Consider these extra features if they align with your specific needs and preferences.
There are both free and paid software options available for VHS to digital conversion. Some popular options include Adobe Premiere Pro, Final Cut Pro, OBS Studio (Open Broadcaster Software), and HandBrake. Research and experiment with different software before making a final decision to ensure that it meets your requirements.
Keep in mind that the success of your conversion process ultimately depends on the compatibility of your software with the digital capture device and your computer’s capabilities. Take your time to explore the features and functionality of different software options to find the one that best suits your needs.
In the next section, we will discuss how to set up and configure the capture software for a successful VHS to digital conversion. So let’s continue our journey towards preserving your VHS memories in a modern and accessible format!
Setting Up the Capture Software
Setting Up the Capture Software
Once you have chosen the right software for converting your VHS tapes to a digital format, it’s time to set it up and configure the necessary settings for a successful capture. Properly configuring the capture software will ensure that your VHS tapes are transferred to digital files with optimal quality. Here’s how to set up the capture software:
- Install the software: Start by downloading and installing the capture software on your computer. Follow the installation instructions provided by the software developer.
- Launch the software: Once you have installed the software, launch it on your computer. Familiarize yourself with the user interface and the different menus and options available.
- Connect your digital capture device: Connect your digital capture device to your computer using the appropriate USB cable or any other connector specified by the device manufacturer. Ensure that the capture device is recognized by your computer and drivers are installed correctly.
- Select the capture device: In the settings or preferences menu of the capture software, select your digital capture device as the input source. The software should recognize the connected device and display it as an available option for capturing.
- Adjust the capture settings: Configure the settings for capturing your VHS tapes. This includes selecting the desired video format (such as MPEG-2 or H.264), setting the resolution and frame rate, and choosing the audio options (such as stereo or mono). Refer to the software’s documentation or user guide for guidance on choosing the optimal settings for your specific needs.
- Configure audio and video preview: Set up the preview options to ensure you can see and hear the content from your VHS tapes through the software. Adjust the audio and video levels to ensure proper synchronization and quality during the capture process.
- Choose the capture destination: Specify the location on your computer where you want the captured video files to be saved. Select a folder or create a new one dedicated to storing your converted files.
- Save the settings: Once you have configured all the necessary settings, save them within the capture software. This will ensure that your preferences are stored and applied every time you use the software for capturing VHS tapes.
It’s important to note that the setup process may vary depending on the software you are using. Some software may have more advanced settings and options, while others may have a simplified interface. Take the time to explore and experiment with the features of the capture software to become familiar with its functionalities.
In the next section, we will discuss how to adjust capture settings for the best possible video quality during the conversion process. So let’s proceed to optimize the settings and ensure the highest quality for your digital VHS recordings!
Adjusting Capture Settings for Best Quality
Adjusting Capture Settings for Best Quality
When converting your VHS tapes to a digital format, it’s important to adjust the capture settings to ensure the best possible video quality. Properly configuring these settings will help maximize the clarity and fidelity of your converted files. Here are some key factors to consider when adjusting the capture settings:
- Resolution: Choose the optimal resolution for your captures based on your needs and the quality of the VHS tapes. If your tapes were recorded in standard definition (SD), capturing them at a higher resolution won’t improve the quality and will only increase file size. However, if you have access to VHS tapes that were recorded in high definition (HD), capturing at a higher resolution can preserve the original quality.
- Frame rate: The frame rate determines the smoothness of the captured video. Most VHS tapes were recorded at a 30 frames per second (fps) or 29.97 fps frame rate. Make sure to match the frame rate of your capture settings to the original frame rate of the VHS tapes for accurate playback.
- Bitrate: The bitrate determines the amount of data used to represent each second of video. Higher bitrates result in better image quality, but also larger file sizes. Find a balance between quality and file size that suits your needs. Experiment with different bitrates to achieve the desired results.
- Audio format and bitrate: Select the appropriate audio format and bitrate for capturing the audio from your VHS tapes. Common options include PCM or AAC for format and 128kbps or 256kbps for bitrates. Adjust these settings based on your preference and the fidelity of the audio on the VHS tapes.
- Deinterlacing: Since VHS tapes are recorded in an interlaced format, consider enabling the deinterlacing feature in the capture software. Deinterlacing helps remove the comb-like artifacts often seen on interlaced footage, resulting in a smoother and more natural-looking video.
- Color correction: VHS tapes can degrade over time, leading to color shifts and faded images. Consider utilizing the color correction tools in your capture software to restore the original colors. Adjust the brightness, contrast, saturation, and other color parameters to enhance the overall visual quality.
It’s important to note that the specific capture settings and options may vary depending on the software you are using. Explore the settings menu of your capture software to find the options mentioned above. Refer to the software’s documentation or user guide for detailed instructions on adjusting each setting.
Take the time to experiment and adjust the capture settings to find the balance that works best for your VHS tapes and personal preferences. Keep in mind that capturing at a higher quality may result in larger file sizes, so consider your available storage space and playback requirements when making these adjustments.
In the next section, we will discuss how to begin the actual conversion process and transfer your VHS tapes to the digital format. So let’s get ready to preserve your memories in a modern and easily accessible form!
Begin the Conversion Process
Begin the Conversion Process
Now that you have prepared your VHS tapes, connected your VCR to a digital capture device, and adjusted the capture settings for the best quality, it’s time to start the actual conversion process. Follow these steps to begin transferring your VHS tapes to the digital format:
- Insert a VHS tape into the VCR: Carefully insert the VHS tape that you want to convert into the VCR. Make sure the tape is inserted correctly and secured in place.
- Launch the capture software: Open the capture software on your computer. Ensure that your VCR and digital capture device are properly connected and recognized by the software.
- Preview the tape: Use the preview feature in the capture software to view the content from the VHS tape on your computer screen. This allows you to confirm that the tape is playing correctly and helps you determine the start and end points for capturing.
- Set the capturing start and end points: Determine the portion of the tape that you want to capture. Set the start and end points in your capture software, specifying the desired duration for the captured video. This step allows you to focus on specific segments instead of capturing the entire tape if desired.
- Start capturing: Once you have set the start and end points, initiate the capturing process in your capture software. The software will begin recording the analog signals from the VHS tape and converting them into digital video and audio files on your computer. Monitor the progress to ensure the capturing is proceeding smoothly.
- Monitor audio and video quality: Keep an eye on the audio and video quality of the captured content. If you notice any issues, such as audio distortions or visual artifacts, you may need to adjust the capturing settings or make improvements during the post-capture editing process.
- Repeat the process: Once the capturing of one VHS tape is complete, repeat the process for the rest of your tapes. Make sure to label and organize each captured file to maintain a structured library of your digital VHS recordings.
It’s important to be patient during the conversion process, as capturing VHS tapes can be time-consuming. Depending on the length and condition of the tapes, it may take several hours or more to transfer all your VHS tapes to the digital format.
Remember to regularly save and back up your captured files to prevent any loss or damage. Consider using external hard drives, cloud storage, or other reliable storage solutions to keep your digital VHS recordings safe and easily accessible.
In the next section, we will discuss how to organize and save your digital files, ensuring easy access to your converted VHS tapes. So let’s proceed and start building a digital library of your cherished memories!
Organizing and Saving the Digital Files
Organizing and Saving the Digital Files
As you complete the conversion process and transfer your VHS tapes to a digital format, it’s important to properly organize and save your digital files. This ensures easy access and longevity for your cherished memories. Here are some steps to follow:
- Create a dedicated folder: Set up a dedicated folder on your computer where you will store all your digital VHS recordings. Organize this folder in a way that makes it easy for you to locate specific tapes or segments in the future. Consider using subfolders categorized by date, event, or any other relevant criteria.
- Rename files: By default, the captured files may have generic names or long filenames. Consider renaming the files to something more descriptive and meaningful. Use a naming convention that includes the tape’s name, date, or any other relevant information. This will make it easier to identify and locate specific recordings.
- Add metadata: If your capture software allows it, consider adding metadata to your digital files. Include details such as the tape’s title, date, location, and any other relevant information. This metadata can help you search and sort your files more efficiently in the future.
- Backup your files: Make sure to regularly back up your digital files to prevent any potential loss or damage. Consider using external hard drives, cloud storage services, or both for added security. Having multiple copies of your files ensures that even if one backup fails, you have another copy available.
- Organize playlists or collections: If your capture software or media player allows it, create playlists or collections based on themes or specific events. This can help you group related recordings together and make browsing and playback more convenient.
- Consider DVD or Blu-ray authoring: If you prefer physical media, you can consider authoring DVDs or Blu-ray discs with your captured files. This allows you to create a physical archive of your converted VHS tapes that can be played on compatible devices.
- Regularly update and maintain: As you capture more VHS tapes or make changes to your digital library, ensure that you update and maintain the organization of your files. This will help prevent clutter and confusion as your collection grows over time.
Taking the time to properly organize, name, and back up your digital files will make it easier to navigate and enjoy your converted VHS recordings. It also ensures that you have reliable backup copies in case of any unforeseen computer or storage issues.
Remember to periodically check the health and integrity of your backup storage devices. Replace any damaged or failing drives to ensure the long-term preservation of your digital files.
In the next section, we will discuss the importance of cleaning and maintaining your VCR, which can help ensure the best playback quality for future conversions or when revisiting your VHS tapes. So let’s continue to take care of the equipment that preserves your cherished memories!
Cleaning and Maintaining Your VCR
Cleaning and Maintaining Your VCR
Regular cleaning and maintenance of your VCR not only ensures optimal playback quality but also extends the lifespan of the device. Here are some tips on how to clean and maintain your VCR:
- Cleaning the tape heads: Over time, the tape heads of your VCR can accumulate dust, debris, and magnetic residue. This can affect the playback quality of your VHS tapes. Use a specialized tape head cleaning solution or a cleaning cassette to gently clean the heads. Follow the manufacturer’s instructions to avoid damaging the delicate components.
- Cleaning the exterior: Wipe the exterior of your VCR with a soft, lint-free cloth. Remove any dust or dirt that may have accumulated. Pay attention to the ventilation slots and ports to ensure proper airflow and prevent overheating.
- Inspecting and cleaning the tape path: Open the VCR and visually inspect the tape path, including the pinch roller and capstan. Remove any debris or dust using a soft, lint-free cloth or a cotton swab moistened with isopropyl alcohol. Be careful not to apply excessive force or use harsh chemicals that could damage the components.
- Ensuring proper storage: When not in use, store your VCR in a clean and dry environment that is free from extreme temperatures and humidity. Avoid exposing it to direct sunlight or placing it near sources of heat, such as radiators or vents.
- Regularly rewinding and fast-forwarding tapes: Periodically play and rewind your VHS tapes to prevent the tape from becoming stuck to the reel or losing its flexibility. This helps maintain the integrity of the tapes and ensures smooth playback.
- Avoiding overuse: While it’s important to periodically use your VCR, avoid excessive playback or recording sessions as this can put additional wear and tear on the device. Allow your VCR to cool down between uses to prevent overheating.
- Professional servicing: If you encounter playback issues or notice any significant problems with your VCR, consider seeking professional servicing. Avoid attempting to repair or modify the internal components of the VCR unless you have the necessary expertise and experience.
Regular cleaning and maintenance of your VCR can improve the playback quality of your VHS tapes and help extend the lifespan of the device. By taking care of your VCR, you ensure that it remains reliable for future conversions or when revisiting your cherished memories.
Remember to always consult the manufacturer’s guidelines and instructions when cleaning and maintaining your VCR. Every VCR model may have specific considerations and recommendations that should be followed.