
Why Transfer PSP Videos to a Memory Stick?
Transferring PSP videos to a memory stick can greatly enhance your gaming experience by giving you the freedom to enjoy your favorite movies and TV shows on the go. As the PSP has a smaller screen compared to traditional TVs or monitors, the compact size makes it a perfect device for portable entertainment. By transferring videos to a memory stick, you can easily carry a wide range of entertainment options with you wherever you go.
One of the primary reasons to transfer PSP videos to a memory stick is the convenience it offers. Instead of relying on a Wi-Fi or internet connection to stream videos, you can store them directly on the memory stick. This means you can access your favorite movies and TV shows even when you’re offline or in an area with limited connectivity. It’s particularly useful during travels, as you can enjoy uninterrupted entertainment during long flights or train journeys.
An additional benefit of transferring videos to a memory stick is the ability to customize your entertainment library. You can curate a collection of movies, TV series, music videos, or even educational content based on your preferences. Unlike limited streaming platforms that may not have your preferred titles or require a subscription, a memory stick gives you the freedom to choose and organize your own content.
Another advantage of transferring videos to a memory stick is the flexibility it offers in terms of file formats. While the PSP has its supported video formats, transferring videos to a memory stick allows you to store a wider range of formats that may not be compatible with the PSP directly. With various video conversion software available, you can convert videos to PSP-compatible formats and transfer them to the memory stick for seamless playback.
Lastly, transferring videos to a memory stick can also help you save storage space on your PSP. PSP games can take up a significant amount of storage, leaving limited room for videos. By offloading videos to a memory stick, you can free up space on your device without losing access to your favorite videos. This is particularly useful if you have a large collection of videos or plan to download additional games in the future.
Assessing Compatibility
Before transferring PSP videos to a memory stick, it’s important to assess the compatibility of the videos with both the memory stick and your PSP. This will ensure a smooth and hassle-free transfer process. Here, we’ll explore some key factors to consider when assessing compatibility.
The first aspect to check is the format of the videos. The PSP supports specific video formats such as MPEG-4 and H.264. However, not all videos may be in these formats by default. You may need to use video conversion software to convert videos to a compatible format before transferring them to the memory stick. It’s crucial to choose a reliable and reputable video conversion tool to ensure the smooth playback of videos on your PSP.
Furthermore, consider the resolution and aspect ratio of the videos. The PSP has a specific screen size and resolution, so it’s essential to make sure the videos you’re transferring have an appropriate resolution and aspect ratio. Otherwise, you may encounter issues such as distorted or stretched video playback on your PSP. Adjust the resolution and aspect ratio of the videos during the conversion process to ensure a perfect fit for your PSP’s screen.
Another aspect to consider is the available space on your memory stick. Determine how much storage capacity your memory stick has before transferring videos. This will help you estimate the number of videos that can be stored on it. Videos can take up a significant amount of space, so it’s essential to choose a memory stick with sufficient capacity. Additionally, ensure that the memory stick is formatted correctly to avoid any compatibility issues or potential data loss.
Additionally, consider the type of memory stick you’re using. The PSP supports various memory stick formats, such as Memory Stick PRO Duo and Memory Stick Micro (M2). Ensure that the memory stick you’re using is compatible with your PSP model. Different PSP models may have different memory stick requirements, so be sure to check the specifications of your PSP to determine the appropriate memory stick format.
Lastly, consider any additional features or software that may be required for transferring videos to the memory stick. Some memory sticks may come with built-in file management features or specific software designed to facilitate transferring videos to the PSP. Familiarize yourself with these features and software to ensure a smooth transfer process and optimal video playback on your PSP.
By assessing compatibility factors such as video format, resolution, available space, memory stick type, and required software, you can ensure that the videos you transfer to your memory stick are compatible with your PSP. This will guarantee a seamless and enjoyable video playback experience on your PSP, allowing you to make the most of your portable entertainment device.
Preparing Your Memory Stick
Before transferring PSP videos to your memory stick, it’s essential to properly prepare the memory stick to ensure a successful transfer and seamless playback on your PSP. Here are some key steps to follow when preparing your memory stick:
1. Formatting the Memory Stick: The first step is to format your memory stick. Formatting helps ensure that the memory stick is clean, free from any errors, and ready to receive the transferred videos. To format the memory stick, insert it into your PSP and navigate to the System Settings menu. From there, find the Format Memory Stick option and follow the on-screen instructions to complete the formatting process.
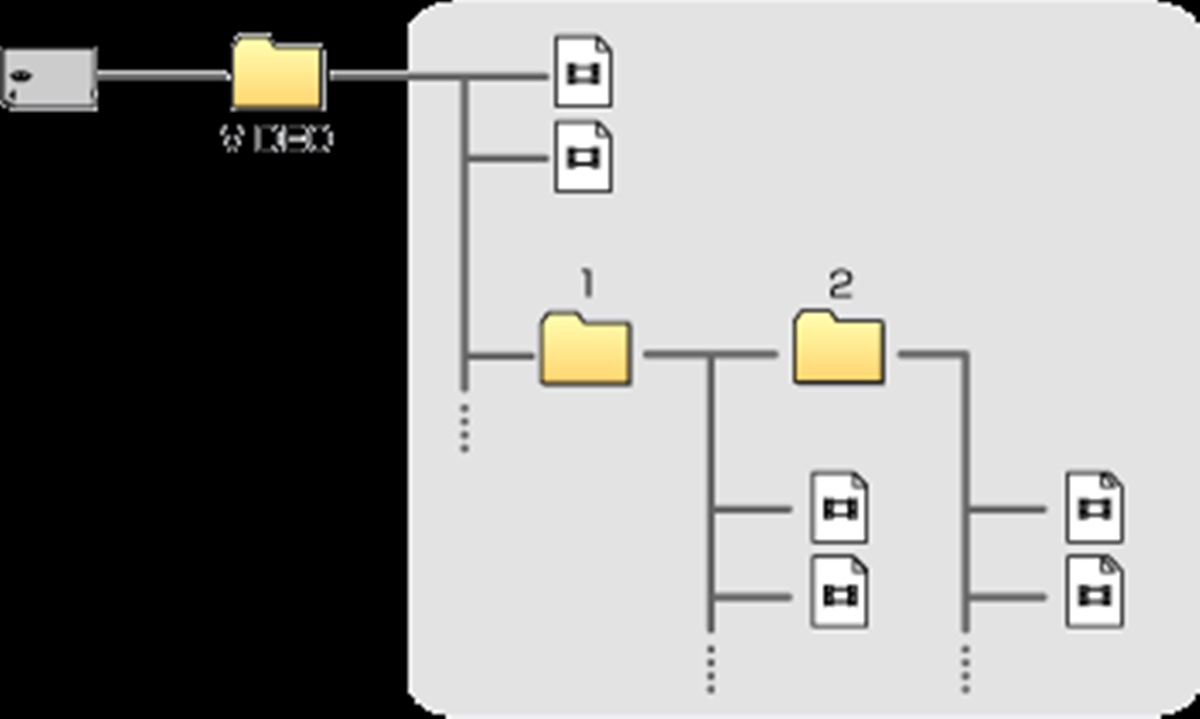
2. Organizing Folders: Creating organization folders on your memory stick can help keep your videos organized and easy to locate. You can create different folders based on genres, TV shows, or movies. To create a new folder, connect your memory stick to your computer using a memory stick reader. Open the memory stick on your computer, right-click, and choose the “New Folder” option. Name the folder accordingly, and you’re ready to start organizing your videos.
3. Optimizing Storage Space: Depending on the capacity of your memory stick and the size of the videos you plan to transfer, it’s crucial to optimize storage space. Compressing videos or converting them to PSP-compatible formats can help reduce the file size, allowing you to store more videos on your memory stick. Additionally, consider deleting any unnecessary files or videos from your memory stick to maximize available space.
4. File Naming: While not necessary for playback, it’s beneficial to give your video files logical and descriptive names. Renaming the video files with titles, episode numbers, or other relevant details can make it easier to find specific videos on your memory stick. This will save you time and effort when browsing through your video collection on the PSP.
5. Scanning for Viruses: To ensure the security of your videos and your PSP, it’s vital to scan your memory stick for viruses. Use reliable antivirus software and perform a thorough scan of the memory stick before transferring any videos. This will help prevent any potential malware or viruses from infecting your PSP or corrupting your video files.
6. Ejecting Safely: After you have prepared your memory stick, always make sure to safely eject it from your computer or memory stick reader. This will prevent any data corruption or loss that may occur if the memory stick is removed while still in use. Follow the correct procedure to safely eject the memory stick to ensure the integrity of your videos.
By following these steps to prepare your memory stick, you can ensure that it is formatted correctly, organized, optimized for storage space, and free from viruses. This will lay the foundation for a smooth video transfer process and a hassle-free experience when playing videos on your PSP.
Transferring Videos from your Computer to a Memory Stick
Transferring PSP videos from your computer to a memory stick is a straightforward process that allows you to enjoy your favorite movies and shows on your PSP. Here’s a step-by-step guide on how to transfer videos to your memory stick:
Step 1: Connect your Memory Stick: Insert your memory stick into your computer’s memory stick reader or use an external memory stick adapter. Ensure that your computer recognizes the memory stick and assigns it a drive letter.
Step 2: Locate the Videos: Open the folder on your computer where the videos you want to transfer are stored. This can be your video library, specific folders, or a designated location where you have saved the videos you want to transfer.
Step 3: Copy and Paste: Select the videos you want to transfer by either clicking and dragging to select multiple files or using the Ctrl or Shift key to select specific videos. Once selected, right-click on the videos and choose the “Copy” option.
Step 4: Navigate to the Memory Stick: Open the folder or directory where your memory stick is recognized on your computer. This can usually be found by going to “My Computer” or “This PC” and locating the drive letter assigned to the memory stick.
Step 5: Paste the Videos: Right-click within the memory stick directory and choose the “Paste” option. This will begin the transfer process, and the videos will be copied from your computer to the memory stick. Depending on the size of the videos and the transfer speed, this process may take a few moments.
Step 6: Verify the Transfer: Once the transfer is complete, double-check that the videos have been successfully copied to the memory stick. You can do this by navigating to the memory stick’s directory and reviewing the videos’ presence.
Step 7: Eject the Memory Stick: Before removing the memory stick from your computer, make sure to safely eject it. This can be done by right-clicking on the memory stick’s drive letter and selecting the “Eject” option. This ensures that all data is written and the memory stick can be safely removed without any risk of data corruption.
By following these steps, you can easily transfer your PSP videos from your computer to a memory stick. This enables you to have your favorite entertainment readily available on your PSP, allowing you to enjoy videos wherever you go.
Connecting your Memory Stick to the PSP
Once you have transferred your videos to the memory stick, the next step is to connect it to your PSP. Connecting the memory stick properly ensures that your PSP can access and play the transferred videos effectively. Follow these steps to connect your memory stick to the PSP:
Step 1: Power off the PSP: Before connecting the memory stick, ensure that your PSP is powered off. This will prevent any data corruption or interference during the connection process.
Step 2: Locate the Memory Stick Slot: On the PSP, locate the memory stick slot. It is typically located on the left side of the PSP or on the top, beneath a small cover. Carefully remove the cover or slide open the slot to access the memory stick slot.
Step 3: Insert the Memory Stick: Take your memory stick and insert it into the memory stick slot on the PSP. Make sure it slots in smoothly and securely. Be gentle to avoid causing any damage to the memory stick or the PSP.
Step 4: Secure the Memory Stick: Once the memory stick is inserted, push it in until it clicks into place. This ensures that the memory stick is securely connected to the PSP and will not accidentally come loose during use.
Step 5: Power on the PSP: After connecting the memory stick, power on your PSP. Wait for the device to initialize and recognize the memory stick. The PSP will automatically detect the presence of the memory stick and display its contents in the appropriate PSP menu.
Step 6: Accessing the Videos: Navigate through the PSP menu to locate the videos stored on the memory stick. Depending on the PSP model and firmware version, the videos may be found in the “Video” or “Music” category. Browse through the menu to find the videos transferred to the memory stick and select the desired video to play.
Step 7: Playback and Enjoyment: Once you have accessed the videos, you can now enjoy them on your PSP. Use the PSP’s controls to start, pause, and adjust the playback settings as desired. The videos should play smoothly and provide an immersive viewing experience on the PSP’s screen.
By following these steps, you can easily connect your memory stick to your PSP, ensuring seamless access to the transferred videos. Now you can enjoy your favorite movies, TV shows, and other videos on your PSP wherever you go.
Playing Videos on Your PSP
After successfully transferring videos to your memory stick and connecting it to your PSP, playing the videos is the final step to enjoy your favorite content on the go. The PSP provides a user-friendly interface to navigate and play videos. Here’s how you can play videos on your PSP:
Step 1: Access the Video Menu: Power on your PSP and navigate to the main menu. Depending on your PSP model and firmware version, the video menu may be labeled as “Video” or “Media” on the PSP’s home screen. Select this menu to access your stored videos.
Step 2: Navigate to the Video Folder: Within the video menu, navigate to the folder where you stored your transferred videos. The folder structure corresponds to the organization you created on your memory stick. Use the PSP’s directional buttons or joystick to navigate through the menu options.
Step 3: Select the Video: Once you have located the desired video in the designated folder, highlight the video’s thumbnail or file name and press the X button. This will initiate the video playback.
Step 4: Playback Controls: During video playback, the PSP provides control options to pause, rewind, fast-forward, and adjust the volume, among other functions. Utilize the corresponding buttons on the PSP to control the playback settings based on your preference.
Step 5: Adjust Display Settings: The PSP offers various display settings to enhance your video viewing experience. Access the display settings by pressing the square button during video playback. You can adjust settings such as aspect ratio, screen size, brightness, and video quality to optimize the visuals according to your preferences.
Step 6: Enjoy Your Videos: Sit back, relax, and enjoy your videos on the PSP’s vibrant screen. Immerse yourself in the visuals and audio playback as you indulge in your favorite movies, TV shows, or other video content.
Step 7: Additional Features: Depending on your PSP model and firmware version, additional features may be available during video playback. These features could include subtitle options, audio track selection, and the ability to create playlists or bookmarks for easy access to your favorite videos.
By following these steps, you can easily navigate through the video menu, select and play videos, and customize the playback settings on your PSP. Take full advantage of the PSP’s portable entertainment capabilities and enjoy a rich multimedia experience wherever you go.