
Method 1: Using a Third-Party App
If you’re looking to transfer music from your iPhone to an Android device, using a third-party app can be a convenient and effective solution. These apps are specifically designed to help you transfer various types of data, including music, between different platforms. One popular app that you can consider using is iMobie AnyTrans. Here’s how you can transfer your music:
- First, download and install the iMobie AnyTrans app on your computer.
- Connect your iPhone to the computer using a USB cable.
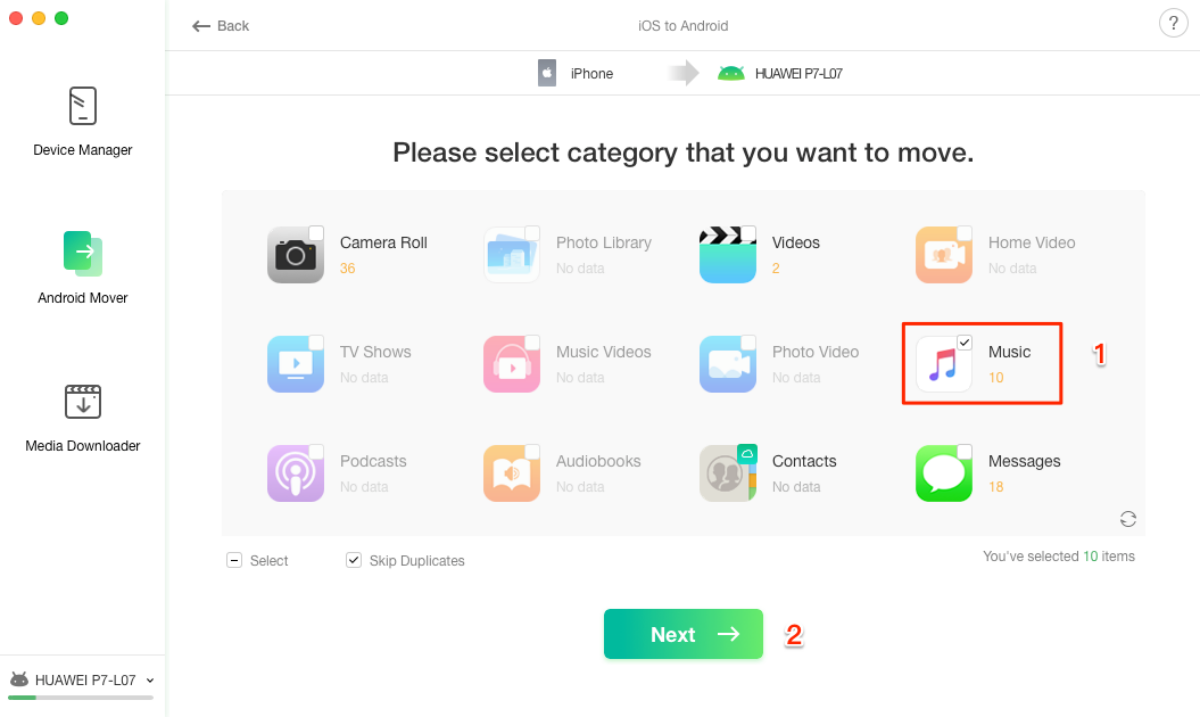
- Launch the iMobie AnyTrans app and click on the “Device Manager” tab.
- Select the “Music” category and choose the songs you want to transfer.
- Click on the “To Android” button located at the top-right corner of the screen.
- Next, connect your Android device to the computer using a USB cable.
- Once your Android device is detected, click on the “Transfer” button to start transferring the selected music files from your iPhone to your Android device.
- Wait for the transfer process to complete. The time it takes will depend on the size of the music files.
- Once the transfer is finished, disconnect your devices from the computer.
Using a third-party app like iMobie AnyTrans simplifies the process of transferring music from an iPhone to an Android device. It allows you to select specific songs or even entire playlists to transfer, ensuring that you have complete control over your music library. Additionally, these apps often support transferring other types of data, such as photos, videos, contacts, and more, making them a versatile choice for managing your iPhone and Android devices.
Method 2: Using iTunes and a Computer
If you have a computer with iTunes installed, you can use it as a middleman to transfer music from your iPhone to your Android device. Follow these steps:
- Connect your iPhone to the computer using a USB cable.
- Open iTunes and click on the device icon that appears in the upper left corner of the iTunes window.
- Click on the “Music” tab under the device settings.
- Ensure that the “Sync Music” option is checked.
- Choose to sync your entire music library or select specific playlists, artists, albums, or songs.
- Click on the “Apply” or “Sync” button to start the syncing process.
- Once the music is synced to your computer, you can locate the music files in your computer’s iTunes media folder.
- Disconnect your iPhone from the computer and connect your Android device.
- Open the file manager on your Android device and navigate to the location where you want to transfer the music files.
- Copy the music files from your computer’s iTunes media folder and paste them into the desired location on your Android device.
- Wait for the files to transfer to your Android device.
- Once the transfer is complete, disconnect your Android device from the computer.
Using iTunes and a computer to transfer music provides a straightforward solution, especially if you already have iTunes set up on your computer. However, keep in mind that this method requires you to have enough storage space on your computer to store the music files temporarily. Additionally, the process may take longer if you have a large music library.
Method 3: Using Google Play Music
If you’re an Android user, you can take advantage of Google Play Music to transfer music from your iPhone to your Android device. Follow these steps:
- On your computer, open a web browser and navigate to the Google Play Music website.
- Sign in to your Google account or create one if you don’t have it already.
- Click on the “Upload music” button, located in the upper right corner of the page.
- Select the option to upload music from your computer.
- Choose the music files or entire folders from your computer that you want to upload to Google Play Music.
- Wait for the upload process to complete. The time it takes will depend on the size of the music files and your internet connection speed.
- On your Android device, download and install the Google Play Music app from the Google Play Store if you don’t have it already.
- Open the Google Play Music app and sign in using the same Google account that you used to upload the music.
- Once you’re signed in, you’ll be able to access and stream all the uploaded music on your Android device.
- If you want to download the music for offline listening, you can select individual songs, albums, or playlists and choose the option to download them to your device.
Using Google Play Music not only allows you to transfer music from your iPhone to your Android device but also provides you with a cloud-based music storage solution. This means you can access your music from any device with the Google Play Music app installed, as long as you’re signed in with your Google account. Keep in mind that you may need to subscribe to Google Play Music’s premium service to access some features, such as ad-free listening and offline downloads.
Method 4: Using a Cloud Storage Service
Another convenient way to transfer music from your iPhone to your Android device is by utilizing a cloud storage service like Dropbox, Google Drive, or OneDrive. Here’s how you can do it:
- Download and install the cloud storage app of your choice on your iPhone from the App Store.
- Create an account or sign in to your existing account.
- Upload the music files or folders from your iPhone to your cloud storage account.
- Once the upload is complete, download and install the cloud storage app on your Android device from the Google Play Store.
- Sign in to your cloud storage account on your Android device.
- Navigate to the location where you uploaded the music files from your iPhone.
- Select the music files you want to transfer and choose the option to download them to your Android device.
- Wait for the download to finish.
Using a cloud storage service provides the advantage of having your music accessible on multiple devices, regardless of the platform. It eliminates the need for physical connections and allows you to transfer music wirelessly. Additionally, cloud storage services often offer a certain amount of free storage space, which you can utilize to store your music files. However, keep in mind that the amount of free space may be limited, and you may need to purchase additional storage if you exceed the allotted limit.
Method 5: Using Bluetooth File Transfer
If both your iPhone and Android device support Bluetooth, you can use Bluetooth file transfer to transfer music between the two devices. Follow these steps:
- On your iPhone, enable Bluetooth by going to Settings > Bluetooth and toggling the switch on.
- On your Android device, go to Settings > Bluetooth and turn it on.
- On your iPhone, open the music app and select the songs you want to transfer.
- Tap on the share button and choose the option to share via Bluetooth.
- Your iPhone will start searching for nearby Bluetooth devices.
- On your Android device, it should detect your iPhone as a nearby device. Tap on it to pair the devices.
- Once the devices are paired, your Android device will prompt you to accept the file transfer.
- Accept the transfer on your Android device, and the selected music files will be transferred to your Android device via Bluetooth.
- Wait for the transfer to complete.
Using Bluetooth file transfer can be a convenient method if both devices are in close proximity and have Bluetooth capabilities. However, keep in mind that the transfer speed may be slower compared to other methods, especially if you’re transferring large music files. Additionally, ensure that both devices have sufficient battery charge to complete the transfer process without interruptions.
Method 6: Using an SD Card
If your Android device has an SD card slot, you can use it to transfer music from your iPhone to your Android device. Here’s how:
- Remove the SD card from your Android device (if it’s already inserted), and insert it into an SD card reader.
- Connect the SD card reader to your computer.
- On your computer, locate the music files on your iPhone.
- Create a new folder on the desktop or any other convenient location on your computer.
- Copy and paste the music files from your iPhone to the newly created folder.
- Eject the SD card reader from your computer and remove the SD card.
- Insert the SD card back into your Android device.
- On your Android device, open the file manager app and navigate to the location where the SD card is mounted.
- Find the folder that contains the music files you copied from your iPhone.
- Copy the music files from the folder and paste them into the desired location on your Android device.
- Wait for the files to transfer to your Android device.
- Once the transfer is complete, safely remove the SD card from your Android device.
Using an SD card to transfer music is a straightforward method, especially if your Android device has an SD card slot. It eliminates the need for a computer or an internet connection and allows you to directly transfer the music files. However, ensure that the SD card is compatible with both your iPhone and Android device, and that it has enough storage capacity to accommodate the music files you want to transfer.
Method 7: Using AirDrop (for Mac Users)
If you’re using a Mac computer and both your iPhone and Android device support AirDrop, you can easily transfer music between the two devices wirelessly. Here’s how:
- Make sure both your iPhone and Mac are connected to the same Wi-Fi network.
- On your iPhone, open the Control Center by swiping down from the top-right corner of the screen (iPhone X or later) or up from the bottom of the screen (iPhone 8 or earlier).
- Long-press on the connectivity card in the Control Center (the section with the Wi-Fi, Bluetooth, and Airplane Mode icons).
- Tap on the AirDrop icon to enable it and set it to “Contacts Only” or “Everyone”.
- On your Mac, open a Finder window.
- In the sidebar, under “Locations”, you should see your iPhone listed. Click on it.
- Select the music files you want to transfer from your iPhone to your Mac.
- Drag and drop the selected music files into a folder on your Mac or your desktop.
- Disconnect your iPhone from your Mac.
- Connect your Android device to your Mac using a USB cable.
- On your Android device, open the file manager app and navigate to the location where you want to transfer the music files.
- Drag and drop the music files from the folder on your Mac into the desired location on your Android device.
- Wait for the files to transfer to your Android device.
- Once the transfer is complete, safely disconnect your Android device from your Mac.
Using AirDrop on a Mac provides a seamless and wireless way to transfer music between your iPhone and Android device. It eliminates the need for cables and allows for direct file sharing. However, keep in mind that AirDrop is only available on Mac computers and iOS devices, so this method may not be suitable if you’re using a Windows computer or an Android device that doesn’t support AirDrop functionality.
Method 8: Transferring Purchased Music Only
If you have purchased music from the iTunes Store on your iPhone, there is a simple method to transfer it to your Android device. Follow these steps:
- On your iPhone, launch the iTunes Store app.
- Tap on the “More” tab at the bottom-right corner of the screen.
- Tap on “Purchased” and then choose “Music”.
- Here, you will find all the music you have purchased from the iTunes Store.
- Tap on the “Download All” button to download all your purchased songs to your iPhone.
- Once the download is complete, launch the Apple Music app on your iPhone.
- Tap on the “Library” tab at the bottom of the screen.
- Scroll down to find the “Downloaded Music” section and tap on it.
- Tap the three-dot menu icon next to a song and select “Share” from the options.
- Choose the method of sharing that suits you, such as email or cloud storage apps like Dropbox or Google Drive.
- Send the shared files to your Android device.
- On your Android device, open the cloud storage app or your email to access the shared music files.
- Download the music files to your Android device.
This method specifically works for music purchased from the iTunes Store since it is tied to your Apple ID and DRM-protected. By downloading the purchased songs to your iPhone and sharing them using the Apple Music app, you can easily transfer these songs to your Android device. However, please note that this method only transfers the purchased music, and any other non-purchased songs or albums will not be included in the transfer process.
Method 9: Using a Music Streaming Service
If you’re using a music streaming service like Spotify, Apple Music, or Google Play Music, you can utilize these platforms to transfer your music from your iPhone to your Android device. Here’s how:
- Ensure that you have signed up for the same music streaming service on both your iPhone and Android device.
- On your iPhone, open the music streaming app and sign in with your credentials.
- Create a playlist and add the songs you want to transfer to it. Make sure the playlist is set to be available offline.
- Wait for the songs in the playlist to be downloaded to your iPhone for offline listening.
- On your Android device, open the music streaming app and sign in with the same account you used on your iPhone.
- Find the playlist you created and set to be available offline on your iPhone.
- Start playing the playlist on your Android device, and the songs will stream or download for offline listening depending on your app settings.
Using a music streaming service simplifies the process of transferring music, as you don’t have to deal with file transfers or storage limitations. You can access your favorite music on both your iPhone and Android device by simply signing in to the same music streaming service account. However, keep in mind that this method requires a stable internet connection for streaming, and downloading songs for offline listening may consume storage space on your Android device.
Additional Tips and Considerations
Transferring music from an iPhone to an Android device may seem challenging, but with the right methods and considerations, you can accomplish it smoothly. Here are some additional tips to keep in mind:
- Before transferring your music, make sure you have a backup of your iPhone’s music library. This ensures that your music collection is safe in case of any unforeseen issues during the transfer process.
- Check the storage capacity of your Android device to ensure that it has enough space to accommodate the transferred music files. If needed, free up space by deleting unnecessary files or apps.
- Keep in mind that transferring music may also transfer any DRM restrictions associated with the files. Ensure that you have the necessary rights or permissions to use the music on your Android device.
- Consider organizing your music files before transferring them. Use descriptive file names, create folders, or assign appropriate metadata to make it easier to manage and find your music on your Android device.
- If you have a large music library, consider dividing the transfer process into smaller batches to avoid overwhelming your devices or encountering unexpected issues.
- Some methods, such as using third-party apps or cloud storage services, may require an internet connection. Ensure that you have a stable and reliable internet connection during the transfer process.
- Regularly update your music apps and software to ensure compatibility with the latest devices and operating systems.
- Remember to respect copyright laws and only transfer music that you have the rights to transfer and use on your Android device.
By following these tips and considering the important factors, you can successfully transfer your music library from your iPhone to your Android device. Remember to choose a method that works best for you and suits your specific needs and preferences.