
What is Trezor and why is it important?
Trezor is a hardware wallet designed to securely store cryptocurrencies. It offers a high level of security by keeping your private keys offline and protecting them from online threats such as hacking or malware attacks.
Unlike software wallets that are susceptible to vulnerabilities in computer systems, Trezor stores your private keys on a secure chip within the device. This ensures that your cryptocurrencies are safe even if your computer is compromised.
The importance of Trezor lies in its ability to provide a secure and convenient way to manage your cryptocurrencies. It eliminates the need to trust third-party exchange platforms or online wallets, reducing the risk of losing your funds.
Furthermore, Trezor supports a wide range of cryptocurrencies, making it a versatile option for investors with diverse digital asset portfolios. Whether you hold Bitcoin, Ethereum, or any other major cryptocurrency, Trezor can securely store them all.
When it comes to the security of your digital assets, convenience should not be compromised. Trezor strikes the perfect balance between ease of use and robust security measures, making it the preferred choice for many crypto enthusiasts and investors.
In addition to its secure storage capabilities, Trezor also offers features like passwordless login and two-factor authentication. This provides an extra layer of protection to ensure that only authorized individuals can access your funds.
As the cryptocurrency market continues to grow and attract more users, the need for reliable and secure storage solutions becomes increasingly important. Trezor fulfills this need by offering a tangible offline storage option that is resistant to cyber threats.
Setting up your Trezor device
Setting up your Trezor device is a simple process that ensures you have full control over your cryptocurrencies. Follow these steps to get started:
- Unbox your Trezor device and connect it to your computer using the provided USB cable.
- Visit the official Trezor website and download the Trezor Wallet software.
- Install the Trezor Wallet software on your computer, following the on-screen instructions.
- Once the installation is complete, launch the Trezor Wallet software and select the option to create a new wallet.
- Follow the prompts on the screen to set a wallet name and create a strong passphrase. Remember, the passphrase is an additional layer of security, so choose one that is unique and difficult to guess.
- After setting up your wallet, the Trezor Wallet software will display a recovery seed. This is a list of words that can be used to recover your wallet in case your device is lost or damaged. Make sure to write down the seed and keep it in a safe place.
- Confirm the recovery seed by selecting the correct words in the given order. This step ensures that you have accurately recorded the seed for future wallet recovery.
- Once the recovery seed is confirmed, the Trezor Wallet software will prompt you to unplug and reconnect your Trezor device.
- Follow the on-screen instructions to complete the device setup process. This may involve setting a PIN code and enabling additional security features.
- After completing the device setup, you can now access your Trezor wallet and start managing your cryptocurrencies securely.
With your Trezor device set up, you can confidently store and transact with your cryptocurrencies, knowing that your private keys are protected from potential threats. Take the time to familiarize yourself with the Trezor Wallet software and explore its various features to make the most out of your hardware wallet.
Connecting your Trezor to a computer
Connecting your Trezor device to a computer is the first step towards securely managing your cryptocurrencies. Follow these steps to establish a connection:
- Take your Trezor device and the provided USB cable.
- Ensure that your computer is powered on and running an up-to-date operating system.
- Plug one end of the USB cable into your Trezor device and the other end into an available USB port on your computer.
- Once the Trezor device is connected, you may be prompted to install any necessary device drivers. Follow the on-screen instructions to complete the installation.
- After the drivers are installed, your computer should detect the Trezor device and recognize it as a secure hardware wallet.
- If you are using the Trezor Wallet software, launch the software on your computer. It should automatically detect the connected Trezor device.
- If prompted, select or confirm the device you want to use from the list of available Trezor devices.
- At this point, your Trezor device should display a prompt asking you to confirm the connection. Verify that the information on the device matches what is displayed on the computer screen.
- Click on the “Confirm” button on the Trezor device to establish a secure connection with your computer.
- Your Trezor device is now connected to your computer, and you can proceed with managing your cryptocurrencies using the Trezor Wallet software or other compatible applications.
It is important to ensure that you only connect your Trezor device to trusted and secure computers. Avoid using public or shared computers, as they might pose a risk to the security of your cryptocurrencies.
By connecting your Trezor device to your computer, you gain full control over your digital assets while enjoying the peace of mind that comes with the enhanced security provided by hardware wallets.
Installing the Trezor Wallet software
To manage your cryptocurrencies on your Trezor device, you need to install the Trezor Wallet software on your computer. Follow these steps to install the software:
- Visit the official Trezor website and navigate to the Downloads page.
- Choose the appropriate version of the Trezor Wallet software for your operating system (Windows, macOS, or Linux).
- Click on the download link to start the software download.
- Once the download is complete, locate the installation file on your computer.
- Double-click on the installation file to launch the installer.
- Follow the on-screen instructions to proceed with the installation.
- If prompted, review the end-user license agreement and accept the terms to continue the installation.
- Choose the destination folder where you want the Trezor Wallet software to be installed, or keep the default location.
- Click on the “Install” or “Next” button to initiate the installation process.
- Wait for the installation to complete, which may take a few minutes.
- Once the installation is finished, the Trezor Wallet software should be successfully installed on your computer.
- Launch the Trezor Wallet software by locating it in your applications or using the shortcut on your desktop.
- Connect your Trezor device to your computer using a USB cable, as described in the previous section.
- The Trezor Wallet software should automatically detect the connected device and display its information on your computer screen.
- You are now ready to create a new wallet or access an existing wallet on your Trezor device using the installed software.
By installing the Trezor Wallet software on your computer, you gain a user-friendly interface to interact with your Trezor hardware wallet, enabling you to securely manage and transact with your cryptocurrencies.
Creating a new wallet on your Trezor
To start using your Trezor device, you need to create a new wallet. Follow these steps to create a new wallet on your Trezor:
- Ensure that your Trezor device is connected to your computer and the Trezor Wallet software is running.
- On the Trezor Wallet software, click on the “Create New” button or a similar option to initiate the wallet creation process.
- Enter a name for your wallet. This can be anything that helps you identify the wallet, such as “Personal Savings” or “Crypto Investments”.
- Set a strong passphrase for your wallet. This passphrase adds an extra layer of security by encrypting your wallet data. Make sure to choose a passphrase that is unique and difficult to guess.
- Follow the on-screen instructions to configure additional security features, such as enabling a PIN code or two-factor authentication.
- After setting up the wallet name and passphrase, the Trezor Wallet software will display a recovery seed. This is a list of words that can be used to recover your wallet in case your device is lost or damaged. It is crucial to write down the recovery seed and store it in a safe place.
- Verify the recovery seed by selecting the correct words in the given order. This step ensures that you have accurately recorded the seed for future wallet recovery.
- Once the recovery seed is confirmed, the Trezor Wallet software will prompt you to unplug and reconnect your Trezor device. Follow these instructions to complete the process.
- Upon reconnecting your Trezor device, you will be prompted to enter your wallet passphrase and optionally your PIN code, if enabled.
- After entering the passphrase and PIN (if applicable), your new wallet will be successfully created and ready to use.
With your new wallet created on your Trezor, you can securely manage and transact with your cryptocurrencies. Make sure to keep your recovery seed and wallet passphrase in a safe place, as they are crucial for wallet recovery and access to your funds in case of any issues with your Trezor device.
How to transfer funds to your Trezor wallet
Once you have set up your Trezor wallet, you can start transferring funds from external wallets or exchanges. Follow these steps to transfer funds to your Trezor wallet:
- Choose the right cryptocurrency and wallet address: Determine the cryptocurrency you want to transfer and make sure your Trezor wallet supports it. Open the Trezor Wallet software and select the appropriate cryptocurrency account. Next, click on the “Receive” tab to view your wallet address.
- Initiate the transfer from your external wallet: Open your external wallet or exchange where your funds are currently held. Choose the option to send or withdraw funds and enter the wallet address of your Trezor wallet as the destination address. Double-check the address to ensure accuracy.
- Enter the transfer details: Specify the amount of funds you want to transfer to your Trezor wallet. Some wallets or exchanges may have additional fields for specifying transaction fees or notes. Fill in the necessary information and review the details before proceeding.
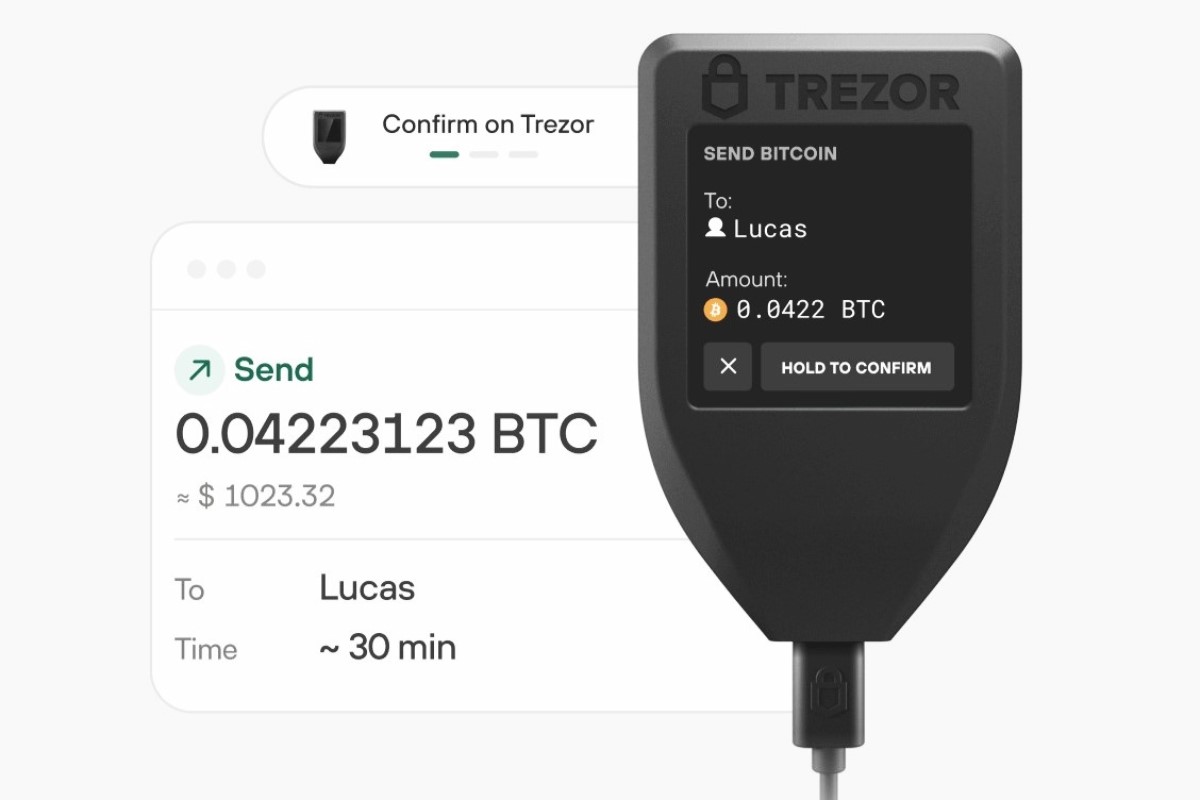
- Confirm the transaction on your Trezor device: Once you initiate the transfer from your external wallet, your Trezor device will display a transaction confirmation request. Carefully review the transaction details displayed on the Trezor screen.
- Authorize the transaction: On your Trezor device, confirm that the displayed transaction details match what you expect. If everything looks correct, press the “Confirm” button on your Trezor device to authorize the transaction.
- Wait for transaction confirmation: After confirming the transaction on your Trezor device, you will need to wait for the network to confirm and process the transaction. This can take a few minutes to several hours, depending on the cryptocurrency and network congestion.
- Check the transaction status: Once the transaction is confirmed and added to the blockchain, you can check its status on the Trezor Wallet software. Open the software, select the appropriate cryptocurrency account, and navigate to the “Transactions” tab to view the details of the completed transfer.
Transferring funds to your Trezor wallet ensures that your cryptocurrencies are securely stored offline and under your control. Always double-check the wallet address and transaction details before confirming any transfer to avoid any potential errors or loss of funds. Keep in mind that transaction fees may apply, depending on the cryptocurrency and network being used.
Choosing the right cryptocurrency and wallet address
Before transferring funds to your Trezor wallet, it is important to choose the right cryptocurrency and obtain the correct wallet address. Follow these steps to ensure a successful transfer:
- Determine the cryptocurrency: Identify the specific cryptocurrency you wish to transfer to your Trezor wallet. Trezor supports a wide range of cryptocurrencies, including Bitcoin (BTC), Ethereum (ETH), Litecoin (LTC), and many more. Make sure to choose a cryptocurrency that is compatible with your Trezor device.
- Access the corresponding wallet on Trezor: Open the Trezor Wallet software on your computer and select the account or wallet associated with the desired cryptocurrency. The Trezor Wallet software allows you to manage multiple wallets for different cryptocurrencies.
- Click on “Receive” to obtain the wallet address: Within the selected cryptocurrency wallet, navigate to the “Receive” tab. Here, you will find the unique wallet address generated by your Trezor device. This address is what you will provide as the destination for your funds.
- Double-check the wallet address: Take a moment to carefully review the wallet address provided by your Trezor device. Ensuring the accuracy of the address is crucial, as sending funds to an incorrect address can result in permanent loss of those funds. Cross-reference the address with the one displayed on your Trezor device to verify that they match.
- Copy or scan the wallet address: To transfer funds from an external wallet or exchange, you will need to provide your Trezor wallet address. You can either copy the address from the Trezor Wallet software and paste it into the appropriate field or use the QR code scanner feature to scan the wallet address directly.
- Proceed with the transfer: Open your external wallet or exchange platform, navigate to the section that allows you to send or withdraw funds, and enter the Trezor wallet address as the destination. Specify the amount of cryptocurrency you wish to transfer, review the details, and initiate the transfer.
Choosing the right cryptocurrency and obtaining the correct Trezor wallet address are essential steps in ensuring that your funds are securely transferred to your Trezor device. Take your time to double-check the wallet address and confirm its accuracy. By following these steps, you can confidently transfer your chosen cryptocurrency to your Trezor wallet for safe storage and management.
Initiating the transfer from your external wallet
Once you have determined the amount and the cryptocurrency you want to transfer to your Trezor wallet, you can initiate the transfer from your external wallet or exchange platform. Follow these steps to successfully initiate the transfer:
- Access your external wallet or exchange: Open the wallet or exchange platform where your funds are currently held. Ensure that you have logged in securely and have access to the wallet or account from which you want to make the transfer.
- Locate the “Send” or “Withdraw” option: Different wallets or exchanges may use different terminology, but the option to send or withdraw funds should be readily available. Look for buttons or tabs labeled with any of these terms to begin the transfer process.
- Enter the recipient address: In the relevant field, enter the wallet address of your Trezor device where you want to send the funds. Take extra care to input the address accurately, as errors can result in the loss of your funds.
- Specify the transfer amount: Enter the amount of cryptocurrency you wish to transfer. Some wallets or exchanges may also provide options to select the desired currency, such as Bitcoin (BTC) or Ethereum (ETH). Double-check the amount and currency before proceeding.
- Review transaction details: Take a moment to review the transaction details that are displayed on the screen. Confirm that the recipient address, transfer amount, and any additional options or fees are displayed correctly before proceeding.
- Authorize the transfer: Once you have reviewed the transaction details and are satisfied that they are correct, proceed with the transfer by clicking on the “Send” or “Confirm” button. Depending on your wallet or exchange, you may be required to enter additional authentication such as a password or two-factor authentication code.
- Wait for the transaction confirmation: After initiating the transfer, you will need to wait for the network to confirm and process the transaction. The length of time can vary depending on network congestion and the specific cryptocurrency being transferred. Be patient and allow ample time for the transaction to be completed.
By following these steps, you can confidently initiate the transfer from your external wallet or exchange to your Trezor wallet. Remember to carefully review the transaction details before authorizing the transfer to ensure accurate and secure fund transfer.
Confirming the transaction on your Trezor device
After initiating a transfer from your external wallet or exchange, the next step is to confirm the transaction on your Trezor device. Follow these steps to ensure a secure and successful confirmation:
- Wait for the transaction confirmation request: Once you have initiated the transfer, your Trezor device will display a confirmation prompt for the transaction. This is an important security feature that ensures you have full control over your funds.
- Verify the transaction details: On the Trezor device screen, carefully review the details of the transaction that are displayed. Take note of the recipient address, the transferred amount, and any associated fees. Ensure that these details match your initial transaction request from your external wallet or exchange.
- Authorize the transaction: If the transaction details shown on your Trezor device are correct, press the corresponding physical button on the device to confirm and authorize the transaction. This confirms that you are sending the specified amount to the intended recipient address.
- Double-check the Trezor device display: Before confirming, take a final moment to verify that the recipient address and the amount shown on the Trezor device screen remain unchanged. This extra step helps ensure that the transaction is not compromised by any potential malware or phishing attempts.
- Keep your Trezor device secure: After confirming the transaction, make sure to securely store your Trezor device in a safe place. Prevent unauthorized access to your device and ensure that it is physically protected from theft or damage.
- Wait for transaction confirmation: After confirming the transaction on your Trezor device, it will be broadcasted to the respective cryptocurrency network. You will need to wait for the network to confirm and process the transaction, which can take some time depending on network congestion and the specific cryptocurrency being transferred.
- Check the transaction status: Once the transaction is confirmed and added to the blockchain, you can check the status of your transaction on the Trezor Wallet software. Open the software, select the appropriate cryptocurrency account, and navigate to the “Transactions” tab to view the details of the completed transfer.
By carefully confirming the transaction on your Trezor device, you maintain full control over your funds and ensure that your cryptocurrency transfer is executed securely. Trezor’s confirmation process adds an extra layer of protection, safeguarding your assets from unauthorized transactions.
Checking the transaction status on the Trezor Wallet
After successfully initiating and confirming a transaction using your Trezor device, you can check the status of your transaction on the Trezor Wallet software. Follow these steps to stay updated on your transaction:
- Open the Trezor Wallet software: Launch the Trezor Wallet software on your computer, ensuring that your Trezor device is connected via USB and properly recognized by the software.
- Access the respective cryptocurrency account: Choose the account or wallet associated with the cryptocurrency you made the transaction with. If you have multiple accounts, select the specific account from the list.
- Navigate to the “Transactions” tab: Within the selected cryptocurrency account, locate and click on the “Transactions” tab. This tab provides an overview of all the recent transactions associated with the chosen account.
- Find your transaction: On the “Transactions” tab, you will see a list of recent transactions, including the one you initiated. Locate your transaction by checking the transaction date, amount, and recipient address.
- View transaction details: Click on your transaction to expand and view more details. The Trezor Wallet software will display information such as the transaction confirmation status, transaction ID, fee, and other relevant details.
- Tracking transaction confirmation: The transaction status will indicate whether the transaction is still pending confirmation or has been successfully confirmed on the cryptocurrency network. The time it takes for a transaction to be confirmed can vary depending on network congestion and the specific cryptocurrency being transferred.
- Monitoring confirmations: While waiting for confirmations, you can periodically refresh the transaction status in the Trezor Wallet software to check for updates. As the network confirms the transaction, the status will change accordingly.
- Ensuring transaction completion: Once the transaction status shows as confirmed, it means that the transaction has been successfully processed on the blockchain. Your funds have been securely transferred to the recipient address.
By checking the transaction status on the Trezor Wallet software, you can keep track of your transaction’s progress and ensure that it has been successfully confirmed on the cryptocurrency network. This feature provides you with peace of mind and transparency as you manage your digital assets with your Trezor device.
Tips for Ensuring Secure Transfers
When transferring funds to your Trezor wallet or any other wallet, it is essential to prioritize security. Here are some tips to help ensure secure transfers:
- Double-check wallet addresses: Always verify the accuracy of the recipient’s wallet address before initiating a transfer. Even a slight mistake in entering the address can result in permanent loss of funds. Cross-reference the address displayed on your Trezor device with the one entered in the external wallet or exchange platform.
- Keep your Trezor firmware up to date: Regularly update the firmware on your Trezor device. Firmware updates often include security enhancements and bug fixes, ensuring the optimal security of your device.
- Use reputable wallets and exchanges: Only transfer funds to and from reputable wallets and exchanges that have established a strong track record for security and reliability. Research and choose platforms that prioritize user security and have positive user reviews.
- Enable additional security features: Take advantage of any additional security features offered by your Trezor device or external wallets, such as passphrase encryption or two-factor authentication. These extra layers of security can significantly enhance the protection of your funds.
- Use hardware wallets on trusted computers: When connecting your Trezor device to a computer, ensure that the computer is trusted, secure, and free from malware. Avoid using public or shared computers, as they may compromise the security of your wallet.
- Keep your seed phrase offline: Safely store your Trezor’s recovery seed phrase offline in multiple secure locations. This recovery seed is crucial for restoring your wallet in case of device loss or damage, and should never be shared or stored digitally.
- Beware of phishing attempts: Be cautious of phishing attempts and avoid clicking on suspicious links or providing personal information. Always access your Trezor wallet through the official website or verified applications.
- Regularly check transaction details: Monitor your transaction details during the transfer process. Make sure the recipient address, amount, fees, and other details are correct before confirming the transaction on your Trezor device.
- Keep your Trezor device physically secure: Store your Trezor device in a secure place, away from potential physical threats. Protect it from theft, damage, or unauthorized use.
- Stay informed: Keep yourself up to date with the latest security practices and news in the cryptocurrency space. Stay aware of potential risks and take steps to mitigate them.
By following these tips, you can significantly enhance the security of your transfers to and from your Trezor wallet. Prioritizing security measures helps ensure the safe management and protection of your valuable digital assets.
Troubleshooting Common Transfer Issues
While transferring funds to your Trezor wallet, you may encounter some common issues. Here are some troubleshooting steps to help resolve these issues:
- Verify the recipient address: Double-check the recipient address you entered in your external wallet or exchange platform. Ensure that it matches the wallet address displayed on your Trezor device. Mistakenly entering an incorrect address can lead to irreversible loss of funds.
- Confirm network congestion: During periods of high network congestion, transaction processing times may be delayed. If your transfer is taking longer than expected, check the blockchain explorer or relevant network statistics to confirm if there is congestion. If so, you may need to be patient and wait for the network to process your transaction.
- Check transaction fees: Insufficient transaction fees can cause delays in confirmations or even rejection of the transfer. Ensure that you have included an appropriate transaction fee based on the current network conditions.
- Update firmware and software: Ensure that both your Trezor device’s firmware and the Trezor Wallet software are up to date. Outdated firmware or software may cause compatibility issues or prevent certain transactions from being processed.
- Restart your Trezor device: If you encounter any issues during the transfer process, try restarting your Trezor device. This simple step often resolves minor connectivity or software-related issues.
- Connect to a different USB port or cable: If you’re experiencing connectivity issues, try connecting your Trezor device to a different USB port on your computer. Additionally, check that the USB cable is functioning correctly and not damaged.
- Recheck passphrase and PIN entry: If you have set up a passphrase or PIN for your Trezor device, ensure that you are entering them correctly. Mistyped or forgotten passphrases or PINs can prevent access to your funds.
- Clear cache and cookies: If you are experiencing issues with the Trezor Wallet software, try clearing your browser cache and cookies. This can resolve certain compatibility or loading issues.
- Contact Trezor support: If you have followed the troubleshooting steps and are still experiencing issues, reach out to Trezor’s customer support for further assistance. They can provide personalized guidance and help resolve any technical issues you may be facing.
Remember, it’s always important to exercise caution when troubleshooting transfer issues. Before attempting any troubleshooting steps, ensure that you have properly safeguarded your funds and have verified the accuracy of your transaction details.
By following the troubleshooting steps outlined above, you can address common transfer issues and ensure a smooth and successful transfer of funds to your Trezor wallet.