
Overview of Google Earth VR and HTC Vive
Google Earth VR is an immersive virtual reality experience that allows users to explore the world from the comfort of their own homes. With stunning 3D graphics and an intuitive user interface, Google Earth VR brings the wonders of our planet to life like never before.
Paired with the HTC Vive, one of the leading virtual reality devices on the market, the Google Earth VR experience is taken to a whole new level. The HTC Vive provides users with a fully immersive experience, allowing them to physically move around and interact with their virtual surroundings.
Together, Google Earth VR and the HTC Vive offer a unique and captivating experience that takes virtual exploration to new heights. Whether you want to visit famous landmarks, explore remote landscapes, or dive into the depths of the ocean, Google Earth VR on the HTC Vive allows you to do so in breathtaking detail.
With the ability to navigate and fly through locations, users can feel a sense of presence and scale that is truly awe-inspiring. From the comfort of your own virtual living room, you can explore the Grand Canyon, walk among ancient ruins, or even take a trip to outer space.
Google Earth VR is not only a tool for exploration, but it also serves as a powerful educational resource. Teachers can use it to introduce students to geography in an immersive and engaging way, while travel enthusiasts can satisfy their wanderlust by virtually visiting far-off destinations.
One of the standout features of Google Earth VR on the HTC Vive is the ability to take screenshots of your virtual adventures. Whether you want to capture a breathtaking view of a city skyline or document a specific location for later reference, taking screenshots in Google Earth VR is a simple and rewarding process.
In the following sections, we will guide you through the step-by-step process of setting up Google Earth VR on the HTC Vive and explain how to take stunning screenshots to preserve your virtual memories.
Step 1: Setting up Google Earth VR on HTC Vive
Before you can embark on your virtual exploration with Google Earth VR on the HTC Vive, you’ll need to ensure that everything is set up properly. Follow these steps to get started:
- Ensure you have a compatible PC: Google Earth VR requires a computer that meets the minimum system requirements. Check the official Google Earth VR website for the specific hardware and software requirements.
- Install SteamVR: If you haven’t already, download and install SteamVR, a virtual reality platform that acts as a gateway to various VR experiences on the HTC Vive.
- Download Google Earth VR: Open the SteamVR app and navigate to the Steam Store. Search for “Google Earth VR” and click on the “Download” button to install it.
- Set up your HTC Vive: Connect your HTC Vive headset to your PC and make sure it’s properly powered on. Follow the on-screen instructions to complete the setup process.
- Launch Google Earth VR: Once you have everything set up, launch the SteamVR app and navigate to your library. Find Google Earth VR and click on “Play” to start the application.
- Adjust settings: Before you dive into your virtual adventures, take a moment to adjust the settings according to your preferences. You can access the settings menu by pressing the “Menu” button on your HTC Vive controllers.
Once you have completed these steps, you’re ready to start exploring the wonders of the world with Google Earth VR on your HTC Vive headset. Get ready to be amazed as you virtually travel to different cities, landmarks, and even countries, all from the comfort of your own home.
Stay tuned for the next section, where we will guide you through the process of navigating in Google Earth VR, helping you make the most out of this immersive virtual reality experience.
Step 2: Navigating in Google Earth VR
Once you have successfully set up Google Earth VR on your HTC Vive, it’s time to master the art of navigation. Navigating in Google Earth VR allows you to explore vast landscapes, fly to different locations, and discover hidden gems. Follow these steps to navigate like a pro:
- Controller Basics: Familiarize yourself with the HTC Vive controllers. The left controller is used for navigation, while the right controller is used for interaction. Use the trackpad and buttons on the left controller to move around and control your virtual movements.
- Movement Controls: To move around, press the trackpad on the left controller and slide your thumb in the desired direction. You can move forward, backwards, left, and right. Experiment with different speeds and movements to find what works best for you.
- Flying Mode: Want to experience the sensation of flying? Press and hold the trackpad on the left controller to enter “fly” mode. While in this mode, tilt the controller up or down to control your altitude and smoothly fly through the virtual world.
- Zooming In and Out: Use the grip buttons on the sides of the controllers to zoom in and out. This allows you to get a closer look at specific areas or get a broader view of the entire landscape.
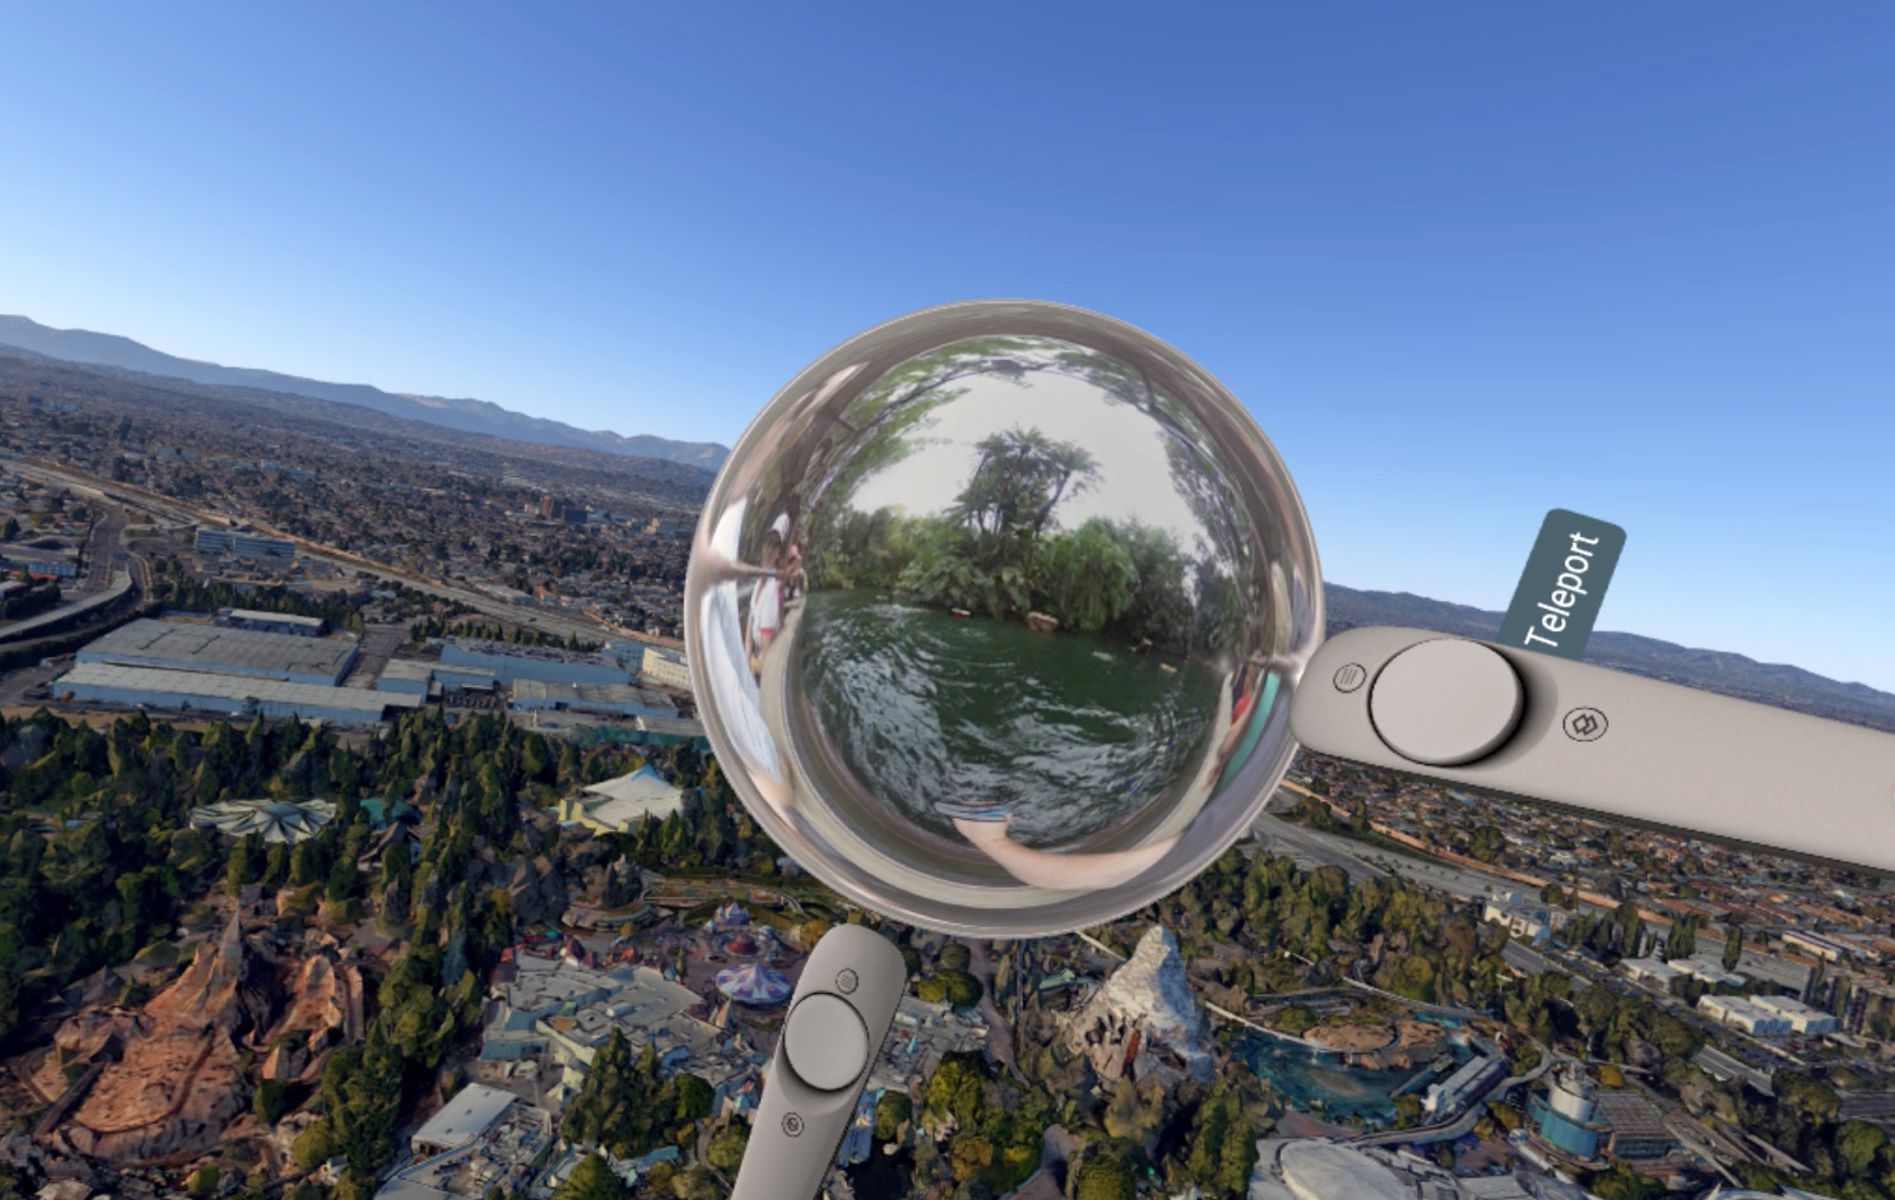
- Teleporting: To quickly move to a specific location, look at the ground and press the trackpad on the right controller. A circular teleportation marker will appear. Point the marker to your desired location and release the trackpad to instantly teleport there.
- Exploration Tips: As you navigate in Google Earth VR, make sure to explore different landmarks, popular tourist destinations, and natural wonders. Use the controllers to interact with objects, such as opening information cards or interacting with virtual tours.
By mastering the navigation controls in Google Earth VR, you can truly immerse yourself in the virtual world and experience the thrill of exploring stunning locations. Spend time flying over iconic landmarks, exploring the depths of the oceans, or even venturing into outer space.
Now that you know how to navigate in Google Earth VR, it’s time to move on to the next section, where we will reveal how to choose the perfect view for your screenshot. Get ready to capture breathtaking moments and create lasting memories in this virtual reality wonderland.
Step 3: Choosing the perfect view for your screenshot
Now that you’re familiar with the navigation controls in Google Earth VR, it’s time to capture those stunning moments in a screenshot. Choosing the perfect view is crucial to ensure that your screenshot captures the essence and beauty of the virtual world. Follow these steps to choose the perfect view for your screenshot:
- Explore Different Locations: Take the time to explore different locations within Google Earth VR. Visit famous landmarks, natural wonders, and picturesque landscapes. Find a location that captivates you and offers a visually appealing scene.
- Consider Your Composition: Composition is key when it comes to capturing an eye-catching screenshot. Look for interesting points of interest or elements that can create a focal point. Experiment with different angles and perspectives to create a visually pleasing composition.
- Pay Attention to Lighting: Lighting can greatly impact the overall mood and atmosphere of your screenshot. Look for areas with interesting lighting conditions such as sunrise or sunset, shadows, or dramatic light reflections. Adjust your position and angle to capture the optimal lighting for your shot.
- Take Advantage of Scale: Google Earth VR allows you to experience a sense of scale in a virtual environment. Make use of this feature by capturing buildings towering above you or vast landscapes that stretch into the horizon. Play around with perspective and distance to convey the magnitude of the scene.
- Experiment with Different Seasons and Weather: Google Earth VR offers the ability to change the time of day and weather conditions. Take advantage of this feature to capture screenshots with different moods and atmospheres. Explore the same location at different times to find the perfect combination of weather and lighting.
Remember, the beauty of virtual reality is the ability to capture moments that are unique and difficult to replicate in the physical world. Take your time to explore, experiment, and find scenes that truly speak to you. Now that you’ve chosen the perfect view, it’s time to learn how to capture the screenshot. Stay tuned for the next section where we will guide you through the process of taking a screenshot in Google Earth VR on the HTC Vive.
Step 4: Taking the screenshot in Google Earth VR
Now that you have found the perfect view in Google Earth VR, it’s time to capture that moment with a screenshot. Taking a screenshot in Google Earth VR is a simple process that allows you to preserve your virtual memories. Follow these steps to capture your screenshot:
- Get Ready: Make sure you are in the desired position and have the perfect view on your HTC Vive headset before taking the screenshot. Adjust your angle, zoom level, and any other visual settings to ensure the screenshot captures exactly what you want.
- Locate the Screenshot Button: On your HTC Vive controller, you will find several buttons. Look for the “menu” button, which is located just below the trackpad. This is the button used to access the screenshot feature in Google Earth VR.
- Take the Screenshot: Once you have located the “menu” button, press it. This will bring up the screenshot menu within Google Earth VR. From here, you can either press the “save screenshot” button to capture the screenshot or use the shortcut button on the controller, depending on the specific HTC Vive model you are using.
- Save Your Screenshot: After capturing the screenshot, you will be prompted to save it. Follow the on-screen instructions to choose the desired location and format for your screenshot. Consider using a high-resolution format like PNG to preserve the quality of the image.
- Review and Edit (Optional): Once the screenshot is saved, you can review it within the SteamVR dashboard. From there, you can also choose to edit the screenshot using image editing software to enhance its visual appeal, apply filters, or crop the image.
By following these steps, you can easily capture your favorite moments and stunning views in Google Earth VR. Whether you want to document a specific location, showcase your virtual adventures on social media, or simply relive memorable moments, taking a screenshot allows you to do exactly that.
Now that you know how to take a screenshot in Google Earth VR, it’s time to explore the final step – saving and sharing your screenshot. The next section will guide you through the process of saving and sharing your virtual memories, so stay tuned!
Step 5: Saving and sharing your screenshot
After capturing a stunning screenshot in Google Earth VR, the next step is to save and share your virtual memory with others. Whether you want to keep it for personal enjoyment or showcase it to the world, here’s how you can save and share your screenshot:
- Locate the Screenshot: Once you have taken a screenshot, navigate to the folder on your computer where the screenshot was saved. By default, Google Earth VR saves screenshots in a designated folder. You can customize the save location in the settings if desired.
- Organize and Rename (Optional): If you have multiple screenshots, consider organizing them in a dedicated folder. You can also rename the file to make it easier to identify or add a date to track the timeframe in which the screenshot was taken.
- Share on Social Media: If you wish to share your screenshot with friends, family, or the larger online community, consider posting it on social media platforms like Facebook, Twitter, or Instagram. You can upload the screenshot directly from your computer or use the social sharing option available within Google Earth VR.
- Create a Screensaver or Wallpaper: Transform your screenshot into a personalized screensaver or desktop wallpaper. Set it as the background on your computer to constantly remind yourself of the breathtaking virtual landscapes you explored in Google Earth VR.
- Showcase in Virtual Reality Galleries: Some virtual reality communities and platforms allow users to share their screenshots and experiences. Explore these VR galleries to share your accomplishments, discover other users’ creations, and engage with a community of virtual reality enthusiasts.
- Print or Create Physical Keepsakes: If you want to hold your virtual memories in your hands, consider printing your screenshot or creating physical keepsakes like posters, photo albums, or even 3D prints. Many online printing services offer customized printing options for digital files.
By saving and sharing your screenshot, you can preserve and showcase the awe-inspiring moments you experienced in Google Earth VR. Whether it’s through social media or physical prints, you have the power to share your virtual adventures with others and inspire them to explore the wonders of the world.
Congratulations! You have now learned how to take, save, and share screenshots in Google Earth VR. Keep exploring, capturing beautiful moments, and sharing your virtual memories with others. Happy adventuring!
Tips and Tricks for Taking Stunning Screenshots in Google Earth VR
Capturing stunning screenshots in Google Earth VR can be a rewarding experience. To make the most out of your virtual adventures and create visually captivating screenshots, consider these tips and tricks:
- Experiment with Different Filters: Google Earth VR offers a variety of filters that can enhance the visual appeal of your screenshots. From sepia tones to vibrant colors, try applying different filters to create a unique and artistic look.
- Utilize the Rule of Thirds: The rule of thirds is a photography technique that can create visually pleasing compositions. Imagine dividing your screenshot into a 3×3 grid and aligning points of interest along the lines or at the intersection points. This can add balance and depth to your screenshot.
- Play with Perspectives: Varying the perspective can add depth and interest to your screenshots. Experiment with different angles and viewpoints, such as capturing a low-angle shot to emphasize the size of buildings or a bird’s-eye view to showcase vast landscapes.
- Include Points of Interest: To make your screenshot more captivating, include interesting points of interest. This could be iconic landmarks, unusual architecture, or beautiful natural scenery. These points of interest can draw the viewer’s eye and create a focal point.
- Adjust the Time of Day: Experiment with different times of the day to capture unique lighting conditions. Sunrise and sunset often offer warm and dramatic lighting, while the golden hour can cast a beautiful glow over your virtual surroundings.
- Use the Overlay Menu: The overlay menu in Google Earth VR provides various options for customizing your screenshot. From removing labels and icons to adjusting the scale of objects, explore these settings to create a clean and visually appealing screenshot.
- Capture Dynamic Elements: Look for elements in the virtual world that are in motion or offer a sense of action. It could be a plane flying overhead, waves crashing against a beach, or a person interacting with the environment. These dynamic elements can add life and interest to your screenshot.
- Take Advantage of Hidden Gems: Google Earth VR is full of hidden gems and lesser-known locations. Explore these hidden gems to discover unique and lesser-known areas that can make your screenshots stand out from the crowd.
- Pay Attention to Detail: Don’t overlook the finer details in the virtual world. Zoom in to capture intricate textures, focus on specific architectural details, or capture the play of light and shadow on different surfaces. These details can add depth and richness to your screenshot.
- Take Your Time: Lastly, don’t rush the process. Take your time to explore, experiment, and appreciate the virtual world. Allow yourself to immerse in the experience and capture the perfect moment that resonates with you.
By applying these tips and tricks, you can elevate your screenshots and create stunning visual memories of your time in Google Earth VR. Have fun exploring and capturing the beauty of the virtual world!