
Compatible Devices
If you’re looking to immerse yourself in the world of virtual reality with the Samsung Gear VR, it’s important to ensure that your device is compatible. The Gear VR is designed to work seamlessly with select Samsung smartphones, delivering an immersive and engaging VR experience. Here are the compatible devices:
- Samsung Galaxy S21
- Samsung Galaxy S21+
- Samsung Galaxy S21 Ultra
- Samsung Galaxy Note20
- Samsung Galaxy Note20 Ultra
- Samsung Galaxy S20
- Samsung Galaxy S20+
- Samsung Galaxy S20 Ultra
- Samsung Galaxy Note10
- Samsung Galaxy Note10+
These are just a few of the compatible devices, and the list is constantly updated as new models are released by Samsung. To ensure compatibility, make sure that your smartphone is one of the Galaxy S or Note series devices mentioned. If you have a different Samsung smartphone model, it may not be compatible with the Gear VR.
It’s important to note that the Gear VR requires a smartphone with specific hardware capabilities to provide the best virtual reality experience. These capabilities include a high-resolution display, powerful processing capabilities, and accurate motion tracking. The compatible devices mentioned above meet these requirements, ensuring a smooth and immersive VR experience.
Prior to purchasing the Gear VR, it’s always a good idea to check the official Samsung website or consult with the retailer to confirm compatibility with your specific smartphone model. This will help avoid any disappointment or compatibility issues down the line.
Check for Updates
Before diving into the world of virtual reality with your Samsung Gear VR, it’s crucial to ensure that you have the latest updates installed. Keeping your device up to date not only provides you with access to the latest features and improvements but also ensures optimal performance. Here’s how to check for updates:
1. Open the Oculus app on your smartphone: To manage your Gear VR and check for updates, you’ll need to use the Oculus app. Locate the Oculus app on your Samsung smartphone and open it.
2. Go to Settings: Once you’re in the Oculus app, tap on the menu icon in the top left corner to access the main menu. From the menu, select “Settings”.
3. Check for updates: Within the Settings menu, look for the “Device” section. Here, you’ll find an option to check for updates. Tap on it to initiate the update check.
4. Install updates if available: The Oculus app will automatically scan for updates and notify you if any are available. If updates are found, follow the on-screen prompts to download and install them. Make sure your smartphone is connected to a stable Wi-Fi network to ensure a smooth update process.
5. Restart your Gear VR: After installing updates, it’s recommended to restart your Gear VR headset. Simply disconnect your smartphone from the headset and then reconnect it. This will ensure that the latest updates are properly applied and ready for use.
Regularly checking for updates is essential to ensure that you’re benefiting from the latest features, bug fixes, and performance enhancements offered by Samsung and Oculus. It’s also a good idea to enable automatic updates within the Oculus app settings to receive updates as soon as they become available.
By keeping your Gear VR up to date, you’ll be able to make the most of your virtual reality experiences, enjoy improved stability, and access new features as they are released.
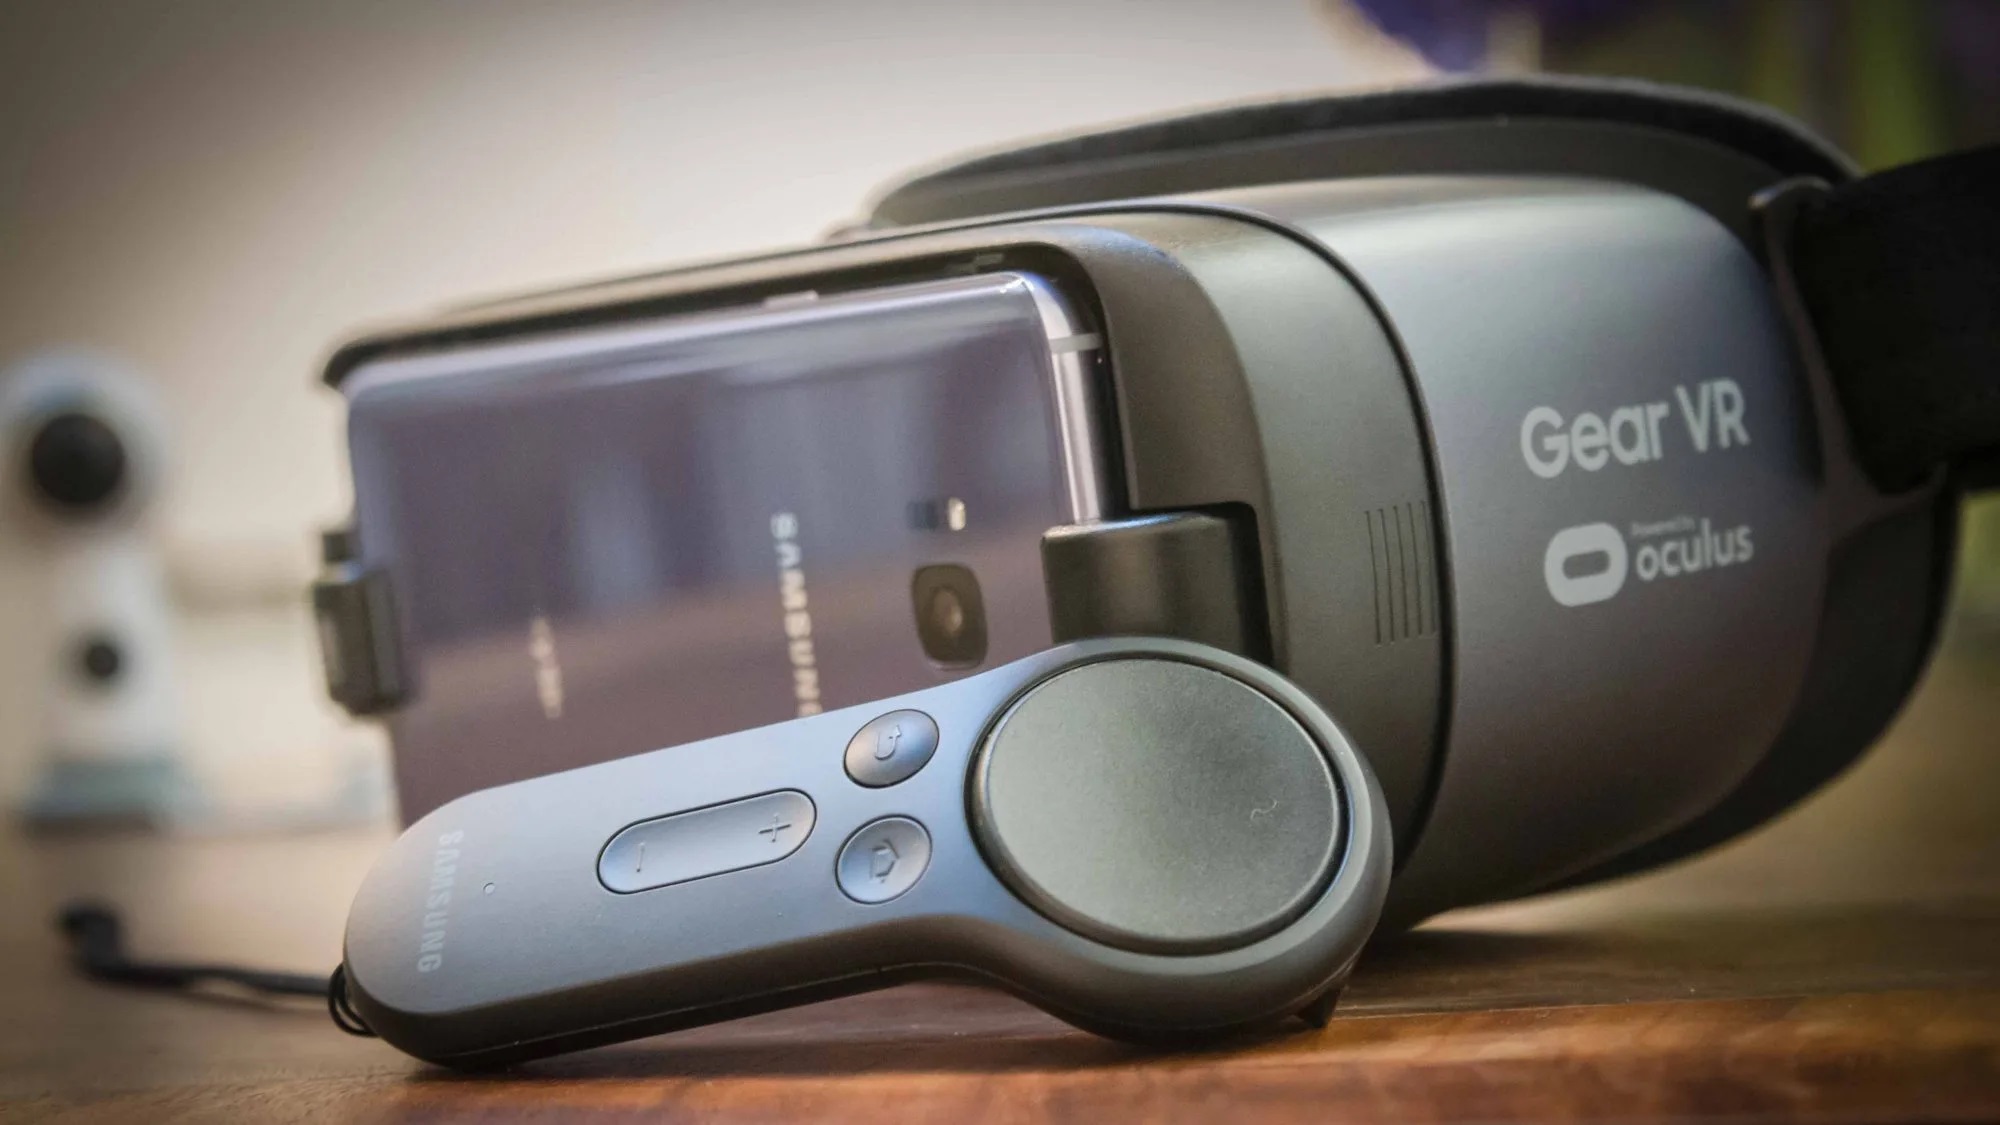
Pairing the Controller
The Samsung Gear VR comes with a controller that enhances your virtual reality experience by providing intuitive and precise control over your actions. To start using the controller, you’ll need to pair it with your Gear VR headset. Here’s a step-by-step guide on how to pair the controller:
1. Power on your Gear VR headset: Make sure your Gear VR headset is powered on and ready for pairing.
2. Open the Oculus app on your smartphone: Launch the Oculus app on your smartphone, which should be connected to the Gear VR headset.
3. Go to the Gear VR settings: Within the Oculus app, navigate to the settings by tapping on the menu icon in the top left corner and selecting “Settings”.
4. Select ‘Controller’: In the settings menu, locate and tap on the ‘Controller’ option. This will take you to the controller pairing screen.
5. Follow the on-screen instructions: The app will guide you through the pairing process. Make sure your controller is turned on and then press the ‘Pair’ button on the controller.
6. Wait for the pairing to complete: The Oculus app will search for the controller and establish a connection. Once the pairing is successful, you’ll see a confirmation message on your smartphone screen.
7. Test the controller: To ensure that the controller is working correctly, you can try navigating through the Gear VR interface using the buttons and touchpad. The controller allows you to point, select, and interact with virtual objects and menus in a more immersive and intuitive way.
Pairing the controller enables you to fully utilize its capabilities and enjoy a more interactive virtual reality experience. With the controller in hand, you can explore virtual worlds, play games, and interact with VR content like never before. It’s worth noting that the controller’s battery level can be monitored from the Oculus app, allowing you to keep it charged for extended use.
With the controller successfully paired, you’re now ready to embark on your VR adventures and make the most out of the Samsung Gear VR experience.
Installing the Gear VR App
Before you can start using your Samsung Gear VR headset, you’ll need to install the Gear VR app on your smartphone. The Gear VR app is essential for accessing and managing your virtual reality content. Here’s a step-by-step guide on how to install the app:
1. Check compatibility: First, make sure that your smartphone is compatible with the Gear VR headset. Refer to the list of compatible devices mentioned earlier in this article to ensure compatibility.
2. Open the Oculus app: Locate the Oculus app on your smartphone and open it. If you haven’t installed the app yet, you can download it for free from the Google Play Store or the Samsung Galaxy Store.
3. Sign in or create an account: If you already have an Oculus account, sign in using your credentials. Otherwise, create a new account by following the on-screen instructions. Having an account allows you to access the Oculus store, purchase VR apps and games, and personalize your virtual reality experience.
4. Connect your smartphone to the Gear VR headset: Connect your smartphone to the Gear VR headset using the USB Type-C connector or the Micro USB connector, depending on your specific model. Make sure the connection is secure to ensure proper communication between the headset and your smartphone.
5. Follow the on-screen instructions: Once your smartphone is connected to the Gear VR headset, the Oculus app will guide you through the setup process. Follow the on-screen instructions to set up your Gear VR and calibrate the sensors for optimal tracking.
6. Install the Gear VR app: During the setup process, you’ll be prompted to install the Gear VR app. Allow the installation process to complete, and once it’s done, the app will be ready to use.
7. Explore the Oculus store: With the Gear VR app installed, you can now access the Oculus store to browse and download a wide range of virtual reality apps, games, and experiences. Navigate through the store using the Oculus app on your smartphone and choose from a vast library of content.
Installing the Gear VR app is a crucial step in preparing your Samsung Gear VR headset for use. It grants you access to a wealth of virtual reality content and ensures a seamless and immersive VR experience. Enjoy exploring the possibilities of virtual reality with your newly installed Gear VR app!
Inserting Your Phone
Once you have the Gear VR app installed and your Gear VR headset set up, it’s time to insert your phone into the headset to begin your virtual reality experience. Here’s a step-by-step guide on how to properly insert your phone:
1. Remove the front cover: Start by removing the front cover of the Gear VR headset. The front cover is usually secured by magnets or clips, so gently pull it off to expose the phone slot.
2. Check phone compatibility: Before inserting your phone, ensure that it is compatible with the Gear VR headset. Refer to the list of compatible devices provided earlier in this article to confirm compatibility.
3. Orient your phone correctly: Depending on your specific Gear VR model, you may need to orient your phone in a particular direction. Look for the notch or indicator on the headset and align it with the corresponding feature on your phone. This will ensure proper alignment for optimal viewing and tracking.
4. Connect your phone to the USB port: Once your phone is properly oriented, gently plug it into the USB Type-C connector or the Micro USB connector in the Gear VR headset. Make sure the phone is securely connected to the headset to prevent any instability during use.
5. Adjust the phone position: After inserting your phone, adjust its position within the headset to achieve the clearest and most comfortable view. Use the sliders or movable mechanisms provided in the headset to align the phone properly. Ensure that the phone is centered and that the display is in focus.
6. Reattach the front cover: Once your phone is securely inserted and in the correct position, reattach the front cover of the Gear VR headset. Make sure it is properly aligned and fully attached to provide a secure enclosure for your phone.
7. Double-check connectivity: Before starting any virtual reality experience, double-check that your phone is connected to the Gear VR headset and that the connection is stable. This will ensure that the phone can communicate with the headset’s sensors and provide the most accurate tracking and immersive experience.
By following these steps, you’ll be able to securely insert your phone into the Gear VR headset and begin exploring the captivating world of virtual reality. Enjoy the immersive experiences that await you as you embark on your virtual reality journey!
Adjusting the Straps
When using the Samsung Gear VR headset, it’s important to ensure a comfortable and secure fit to enhance your virtual reality experience. The straps play a crucial role in achieving the desired fit, allowing you to comfortably wear the headset for extended periods. Here’s how to adjust the straps on your Gear VR headset:
1. Position the headset on your head: Start by positioning the Gear VR headset on your head. Hold the headset in both hands and place it over your eyes, making sure the lenses align properly with your eyes. The straps should hang down the sides.
2. Adjust the top strap: Locate the top strap or head strap on the Gear VR headset. It typically runs along the top of your head. Pull the strap gently to adjust its length, ensuring that it provides a secure yet comfortable fit. Avoid making it too tight, as it can cause discomfort or leave marks on your face.
3. Adjust the side straps: The Gear VR headset usually comes with side straps that go around the back of your head. These straps help distribute the weight of the headset and provide additional stability. Adjust the side straps by pulling on the adjustable sliders or fasteners until you achieve a snug fit.
4. Check for comfort and stability: After adjusting the straps, check for comfort and stability. The headset should fit securely on your head without feeling too tight or causing discomfort. It should also stay in place even with slight movements of your head.
5. Make further adjustments if needed: If the initial adjustments don’t provide the desired fit, feel free to make further adjustments. Experiment with the strap lengths and tightness to find the most comfortable and secure fit for your head shape and size.
6. Test the fit with movement: Once you’ve adjusted the straps to your satisfaction, test the fit by moving your head in different directions. If the headset stays in place and remains comfortable, you’ve achieved the appropriate strap adjustment.
By taking the time to adjust the straps on your Gear VR headset, you can ensure a comfortable and secure fit, which is crucial for an enjoyable and immersive virtual reality experience. Remember to readjust the straps if you share the headset with others to ensure a personalized and comfortable fit for each user.
Adjusting the Focus
To fully immerse yourself in the virtual reality experiences offered by the Samsung Gear VR, it’s important to ensure that the focus is properly set. Adjusting the focus helps enhance the clarity and sharpness of the visuals for a more enjoyable VR experience. Here’s how to adjust the focus on your Gear VR headset:
1. Put on the headset: Start by putting on the Gear VR headset and making sure it is properly positioned on your head.
2. Locate the focus wheel: On the top or side of the Gear VR headset, you’ll find a focus wheel. The location of the wheel may vary depending on the specific Gear VR model you have.
3. Adjust the focus: Gently turn the focus wheel in either direction to adjust the focus. Pay attention to the visuals inside the headset as you make adjustments. Slowly turn the wheel until the visuals appear clear and sharp.
4. Test with different content: To ensure that the focus is properly set for different virtual reality content, try out various apps, games, or videos in the Gear VR. Pay attention to details, text, and overall clarity. If you notice any blurriness or difficulty in reading text, readjust the focus accordingly.
5. Consider individual visual needs: Keep in mind that everyone’s eyesight is unique. If you wear glasses or contact lenses, you may need to make additional adjustments. Some Gear VR models have a built-in diopter adjustment feature that can compensate for different visual needs.
6. Make fine-tuning adjustments: If you’re still not satisfied with the focus, try making smaller, more precise adjustments to find the optimal setting. Take your time to iteratively refine the focus until you achieve the best visual experience.
7. Share the headset? Adjust back if needed: If you share the Gear VR headset with others, remember to readjust the focus if they have different visual needs. Sharing a headset with adjusted focus may cause discomfort or strain for others, so it’s important to find a balance that works for everyone.
By taking the time to adjust the focus on your Gear VR headset, you can ensure a clearer and more immersive virtual reality experience. Proper focus enhances the details and realism of the virtual world, allowing you to fully engage with the content and enjoy the magic of virtual reality.
Navigating the Interface
The Samsung Gear VR provides an intuitive interface that allows you to navigate through various virtual reality apps, games, and experiences. Understanding how to navigate the interface is essential for getting the most out of your Gear VR headset. Here’s a guide on how to navigate the interface:
1. Familiarize yourself with the touchpad: The Gear VR controller is equipped with a touchpad located at the top. Familiarize yourself with this touchpad, as it is the primary method for navigating the interface. Swipe your finger across the touchpad to move the cursor and select items.
2. Use the back button: The Gear VR controller also has a back button located near the top. Pressing this button will take you back to the previous screen or menu. It’s a useful feature for navigating through menus or returning to the main interface.
3. Selecting items: To select an item within an app or menu, simply place the cursor over the desired item using the touchpad and press the touchpad to confirm your selection. This can include selecting app icons, menu options, or even in-game interactions.
4. Navigating through menus: Within the Gear VR interface, you’ll encounter various menus and screens. To navigate through these, swipe left, right, up, or down on the touchpad to scroll through options, lists, or menus. Scroll slowly and steadily to ensure accurate navigation.
5. Use the Oculus Dashboard: The Oculus Dashboard is the central hub of the Gear VR interface. To access it, press the Home button on the Gear VR controller. Here, you can access your library of apps, adjust settings, browse the Oculus store, and more. Use the touchpad and back button to navigate within the Oculus Dashboard.
6. Explore virtual environments: Beyond just navigating menus, the Gear VR allows you to explore virtual environments. Some VR experiences provide interactive environments where you can walk or move around. Pay attention to the in-app instructions to learn how to navigate and explore these virtual spaces.
7. Experiment and learn: Navigating the Gear VR interface may take some getting used to, but the more you use it, the more familiar you will become. Play around with the touchpad, buttons, and different apps to discover how to navigate effectively and efficiently.
The Gear VR interface is designed to be user-friendly and immersive. Once you become comfortable with navigating the interface, you’ll be able to effortlessly explore the vast world of virtual reality and enjoy a wide range of exciting experiences.
Playing VR Games and Experiences
One of the most exciting aspects of the Samsung Gear VR is the ability to dive into immersive virtual reality games and experiences. With a growing library of apps and games to choose from, here’s a guide on how to play VR games and experiences on your Gear VR:
1. Choose a game or experience: Start by browsing through the Oculus store or your VR app library to find a game or experience that interests you. There are various genres to choose from, including action, adventure, puzzle, simulation, and more. Read descriptions, reviews, and ratings to help you make your selection.
2. Install the game or experience: Once you’ve found a game or experience you want to try, follow the prompts to install it. Make sure your Gear VR is properly connected to your smartphone, and the installation should begin automatically. Note that some games or experiences may require additional downloads or updates before you can start playing.
3. Follow in-game instructions: Each game or experience may have its own set of instructions, so pay attention to any in-game tutorials or guidance provided. These instructions will help you understand the controls, objectives, and specific gameplay mechanics. Take your time to familiarize yourself with the game’s mechanics before jumping in.
4. Use the Gear VR controller: The Gear VR controller offers a more immersive and intuitive way to interact with VR games and experiences. Depending on the game, you may use the controller to point, shoot, grab objects, or perform various actions. Familiarize yourself with the controller’s buttons and touchpad to fully utilize its capabilities within each game or experience.
5. Get comfortable and clear your play area: Find a comfortable spot to play your VR game or experience. Make sure you have enough space to move around safely, especially if the game involves physical movements. Clear any obstacles within your play area to prevent accidents and ensure an uninterrupted experience.
6. Take breaks when needed: Virtual reality can be immersive, but it’s important to listen to your body and take breaks when needed. Playing VR games or experiences for extended periods may cause discomfort or eye fatigue. Take regular breaks to rest your eyes and maintain your comfort.
7. Experiment and enjoy: VR games and experiences are a unique opportunity to engage with virtual worlds like never before. Don’t be afraid to experiment, try different games, and explore various experiences. Immerse yourself in the virtual reality and let the games and experiences take you on unforgettable adventures.
Remember, the Gear VR offers a wide variety of games and experiences, so explore different genres, try new titles, and find what captivates you the most. With an ever-expanding library of content, your VR gaming and experience possibilities are limitless.
Troubleshooting Common Issues
While using the Samsung Gear VR, you may encounter some common issues that can disrupt your virtual reality experience. Fortunately, many of these issues can be resolved easily. Here are some troubleshooting tips to help you overcome common problems:
1. Blurry visuals: If you notice that the visuals appear blurry or out of focus, try adjusting the focus wheel on the Gear VR headset. Turn it slowly until the visuals become clear and sharp. Also, ensure that your phone is properly inserted and aligned within the headset.
2. Overheating: Extended use of the Gear VR headset can sometimes cause your smartphone to heat up. If you encounter overheating issues, try removing the phone from the headset and allowing it to cool down for a few minutes. Additionally, close any unnecessary apps running in the background that may contribute to increased heat.
3. Controller connectivity: If you’re experiencing issues with the controller not connecting or properly responding, try resetting the controller. Turn it off and then back on again, making sure it is properly paired with the Gear VR headset. If the problem persists, check for any firmware updates for the controller and install them as necessary.
4. App or game crashes: If you encounter frequent app or game crashes, ensure that both the Gear VR app and the specific app or game are up to date. Uninstall and reinstall the problematic app, and if the issue continues, try restarting your smartphone. It’s also helpful to clear cache and data for the app in question, as this can resolve many performance-related issues.
5. Poor tracking or controllers not responding: If you’re experiencing issues with tracking or the controllers not responding properly, make sure that the sensors on the Gear VR headset are not obstructed. Clean any dirt or smudges from the sensors to ensure accurate tracking. Additionally, ensure that the batteries in the controllers are charged or replace them if needed.
6. Limited storage space: If you’re running out of storage space on your smartphone, consider uninstalling unused apps or games to free up space. Offloading media files and clearing cache can also help maximize available storage. Remember to regularly manage your storage to avoid storage-related issues.
7. Audio issues: If you’re experiencing issues with audio, ensure that the audio output is properly configured. Check the settings in the Oculus app or the specific app you’re using to make sure that the audio is set correctly. Additionally, ensure that the volume on your smartphone and the volume on the Gear VR headset are adjusted properly.
If none of these troubleshooting tips resolve the issue you’re facing, consult the official Samsung support website or contact their support team for further assistance. They are equipped to provide specific guidance and solutions tailored to your particular situation.
By employing these troubleshooting tips, you can quickly overcome common issues and enjoy a seamless and immersive virtual reality experience with your Samsung Gear VR.