
What is the Philips Hue HDMI Sync Box?
The Philips Hue HDMI Sync Box is a innovative device that allows you to upgrade your home entertainment experience by synchronizing your TV or projector with your Philips Hue smart light bulbs. It is designed to create an immersive viewing experience by extending the colors and brightness of your movie, gaming, and music content beyond the screen and into your living space.
With the Philips Hue HDMI Sync Box, you can take your viewing experience to a whole new level. Instead of just watching colorful visuals on your TV, you can now have the colors and effects come alive around your room, creating a fully immersive ambiance that enhances the mood of your entertainment. Whether you’re watching a movie, playing video games, or relaxing with music, the Philips Hue HDMI Sync Box adds a new dimension to your home theater.
The device works by analyzing the content on your screen and wirelessly communicating with your Philips Hue smart lights, which are strategically placed throughout your room. It then intelligently matches the lighting effects to the colors and actions on the screen, creating a harmonious blend between the visual and ambient lighting. This synchronization enhances the overall viewing experience, making it more engaging and captivating.
Not only does the Philips Hue HDMI Sync Box sync with your TV or projector, but it also supports multiple HDMI inputs, allowing you to connect various devices such as game consoles, Blu-ray players, streaming devices, and more. This means that you can enjoy the immersive lighting effects with all of your entertainment sources, bringing a consistent and synchronized experience to every device.
Furthermore, the Philips Hue HDMI Sync Box is compatible with the Philips Hue Bridge, which acts as the central hub for your Philips Hue smart lights. This integration allows you to control and manage your lighting setup through the Philips Hue app, giving you the flexibility to customize the colors, brightness, and effects according to your preferences.
Overall, the Philips Hue HDMI Sync Box is a creative and innovative solution for transforming your entertainment space into a truly immersive and interactive environment. It adds a dynamic and captivating element to your movies, games, and music, allowing you to enjoy a multisensory experience that goes beyond the screen.
What do you need to set up the Philips Hue HDMI Sync Box?
Before setting up the Philips Hue HDMI Sync Box, you will need a few essential items to ensure a seamless installation process. Here is a list of what you need:
- Philips Hue HDMI Sync Box: The first and most crucial item you will need is the Philips Hue HDMI Sync Box itself. Make sure you have the box, power adapter, and any included cables.
- Compatible TV or Projector: The Philips Hue HDMI Sync Box works with a wide range of TVs and projectors, but it’s important to check for compatibility before purchasing. Ensure that your TV or projector has an available HDMI input and supports the required resolution.
- Philips Hue Bridge: To fully utilize the features of the Philips Hue HDMI Sync Box, you will need a Philips Hue Bridge. The Sync Box syncs with your Hue Bridge to control the connected smart lights.
- Philips Hue Smart Lights: To create the immersive lighting effects, you will need Philips Hue smart lights. These lights should be strategically placed around your room to achieve the desired visual impact.
- HDMI Cables: You will need HDMI cables to connect your TV or projector, various HDMI devices, and the Philips Hue HDMI Sync Box. Ensure that you have enough cables for all the necessary connections.
- HDMI Devices: The Philips Hue HDMI Sync Box allows you to connect multiple HDMI devices, such as game consoles, streaming devices, Blu-ray players, or media boxes. Make sure you have the devices you want to connect ready.
- Power Outlets: Ensure that you have enough power outlets near your TV or entertainment setup to plug in the Philips Hue HDMI Sync Box, your TV or projector, and other connected devices.
Once you have gathered all the necessary items, you will be ready to proceed with setting up the Philips Hue HDMI Sync Box and creating your immersive home entertainment experience. Make sure to carefully follow the manufacturer’s instructions and consult any provided guides for a smooth installation process.
Step 1: Unboxing the Philips Hue HDMI Sync Box
The first step in setting up your Philips Hue HDMI Sync Box is unboxing the device. Follow these steps to ensure a proper unboxing process:
- Find a suitable workspace: Choose a clean and spacious area to unbox your Philips Hue HDMI Sync Box. Make sure there is enough room to lay out all the included items and that you have easy access to power outlets.
- Open the packaging: Carefully remove the outer packaging of the Philips Hue HDMI Sync Box. You may need to use scissors or a knife to cut any tape or plastic wrapping. Be cautious not to damage the contents inside.
- Take out the Sync Box: Locate the Philips Hue HDMI Sync Box within the packaging and gently lift it out. Set it down on a flat surface, ensuring that it is stable and secure.
- Inspect the contents: Look inside the box and make sure you have all the necessary items. This should include the Sync Box itself, a power adapter, HDMI cables, and any other additional cables or accessories that may come with it.
- Read the user manual: Take a moment to review the user manual or quick start guide provided with the Philips Hue HDMI Sync Box. Familiarize yourself with the device’s features, connections, and setup instructions.
- Organize the components: Before proceeding, organize the components neatly on your workspace. This will make it easier to locate and connect each item during the setup process.
- Keep the packaging for later: It is advisable to keep the original packaging and any included inserts in a safe place, as you may need them for warranty purposes or if you ever need to transport or store the device.
By carefully unboxing the Philips Hue HDMI Sync Box and familiarizing yourself with its contents, you are now ready to move on to the next step, which involves connecting the Sync Box to your television or projector.
Step 2: Connect the Philips Hue HDMI Sync Box to your TV
Once you have successfully unboxed the Philips Hue HDMI Sync Box, you can proceed to connect it to your TV or projector. Follow these steps to ensure a proper connection:
- Locate the HDMI output port on the Philips Hue HDMI Sync Box: The HDMI output port is where you will plug in the HDMI cable that connects the Sync Box to your TV or projector. Look for the port labeled “Output” or “HDMI Out” on the back or side of the Sync Box.
- Locate an available HDMI input port on your TV or projector: On your TV or projector, locate an HDMI input port where you can connect the Sync Box. Depending on the model, there may be multiple HDMI ports labeled with numbers or specific names.
- Connect one end of the HDMI cable to the HDMI output port on the Sync Box: Take one end of the HDMI cable and insert it into the HDMI output port on the Philips Hue HDMI Sync Box. Ensure that the cable is securely connected.
- Connect the other end of the HDMI cable to the HDMI input port on your TV or projector: Take the other end of the HDMI cable and insert it into the HDMI input port on your TV or projector. Make sure the cable is firmly inserted into the port.
- Secure the connection: Gently wiggle the cables to ensure a secure connection between the Sync Box and your TV or projector. Avoid applying excessive force that could damage the ports or cables.
- Note the HDMI input label: If your TV or projector has multiple HDMI input ports, take note of the specific HDMI input where you connected the Philips Hue HDMI Sync Box. This information will be useful later when configuring the Sync Box settings.
- Power on the Philips Hue HDMI Sync Box: Plug the power adapter into a nearby power outlet and connect the other end to the power input on the Sync Box. Once connected, turn on the Sync Box by pressing the power button or using the remote control, if included.
- Power on your TV or projector: Turn on your TV or projector and switch to the HDMI input that you connected the Sync Box to. Use the remote control or buttons on your TV or projector to navigate to the correct input.
- Verify the connection: Look for any on-screen messages or indicators that confirm the Sync Box is successfully connected to your TV or projector. You should now see the Philips Hue HDMI Sync Box interface, indicating that the connection is established.
With the Philips Hue HDMI Sync Box successfully connected to your TV or projector, you have completed the second step in the setup process. The next step involves connecting your HDMI devices to the Sync Box to enjoy synchronized lighting effects with your entertainment sources.
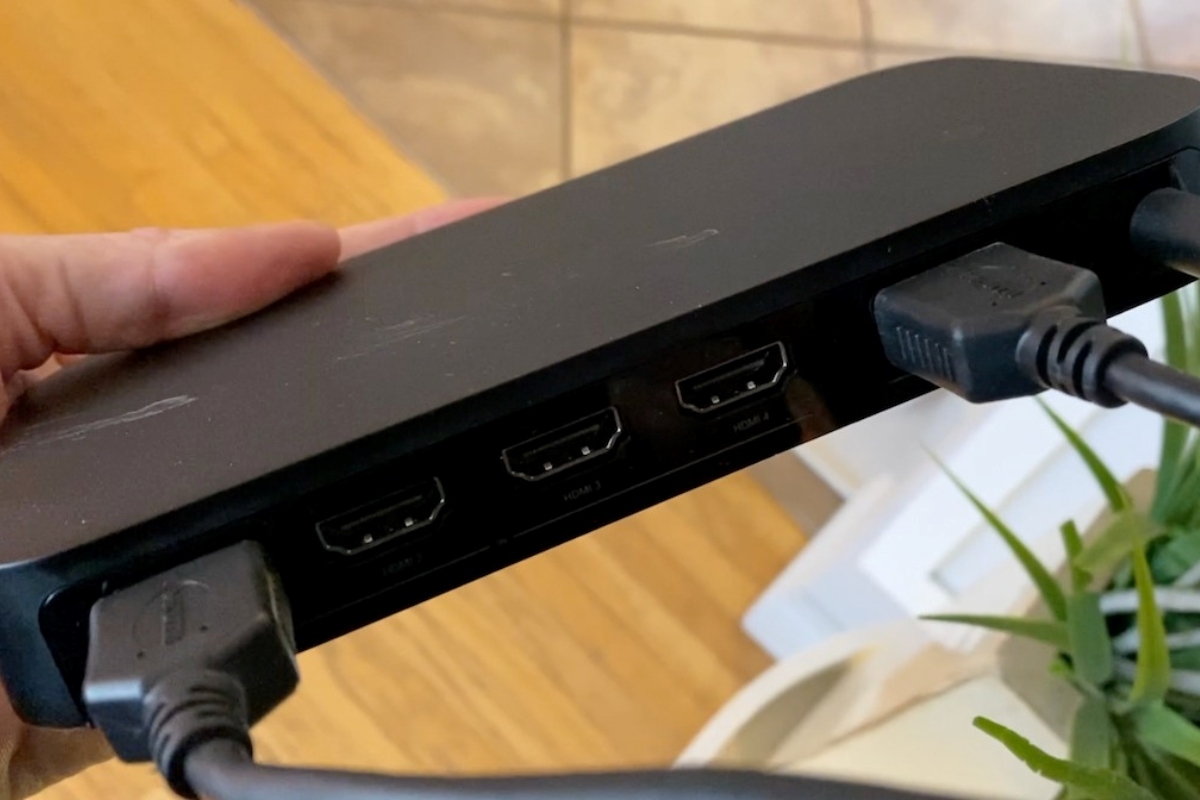
Step 3: Connecting your HDMI devices to the Philips Hue HDMI Sync Box
Once you have connected the Philips Hue HDMI Sync Box to your TV or projector, the next step is to connect your HDMI devices to the Sync Box. Follow these steps to ensure a proper connection:
- Identify the HDMI input ports on the Philips Hue HDMI Sync Box: Take a look at the back or side of the Sync Box and locate the HDMI input ports. These ports are where you will connect your HDMI devices.
- Identify the HDMI output ports on your devices: Look at each of your HDMI devices, such as gaming consoles, Blu-ray players, streaming devices, or media boxes, and identify their HDMI output ports. These are the ports where you connect the HDMI cables.
- Connect one end of an HDMI cable to the HDMI output port of a device: Take one end of an HDMI cable and insert it into the HDMI output port of the device you want to connect. Ensure that the cable is firmly inserted into the port.
- Connect the other end of the HDMI cable to an HDMI input port on the Sync Box: Take the other end of the HDMI cable and insert it into an available HDMI input port on the Philips Hue HDMI Sync Box. Repeat this step for each of your HDMI devices.
- Repeat the process for all your HDMI devices: Connect each of your HDMI devices to an available HDMI input port on the Sync Box using separate HDMI cables. Ensure that each device is connected securely to the Sync Box.
- Organize and manage the HDMI cables: As you connect your HDMI devices, make sure to manage the HDMI cables to keep everything neat and organized. Consider using cable management solutions to prevent tangling or clutter.
- Label the HDMI input ports on the Sync Box: To make it easier to navigate between devices, consider labeling each HDMI input port on the Philips Hue HDMI Sync Box. You can use removable labels or stickers to differentiate each device.
- Power on your HDMI devices: Turn on each of your HDMI devices, such as your gaming console, Blu-ray player, or streaming device. Ensure that they are properly powered on and set to the correct HDMI channel.
- Switch between HDMI devices: To switch between your HDMI devices and view content on your TV or projector, use the remote control or buttons on the Sync Box. The Sync Box interface should provide you with easy navigation options to select the desired HDMI device.
- Test the connection: Once connected, verify that the HDMI devices are properly recognized by the Philips Hue HDMI Sync Box. You should see the visuals on your TV or projector and experience synchronized lighting effects with your connected Hue lights.
By connecting your HDMI devices to the Philips Hue HDMI Sync Box, you have completed the third step in the setup process. The next step involves connecting the Sync Box to your Philips Hue Bridge for enhanced control and customization.
Step 4: Connect the Philips Hue HDMI Sync Box to your Philips Hue Bridge
Connecting your Philips Hue HDMI Sync Box to your Philips Hue Bridge is an important step in the setup process and allows you to fully control and customize the lighting effects. Follow these steps to establish the connection:
- Ensure that your Philips Hue Bridge is properly set up and connected to your Wi-Fi network. If you haven’t set up the bridge yet, refer to the manufacturer’s instructions for guidance.
- Locate the Ethernet port on the back of your Philips Hue Bridge. This is where you will connect an Ethernet cable to establish a connection between the bridge and your home network.
- Connect one end of the Ethernet cable to the Ethernet port on the Philips Hue Bridge. Ensure that the connection is secure.
- Connect the other end of the Ethernet cable to an available Ethernet port on your Wi-Fi router or modem. This will establish a connection between the bridge and your network.
- Power on the Philips Hue HDMI Sync Box by plugging in the power adapter and connecting it to a power outlet.
- Launch the Philips Hue Sync app on your mobile device or computer. If you haven’t installed the app yet, it can be downloaded from the App Store or Google Play Store.
- Follow the on-screen instructions in the app to set up and discover devices. Make sure your Philips Hue Bridge and Philips Hue HDMI Sync Box are within range and connected to the same Wi-Fi network.
- In the app, select the option to connect additional devices. The app should detect the Philips Hue HDMI Sync Box and guide you through the connection process.
- Once the app successfully establishes a connection with the Sync Box, it will be added to your Philips Hue ecosystem. You can now control the lighting effects of your Sync Box through the Philips Hue app.
- Take some time to explore the various customization options available in the app. You can adjust the brightness, colors, and intensity of the lighting effects to suit your preferences and enhance your viewing experience.
- Make any desired adjustments to the settings in the app and test the connection by playing your preferred entertainment content. The lighting effects should synchronize with the on-screen action, providing an immersive visual experience.
By connecting the Philips Hue HDMI Sync Box to your Philips Hue Bridge, you have completed an important step in the setup process. The next step involves setting up the Philips Hue Sync app to fine-tune the lighting settings for your entertainment.
Step 5: Set up the Philips Hue Sync app
To fully optimize and customize the lighting effects of your Philips Hue HDMI Sync Box, you will need to set up the Philips Hue Sync app. Follow these steps to get started:
- Download the Philips Hue Sync app on your mobile device or computer. The app is available for both iOS and Android devices and can also be downloaded for Windows or macOS.
- Launch the app and sign in to your Philips Hue account. If you don’t have an account, you can create one within the app by following the provided instructions.
- Ensure that your mobile device or computer is connected to the same Wi-Fi network as your Philips Hue Bridge and Philips Hue HDMI Sync Box.
- Once you are signed in, the app will automatically search for and detect your Philips Hue devices, including the Sync Box. Make sure your Sync Box is powered on and connected to the same network as your device.
- Follow the on-screen instructions in the app to complete the initial setup process. This may involve syncing your devices, granting necessary permissions, and configuring the connection between the app and the Sync Box.
- After setup is complete, you will have access to the various features and settings of the Philips Hue Sync app. Explore the app interface to familiarize yourself with the available options.
- Customize the lighting effects to suit your preferences. The app allows you to adjust parameters such as brightness, intensity, color palettes, and synchronization preferences.
- Experiment with different modes and presets provided by the app to enhance your entertainment experience. These modes can automatically adjust the lighting effects based on the content being displayed on your TV or projector.
- Consider creating custom scenes and lighting setups to suit specific moods or activities. The app provides options to save and recall these scenes for quick and easy access.
- Take some time to fine-tune the settings and experiment with different combinations to achieve the desired visual ambiance during your entertainment sessions.
- Once you are satisfied with your customizations, you are ready to enjoy the immersive entertainment experience with the Philips Hue HDMI Sync Box and the Philips Hue Sync app.
By setting up the Philips Hue Sync app, you have unlocked a range of customization options to enhance your viewing experience. The next step involves adjusting the settings in the app to further optimize the lighting effects.
Step 6: Adjusting the settings in the Philips Hue Sync app
After setting up the Philips Hue Sync app, you can further optimize and personalize the lighting effects to suit your preferences. Follow these steps to adjust the settings in the app:
- Open the Philips Hue Sync app on your mobile device or computer, making sure you are connected to the same Wi-Fi network as your Philips Hue Bridge and Sync Box.
- Explore the app’s settings menu. Look for options related to lighting effects, synchronization, colors, and other visual parameters.
- Adjust brightness and intensity: Fine-tune the overall brightness and intensity of the lighting effects. Increase or decrease these settings to match the ambiance of your room and your personal preferences.
- Modify color settings: Experiment with different color palettes and adjust the saturation levels to find the perfect balance. Customize the colors to create a captivating and immersive visual experience.
- Choose synchronization options: Determine how closely the lighting effects follow the content on your screen. Select the preferred synchronization mode, such as “video,” “music,” or “game,” depending on your activity.
- Enable or disable individual effects: The app may offer various lighting effects, such as strobe, color flow, or gradient. Enable or disable these effects based on your preference and the type of content you are watching.
- Configure zone settings: If you have multiple Philips Hue smart lights in different areas of your room, you can create zones and customize the lighting effects for each specific zone.
- Test the settings: Play various types of entertainment content, such as movies, TV shows, music, or games, to see how the lighting effects respond. Make adjustments as necessary to achieve the desired ambiance.
- Save your customizations: Once you are satisfied with your settings, consider saving them as presets or scenes. This allows you to easily recall and switch between different setups depending on your mood or activity.
- Continuously refine your settings: As you use the Philips Hue HDMI Sync Box, you may find that certain settings need further adjustment. Don’t hesitate to revisit the app’s settings and fine-tune as needed.
By adjusting the settings in the Philips Hue Sync app, you can optimize the lighting effects and create a personalized and immersive entertainment experience. The next step involves enjoying your content with the synchronized lighting effects of the Philips Hue HDMI Sync Box.
Step 7: Enjoy immersive entertainment with Philips Hue HDMI Sync Box
Now that you have set up and customized the lighting effects using the Philips Hue HDMI Sync Box and the Philips Hue Sync app, it’s time to sit back, relax, and enjoy the immersive entertainment experience. Here are a few tips to maximize your enjoyment:
- Select your preferred entertainment: Whether you’re watching a thrilling movie, playing an intense video game, or listening to your favorite music, choose the content that you want to immerse yourself in.
- Ensure your TV or projector is set up correctly: Check the resolution, display settings, and audio configuration of your TV or projector to ensure optimal performance. Adjust the settings as necessary to match your preferences.
- Dim the room lights: As the Philips Hue HDMI Sync Box brings the lighting effects beyond the screen, dimming the other room lights can enhance the immersive experience. This allows the synchronized lights to become the primary source of ambient lighting.
- Adjust the lighting effects to match the content: Use the Philips Hue Sync app to fine-tune the lighting effects according to the type of content you are experiencing. Experiment with different settings to find the perfect balance between visual immersion and comfort.
- Explore different modes and presets: Experiment with the modes and presets provided by the app. These options can automatically adjust the lighting effects based on the specific genre of the content, creating an even more immersive experience.
- Share the experience: Invite friends, family, or loved ones to join you in your immersive entertainment sessions. The synchronized lighting effects can be an exciting and engaging addition to your social gatherings.
- Continuously tweak and refine: As you enjoy your entertainment with the Philips Hue HDMI Sync Box, feel free to make adjustments to the settings as needed. Every viewing experience may be different, so don’t be afraid to experiment and customize accordingly.
- Sit back, relax, and enjoy: The Philips Hue HDMI Sync Box is designed to enhance your entertainment experience, so take the time to fully immerse yourself in the visuals, sounds, and lighting effects. Let yourself be transported into a whole new world of sensory delight.
By following these steps and embracing the immersive entertainment experience with the Philips Hue HDMI Sync Box, you can create a captivating and truly unforgettable viewing and listening experience.
Troubleshooting common issues with Philips Hue HDMI Sync Box
While setting up and using the Philips Hue HDMI Sync Box, you may encounter some common issues. Here are a few troubleshooting steps to help you resolve these problems:
- No response from Philips Hue HDMI Sync Box: If the Sync Box is not responding, ensure that it is powered on and connected to both your TV and the power outlet. Check the HDMI connections and make sure they are secure. Try unplugging and replugging the power adapter to reset the Sync Box.
- Sync Box not discovering HDMI devices: If the Sync Box is not detecting your HDMI devices, double-check the HDMI connections and ensure that the devices are powered on. Verify that the HDMI cables are securely plugged into both the Sync Box and the devices. Restart the Sync Box and try again.
- Unable to control lighting effects: If you are unable to control the lighting effects using the Philips Hue Sync app, make sure your mobile device or computer is connected to the same Wi-Fi network as your Philips Hue Bridge and the Sync Box. Restart the app and try again. If the issue persists, reset the Sync Box and reconnect it to the app.
- Unstable or choppy lighting effects: If the lighting effects are unstable or choppy, ensure that your Philips Hue Bridge and Sync Box are within range of each other, preferably in the same room. Check your Wi-Fi network strength and stability. If necessary, move the Sync Box closer to the Bridge or consider using a Wi-Fi extender to improve connectivity.
- Dissimilar colors or delayed sync: If the colors displayed on the synchronized lights are different from the content on the screen or if there is a noticeable delay in the synchronization, ensure that your lighting setup is properly calibrated using the Philips Hue Sync app. Adjust the settings for color calibration and synchronization delay to achieve the desired results.
- Incompatibility with certain HDMI devices: Some HDMI devices may have compatibility issues with the Philips Hue HDMI Sync Box. Check the list of supported devices provided by Philips or consult customer support for further assistance. Consider using different HDMI devices or firmware updates if available.
- Interference from other wireless devices: If you experience interference or signal dropouts, it may be due to other wireless devices operating on the same frequency. Move other devices away from the Sync Box and Philips Hue Bridge to reduce potential interference.
- Software or firmware updates: Ensure that your Philips Hue Sync app, Philips Hue Bridge, and Philips Hue HDMI Sync Box are all running on the latest software or firmware versions. Regularly check for updates and install them to ensure optimal performance and to access any new features or bug fixes.
- Contact customer support: If you have followed the troubleshooting steps and are still experiencing issues, don’t hesitate to reach out to Philips customer support. They can provide further guidance and assistance in resolving any persistent problems or technical difficulties you may encounter.
By troubleshooting these common issues with the Philips Hue HDMI Sync Box, you can overcome any obstacles and fully optimize your immersive entertainment experience.