
Why Set up Multiple Accounts?
Setting up multiple accounts on your Apple TV can offer a range of benefits and convenience, especially for households with multiple users. Here are the key reasons why you might consider creating separate accounts:
- Personalized Experience: Each member of your household can have their own account, allowing them to customize their Apple TV experience to their liking. From customized app layouts to personalized recommendations, having individual accounts ensures that everyone gets the most out of their Apple TV.
- Privacy: Having separate accounts adds a layer of privacy, preventing others from accessing your personal information, content, and preferences. This is especially important if you have children using the Apple TV, as you can restrict access to certain apps or content.
- Content Management: Multiple accounts make it easier to manage and organize content on your Apple TV. Each account can have its own library of shows, movies, and music, preventing mix-ups and allowing each user to maintain their own collection of media.
- Parental Controls: By setting up separate accounts, you can implement parental controls on specific accounts, ensuring that certain content is restricted based on age appropriateness. This feature gives parents peace of mind, knowing that their children are protected from accessing inappropriate material.
- Personal Preferences: Different users may have distinct preferences regarding language, subtitles, and accessibility features. With multiple accounts, each user can set their preferred settings, making their viewing experience more enjoyable and tailored to their needs.
- Separate Purchases: If multiple family members use the same Apple TV, having separate accounts allows each person to make their own purchases without interfering with others. This prevents accidental purchases and ensures that each user has control over their own spending.
By setting up multiple accounts on your Apple TV, you can ensure that each user has a personalized and secure experience. Whether it’s customizing settings, managing content, or maintaining privacy, separate accounts offer a host of benefits for every member of your household.
Step 1: Update Your Apple TV
Before you can set up multiple accounts on your Apple TV, it’s crucial to ensure that your device is running the latest software version. This step is essential as it ensures that you have access to all the necessary features and improvements for a smooth account setup process. Here’s how you can update your Apple TV:
- First, navigate to the home screen of your Apple TV by pressing the home button on your remote.
- From the home screen, scroll to the “Settings” icon and click on it using the touchpad on your Apple TV remote.
- In the “Settings” menu, select “System.”
- Within the “System” settings, choose “Software Updates.”
- If an update is available, you will see the option to “Update Software.” Click on it to begin the update process.
- Wait for the update to download and install onto your Apple TV. This may take a few minutes, depending on your internet connection speed.
- Once the update is complete, your Apple TV will restart, and you will be ready to proceed with setting up multiple accounts.
It’s crucial to keep your Apple TV updated regularly to ensure optimal performance, compatibility with new features, and enhanced security. By following these steps, you can easily update your Apple TV and be prepared to set up multiple accounts for a more personalized and enjoyable viewing experience.
Step 2: Sign Out of Your Apple ID
Before you can create and add new Apple IDs for multiple accounts on your Apple TV, you’ll need to sign out of your current Apple ID. Here’s how you can do it:
- Start by navigating to the home screen of your Apple TV by pressing the home button on your remote.
- Once on the home screen, scroll to the “Settings” icon and click on it using the touchpad on your Apple TV remote.
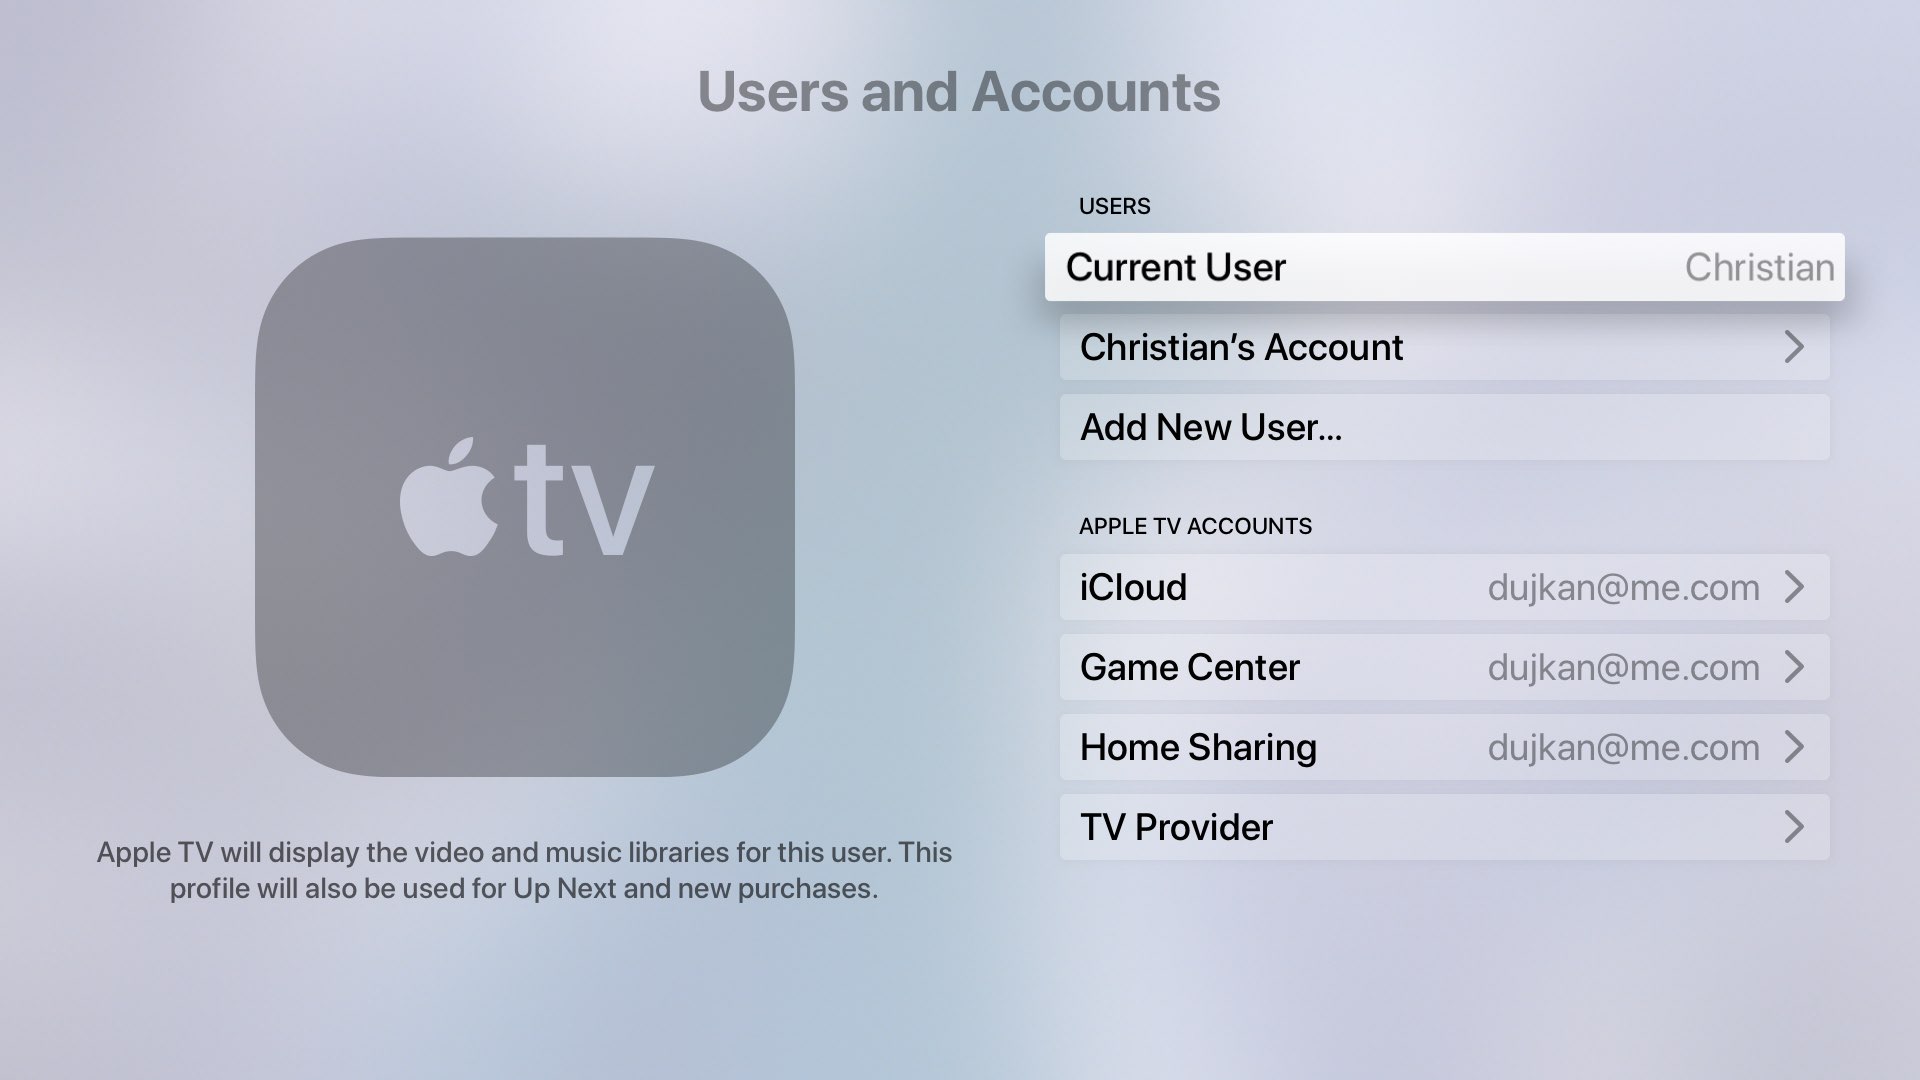
- In the “Settings” menu, select “Users and Accounts.”
- Within the “Users and Accounts” settings, choose your current Apple ID under the “Signed In” section.
- Select “Sign Out” and confirm your choice by clicking on “Sign Out” again when prompted.
- Wait for your Apple TV to sign out of your current Apple ID. This may take a few moments.
- Once you see the confirmation message that you have successfully signed out, you’re now ready to create and add new Apple IDs for additional accounts on your Apple TV.
Signing out of your current Apple ID is a necessary step to make way for new accounts. By following these steps, you can easily sign out of your existing Apple ID on your Apple TV and proceed with the setup of multiple accounts for a more personalized and tailored viewing experience.
Step 3: Create a New Apple ID
To set up multiple accounts on your Apple TV, you’ll need to create a new Apple ID for each additional user. Follow these steps to create a new Apple ID:
- Using a web browser, navigate to the Apple ID account creation page.
- Click on the “Create Your Apple ID” button to begin the process.
- Provide the necessary information, including your name, email address, password, and security questions.
- Agree to the terms and conditions and click on “Continue” to proceed.
- Verify your email address by following the instructions sent to the email associated with your new Apple ID.
- Once your email address is verified, your new Apple ID is ready to use.
Creating a new Apple ID enables each user to have their own account and personalized experience on the Apple TV. Each new Apple ID will be associated with a separate email address, allowing for individual customization and content management. By following these steps, you can easily create a new Apple ID and prepare to add it to your Apple TV.
Step 4: Add Your New Apple ID to Apple TV
After creating a new Apple ID for each additional user, the next step is to add these new accounts to your Apple TV. Follow these steps to add your new Apple ID to the Apple TV:
- Start by navigating to the home screen of your Apple TV by pressing the home button on your remote.
- From the home screen, scroll to the “Settings” icon and click on it using the touchpad on your Apple TV remote.
- In the “Settings” menu, select “Users and Accounts.”
- Within the “Users and Accounts” settings, choose “Add New User.”
- Enter the email address and password associated with the new Apple ID you created in the previous step.
- Follow the on-screen prompts to complete the sign-in process and set up the new user account on your Apple TV.
- Once signed in, you can customize the settings and preferences for the new user account, including language, accessibility features, and content restrictions (if applicable).
By adding your new Apple ID to your Apple TV, you’re granting access to the personalized experience and content associated with that account. This allows each user to have their own library of apps, media, and recommendations, tailored to their preferences. By following these steps, you can easily add your new Apple ID to your Apple TV and create a dedicated account for each user.
Step 5: Customize Your New Account
Once you’ve added your new Apple ID to your Apple TV, it’s time to customize the account settings to match your preferences. Here are the steps to customize your new account:
- Start by navigating to the home screen of your Apple TV by pressing the home button on your remote.
- From the home screen, scroll to the “Settings” icon and click on it using the touchpad on your Apple TV remote.
- In the “Settings” menu, select “Users and Accounts.”
- Within the “Users and Accounts” settings, choose the new user account you want to customize.
- Here, you can customize various settings, including language preferences, accessibility options, and restrictions.
- Adjust the language preference to your desired language by selecting the appropriate option from the available list.
- Choose the accessibility options that best suit your needs, such as closed captions, audio descriptions, or increased text size.
- If desired, enable parental controls and set up content restrictions to ensure a safe viewing experience for children.
- Customize other account settings as desired, such as screen savers, app layout, and more, to make your new account truly personalized.
By customizing your new account, you can enhance your viewing experience and tailor it according to your preferences. From choosing your preferred language to adjusting accessibility options and implementing parental controls, these customizations ensure a personalized and enjoyable experience on your Apple TV. Follow these steps to customize your new account settings and make the most out of your multiple Apple ID setup.
Step 6: Repeat for Additional Accounts
If you have more than one additional user that you want to set up on your Apple TV, you can repeat the process of creating new Apple IDs and adding them to your device. Follow these steps to set up multiple accounts:
- Create a new Apple ID for each additional user by following the steps outlined in the previous section.
- Once you have created the new Apple ID, navigate to the home screen of your Apple TV.
- Access the “Settings” menu and select “Users and Accounts.”
- Choose “Add New User” to add another account to your Apple TV.
- Enter the email address and password associated with the new Apple ID and follow the on-screen prompts to complete the setup.
- Repeat this process for each additional user account you want to create.
- Customize the settings for each new account based on the preferences of the respective user, as outlined in the previous section.
- Ensure that each user signs in to their respective account when using the Apple TV to access their personalized content and settings.
By repeating this process for additional accounts, you can create a personalized experience for each user in your household. Each member will have their own account with customized settings, content libraries, and preferences. This allows everyone to enjoy a tailored and optimized viewing experience on the Apple TV.
Step 7: Switch Between Accounts
Once you have set up multiple accounts on your Apple TV, it’s essential to learn how to switch between them seamlessly. Here’s how you can switch between accounts on your Apple TV:
- Start by navigating to the home screen of your Apple TV by pressing the home button on your remote.
- From the home screen, scroll to the top and select the “Users” icon, which looks like a silhouette of a person.
- You will see a list of all the user accounts that you have set up on your Apple TV.
- Use the touchpad on your Apple TV remote to select the account you want to switch to.
- Enter the password for the selected account if prompted.
- Your Apple TV will switch to the selected account, and the interface will update to reflect the personalized settings and content associated with that account.
- To switch to another account, repeat steps 3 to 6.
- You can switch between accounts at any time, allowing each user to access their personalized experience on the Apple TV.
By knowing how to switch between accounts, you can easily navigate between user profiles on your Apple TV. This flexibility ensures that each member of your household can enjoy their own customized content, settings, and recommendations. Follow these steps to seamlessly switch between accounts and make the most out of your multiple Apple ID setup on the Apple TV.