
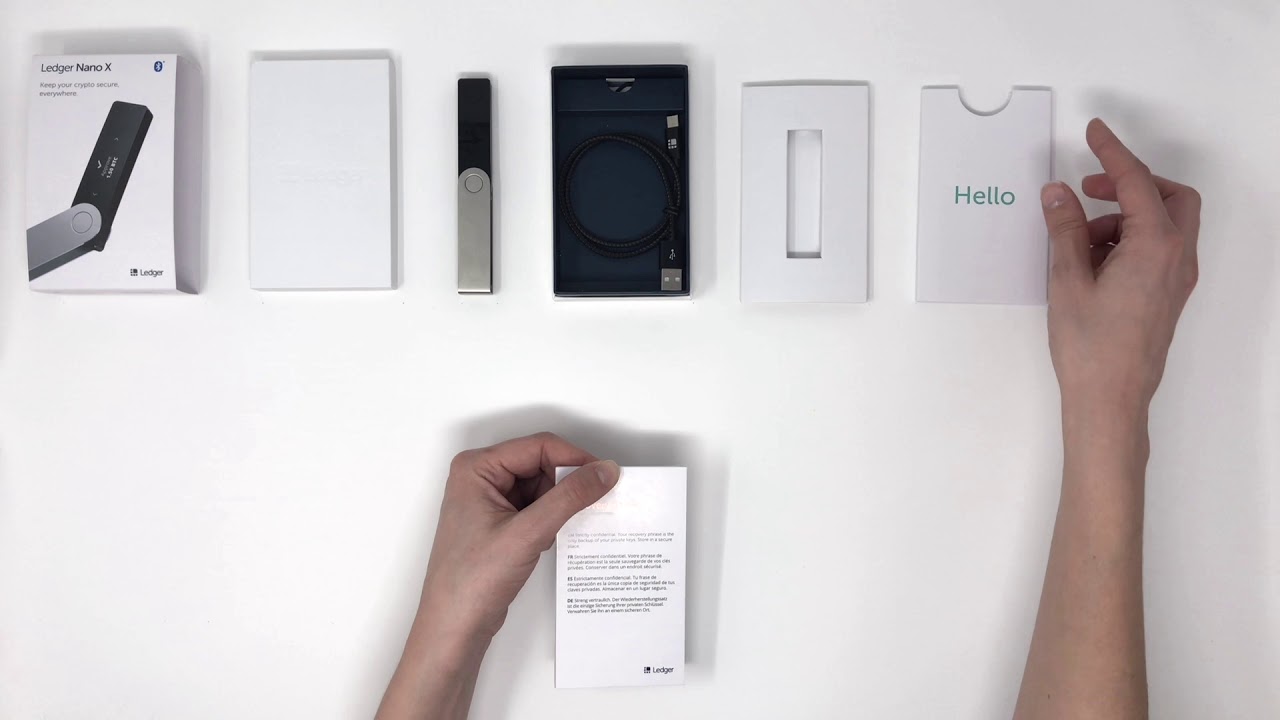
Unboxing the Ledger Nano X
When you receive your brand new Ledger Nano X, unboxing it can be an exciting experience. The careful packaging and the sleek design of the device are the first indicators of the quality and attention to detail that Ledger is known for.
Upon opening the package, you will find the Ledger Nano X securely enclosed in a protective plastic case. Take a moment to appreciate the compact and elegant design of the device. Its smooth metal surface and crisp OLED screen give it a modern and sophisticated feel.
Inside the box, you will find a USB-C cable for charging and connecting to your computer or mobile device. There will also be a set of recovery sheets, used to write down the recovery phrase that will enable you to recover your wallet in case of loss or damage to the device.
Before proceeding, make sure to inspect the Ledger Nano X for any physical defects or damage. While rare, it is always better to be safe than sorry.
Once you’ve ensured that everything is in order, it’s time to move on to the next steps in the setup process. The first of these steps is charging the Ledger Nano X to ensure it has enough power to complete the setup and installation process.
Remember, the Ledger Nano X is designed to be a secure hardware wallet that keeps your cryptocurrencies safe offline. It is crucial to keep it in a secure location and never share your PIN code or recovery phrase with anyone.
Charging the Ledger Nano X
Before you can start using your Ledger Nano X, you need to make sure it’s fully charged. This will ensure that you have enough battery power to complete the setup process and use the device without interruptions.
To charge the Ledger Nano X, connect one end of the USB-C cable to the device and the other end to a USB port on your computer or a USB charger. The device will automatically start charging once connected.
While the Ledger Nano X is charging, you will see a battery icon on the device’s screen indicating the progress. It’s recommended to let it charge for at least an hour, but you can leave it connected for longer to ensure a full charge.
During the charging process, you can use this time to familiarize yourself with the Ledger Nano X and read the user guide or other educational materials provided. This will help you get a better understanding of the features and capabilities of the device.
It’s important to note that the Ledger Nano X has a built-in battery that can last for several weeks on a single charge, depending on usage. Therefore, regular charging is not required for day-to-day use. However, it’s a good practice to periodically charge the device to ensure its battery is sufficiently powered.
Once the Ledger Nano X is fully charged, you can safely disconnect it from the USB cable and proceed with the installation and setup process. Remember to keep your Ledger Nano X in a secure location when not in use and avoid exposing it to extreme temperatures or moisture.
Now that your Ledger Nano X is charged and ready to go, let’s move on to the next step: installing the Ledger Live app.
Installing the Ledger Live app
The Ledger Live app is the official companion software for managing your Ledger Nano X. It allows you to securely manage and track your cryptocurrency assets, update the firmware of your device, and install and uninstall apps.
To install the Ledger Live app, visit the official Ledger website and navigate to the “Downloads” section. Choose the version of the app that is compatible with your operating system, whether it’s Windows, macOS, or Linux.
Once you’ve downloaded the Ledger Live app installer, run the setup file and follow the on-screen instructions to install it on your computer. Make sure to read and accept the terms and conditions before proceeding.
After the installation is complete, launch the Ledger Live app. You will be prompted to choose your device. Connect your Ledger Nano X to your computer using the USB-C cable, and the app will automatically detect it.
Next, you will need to set up your Ledger Live account. Create a new account and follow the on-screen instructions to choose a strong password. Remember to save this password in a secure place as it will be required to access your account and perform transactions.
Once your account is set up, you will be presented with the main dashboard of the Ledger Live app. From here, you can manage your cryptocurrencies, view balances, send and receive funds, and perform other related tasks.
It’s important to note that the Ledger Live app is regularly updated with bug fixes and security enhancements. To ensure you have the latest version of the app, it’s recommended to regularly check for updates and install them when available.
With the Ledger Live app successfully installed and your Ledger Nano X connected, you are now ready to proceed with the setup process and start using your hardware wallet securely.
Setting up the Ledger Nano X
Now that you have installed the Ledger Live app and have your Ledger Nano X connected to your computer, it’s time to set up your device for use. This involves initializing the device, creating a new wallet, and setting up a PIN code for added security.
Launch the Ledger Live app on your computer and make sure your Ledger Nano X is connected. On the app’s dashboard, click on the “Get Started” button to begin the setup process.
You will be prompted to choose whether you want to set up a new device or restore a device using a recovery phrase. Since we are setting up a new device, select the “Initialize as new device” option.
Next, the Ledger Live app will guide you through a series of steps to initialize your Ledger Nano X. Follow the on-screen instructions carefully, making sure to read each step before proceeding.
During this process, you will be asked to set a PIN code for your device. Choose a unique PIN code that is easy for you to remember but difficult for others to guess. Avoid using commonly used PIN codes or easily guessable combinations.
After setting up the PIN code, the app will generate a 24-word recovery phrase. This phrase is crucial for recovering your wallet in case your device is lost, damaged, or stolen. Write down the recovery phrase on the provided recovery sheets, in the exact order given by the app.
Once you have written down the recovery phrase, the app will ask you to confirm it by selecting the words in the same order as they appear on the recovery sheet. This step ensures that you have accurately recorded the recovery phrase.
Take extra precautions to store the recovery phrase securely. Keep it in a safe place, protected from fire, water, and unauthorized access. It is recommended to make multiple copies and store them in separate secure locations.
After confirming the recovery phrase, the setup process is almost complete. The Ledger Live app will guide you through a final set of instructions to verify the firmware on your Ledger Nano X and set up additional security features, such as a passphrase if desired.
Once the setup process is finished, congratulations! Your Ledger Nano X is now ready to safely store your cryptocurrencies and perform secure transactions. Take a moment to explore the features and functions of the device and get familiar with its interface.
Remember to regularly update the Ledger Live app and Ledger Nano X firmware to ensure you have the latest security enhancements. Keeping your device and software up to date is essential for maintaining the highest level of protection for your digital assets.
Creating a new wallet on the Ledger Live app
Now that your Ledger Nano X is set up, it’s time to create a new wallet on the Ledger Live app. This will allow you to manage and track your cryptocurrency assets directly from your computer.
Launch the Ledger Live app and make sure your Ledger Nano X is connected to your computer. On the app’s dashboard, click on the “Add Account” button to begin creating a new wallet.
You will be presented with a list of supported cryptocurrencies. Choose the cryptocurrency you wish to create a wallet for and click on it.
Next, you will need to choose the account type. Depending on the cryptocurrency, you may have options such as “Native SegWit” or “Legacy”. It is recommended to choose the account type that best suits your needs and is compatible with the transactions you plan to make.
After selecting the account type, the Ledger Live app will generate a new wallet address for the chosen cryptocurrency. This address serves as your unique identifier on the blockchain for that specific cryptocurrency.
Take note of the wallet address or copy it to your clipboard. You can share this address with others to receive funds or use it to verify transactions.
Once the wallet is created, it will appear in your Ledger Live app dashboard, along with the balance and transaction history for that particular cryptocurrency.
You can repeat this process to create wallets for other supported cryptocurrencies. Each wallet will have its unique wallet address and can be managed separately within the Ledger Live app.
It’s important to keep in mind that the Ledger Live app only acts as an interface to interact with your Ledger Nano X. The actual cryptocurrencies are stored securely on the device itself, ensuring the highest level of protection against hacking and theft.
By creating a new wallet on the Ledger Live app, you can conveniently manage and monitor your cryptocurrency assets, view transaction history, and easily send and receive funds from the comfort of your computer.
Remember to keep your Ledger Nano X and recovery phrase safe and secure. Regularly update the Ledger Live app and your device’s firmware to benefit from the latest features and security enhancements.
Setting a PIN code
One of the key security features of the Ledger Nano X is the ability to set a PIN code. This PIN code acts as the first line of defense against unauthorized access to your device and your cryptocurrency funds.
To set a PIN code, ensure that your Ledger Nano X is connected to your computer and open the Ledger Live app.
On the app’s dashboard, select your connected Ledger Nano X device. Then, navigate to the “Settings” section, where you will find the option to set the PIN code.
Click on the “Change PIN” button to initiate the PIN code setup process. Follow the on-screen instructions to choose a PIN code that meets the device’s requirements.
It is important to choose a PIN code that is unique and not easily guessable. Avoid using common PIN codes such as “1234” or sequences like “123456”. Opt for a combination of numbers that is meaningful to you but challenging for others to guess.
Throughout the process, you will be prompted to enter your PIN code multiple times to confirm it. This is to ensure that you have properly set and entered the desired PIN code without errors.
Remember, your PIN code should be kept confidential and not shared with anyone. It acts as the first layer of protection for your Ledger Nano X and is an essential component of securing your cryptocurrency funds.
If you ever forget your PIN code, don’t panic; the Ledger Nano X has a built-in security mechanism. After three incorrect PIN code attempts, the device will incrementally increase the waiting time between each subsequent attempt. This prevents brute-force attacks. After a certain number of incorrect attempts, the device will reset itself, erasing all data. This is why it’s crucial to ensure you remember your PIN code or have access to your recovery phrase.
By setting a PIN code for your Ledger Nano X, you add an additional layer of protection to your device and your cryptocurrency holdings. This, combined with other security measures such as a strong password, ensures that your digital assets remain secure.
Remember to periodically review and update your PIN code to maintain the highest level of security for your Ledger Nano X.
Recording the recovery phrase
The recovery phrase is a vital component of securing your cryptocurrency funds on the Ledger Nano X. It serves as a backup in case your device is lost, damaged, or stolen. Recording the recovery phrase correctly is crucial for ensuring the safety and accessibility of your digital assets.
After setting up your Ledger Nano X and choosing a PIN code, the Ledger Live app will guide you through the process of generating a 24-word recovery phrase. This phrase is a randomly generated sequence of words that acts as a master key to your wallet.
It’s important to ensure the privacy and security of this recovery phrase. Make sure you are in a private and distraction-free environment when recording it.
Using the provided recovery sheets that came with your Ledger Nano X, write down each word of the recovery phrase in the exact order displayed on the device’s screen. Take your time and double-check each word to ensure accuracy.
Copying the recovery phrase digitally or taking a screenshot on your computer may compromise its security. It’s highly recommended to use the provided recovery sheets and avoid storing it electronically.
After writing down the recovery phrase, keep the recovery sheets in a safe and secure location. Consider using a fireproof and waterproof container or a secure bank vault. It’s wise to store multiple copies of the recovery phrase in separate locations for added redundancy.
It is crucial to emphasize that the recovery phrase should never be shared with anyone. It should only be known to you and kept confidential. Sharing your recovery phrase with others puts your funds at risk of theft or unauthorized access.
Additionally, be cautious of online services or individuals claiming to offer recovery phrase backup services. It is best to rely solely on your own record-keeping and not entrust your recovery phrase to third parties.
If you ever need to restore your wallet on a new device or recover your funds, you will be prompted to enter the recovery phrase in the exact order it was recorded. This is why accurately recording and securely storing the recovery phrase is of utmost importance.
By responsibly and securely recording the recovery phrase, you maintain control over your cryptocurrency funds and ensure the ability to restore and access your wallet in case of unforeseen circumstances.
Take the time to safeguard your recovery phrase, knowing that it is the key to protecting and preserving your digital wealth.
Verifying the recovery phrase
After recording the 24-word recovery phrase for your Ledger Nano X, it is essential to verify its accuracy. Verifying the recovery phrase ensures that you have correctly recorded each word in the exact order, helping to avoid any potential issues when restoring your wallet.
To verify the recovery phrase, the Ledger Live app will prompt you to enter each word in the order it was shown on the device’s screen during the initial setup process. Take your time and carefully input each word.
As you enter each word, the Ledger Live app will automatically compare it to the original recovery phrase stored on your Ledger Nano X. If you have entered a word incorrectly or out of order, the app will prompt you to correct it.
It’s essential to be meticulous during the verification process. Double-check your spelling and ensure that the words are in the correct order. Any mistakes in recording or verifying the recovery phrase may result in the inability to access your wallet and recover your funds.
If you encounter an error during the verification process, you should repeat the verification from the beginning. This ensures that the recovery phrase is accurately recorded and provides you with peace of mind that your funds are securely stored.
Verifying the recovery phrase is a critical step in the setup process of your Ledger Nano X. It confirms that you have a complete and accurate record of the recovery phrase, enabling you to restore your wallet successfully in case of device loss, damage, or theft.
Remember to keep your recovery phrase secure and confidential, as it acts as a master key to your wallet. Store it in a safe place, away from prying eyes and potential hazards.
Regularly check the condition of your recovery phrase and make backup copies if necessary. It’s important to have redundant copies stored in separate secure locations. By taking these precautions, you ensure the safety and accessibility of your digital assets.
With the verification of your recovery phrase complete, you can have confidence in the integrity of your recorded information. Your Ledger Nano X is now prepared for any unforeseen circumstances, giving you peace of mind as you continue to manage and secure your cryptocurrency holdings.
Securing your Ledger Nano X with a passphrase
In addition to the built-in security features of the Ledger Nano X, you have the option to further enhance the protection of your wallet by utilizing a passphrase. This feature adds an extra layer of security by requiring an additional code to access your funds.
A passphrase is an additional word or series of words that you can add to your recovery phrase. It acts as a second-factor authentication, making it even more challenging for unauthorized users to gain access to your wallet.
To set up a passphrase, open the Ledger Live app on your computer and ensure your Ledger Nano X is connected. Navigate to the “Settings” section and click on the “Security” tab.
Within the Security settings, you will find the option to enable or disable the passphrase feature. When enabling the feature, you will be prompted to create a unique passphrase.
When creating a passphrase, it is crucial to choose a strong and memorable combination of words or characters. Avoid using common phrases or easily guessable information. A strong passphrase should include a mix of uppercase and lowercase letters, numbers, and special characters.
Once you have set up a passphrase, you will need to enter it every time you access your Ledger Nano X. The device will prompt you to enter the passphrase on its screen, adding an additional layer of protection to your cryptocurrency funds.
It is important to note that the passphrase is not stored on the Ledger Nano X or in the Ledger Live app. It is solely in your possession. Therefore, it is critical to remember your passphrase and keep it in a secure location.
Be cautious when entering the passphrase, as any errors in entering it may result in the inability to access your funds. Take your time and double-check each character as you enter the passphrase to ensure accuracy.
By utilizing a passphrase, you significantly enhance the security of your Ledger Nano X and protect your digital assets from unauthorized access. It adds an extra layer of protection that can deter potential attackers and ensures the safety of your funds.
Remember to keep your passphrase confidential and never share it with anyone. Additionally, consider using a different passphrase for each wallet or cryptocurrency you hold, further enhancing the security of your diverse assets.
With the passphrase feature enabled, you can confidently use your Ledger Nano X, knowing that your cryptocurrencies are protected by multiple layers of security.
Adding accounts to your Ledger Nano X
With your Ledger Nano X set up and secured, it’s time to start adding accounts for different cryptocurrencies to your device. Each account represents a separate wallet and allows you to manage and transact with specific cryptocurrencies.
To add an account to your Ledger Nano X, ensure that it is connected to your computer and open the Ledger Live app.
In the Ledger Live app dashboard, click on the “Add Account” button. You will be presented with a list of supported cryptocurrencies. Choose the cryptocurrency for which you want to add an account.
Next, you will need to select the account type. Depending on the cryptocurrency, you may have options such as “Native SegWit” or “Legacy”. The account type determines the format of your wallet address and the compatibility with certain features and transactions.
After selecting the account type, the Ledger Live app will generate a new wallet address for the chosen cryptocurrency. This address will be associated with the account on your Ledger Nano X.
Make a note of the new wallet address or copy it to your clipboard. You can share this address to receive funds or use it to verify transactions on the blockchain.
Repeat this process to add accounts for other supported cryptocurrencies. Each account will have its unique wallet address, allowing you to manage different cryptocurrencies within a single device.
It’s worth noting that although you can have multiple accounts on your Ledger Nano X, the device’s storage capacity is limited. You can install and uninstall different apps to manage various cryptocurrencies within the available storage space.
By adding accounts to your Ledger Nano X, you centralize the management of your cryptocurrency holdings and reduce the need for multiple wallets or applications. This streamlines your user experience and ensures the security of your digital assets in one device.
Remember to regularly update the Ledger Live app and the firmware on your Ledger Nano X to benefit from the latest security enhancements and features.
With accounts added to your Ledger Nano X, you are now ready to send, receive, and manage multiple cryptocurrencies securely within a single hardware wallet.
Sending and receiving cryptocurrencies with the Ledger Nano X
The Ledger Nano X provides a secure and convenient way to send and receive cryptocurrencies. With its built-in features and compatibility with various blockchain networks, you can confidently transact with your digital assets knowing they are well protected.
To send cryptocurrencies using your Ledger Nano X, open the Ledger Live app on your computer and ensure your device is connected.
In the app’s dashboard, select the account for the specific cryptocurrency you want to send. Click on the “Send” button to initiate the transaction.
Enter the recipient’s wallet address in the designated field. This address is unique to the recipient and should be obtained from them directly or through a secure channel. Double-check the address for accuracy to avoid sending funds to the wrong destination.
Specify the amount of cryptocurrency you want to send. It’s important to note that some cryptocurrencies have minimum transaction amounts and may require additional network fees. Be aware of the current transaction fees and adjust accordingly.
Review the transaction details, including the amount, recipient’s address, and transaction fee, and confirm the transaction on your Ledger Nano X. Follow the prompts on the device’s screen to authorize the transaction.
Once confirmed, the Ledger Nano X will sign the transaction using its private key, ensuring that only you, as the rightful owner of the cryptocurrencies, can authorize the transfer. The transaction will then be broadcasted to the blockchain network for verification and inclusion in the relevant block.
To receive cryptocurrencies using your Ledger Nano X, you need to provide the sender with your wallet address. Open the Ledger Live app, select the specific account for the respective cryptocurrency, and click on the “Receive” button.
Your wallet address will be displayed on the screen, and you can copy it or provide it directly to the sender. The sender can then use this address to initiate a transaction and send the cryptocurrencies to your Ledger Nano X.
It’s important to keep your wallet address secure and only share it with trusted individuals or entities. Sharing your address publicly can lead to unwanted attention and potential phishing attempts.
Remember, the Ledger Nano X stores your private keys offline, adding an extra layer of security to your transactions. Your confidential information never leaves the device, protecting you from online threats and reducing the risk of unauthorized access to your funds.
Regularly check for firmware updates and keep your Ledger Live app up to date to benefit from the latest security enhancements and features.
With the ability to send and receive cryptocurrencies securely, the Ledger Nano X gives you full control over your digital assets, ensuring safe and reliable transactions.
Managing apps on the Ledger Nano X
One of the key features of the Ledger Nano X is its ability to support various cryptocurrencies through dedicated apps. These apps allow you to manage and transact with different digital assets directly from your device. It’s important to understand how to effectively manage these apps to ensure optimal functionality and security.
To manage apps on your Ledger Nano X, open the Ledger Live app on your computer and ensure your device is connected.
In the app’s dashboard, click on the “Manager” tab. You will see a list of available apps that you can install on your Ledger Nano X. These apps represent the different cryptocurrencies and blockchain networks that the device supports.
To install a new app, click on the “Install” button next to the desired app. Follow the prompts on the Ledger Live app and the Ledger Nano X screen to complete the installation process. This typically involves confirming the installation on your device and waiting for the app to be installed.
It’s important to note that due to the limited storage capacity of the Ledger Nano X, you may need to delete certain apps to make space for new ones. However, deleting an app does not remove your account or cryptocurrency holdings associated with that app. Your funds are securely stored on the blockchain, independent of the app installed on your device.
If you wish to uninstall an app from your Ledger Nano X, go to the “Manager” tab in the Ledger Live app. Locate the app you want to remove and click on the “Uninstall” button next to it. Follow the on-screen instructions to complete the uninstallation process.
It’s a good practice to periodically review and update the apps on your Ledger Nano X. Check for app updates in the “Manager” tab of the Ledger Live app and install them when available. These updates often include bug fixes and security enhancements to ensure optimal performance and protection.
When managing apps on your Ledger Nano X, it’s crucial to only download apps from trusted sources. The official Ledger Live app provides a secure environment for managing your apps and ensures that you are installing legitimate and verified apps for your device.
Lastly, be cautious of phishing attempts or unauthorized app downloads. Always double-check the app’s name and source before installing it on your device.
By effectively managing the apps on your Ledger Nano X, you can securely manage and transact with different cryptocurrencies, ensuring the optimal functionality and security of your digital assets.
Updating the firmware on the Ledger Nano X
Keeping your Ledger Nano X firmware up to date is crucial for maintaining the highest level of security and accessing the latest features and improvements offered by Ledger. Firmware updates provide bug fixes, performance enhancements, and security patches to protect your cryptocurrency holdings from potential vulnerabilities.
To update the firmware on your Ledger Nano X, follow these steps:
1. Connect your Ledger Nano X to your computer using the USB-C cable.
2. Open the Ledger Live app on your computer and ensure your device is connected.
3. If there is a firmware update available for your device, a notification will appear in the Ledger Live app. Click on the notification or navigate to the “Manager” tab to see the available updates.
4. Click on the “Update” button next to the firmware update. Read the release notes and instructions carefully before proceeding.
5. The Ledger Live app will guide you through the update process. Follow the prompts on the app and the Ledger Nano X screen to complete the firmware update. Ensure that your device remains connected throughout the update process.
6. During the update, the Ledger Nano X may display messages such as “Bootloader” or “Update”. Do not unplug your device or close the Ledger Live app during this process, as it may interrupt the firmware update and potentially damage your device.
7. Once the firmware update is complete, the Ledger Live app will confirm the successful update and provide any additional steps or actions if required.
It’s important to note that updating the firmware on your Ledger Nano X may take several minutes. Patience is key during this process, and it’s crucial to resist the urge to disconnect the device prematurely.
Regularly checking for firmware updates and keeping your Ledger Nano X up to date ensures that you have the latest security enhancements, bug fixes, and features available. These updates fortify the protection of your cryptocurrency holdings and help you stay ahead of potential vulnerabilities.
It’s worth mentioning that Ledger takes security seriously and thoroughly reviews the firmware updates. However, it’s always a good practice to verify the authenticity of any firmware updates by visiting the official Ledger website and using the official Ledger Live app.
By regularly updating the firmware on your Ledger Nano X, you maintain a strong defense against potential threats and ensure the continued security and functionality of your hardware wallet.
Enabling or disabling features on the Ledger Nano X
The Ledger Nano X offers various features that allow you to customize and enhance your device’s functionality based on your specific needs. These features can be enabled or disabled depending on your preferences and requirements. Understanding how to manage these features is crucial for optimizing your experience with the Ledger Nano X.
To enable or disable features on your Ledger Nano X, follow these steps:
1. Connect your Ledger Nano X to your computer using the USB-C cable.
2. Open the Ledger Live app on your computer and ensure your device is connected.
3. In the app’s dashboard, click on the “Settings” tab to access the device settings.
4. Within the settings, you will find various options and features that can be enabled or disabled.
5. To enable a feature, simply toggle the switch next to the desired feature to the “On” position.
6. To disable a feature, toggle the switch next to the feature to the “Off” position.
Some of the common features that can be enabled or disabled on the Ledger Nano X include:
- Passphrase: This feature allows you to set and enable a passphrase for an additional layer of security. You can choose to enable or disable this feature based on your security preferences.
- Display contrast: You can adjust the display contrast of your Ledger Nano X to optimize the visibility of the screen. Make sure the display contrast is set to a level that suits your viewing environment.
- Auto-lock: The auto-lock feature automatically locks your Ledger Nano X after a certain period of inactivity. This helps prevent unauthorized access when the device is left unattended. You can choose to enable or disable this feature, depending on your convenience.
- Developer mode: Enabling developer mode allows you to test and use experimental features on your Ledger Nano X. This is primarily intended for advanced users and developers who want to explore additional functionalities beyond the standard features. Use this feature with caution and be aware of the potential risks involved.
It’s important to review and understand the implications of enabling or disabling any features on your Ledger Nano X. Consider the potential impact on your device’s security, usability, and compatibility with third-party applications or services.
Regularly check the Ledger Live app and Ledger website for any firmware updates or feature enhancements. This ensures that you have the latest versions and options available for your Ledger Nano X.
By enabling or disabling features on your Ledger Nano X, you can customize the device to suit your preferences and optimize its functionality based on your security requirements and usage patterns.
Troubleshooting common issues with the Ledger Nano X
Although the Ledger Nano X is designed to be a reliable and secure hardware wallet, there may be instances when you encounter certain issues or challenges. Understanding how to troubleshoot common issues can help you quickly resolve any problems and ensure smooth operation of your Ledger Nano X.
Here are some common issues you may encounter with the Ledger Nano X and their possible solutions:
1. Connectivity issues: If your Ledger Nano X is not connecting to the computer or the Ledger Live app, try the following:
- Make sure the USB cable is securely plugged into both your computer and the device.
- Try using a different USB cable or port to rule out any connection problems.
- Ensure that the Ledger Live app is up to date and compatible with your operating system.
- Restart your computer and try reconnecting the device.
2. Firmware update failures: If you encounter issues while updating the firmware on your Ledger Nano X, consider the following:
- Ensure that your device has sufficient battery power or is connected to a power source during the update.
- Ensure a stable and uninterrupted internet connection to prevent update interruptions.
- Make sure you are using the official Ledger Live app and that it is up to date.
- Try using a different USB cable or port to rule out any connection-related issues.
3. App installation or removal problems: If you’re facing difficulties installing or removing apps on your Ledger Nano X, try the following:
- Ensure that your device’s storage capacity is not full. Delete unnecessary apps to free up space.
- Make sure you have a stable internet connection during the app installation or removal process.
- Ensure that you are using the latest version of the Ledger Live app.
- Restart your computer and try again.
4. Forgotten or lost PIN code: If you cannot remember your PIN code, follow these steps:
- The device will allow a certain number of unsuccessful attempts before resetting itself. Refer to the Ledger documentation for the number of permissible attempts for your particular device.
- If you exceed the maximum number of attempts, your device will reset, and you will need to restore it using your recovery phrase.
- Ensure you have your recovery phrase available and follow the instructions to restore your wallet.
If you encounter any other issues or problems with your Ledger Nano X, refer to the official Ledger support resources, including their website, support articles, and community forums. The Ledger support team is also available to assist you with any specific concerns you may have.
Remember to exercise caution and take necessary steps to ensure the security of your device, including keeping your recovery phrase safe and updated, and verifying the authenticity of any updates or apps you install.
By familiarizing yourself with the common troubleshooting steps and resources, you can quickly address any issues that may arise with your Ledger Nano X and continue securely managing your cryptocurrency holdings.
Additional security tips and best practices
While the Ledger Nano X provides excellent security for your cryptocurrency assets, it’s important to follow additional security tips and best practices to further safeguard your funds. By implementing these measures, you can enhance the overall security of your hardware wallet and protect yourself from potential risks.
1. Keep your firmware and apps updated: Regularly check for firmware updates and install them as soon as they become available. Updates often include bug fixes, security patches, and new features. Additionally, keep your Ledger Live app and any installed apps up to date to benefit from the latest enhancements.
2. Use strong and unique passwords: When setting passwords for your Ledger Live app or other related accounts, make sure to use strong and unique passwords. Avoid using easily guessable information and consider using a password manager to securely store your passwords.
3. Enable two-factor authentication (2FA): Activate 2FA whenever possible on your Ledger Live app or any platforms you use to manage your cryptocurrencies. Two-factor authentication adds an extra layer of security by requiring a second verification step, usually through a separate device or app.
4. Beware of phishing attempts: Stay vigilant and be cautious of phishing attempts. Do not click on suspicious links or download software from unverified sources. Legitimate communications from Ledger or the Ledger Live app will never ask for your recovery phrase, PIN code, or other sensitive information.
5. Secure your recovery phrase: Keep your recovery phrase offline and safely stored in multiple secure locations. Use waterproof and fireproof storage options and avoid storing it digitally or in cloud-based services. Only share your recovery phrase in emergency or recovery situations.
6. Use a dedicated computer or device: Consider using a dedicated computer or device for cryptocurrency-related activities. This reduces the risk of malware or keyloggers compromising your security. Avoid conducting cryptocurrency transactions on public or unsecured networks.
7. Be cautious of public Wi-Fi networks: Public Wi-Fi networks may not be secure, exposing you to potential risks. Avoid making cryptocurrency transactions or accessing sensitive information when connected to public Wi-Fi. Use a trusted and secure network connection for your Ledger Nano X activities.
8. Maintain physical security: Keep your Ledger Nano X device in a safe and secure location when not in use. Avoid leaving it unattended or in easily accessible places. Protect your device from physical damage, extreme temperatures, and potential theft.
9. Be mindful of third-party apps and services: Only use well-established and trusted third-party apps and services with your Ledger Nano X. Be cautious of unknown or unverified applications that may attempt to access your wallet or compromise your security.
10. Stay informed and educate yourself: Stay updated on the latest security practices and cryptocurrency-related news. Educate yourself about potential risks and how to mitigate them. Follow credible sources such as Ledger’s official website, blog, and community forums for reliable information.
Remember, maintaining the highest level of security for your Ledger Nano X is a shared responsibility. By following these additional security tips and best practices, you can further safeguard your cryptocurrency assets and have peace of mind knowing that your funds are protected.