
Compatibility Requirements
Before setting up the HTC Vive Pro Wireless Adapter, it is crucial to ensure that your system meets the necessary compatibility requirements. This will ensure smooth and reliable performance of the wireless adapter for an immersive virtual reality experience. Here are the key compatibility requirements to consider:
- Hardware Requirements: The HTC Vive Pro Wireless Adapter is designed to work with the HTC Vive Pro headset. Therefore, you will need to have a compatible Vive Pro headset to use the wireless adapter. Additionally, your system should have an available PCIe slot for installing the wireless adapter’s PCIe card.
- Operating System: The HTC Vive Pro Wireless Adapter is compatible with Windows operating systems. Make sure your computer is running on Windows 10 (64-bit) or later for optimal performance.
- Processor and RAM: To ensure smooth functioning of the wireless adapter, it is recommended to have a powerful processor and an adequate amount of RAM. A quad-core Intel Core i5 processor or higher, along with 8GB or more of RAM, is recommended.
- Graphics Card: A capable graphics card is essential for delivering a high-quality VR experience. Check that your system has a compatible graphics card, such as an Nvidia GeForce GTX 1060 or AMD Radeon RX 480 (or higher).
- Power Supply: The wireless adapter requires sufficient power to function properly. Ensure that your computer’s power supply can provide enough wattage to support the wireless adapter and other components.
- Internet Connection: While not a direct compatibility requirement, an internet connection is necessary for downloading and installing the Vive Wireless software, as well as for any software updates.
By meeting these compatibility requirements, you can ensure a seamless installation and optimal performance of the HTC Vive Pro Wireless Adapter. It is important to carefully consider these requirements before proceeding with the setup process to avoid any potential compatibility issues and to fully enjoy the freedom of wireless VR.
Unboxing the HTC Vive Pro Wireless Adapter
Excitement builds as you unbox the HTC Vive Pro Wireless Adapter, knowing that you are one step closer to a truly immersive and untethered virtual reality experience. The unboxing process is straightforward, and within minutes you’ll have the components in your hands ready for installation. Here’s what to expect:
1. Start by carefully opening the box, ensuring that you don’t accidentally damage any of the contents. Inside, you will find the following:
- The HTC Vive Pro Wireless Adapter unit
- A PCIe card for installation
- An antenna
- A linkbox for connecting the wireless adapter
- Power cables and adapters
- Instructions and documentation
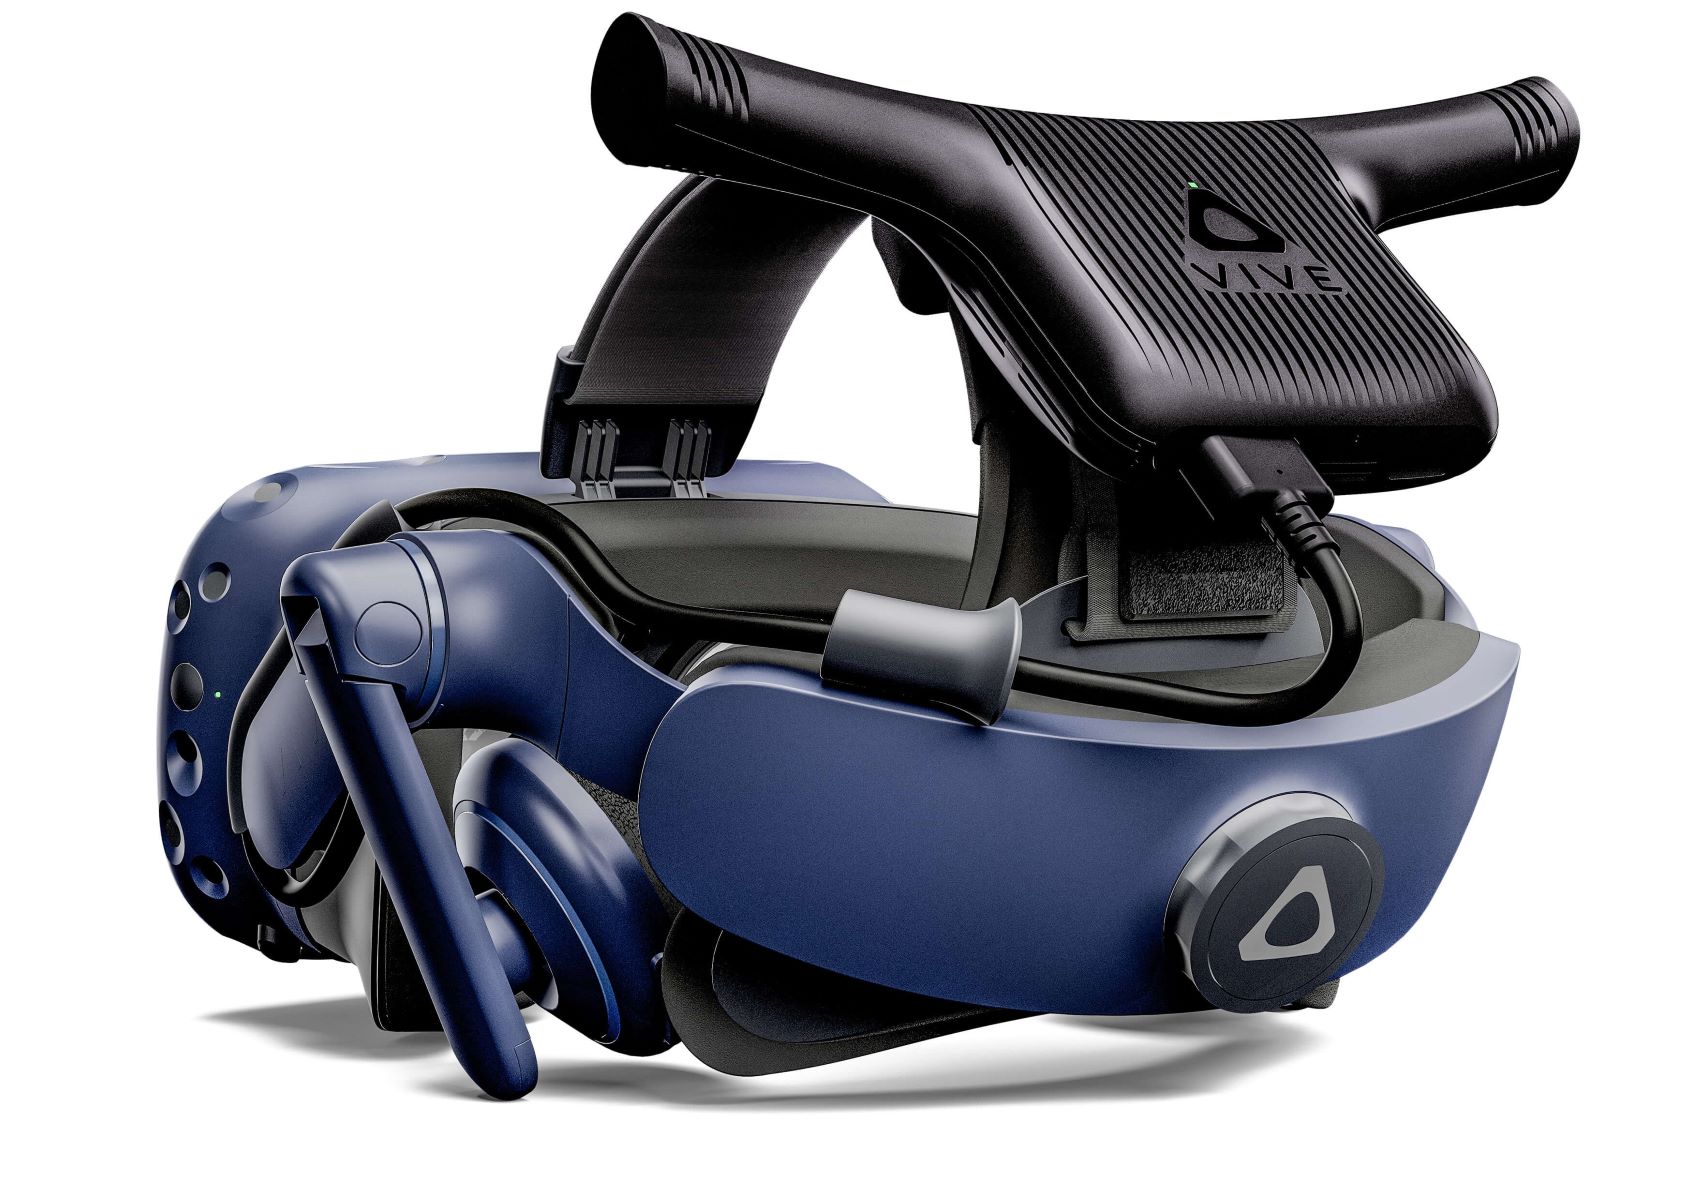
2. Take a moment to familiarize yourself with the components. The Vive Pro Wireless Adapter unit itself is a sleek and compact device that attaches to the back of your HTC Vive Pro headset, eliminating the need for a tethered cable connection. The PCIe card is what you’ll install into an available PCIe slot on your computer’s motherboard. The antenna will be used to establish a wireless connection between the headset and the adapter, while the linkbox serves as the hub for connecting the adapter to your computer.
3. Carefully remove each component from its packaging, ensuring that you don’t misplace any of the cables or connectors. Keep everything organized and within easy reach for the installation process.
4. Take a moment to read through the included instructions and documentation. Familiarize yourself with the step-by-step process to ensure a smooth installation. Make sure to follow the provided guidelines to prevent any potential damage and to guarantee optimal performance.
Now that you’ve unboxed the HTC Vive Pro Wireless Adapter and familiarized yourself with its components, you’re ready to proceed to the installation process. This unboxing experience is just the beginning of your journey towards a truly wireless VR setup, allowing you to move freely and fully immerse yourself in virtual reality without being restricted by cables.
Installing the PCIe Card
Installing the PCIe card for the HTC Vive Pro Wireless Adapter is an important step in setting up your wireless VR experience. The PCIe card enables the wireless adapter to connect to your computer and transmit data seamlessly. Here’s how to install the PCIe card:
1. Before proceeding, ensure that your computer is powered off and unplugged from any power source. This will prevent any electrical damage during the installation process.
2. Locate an available PCIe slot on your computer’s motherboard. The slot is typically longer than other expansion slots and may be labeled as “PCIe”. Check your computer’s documentation or motherboard manual for the exact location of the slots.
3. Remove the metal slot cover from the back of your computer case that corresponds to the PCIe slot you will be using. This will allow you to access the slot.
4. Take the PCIe card from its packaging and align it with the PCIe slot. The gold-colored contacts on the card should face down towards the slot, and the notches on the card should align with the notches on the slot.
5. Gently push the card into the slot until it is securely in place. Apply even pressure on both ends of the card if necessary, but avoid excessive force.
6. Once the card is inserted, use a screw or latch to secure it in place. This will prevent the card from coming loose during use.
7. Replace the metal slot cover that you removed earlier to ensure a clean and secure installation.
8. Finally, connect the necessary power cables to the PCIe card. Refer to the provided documentation for specific instructions on power connections.
With the PCIe card now successfully installed, you’re one step closer to experiencing wireless VR with the HTC Vive Pro Wireless Adapter. The card allows for seamless communication between the wireless adapter and your computer, enabling you to move freely without the restrictions of cables. Before moving on to the next step, ensure that the card is securely installed and that all necessary connections have been made.
Connecting the Antenna and Linkbox
Now that you have successfully installed the PCIe card for the HTC Vive Pro Wireless Adapter, it’s time to connect the antenna and linkbox. These components play a crucial role in establishing a wireless connection between the adapter and your HTC Vive Pro headset. Here’s how to connect them:
1. Begin by locating the antenna and linkbox that came with your HTC Vive Pro Wireless Adapter. The antenna is a small device with a thin cable, while the linkbox serves as a connection hub between the wireless adapter and your computer.
2. Connect the antenna to the wireless adapter. Look for the designated port on the adapter and carefully insert the antenna connector. Make sure it is securely connected to ensure a strong wireless signal.
3. Find a suitable spot to place the antenna. For best performance, it is recommended to position the antenna in a location where there are minimal obstructions. Ideally, it should be placed in a high and central position to maximize the wireless signal coverage.
4. Secure the antenna in place using the provided mounting options, such as attaching it to a wall or placing it on a stand.
5. Next, connect the linkbox to your computer. Locate the USB and power cables included with the linkbox.
6. Connect one end of the USB cable to an available USB port on your computer, and the other end to the corresponding port on the linkbox.
7. Connect the power cable to the linkbox and plug it into a power outlet. Make sure the linkbox is receiving power to facilitate proper communication between the wireless adapter and your computer.
8. Check that all connections are secure and properly plugged in. Ensure that the antenna is placed in an optimal location.
With the antenna and linkbox connected, your HTC Vive Pro Wireless Adapter is now ready to establish a wireless connection with your headset. This connection will enable you to enjoy a seamless VR experience without being tethered by cables. Ensure that the antenna is securely positioned and the linkbox is properly connected before proceeding to the next step of the setup process.
Installing the Vive Wireless Software
With the HTC Vive Pro Wireless Adapter hardware set up, the next step is to install the Vive Wireless software. This software is essential for establishing a wireless connection between the adapter and your computer, enabling seamless communication and an immersive VR experience. Follow these steps to install the Vive Wireless software:
1. Begin by ensuring that your computer is powered on and connected to the internet. A stable internet connection is necessary for downloading and installing the software.
2. Open your preferred web browser and navigate to the official HTC Vive website. Look for the “Downloads” or “Support” section and search for the Vive Wireless software.
3. Download the Vive Wireless software package suitable for your operating system. Ensure that you choose the correct version (32-bit or 64-bit) that matches your system specifications.
4. Once the software package is downloaded, locate the file and double-click on it to start the installation process.
5. Follow the on-screen prompts to proceed with the installation. Read and accept any terms and conditions that may be presented during the installation process.
6. Choose the destination folder where you want to install the Vive Wireless software. It is recommended to keep the default location unless you have a specific reason to choose a different folder.
7. Wait for the installation process to complete. This may take a few moments depending on the speed of your computer.
8. Once the installation is finished, you may be prompted to restart your computer. It is recommended to do so to ensure that all changes are applied successfully.
9. After restarting your computer, launch the Vive Wireless software. Follow any additional setup instructions that may be displayed on your screen.
10. The Vive Wireless software will automatically detect the HTC Vive Pro Wireless Adapter and guide you through the pairing process. Follow the on-screen instructions to complete the pairing.
With the Vive Wireless software installed and the HTC Vive Pro Wireless Adapter paired with your computer, you are now ready to experience the freedom of wireless VR. Make sure to keep the software up to date by regularly checking for updates on the HTC Vive website to ensure optimal performance and compatibility with your system.
Pairing the Wireless Adapter with the Vive Pro Headset
After successfully installing the Vive Wireless software and setting up the HTC Vive Pro Wireless Adapter, the next step is to pair the adapter with your Vive Pro headset. This pairing process ensures that the headset can establish a wireless connection with the adapter, allowing you to enjoy untethered VR experiences. Here’s how to pair the wireless adapter with the Vive Pro headset:
1. Put on your Vive Pro headset and ensure that it is powered on. Make sure that the headset is functioning properly before proceeding with the pairing process.
2. Launch the Vive Wireless software on your computer. Ensure that the software recognizes the wireless adapter and displays the appropriate status indicator.
3. On the Vive Pro headset, locate the Power button/menu button. Press and hold this button for a few seconds until the Vive logo appears on the headset’s display.
4. The Vive Wireless software on your computer will detect the headset and prompt you to complete the pairing process. Follow the on-screen instructions to pair the wireless adapter with the headset.
5. During the pairing process, you may be asked to select the wireless channel for better signal quality. Follow the provided instructions to choose the optimal channel.
6. Once the pairing process is complete, the wireless adapter and the Vive Pro headset should be connected. You will now be able to experience VR without the restrictions of a tethered connection.
7. To confirm that the pairing was successful, put on the Vive Pro headset and move around within the designated play area. You should be able to move freely without any connection issues or lag.
Note that if you experience any difficulties or connection problems during the pairing process, try restarting both the headset and the computer. Ensure that all cables and connections are secure and functioning properly.
By successfully pairing the wireless adapter with the Vive Pro headset, you have achieved a truly wireless VR setup. Now you can fully immerse yourself in virtual reality without the limitations of cables, bringing your VR experiences to a whole new level of freedom and immersion.
Adjusting the Wireless Adapter Settings
After pairing the wireless adapter with the Vive Pro headset, it’s important to adjust the adapter settings to optimize your wireless VR experience. The wireless adapter settings allow you to fine-tune various parameters and customize the performance according to your preferences. Here’s how to adjust the wireless adapter settings:
1. Launch the Vive Wireless software on your computer. The software should automatically detect the wireless adapter and display its settings interface.
2. Explore the available settings options. Depending on the version of the software, you may have options to adjust the wireless channel, signal strength, power management, and more.
3. Adjust the wireless channel if needed. The wireless channel setting allows you to change the frequency at which the adapter communicates with the headset. If you experience interference or performance issues, you can try changing the channel to a less crowded one to improve signal quality.
4. Fine-tune the signal strength. The signal strength setting allows you to adjust the power output of the wireless adapter. Increasing the signal strength may help improve the stability and range of the wireless connection. However, keep in mind that higher signal strength may consume more power and generate more heat.
5. Experiment with power management options. Some wireless adapter software versions provide power management settings, allowing you to optimize power consumption. You may have options to prioritize performance, power saving, or a balanced mode depending on your needs and preferences.
6. Save and apply your settings. Once you have adjusted the wireless adapter settings to your liking, save the changes and apply them. This ensures that your preferred settings are used each time you start the wireless adapter.
7. Test the adjusted settings in VR. Put on your Vive Pro headset and engage in VR experiences to evaluate how the adjusted settings impact the overall performance and wireless connection. If necessary, fine-tune the settings further until you achieve the desired balance of performance and stability.
Be aware that changing advanced settings may require technical expertise and knowledge. It is advisable to consult the official documentation or seek assistance from support resources if you are unsure about certain settings or their implications.
By adjusting the wireless adapter settings, you can optimize the performance and stability of your wireless VR experience. Take the time to explore and experiment with the available settings to find the perfect configuration that suits your preferences and provides a seamless and immersive virtual reality experience.
Troubleshooting Common Issues
While setting up and using the HTC Vive Pro Wireless Adapter, you may encounter some common issues that can hinder your wireless VR experience. Luckily, many of these issues can be resolved with a few troubleshooting steps. Here are some common issues and how to troubleshoot them:
1. Wireless signal dropouts: If you experience intermittent or frequent signal dropouts, try adjusting the wireless channel in the adapter settings. Switching to a less crowded channel can help improve signal stability. Additionally, ensure that there are no physical obstructions or electronic devices interfering with the wireless signal.
2. Poor wireless signal range: If you notice that the wireless signal range is limited, check the position and orientation of the antenna. The antenna should be placed in a high and central location for optimal signal coverage. If the issue persists, try repositioning the antenna or adjusting the signal strength settings in the wireless adapter software.
3. Interference from other wireless devices: Wireless devices operating on similar frequencies can interfere with the wireless adapter. Make sure to keep other wireless devices, such as routers or cordless phones, away from the wireless adapter and headset to minimize interference. Turning off or moving these devices may also help reduce interference.
4. Excessive heat: If the wireless adapter becomes excessively hot during use, it may impact performance. Ensure that the cooling system of your computer is working properly and that the adapter has sufficient airflow to dissipate heat. If necessary, consider adding additional cooling solutions to your computer setup.
5. Software or driver issues: If you encounter software or driver-related issues, try reinstalling the Vive Wireless software or updating the wireless adapter drivers. Ensure that you have the latest software version installed from the official HTC Vive website. Restarting your computer after reinstalling the software or updating drivers may also help resolve any software-related issues.
6. Incompatible hardware: Check that your computer meets all the compatibility requirements for the wireless adapter. Ensure that your system has a compatible graphics card, sufficient power supply, and supported operating system. Incompatibility with the hardware can lead to performance issues and connection problems.
7. Physical cable connection issues: Sometimes, physical cable connections can become loose or disconnected. If you experience connection issues, double-check that all cables are securely connected to the wireless adapter, the linkbox, and the headset. Ensure that the cables are not damaged or frayed.
If you continue to experience issues even after troubleshooting, it is advisable to consult the official documentation or seek assistance from HTC Vive support. They can provide further guidance and help resolve any persistent issues you may encounter during the setup or usage of the HTC Vive Pro Wireless Adapter.
Frequently Asked Questions (FAQs)
Here are some frequently asked questions (FAQs) about the HTC Vive Pro Wireless Adapter:
1. Can I use the HTC Vive Pro Wireless Adapter with other headsets?
No, the HTC Vive Pro Wireless Adapter is specifically designed for use with the HTC Vive Pro headset. It is not compatible with other VR headsets.
2. Do I need to purchase any additional accessories for the wireless adapter?
The HTC Vive Pro Wireless Adapter comes with all the necessary components and cables to set up the wireless connection. However, you may need to provide a compatible PCIe slot on your computer for installation.
3. What is the wireless range of the HTC Vive Pro Wireless Adapter?
The wireless range of the adapter can vary depending on the environment and any potential obstructions. In optimal conditions, the wireless range can extend up to 6 meters (20 feet).
4. Can I use the wireless adapter with multiple Vive Pro headsets?
The wireless adapter can only be paired with one Vive Pro headset at a time. If you have multiple headsets, each headset will require its own wireless adapter for independent wireless functionality.
5. Is there any latency or lag when using the wireless adapter?
The wireless adapter is designed to provide low latency and minimal lag for a smooth VR experience. However, it is important to ensure that your system meets the recommended specifications and that there are no significant wireless signal interference or range limitations.
6. Can I connect additional accessories, such as wireless controllers, to the wireless adapter?
No, the wireless adapter is specifically designed for wireless connectivity between the headset and the computer. Additional accessories, such as wireless controllers, will still need to be connected directly to the computer or through separate wireless connections.
7. Can I use the wireless adapter in a large play area?
Yes, the wireless adapter can be used in larger play areas, but the wireless signal range may be limited. Ensure that you position the antenna in a central and high location to maximize the wireless signal coverage.
These are some of the common questions related to the HTC Vive Pro Wireless Adapter. If you have any further inquiries or concerns, it is recommended to refer to the official documentation or reach out to HTC Vive support for assistance.