
Benefits of Using Dual Monitors on a Mac
Using dual monitors on a Mac can greatly enhance your productivity and improve your computing experience. Whether you’re a professional designer, developer, writer, or just a regular computer user, the benefits of having two monitors are numerous.
1. Increased Screen Real Estate: One of the primary advantages of using dual monitors is the ability to have more screen space. With two monitors connected to your Mac, you can spread out your work across multiple displays, allowing you to have multiple windows open and simultaneously view and work on different applications.
2. Multitasking Made Easy: Dual monitors enable you to multitask more efficiently. You can have your main work or project on one screen while using the other screen for reference material, research, or communication tools like email or chat applications. This setup eliminates the need to constantly switch between tabs or applications, saving you time and minimizing distractions.
3. Improved Workflow: Having dual monitors can significantly streamline your workflow. It allows you to keep all your essential tools and applications visible and accessible at all times. For example, you can have your design software on one screen while keeping your image assets, project files, and reference materials open on the other screen. This makes it easier to drag and drop files, compare documents side by side, and seamlessly collaborate with colleagues.
4. Enhanced Gaming and Entertainment: If you are a gamer or enjoy multimedia entertainment on your Mac, dual monitors offer a more immersive experience. You can keep the game or video on one screen while using the other screen for chat windows, web browsing, or monitoring system performance. This setup enhances your gaming enjoyment and allows you to multitask without interrupting your gameplay or entertainment experience.
5. Efficient Data Analysis: Dual monitors are especially beneficial for data analysts, spreadsheet users, and financial professionals. You can have a spreadsheet or data visualization on one screen while using the other screen for research, reports, or additional data input. This setup enables you to compare and analyze data more efficiently, increasing accuracy and productivity.
6. Better Organization and Focus: Having two monitors helps you stay organized and focused. You can dedicate one screen for your main work area and use the other screen for auxiliary tasks such as monitoring email, calendar, or task management tools. This separation allows you to prioritize your primary tasks while keeping important information readily available on the secondary screen.
7. More Flexible Collaboration: Dual monitors make collaboration easier, especially during meetings or presentations. You can connect one monitor to a projector or display device, allowing you to showcase your work to others while simultaneously having the original document or presentation open on your second screen. This setup promotes seamless collaboration and enhances communication with clients, colleagues, or stakeholders.
In summary, using dual monitors on a Mac provides a wide range of benefits, including increased screen real estate, improved multitasking capabilities, enhanced productivity, immersive gaming experiences, efficient data analysis, better organization and focus, and more flexible collaboration opportunities. Whether you’re a professional or a casual user, incorporating dual monitors into your setup can greatly enhance your workflow and computing experience.
Checking Mac Compatibility for Dual Monitor Setup
Before setting up dual monitors on your Mac, it is important to ensure compatibility to avoid any issues or compatibility conflicts. Follow these steps to check if your Mac supports a dual monitor setup:
1. Check Mac Model: First, identify the model of your Mac. Different Mac models have varying capabilities when it comes to dual monitor setups. Visit the Apple website or go to the Apple menu > About This Mac to find this information.
2. Graphics Card: Verify that your Mac has a graphics card that supports dual monitors. Open the Apple menu > About This Mac > System Report. Under Graphics/Displays, you will find information about your graphics card. Look for details like “Extended Desktop” or “Dual Display Support.”
3. Number of Video Ports: Check the number and type of video ports available on your Mac. Common video ports include HDMI, DisplayPort, Thunderbolt, and USB-C. Ensure that you have enough video ports to connect multiple monitors simultaneously. Keep in mind that you may need specific adapters or cables to connect your monitors to the appropriate ports.
4. Maximum Display Resolution: Determine the maximum display resolution supported by your Mac. This information can be found in the System Report under Graphics/Displays. It is crucial to check if your Mac can handle the resolution of the monitors you plan to connect.
5. System Requirements: Make sure your Mac meets the system requirements for dual monitor support. Check the documentation or technical specifications provided by Apple for your specific Mac model. Verify the minimum macOS version required for dual monitor functionality.
6. Software and Drivers: Ensure that your Mac’s operating system and graphics card drivers are up to date. Installing the latest software updates and graphics drivers can help prevent compatibility issues and improve performance with dual monitors.
7. External Monitor Compatibility: If you already have a specific monitor in mind, check its compatibility with macOS. Visit the manufacturer’s website or product documentation to verify if it supports macOS and offers the necessary connectivity options for your Mac.
Taking the time to check the compatibility of your Mac and understanding its capabilities for dual monitor setups is crucial for a smooth and hassle-free experience. By following these steps and conducting the necessary research, you can ensure that your Mac is compatible with dual monitors and avoid any compatibility issues.
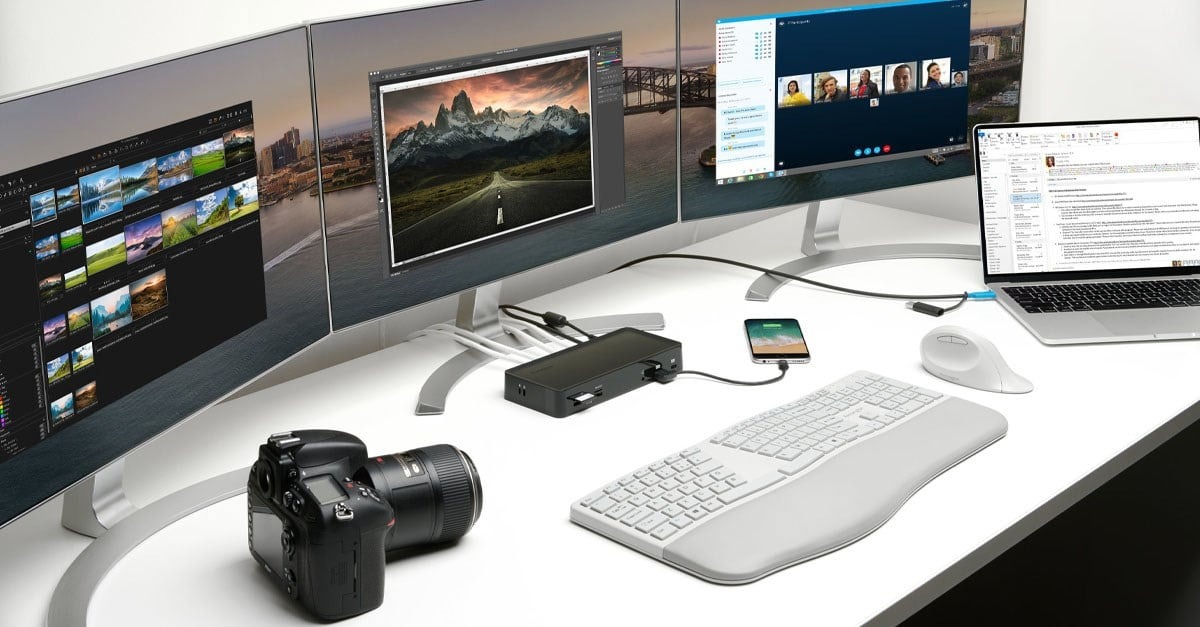
Connecting Dual Monitors to a Mac
Connecting dual monitors to your Mac allows you to expand your display and make the most of your workspace. Follow these steps to connect dual monitors to your Mac:
1. Identify the Video Ports: Determine the video ports available on your Mac. Different Mac models have different port options such as HDMI, DisplayPort, Thunderbolt, and USB-C. Remember to check the documentation or Apple’s website for your specific Mac model to identify the available ports.
2. Check Monitor Compatibility: Ensure that your monitors are compatible with your Mac’s video ports. Verify the connectors needed and make sure you have the necessary adapters or cables. For example, if your Mac has only USB-C ports and your monitor has an HDMI port, you may need a USB-C to HDMI adapter.
3. Connect the First Monitor: Connect one end of the cable to your Mac’s video port and the other end to the corresponding port on your first monitor. Make sure the cable is securely connected on both ends. If your monitor has multiple input options, choose the correct input source using the monitor’s menu or buttons.
4. Configure Display Settings: Once the first monitor is connected, go to Apple menu > System Preferences > Displays. In the Displays window, navigate to the Arrangement tab. You should see a representation of your monitors. Adjust the relative positions of the monitors by dragging them to the desired arrangement. This ensures that the cursor moves smoothly between the displays.
5. Connect the Second Monitor: Connect the second monitor using the same process as the first. Use the appropriate cable and connect it to an available video port on your Mac. Ensure that the cable is securely connected on both ends.
6. Adjust Display Settings: Once both monitors are connected, go back to the Display settings in System Preferences. You can adjust various settings such as resolution, refresh rate, and color profiles for each monitor individually. Experiment with these settings to find the optimal display configuration for your needs.
7. Test and Troubleshoot: Test your dual monitor setup by dragging windows or applications across the displays. Ensure that everything appears as expected and that there are no display issues. If you encounter any problems, double-check the connections, cables, and settings. Update your Mac’s software and drivers if necessary.
By following these steps, you can easily connect dual monitors to your Mac and take advantage of the increased display space and productivity. Experiment with different display configurations and settings to find the setup that works best for your workflow.
Adjusting Display Settings on a Mac
Once you have connected dual monitors to your Mac, it’s important to adjust the display settings to optimize your viewing experience. Follow these steps to adjust the display settings on a Mac:
1. Access System Preferences: Click on the Apple menu in the top-left corner of your screen and select “System Preferences” from the drop-down menu.
2. Open the Display Settings: In the System Preferences window, locate and click on the “Displays” icon. This will open the Display settings panel.
3. Arrange Monitors: In the Display settings panel, navigate to the “Arrangement” tab. You will see a representation of your dual monitors. You can click and drag the displays to adjust their relative position and alignment. This ensures that the cursor flows seamlessly across the screens.
4. Adjust Resolution: In the Display settings panel, go to the “Display” tab. Here, you can adjust the resolution for each monitor individually. Select the desired resolution from the available options. Higher resolutions provide sharper images but may make text and icons smaller. Experiment with different resolutions to find the one that suits your preferences and provides optimal clarity.
5. Set Refresh Rate: If your Mac and monitors support different refresh rates, you can fine-tune this setting. In the Display settings panel, navigate to the “Display” tab, and click on the “Refresh Rate” dropdown menu. Select the desired refresh rate for each monitor. Higher refresh rates result in smoother motion but may be limited by the capabilities of your monitors.
6. Adjust Brightness and Contrast: Most monitors have built-in controls to adjust brightness, contrast, and other display settings. Use the buttons or menu on your monitors to adjust these settings according to your preferences. You can also use the Display settings panel on your Mac to control the brightness level by adjusting the slider.
7. Color Calibration: For accurate colors on your dual monitors, you can calibrate them using the Display settings panel. Go to the “Color” tab, and click on the “Calibrate” button. Follow the on-screen instructions to perform a color calibration process. This helps ensure that colors are consistent across both monitors and accurately reflect what you see.
8. Use Night Shift: Night Shift is a feature that adjusts the color temperature of your display to reduce eye strain in low-light conditions. In the Display settings panel, go to the “Night Shift” tab. Enable Night Shift and adjust the schedule and color temperature according to your preference.
By adjusting the display settings on your Mac, you can personalize the viewing experience on your dual monitors. Take some time to find the optimal resolution, refresh rate, brightness, contrast, and color settings that suit your needs and provide a comfortable and visually pleasing workspace.
Arranging and Organizing Desktop Space
When using dual monitors on your Mac, it’s important to effectively arrange and organize your desktop space to maximize productivity and efficiency. Here are some tips for arranging and organizing your desktop space:
1. Determine Primary and Secondary Display: Decide which monitor will be your primary display and which will be the secondary display. The primary display is where your menu bar, Dock, and app icons are located by default. You can designate the primary display by going to the Display settings in System Preferences and dragging the white menu bar to the desired monitor.
2. Optimize Application Placement: Consider the type of work you do and arrange your applications accordingly. You can keep your main working app on the primary display and supporting apps or reference materials on the secondary display. Drag and resize windows as needed to fit your workflow and ensure easy access to the tools you require.
3. Use Full-Screen Mode: Utilize the full-screen mode for applications when appropriate. This allows you to take advantage of the entire screen real estate of one monitor, providing a distraction-free workspace for focused tasks or immersive experiences like watching videos or playing games.
4. Utilize Spaces and Mission Control: Take advantage of the Spaces and Mission Control features on your Mac to better organize your desktop space. Spaces allow you to create virtual desktops, and Mission Control provides a bird’s-eye view of all your open windows, apps, and spaces. Use these features to group related applications and tasks, keeping your work organized and reducing clutter.
5. Customize Wallpaper: Set different wallpapers for each monitor to visually distinguish them. This helps create a clear separation between your work areas and makes it easier to identify which monitor corresponds to specific tasks or applications.
6. Employ Desktop Organization Tools: Consider using third-party desktop organization tools to help manage files and folders. These tools enable you to create virtual desktops, arrange windows automatically, and declutter your desktop by grouping similar files or applications together.
7. Keyboard Shortcuts: Familiarize yourself with keyboard shortcuts to quickly navigate between monitors and applications. Mac OS provides several useful shortcuts for managing windows, moving them between displays, and activating Mission Control or Spaces.
8. Regular Cleanup: Regularly declutter your desktop by organizing files, deleting unnecessary shortcuts, and clearing out temporary files. A clean and organized desktop helps reduce distractions and promotes a more focused working environment.
Taking the time to arrange and organize your desktop space with dual monitors can lead to improved productivity and a more efficient workflow. Experiment with different setups, utilize desktop organization tools, and customize your workspace to suit your specific needs and working style.
Extending or Mirroring Displays on a Mac
When setting up dual monitors on your Mac, you have the option to extend or mirror your displays, depending on your preferences and needs. Here’s how you can extend or mirror displays on a Mac:
1. Access Display Settings: Click on the Apple menu in the top-left corner of your screen and select “System Preferences” from the drop-down menu. In the System Preferences window, click on the “Displays” icon to access the Display settings panel.
2. Select the Arrangement Tab: In the Display settings panel, navigate to the “Arrangement” tab. You will see a representation of your dual monitors. By default, the “Mirror Displays” option will be unchecked, indicating that the displays are currently set to extend mode.
3. Extend Displays: To extend your displays, ensure that the “Mirror Displays” option is unchecked. This allows you to have separate content on each monitor, effectively providing you with more screen real estate. You can drag windows or applications between the displays to expand your workspace.
4. Mirror Displays: If you prefer to have both monitors show the same content simultaneously, check the “Mirror Displays” option in the Arrangement tab. This creates an exact duplicate or mirror image of your primary display on the secondary monitor. Any actions performed on one monitor will be replicated on the other.
5. Adjust Display Resolution if Needed: In extended mode, you may want to adjust the display resolution of each monitor individually. In the Display settings panel, go to the “Display” tab and select the desired resolution for each monitor. This allows you to optimize the clarity and size of content on each display as per your preferences.
6. Test and Optimize: After extending or mirroring your displays, test the setup to ensure it functions as desired. Drag windows or applications across the screens, open different types of content, and verify that everything appears correctly on both monitors. If needed, adjust the display settings further based on your preferences and requirements.
7. Use Displays Preferences for Additional Settings: Apart from extending or mirroring displays, the Display settings panel offers additional options to customize display settings. You can adjust brightness, color calibration, screen rotation, and other settings specific to each monitor.
Extending or mirroring displays on a Mac allows you to customize your workflow and accommodate various tasks. Whether you prefer an extended desktop for multitasking or a mirrored display for presentations, using dual monitors provides increased flexibility and enhances your overall computing experience.
Adjusting Resolution and Display Preferences
When using dual monitors on a Mac, it’s important to adjust the resolution and display preferences to optimize the visual experience and ensure clarity. Here are the steps to adjust the resolution and display preferences on a Mac:
1. Access Display Settings: Click on the Apple menu in the top-left corner of your screen and select “System Preferences” from the drop-down menu. In the System Preferences window, click on the “Displays” icon to access the Display settings panel.
2. Select the Display Tab: In the Display settings panel, navigate to the “Display” tab. Here, you’ll find various options to adjust the resolution, refresh rate, and other display preferences for each monitor.
3. Adjust Resolution: To change the resolution, click on the dropdown menu next to “Resolution” for each monitor. Select the desired resolution from the available options. Higher resolutions provide more screen space and sharper images, but keep in mind that smaller text and icons may be harder to read.
4. Set Refresh Rate: If your Mac supports different refresh rates, you can adjust this setting for each monitor. Click on the dropdown menu next to “Refresh Rate” and select the desired rate. Higher refresh rates result in smoother motion when viewing videos or interacting with dynamic content.
5. Customize Color Profiles: Macs allow you to set color profiles for each monitor to ensure accurate and consistent color representation. In the Display settings panel, go to the “Color” tab. Click on the “Color Profile” dropdown menu and choose the appropriate profile for each monitor. You can also calibrate colors using the built-in color calibration tool to achieve optimal color accuracy.
6. Adjust Brightness, Contrast, and Sharpness: Most monitors have their own physical controls for adjusting settings such as brightness, contrast, and sharpness. Use the buttons or menu on each monitor to adjust these settings to your preference. You can also use the “Brightness” slider in the Display settings panel on your Mac to control the overall brightness level.
7. Enable Night Shift: Night Shift is a feature that automatically adjusts the color temperature of your display to reduce eye strain in low-light conditions. In the Display settings panel, go to the “Night Shift” tab. Enable Night Shift and adjust the schedule and color temperature according to your preference.
8. Test and Fine-Tune: After adjusting the resolution and display preferences, test your dual monitor setup by viewing various types of content and checking if everything appears crisp and clear. If needed, fine-tune the settings further based on your preferences and requirements.
By adjusting the resolution, refresh rate, color profiles, and other display preferences on your Mac, you can customize your dual monitor setup to provide the best visual experience for your specific needs. Take the time to experiment with different settings and find the combination that offers optimal clarity, color accuracy, and overall visual satisfaction.
Using Spaces and Mission Control with Dual Monitors
When using dual monitors on a Mac, Spaces and Mission Control are powerful features that can help you better manage and organize your workspace. Here’s how you can leverage Spaces and Mission Control with dual monitors:
1. Understand Spaces: Spaces allow you to create and navigate between different virtual desktops on your Mac. Each space can have its own set of applications and windows, allowing you to group related tasks or projects. Think of spaces as multiple desktops that you can switch between seamlessly.
2. Enable Spaces: Go to the Apple menu > System Preferences > Mission Control. Ensure that the “Displays have separate Spaces” option is checked. This ensures that each monitor has its own set of spaces, allowing you to independently switch between virtual desktops on each monitor.
3. Assign Applications to Spaces: To assign specific applications to a particular space, launch the desired application, right-click its icon in the Dock, and choose “Options” > “Assign to” > “This Desktop” or “All Desktops.” This determines whether the application will remain on a specific space or appear on all spaces.
4. Navigate between Spaces: To switch between spaces on a particular monitor, use the Mission Control gesture or press the Control and arrow keys corresponding to the desired space. You can assign shortcuts to switch directly to a specific space in System Preferences > Keyboard > Shortcuts > Mission Control.
5. Use Mission Control: Mission Control provides a bird’s-eye view of all open windows, applications, and spaces on your Mac. Swipe up on your trackpad with three fingers, or press the Mission Control key (F3 or Control + Up Arrow). From there, you can drag windows between spaces or displays, rearrange them, and easily identify open applications.
6. Spread Applications across Spaces: Utilize spaces to distribute applications across your dual monitors. For example, you can have your main work applications on one display while using another display for communication tools, email, or reference materials. This helps keep your workspace organized and minimizes distractions.
7. Customize Spaces: In System Preferences > Mission Control, you can customize Spaces to suit your workflow. You can choose to have displays with different ratios assigned to specific spaces or make them follow the order in which you set them up physically. Experiment with these settings to find the configuration that works best for you.
By utilizing Spaces and Mission Control with dual monitors, you can effectively manage and organize your workspace, improve productivity, and seamlessly switch between different tasks or projects. Take advantage of these features to create a customized and efficient working environment on your Mac.
Productivity Tips for Dual Monitor Setup on a Mac
Using dual monitors on a Mac can significantly enhance your productivity and workflow. Here are some valuable tips to maximize your productivity with a dual monitor setup:
1. Organize your Workspace: Take advantage of the expanded screen space and organize your windows and applications on different monitors. Keep your main work area on one monitor and use the other monitor for secondary tasks, such as email, chat applications, or reference materials.
2. Use Full-Screen Mode: When working on a single application or task that requires full focus, utilize the full-screen mode. This allows you to make the most of one monitor, eliminating distractions from other applications or windows.
3. Enable Hot Corners: Configure hot corners in System Preferences > Mission Control. By assigning specific actions to the corners of your screens, you can trigger useful functions such as activating Mission Control, showing the desktop, or quickly launching apps. This streamlines navigation and saves time.
4. Customize Keyboard Shortcuts: Customize and learn keyboard shortcuts to navigate between monitors, switch applications, and perform common actions. Familiarize yourself with shortcuts like Command + Tab to switch between applications, Control + Left/Right Arrow to switch between spaces, and Control + Up Arrow for Mission Control.
5. Use Spaces for Different Workspaces: Utilize Spaces to create dedicated workspaces for different projects or tasks. Assign specific applications or windows to each space, allowing you to switch between different work contexts effortlessly. This helps keep your workflow organized and minimizes mental context switching.
6. Take Advantage of Split Screen: macOS offers a split-screen feature that allows you to display two applications side by side on one monitor. Enter full-screen mode for one application, and then drag another app to one side of the screen. This enables seamless multitasking and easy comparison of information.
7. Utilize Productivity Software: Install productivity software that enhances your dual monitor setup. Applications like Magnet, BetterSnapTool, or DisplayFusion provide additional tools and features to manage window placement, resizing, and snapping within your dual monitor environment.
8. Minimize Distractions: With the increased screen space, it’s essential to maintain a clutter-free workspace. Keep your desktop organized, close unnecessary applications or windows, and set up notifications to appear on the primary monitor only. This helps to minimize distractions and improve focus.
9. Use Virtual Desktops: Take advantage of virtual desktops or multiple spaces to segregate different types of work or applications. This allows for efficient workflow management by giving you dedicated areas for specific tasks without cluttering a single monitor.
By implementing these productivity tips, you can make the most of your dual monitor setup on a Mac. With an organized workspace, customized shortcuts, and efficient multitasking, you’ll enhance productivity, streamline your workflow, and accomplish tasks more effectively.
Troubleshooting Common Dual Monitor Issues on a Mac
While using dual monitors on a Mac can be highly beneficial, it’s not uncommon to encounter some issues along the way. Here are some common dual monitor issues and troubleshooting steps to resolve them:
1. No Display on Second Monitor: If your second monitor isn’t displaying anything, check the cable connections. Ensure that the cable is securely connected to both the monitor and the Mac. If using an adapter, verify that it is compatible and functioning correctly.
2. Incorrect Resolution or Scaling: If the resolution or scaling of one monitor appears different from the other, go to System Preferences > Displays > Display tab. Adjust the resolution settings for each monitor individually to ensure they match or align with your preferences.
3. Display Arrangement Issues: If the position of the screens in the Arrangement tab of the Display settings panel doesn’t match the physical setup, drag and arrange the displays to the correct position. This ensures that the cursor moves smoothly between the monitors.
4. Display Flickering or Artifacts: If you experience flickering or artifacts on one or both monitors, try adjusting the refresh rate. Go to System Preferences > Displays > Display tab and select a different refresh rate. Experiment with different rates to find the one that eliminates the issue.
5. Inconsistent Color or Brightness: If the color or brightness levels differ between the monitors, use the Color tab in the Display settings panel to calibrate the color profiles of each display. Follow the on-screen instructions to ensure accurate and consistent color representation.
6. Missing Applications or Windows: If applications or windows appear to be “off-screen,” meaning they’re not visible on any monitor, try resetting the windows’ positions. Go to System Preferences > Mission Control and disable “Displays have separate Spaces,” then enable it again to force macOS to reposition the windows.
7. Display Not Detected: If a connected monitor is not detected at all, try restarting your Mac while keeping the monitor connected. If that doesn’t work, reset the System Management Controller (SMC) or the Non-Volatile Random-Access Memory (NVRAM) on your Mac. Refer to Apple’s support documentation or contact Apple support for specific instructions based on your Mac model.
8. Update macOS and Drivers: Ensure that your Mac is running the latest version of macOS and that you have installed any available software updates. It’s also essential to keep your graphics card drivers up to date by visiting the manufacturer’s website or using software update utilities recommended by the manufacturer.
If you’ve tried these troubleshooting steps and are still experiencing issues with your dual monitor setup, consider seeking additional support from Apple’s official support channels or consulting with a professional technician.