
Checking the Contents of the Modem Package
Before setting up your modem, it’s crucial to ensure that you have all the necessary components. Unpack the modem package and carefully check its contents to avoid any potential delays during the installation process. Here’s a step-by-step guide on how to check the contents of the modem package:
- Inspect the modem: Take out the modem and check for any physical damage. Look for any visible cracks, dents, or loose parts. If you notice any issues, contact your internet service provider (ISP) or the modem manufacturer for assistance.
- Power adapter and cables: Look for the power adapter and the accompanying cables. Typically, a modem package includes an Ethernet cable, a power cable, and an adapter. Ensure that all the cables are present and in good condition.
- Instruction manual and documentation: Find the instruction manual or setup guide that provides detailed information on how to install and configure the modem. Review the manual thoroughly to familiarize yourself with the process and troubleshoot any potential issues.
- Additional accessories or components: Some modem packages may include additional accessories such as filters, splitters, or phone cables. Check the package contents to see if any of these items are included, and verify their functionality if necessary.
- Warranty information: Locate the warranty information or any warranty cards that may be included in the package. It’s essential to keep track of the warranty period and understand the terms and conditions for any potential repairs or replacements.
By ensuring that all the necessary components are present and in good condition, you can proceed with confidence to the next steps of setting up your modem. If you find any missing or damaged components, reach out to your ISP or the modem manufacturer for assistance in getting a replacement.
Choosing the Right Location for the Modem
When setting up your modem, selecting the appropriate location is essential for optimal performance. The placement of the modem can affect its signal strength and overall internet connectivity. Here are some factors to consider when choosing the right location for your modem:
- Central position: Place the modem in a central area of your home or office where the Wi-Fi signal can reach all desired areas. This helps ensure a more consistent and reliable connection throughout your space.
- Avoid obstructions: Keep the modem away from physical obstructions, such as walls, furniture, or appliances, that could interfere with the signal. These barriers can weaken the Wi-Fi signal and hinder its reach.
- Away from interference: Position the modem away from devices that emit radio waves or electromagnetic interference, such as cordless phones, microwaves, or baby monitors. These devices can disrupt the Wi-Fi signal and cause connection issues.
- Elevated location: If possible, place the modem at an elevated position, such as on a table or shelf, to enhance the Wi-Fi signal’s coverage and reach. This can help minimize signal degradation caused by obstacles or interference.
- Proper ventilation: Ensure that the modem has adequate ventilation to prevent overheating. Avoid placing it in enclosed spaces or near heat sources that can affect its performance and lifespan.
By considering these factors, you can choose a suitable location for your modem that will optimize its signal strength and provide a stable internet connection. Keep in mind that environmental factors and the layout of your space may require some trial and error to find the ideal placement. Experiment with different positions until you find the one that delivers the best performance for your specific needs.
Connecting the Modem to Power
Before you can start using your modem, you need to connect it to a power source. Follow these steps to properly connect your modem to power:
- Locate the power adapter: Find the power adapter that came with your modem package. It should have a cord and a plug.
- Connect the power adapter: Plug one end of the power adapter into the power port on the back of the modem. Ensure that it fits securely.
- Connect the power cord: Plug the other end of the power adapter into a power outlet. Make sure the outlet is easily accessible and not obstructed.
- Check the power indicator: Once the modem is connected to power, a power indicator light should illuminate. This light indicates that the modem is receiving power and is ready to be set up.
It’s important to note that most modems don’t have an on/off switch. They are designed to be continuously powered on for optimal performance. If you need to power off the modem for any reason, such as during a power outage or when instructed by your ISP, simply unplug the power adapter from the outlet.
By properly connecting the modem to power, you ensure that it has the necessary electricity to function. Proceed to the next steps of connecting the modem to your computer or router to continue the setup process.
Connecting the Modem to Your Computer or Router
Once you have connected your modem to power, the next step is to establish a connection between the modem and your computer or router. Here’s how to connect the modem:
- Gather the necessary cables: Depending on your setup, you may need an Ethernet cable or a Wi-Fi connection for this step. Ensure you have the appropriate cables ready.
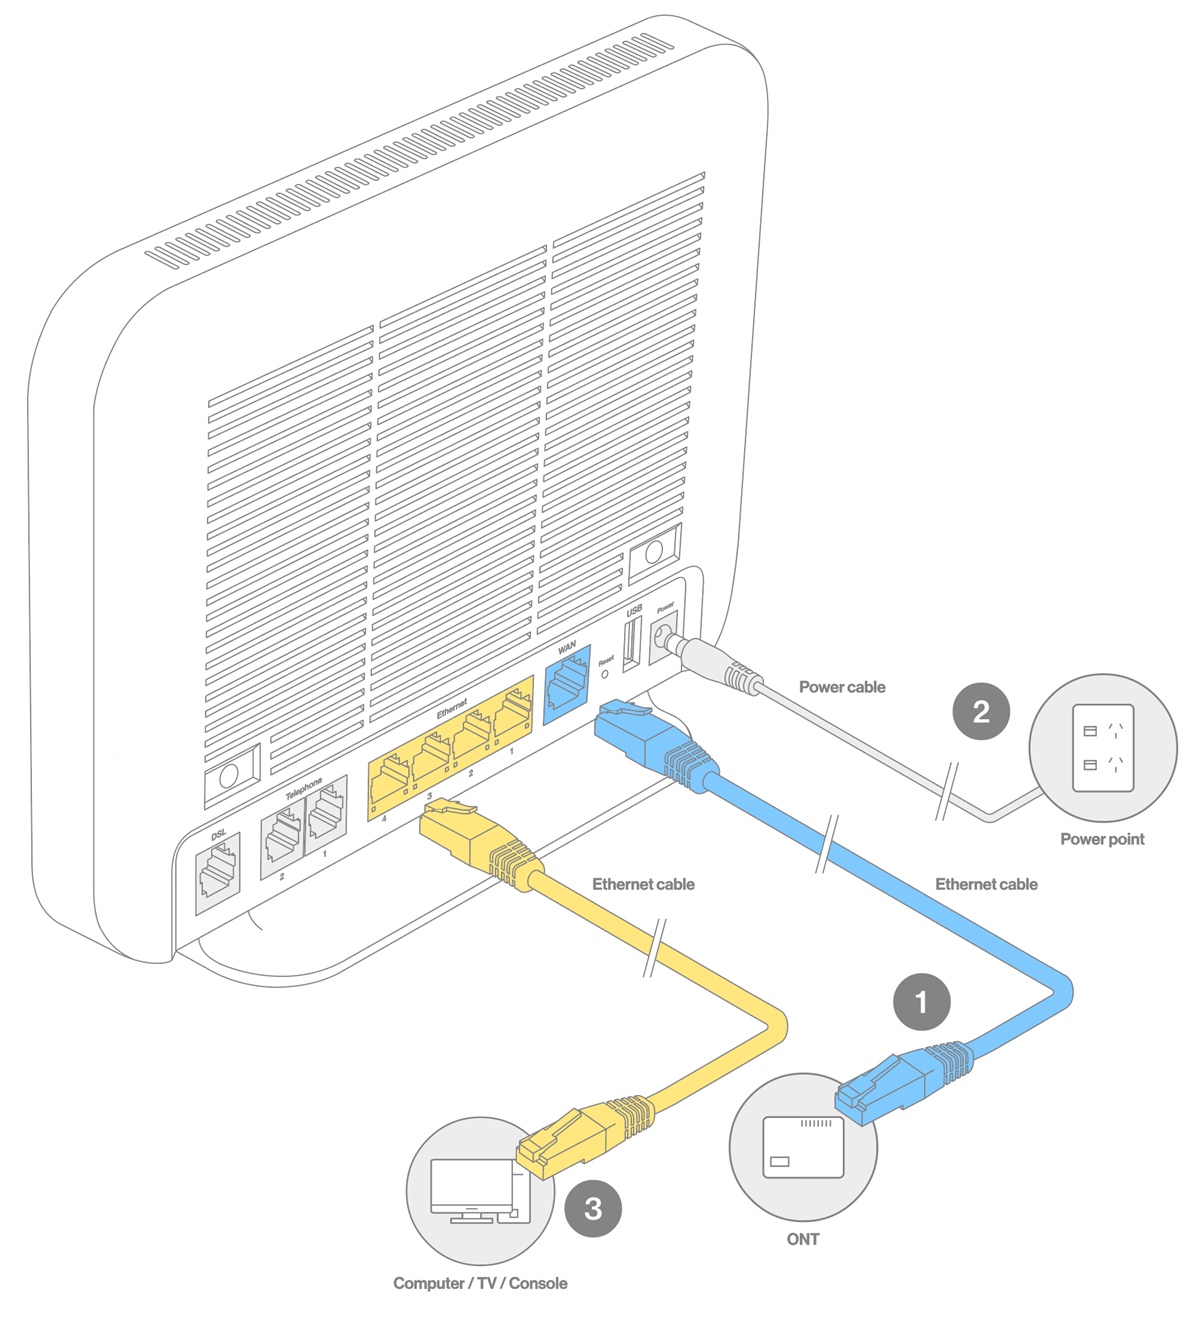
- Wired connection (Ethernet): If you’re using a wired connection, connect one end of the Ethernet cable to the Ethernet port on the back of the modem. Then, connect the other end of the Ethernet cable to the Ethernet port on your computer or router. Make sure the connection is secure.
- Wireless connection (Wi-Fi): If you prefer a wireless connection, ensure that your computer or router is Wi-Fi enabled. Go to the network settings on your computer and search for available Wi-Fi networks. Select the network with the name or SSID (Service Set Identifier) provided by your modem manufacturer. Enter the network password if prompted. Once connected, your computer will establish a wireless connection with the modem.
- Verify the connection: After connecting the modem to your computer or router, check for the internet connectivity indicator. It can be in the form of a light, an icon on your computer screen, or a Wi-Fi signal indicator. If you see a solid connection indicator, it means the modem is successfully linked to your computer or router.
It’s worth mentioning that if you’re using a router, you can connect multiple devices to the modem through the router’s Ethernet ports or Wi-Fi network. This allows multiple devices to access the internet simultaneously.
By establishing the connection between your modem and computer or router, you are now ready to move on to the next step of connecting your modem to the internet service provider (ISP).
Connecting the Modem to the Internet Service Provider (ISP)
In order to access the internet, your modem needs to establish a connection with your internet service provider (ISP). Follow these steps to connect your modem to the ISP:
- Contact your ISP: Reach out to your ISP to obtain the necessary information and instructions for connecting your modem. They will provide you with specific details such as the type of connection (DSL, cable, fiber), username, password, and any additional settings required.
- Access the modem settings: Open a web browser on your computer and enter the IP address provided by your ISP in the address bar. This will take you to the modem’s settings page. Enter the username and password, which can also be provided by your ISP, to log into the modem’s settings.
- Locate the setup or connection wizard: Once logged in, look for a setup or connection wizard within the modem’s settings. This wizard will guide you through the process of connecting to your ISP.
- Enter the ISP information: Follow the instructions provided by the connection wizard to enter the necessary information such as the ISP username, password, and connection type. Make sure to input the information accurately to establish a successful connection.
- Save and apply the settings: After entering the ISP information, save and apply the settings within the modem’s interface. This will initiate the connection process between the modem and your ISP. Wait for a few minutes for the modem to establish the connection.
Once the modem establishes a connection with your ISP, you should see the internet connectivity indicator light up or a notification on your computer confirming the successful connection. Now you’re ready to enjoy a reliable and high-speed internet connection.
If you encounter any difficulties during the setup process or have trouble connecting to your ISP, don’t hesitate to contact your ISP’s customer support for assistance. They will be able to guide you through any troubleshooting steps or provide further instructions specific to your ISP.
Powering On the Modem
After connecting your modem to power and establishing the necessary connections, it’s time to power on the modem. Follow these steps to properly power on your modem:
- Ensure all connections are secure: Double-check that all cables are securely connected to both the modem and your computer or router. This includes the power cable, Ethernet cable (if applicable), and any other necessary cables.
- Locate the power button or switch: Some modems have a power button or switch located on the front or back panel. If your modem has a power button, make sure it is in the “Off” or “Standby” position.
- Power on the modem: Press the power button or flip the power switch to turn on the modem. If there is no power button or switch, simply plugging in the power adapter will automatically power on the modem.
- Wait for the modem to initialize: After powering on the modem, it will go through an initialization process, which may take a few minutes. During this time, the modem’s indicator lights will flash or change color to indicate that it is establishing a connection with your ISP.
- Verify the connection status: Once the initialization process is complete, check the modem’s indicator lights to ensure that it has successfully established a connection. The specific indicator light pattern may vary depending on your modem model, but typically the “Power” and “Internet” lights should be solid or steady.
It’s important to note that it may take a few minutes for the modem to fully connect to the internet and for the connection to become active. Be patient and allow sufficient time for the modem to establish a stable connection before proceeding to the next steps.
If you experience any issues or notice unusual indicator light patterns, refer to the modem’s user manual or contact your ISP for further assistance. They will be able to provide guidance and troubleshooting steps specific to your modem model and internet service.
Verifying the Modem Connection
Once you have powered on the modem and allowed sufficient time for it to establish a connection with your internet service provider (ISP), it’s important to verify the modem connection to ensure everything is functioning properly. Here’s how you can verify the modem connection:
- Check the indicator lights: Take a look at the indicator lights on your modem. Different modem models may have varying lights, but there are typically common ones such as Power, Internet, and Wi-Fi. Ensure that the relevant lights are solid, steady, or displaying the expected status. If any lights are flashing or not lit at all, refer to the modem’s user manual or contact your ISP for assistance.
- Test the internet connection on your computer: Open a web browser on your computer and try to access a website or perform a simple search. If the web page loads successfully or you see search results, it indicates that your modem is connected to the internet and functioning properly.
- Perform a speed test: To further verify the modem connection, you can conduct a speed test. There are various online speed test tools available that measure your internet connection’s download and upload speeds. Run a speed test and compare the results with your expected internet plan speeds. If the speeds are close to what you’re paying for, it indicates a healthy modem connection.
- Test connectivity on other devices: Connect other devices, such as smartphones, tablets, or laptops, to the Wi-Fi network provided by your modem. Check if these devices can successfully connect to the internet and access websites or perform online tasks. This step helps ensure that the modem’s connection is not limited to a single device and that multiple devices can access the internet simultaneously.
Verifying the modem connection is crucial to ensure that you have a stable and reliable internet connection. If you encounter any issues or inconsistencies during the verification process, it’s recommended to consult your ISP’s customer support. They can guide you through further troubleshooting steps or provide additional assistance specific to your modem and internet service.
Activating the Modem with the ISP
Once you have verified that your modem is properly connected and configured, the next step is to activate it with your internet service provider (ISP) to gain access to the internet. Activating the modem involves registering your modem’s unique identification information with your ISP. Here’s how you can activate the modem:
- Contact your ISP: Get in touch with your ISP’s customer support or activation department to begin the activation process. They will provide you with the necessary instructions and information required to activate your modem.
- Provide necessary details: During the activation process, your ISP will ask for specific details such as your account number, phone number, or billing information. Ensure you have this information readily available to expedite the activation process.
- Submit the modem’s MAC address: Each modem has a unique MAC (Media Access Control) address, which is a set of alphanumeric characters assigned to the device. Your ISP may ask for the modem’s MAC address to complete the activation. The MAC address is typically found on the modem itself or on its packaging. Provide this information to your ISP as requested.
- Follow the activation instructions: Your ISP will provide step-by-step instructions to activate the modem. This may involve accessing the modem’s settings page through a web browser and entering the necessary information. Follow the instructions carefully to ensure successful activation.
- Wait for confirmation: After completing the activation process, you may need to wait for your ISP to confirm the activation. This can take anywhere from a few minutes to a couple of hours. During this time, your ISP may remotely configure the modem’s settings to establish the connection and assign it an IP address.
Once your modem is successfully activated, you should be able to access the internet using the provided ISP service. If you experience any issues or are unable to establish a connection after activation, reach out to your ISP’s customer support for further assistance. They can troubleshoot the issue and guide you through any necessary steps to ensure a smooth and successful activation process.
Configuring the Modem’s Settings
Once your modem is activated and connected to the internet, you may need to configure certain settings to optimize its performance and meet your specific needs. Here’s how you can configure the modem’s settings:
- Access the modem’s settings page: Open a web browser on your computer and enter the modem’s IP address into the address bar. This IP address is typically provided by your internet service provider (ISP) and can be found in the modem’s documentation or on the modem itself. Enter any required login credentials to access the modem’s settings page.
- Change the default login credentials: For security purposes, it is highly recommended to change the default login credentials of the modem. Look for the option to change the username and password within the modem’s settings page. Create new login credentials that are unique and strong to protect your modem and network.
- Configure Wi-Fi settings: If your modem has built-in Wi-Fi capabilities, you can configure the Wi-Fi settings to set up your wireless network. Provide a unique network name (SSID) and secure password to prevent unauthorized access. You may also have the option to select a specific Wi-Fi frequency band or enable features such as guest networks or parental controls.
- Adjust advanced settings: Explore the advanced settings within the modem’s interface to customize the functionality according to your preferences. This may include configuring firewall settings, port forwarding, quality of service (QoS), or other networking options. Consult the modem’s user manual or your ISP for guidance on specific advanced settings.
- Update firmware (if needed): Check if there are any firmware updates available for your modem. Firmware updates improve the modem’s performance, security, and compatibility with new features or technologies. Look for the firmware update option within the modem’s settings page and follow the provided instructions to update the firmware if necessary.
It’s important to note that the specific options and settings available within the modem’s interface can vary depending on the modem model and manufacturer. Refer to the modem’s user manual or contact your ISP for assistance if you encounter any difficulties or have questions regarding specific settings.
By configuring the modem’s settings, you can customize its functionality to better suit your needs and ensure a secure and efficient internet connection.
Testing the Modem’s Connection
After setting up and configuring your modem, it’s important to run a series of tests to ensure that the connection is stable, reliable, and performing at its best. Testing the modem’s connection can help identify any potential issues or areas for improvement. Here are some tests you can perform to evaluate the modem’s connection:
- Internet speed test: Use an online speed test tool to measure the download and upload speeds of your internet connection. This will give you an idea of the actual speeds you are receiving compared to the speeds promised by your internet service provider (ISP). If the measured speeds are significantly lower than expected, contact your ISP for troubleshooting assistance.
- Web browsing test: Open your web browser and visit various websites to assess the responsiveness and load times. Check if web pages load quickly and without any errors. If you encounter slow loading times or frequent errors, it may indicate an issue with your modem’s connection or a problem with your ISP’s network.
- Streaming test: Stream videos or music from popular streaming platforms to assess the quality of your internet connection. Monitor for buffering or buffering interruptions during playback. If you experience consistent buffering or poor streaming quality, it could be an indication of a weak internet connection or a need to upgrade your internet plan.
- Online gaming test: If you are a gamer, test your internet connection’s performance by playing online games. Look for any high latency, lag, or connection drops. A stable and reliable connection is crucial for an optimal gaming experience. If you encounter persistent issues, consider troubleshooting steps recommended by your game’s support team or contacting your ISP for assistance.
- Connectivity test on multiple devices: Connect multiple devices to your modem, such as smartphones, tablets, or smart home devices, and test the internet connectivity on each device. Check if all devices can successfully connect to the internet and perform online tasks without any issues. This test helps ensure that the modem can handle multiple connections simultaneously.
By performing these tests, you can gain a better understanding of the performance and reliability of your modem’s connection. If you notice any consistent issues or poor performance during the tests, don’t hesitate to reach out to your ISP for further troubleshooting assistance. They can help you identify and resolve any underlying issues to ensure a smooth and enjoyable internet experience.