
Enabling the Screen Recorder Feature
Screen recording has become an essential tool for many Samsung users, allowing them to capture and share important moments, create tutorials, or troubleshoot technical issues. Luckily, Samsung devices come equipped with a built-in screen recording feature that is easy to enable and use. In this section, we will guide you through the process of enabling the screen recorder feature on your Samsung device.
To begin, navigate to the settings menu on your Samsung device. You can access this by swiping down from the top of your screen and tapping on the gear icon in the top right corner, or by finding the settings app in your app drawer. Once in the settings menu, scroll down and locate the “Advanced features” option. Tap on it to proceed.
In the “Advanced features” menu, you should see an option called “Screenshots and screen recorder.” Tap on it to access the screen recording settings. Here, you will find various options related to screen recording, including the ability to enable or disable the feature entirely.
To enable screen recording, simply toggle the switch next to “Screen recorder” to the “on” position. Once enabled, you can customize the settings further by tapping on the “Screen recorder settings” option. This will allow you to adjust the video quality, audio settings, and other recording options according to your preferences.
It’s worth mentioning that some older Samsung devices may not have the screen recording feature built-in. In such cases, you can explore third-party screen recording apps from the Google Play Store to achieve similar functionality.
Now that you have successfully enabled the screen recording feature on your Samsung device, you are ready to start capturing your screen. In the following sections, we will guide you through the process of starting, pausing, and ending a screen recording, as well as how to view and share your recordings.
Accessing the Screen Recorder Settings
Once you have enabled the screen recording feature on your Samsung device, the next step is to access the screen recorder settings. These settings allow you to customize various aspects of your screen recording experience. In this section, we will walk you through the process of accessing the screen recorder settings on your Samsung device.
To access the screen recorder settings, start by opening the app drawer on your Samsung device. Look for the “Settings” app, which is represented by a gear icon, and tap on it to open the settings menu.
Once you are in the settings menu, scroll down to find the section labeled “Advanced features.” Tap on it to expand the options within.
Within the “Advanced features” section, look for the option titled “Screenshots and screen recorder” and tap on it to access the screen recorder settings.
Upon entering the screen recorder settings, you will see a range of options that you can adjust to customize your screen recording experience. These options typically include:
- Video quality: This allows you to select the resolution at which your screen recordings will be captured. Higher resolutions result in better image quality but may also result in larger file sizes.
- Audio settings: Here, you can decide whether you want to capture audio along with your screen recording. You can choose to record audio from the device’s internal microphone, external microphone, or disable audio recording altogether.
- Recording options: This includes additional features such as recording orientation, display touches, and countdown timer before recording starts.
Take your time to explore these settings and adjust them according to your preferences. Once you have customized the settings to your liking, you can exit the screen recorder settings and proceed to start recording your screen.
In the next section, we will guide you through the process of adjusting the screen recorder settings to ensure that your screen recordings meet your specific requirements.
Adjusting the Screen Recorder Settings
After accessing the screen recorder settings on your Samsung device, you have the flexibility to adjust various options to enhance your screen recording experience. In this section, we will walk you through the process of adjusting the screen recorder settings to meet your specific needs and preferences.
One of the essential settings to consider is the video quality. The video quality determines the resolution at which your screen recordings will be captured. Higher resolutions result in crisper and more detailed videos, but they may also lead to larger file sizes. To adjust the video quality, simply select the desired resolution from the available options in the screen recorder settings.
Audio settings are another crucial aspect to consider when adjusting the screen recorder settings. You can choose whether you want to include audio in your screen recordings or not. By default, the screen recorder captures audio from the device’s internal microphone. However, if you prefer to use an external microphone for better audio quality, you can select that option in the settings. On the other hand, if you do not want any audio to be recorded, you have the option to disable it entirely.
Additionally, you can customize other recording options based on your preferences. For instance, you can enable the display touches feature, which overlays a visual indicator on the screen to highlight where you are tapping during the recording. This can be helpful when creating tutorial videos or demonstrating certain actions on your screen.
Furthermore, you can adjust the recording orientation to either portrait or landscape mode, depending on what works best for your recording needs. Some devices even offer the option to lock the orientation, ensuring that the recording stays in a particular mode throughout.
If you want to have a countdown timer before the recording starts, you can also enable this feature in the screen recorder settings. The countdown timer gives you a few seconds to prepare before the recording begins.
Take your time to explore and experiment with these settings to find the configuration that suits your requirements. Once you have adjusted the screen recorder settings to your satisfaction, you are now ready to start recording your screen.
In the next section, we will guide you through the process of starting a screen recording on your Samsung device.
Starting a Screen Recording
Now that you have enabled and adjusted the screen recorder settings on your Samsung device, you are ready to start capturing your screen. Whether you want to create instructional videos, record gameplay, or document a technical issue, the screen recording feature makes it easy to do so. In this section, we will guide you through the process of starting a screen recording on your Samsung device.
To begin, open the app or webpage that you want to record on your device. Make sure that the content you want to capture is visible on the screen before proceeding.
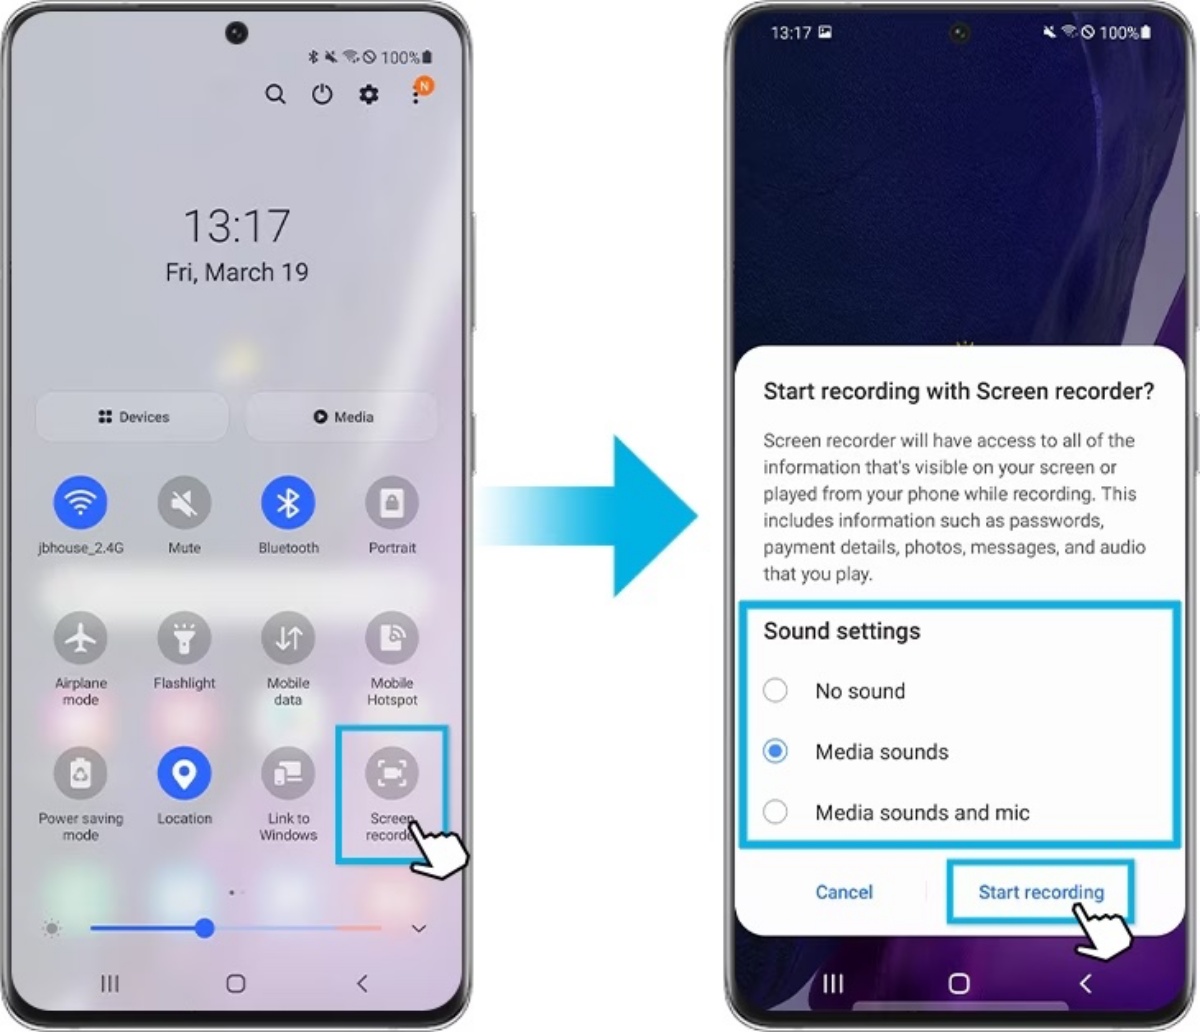
Next, swipe down from the top of your device’s screen to access the quick settings panel. This panel allows you to have quick access to various device settings and features.
In the quick settings panel, you might find a toggle button labeled “Screen Recorder.” Tap on it to start the screen recording process.
If you don’t see the screen recorder toggle in the quick settings panel, don’t worry. It may not be available by default. In this case, you can go to the settings app and find the “Advanced features” section. From there, locate the “Screenshots and screen recorder” option and tap on it. Then, toggle the switch next to “Screen recorder” to enable it.
Once you have initiated the screen recording, the recording control panel will appear on the screen. This panel typically includes options to pause, stop, and access additional settings.
If you want to include audio in your screen recording, ensure that the microphone icon is enabled on the recording control panel. This ensures that the device’s internal microphone or the selected external microphone will capture the audio during the recording.
To start the actual recording, tap on the record button, usually represented by a circle or a red dot. At this point, the screen recording will begin, and everything on your screen will be captured until you decide to stop it.
While you are recording, you can navigate through different apps, menus, or screens on your device. The screen recording will continue regardless of the actions you perform, allowing you to capture precisely what you need.
Keep in mind that some devices may display a small recording indicator or notification during the recording process. This indicator is an assurance that the screen recording is ongoing and helps you keep track of the recording duration.
Once you have captured the desired content, proceed to the next section to learn how to effectively pause and resume a screen recording on your Samsung device.
Pausing and Resuming a Screen Recording
During a screen recording session on your Samsung device, you may sometimes need to pause the recording temporarily to attend to other tasks or make adjustments. The screen recording feature allows you to pause and resume the recording seamlessly, ensuring that you capture exactly what you need. In this section, we will guide you through the process of pausing and resuming a screen recording on your Samsung device.
While you are recording your screen, the recording control panel will be visible on the screen. This control panel typically includes options to pause, stop, and access additional settings related to the screen recording.
To pause the screen recording, tap on the pause button on the recording control panel. This button is usually represented by a symbol that indicates a pause or a square icon. Tapping on this button will temporarily halt the recording, freezing the screen at the current frame.
While the recording is paused, you can attend to other tasks on your device without worrying about the screen being recorded. This allows you to make adjustments or set up your screen before resuming the recording.
When you are ready to continue the recording, simply tap on the resume button on the recording control panel. This button is usually represented by a symbol that indicates a play or a triangle icon. Tapping on this button will resume the screen recording from where it was paused, seamlessly capturing the ongoing screen activities.
It’s important to note that while the screen recording is paused, the elapsed time of the recording will continue to accumulate. This ensures that the final recording accurately represents the total duration of the screen activities, even with the pauses.
Additionally, you can utilize the pause and resume feature creatively to create a more polished screen recording. For example, if you are creating a tutorial video, you can pause the recording between steps or when transitioning between different sections of the tutorial. This allows you to edit the recording later and create a more concise and organized final video.
With the ability to easily pause and resume the screen recording on your Samsung device, you have the control and flexibility to capture your screen in a way that best suits your needs.
In the next section, we will explore how to effectively end a screen recording and save your captured content on your Samsung device.
Ending a Screen Recording
Once you have completed the screen recording on your Samsung device, it’s important to properly end the recording session and save your captured content. The process of ending a screen recording is simple and ensures that you have a complete recording that can be accessed and shared later. In this section, we will guide you through the process of ending a screen recording on your Samsung device.
To end a screen recording, navigate back to the screen where the recording control panel is visible. This control panel typically includes options to pause, stop, and access additional settings related to the screen recording.
Tap on the stop button to end the screen recording. The stop button is usually represented by a square icon or a symbol that indicates the end of the recording. Tapping on this button will prompt your device to stop capturing the screen and finalize the recording.
After you have tapped the stop button, your screen recording will be saved as a video file on your Samsung device. The exact location where the recording is saved may vary depending on your device model and settings.
For easy access to your screen recordings, you can typically find them in the “Gallery” or “Photos” app on your device. They may also be saved in a dedicated “Screen Recordings” folder within the file management system.
Once you have located the recorded video, you can preview it to ensure that the content was captured as intended. You can also make further edits or enhancements to the recording if desired, using video editing apps or software.
From here, you can share your screen recording with others or use it for various purposes. Whether you want to upload it to a video sharing platform, send it via messaging apps, or include it in presentations, the choice is yours.
Remember to always consider the privacy and consent of others when sharing screen recordings. Ensure that you have the necessary permissions to share any sensitive or personal information captured in your screen recording.
By properly ending the screen recording and saving your captured content, you can effectively preserve and share your screen activities on your Samsung device.
In the next section, we will discuss how to view and share your screen recordings after they have been saved.
Viewing and Sharing Screen Recordings
After you have successfully ended a screen recording on your Samsung device, the next step is to view and share your captured content. Viewing the screen recordings allows you to review your recorded material, while sharing them enables you to distribute them to others for various purposes. In this section, we will guide you through the process of viewing and sharing screen recordings on your Samsung device.
To view your screen recordings, navigate to the “Gallery” or “Photos” app on your Samsung device. In some cases, you might find a dedicated “Screen Recordings” folder within the file management system. Tap on the respective app or folder to access your recorded videos.
Once you have located the desired screen recording, tap on it to open and view the recorded video. This allows you to review the content and ensure that it was captured as intended. You can play, pause, rewind, or fast-forward through the recording to get a thorough understanding of what was captured.
If you need to make any edits or enhancements to the screen recording, you can use video editing apps or software available on your device. These tools allow you to trim the video, add annotations, overlay audio, or include captions to make your screen recording more professional or informative.
When it comes to sharing your screen recordings, there are several options available on your Samsung device. The most common method is to tap on the “Share” button within the screen recording app or video player. This allows you to choose different platforms or apps to share the recording, such as messaging apps, social media platforms, email, or cloud storage services.
Alternatively, you can also access the screen recording file directly through the file management system on your device. From there, you can long-press on the recording file to bring up the sharing options. This method allows you to share the recording via multiple apps or services simultaneously.
Before sharing your screen recordings, it’s essential to consider the privacy and consent of others who may be featured in the recording. Make sure you have the appropriate permissions to share any sensitive or personal information captured in your screen recording.
Additionally, you can upload your screen recordings to video sharing platforms like YouTube or Vimeo. This allows you to reach a wider audience and easily embed or link the recording in various online platforms, such as websites, blogs, or social media accounts.
By effectively viewing and sharing your screen recordings, you can showcase your work, provide tutorials, or solve technical issues effectively using the captured content on your Samsung device.
In the next section, we will provide some additional tips and tricks to enhance your screen recording experience.
Additional Tips and Tricks
Now that you are familiar with the process of screen recording on your Samsung device, here are some additional tips and tricks to enhance your screen recording experience:
- Utilize the pause and resume feature: As mentioned earlier, pausing and resuming the screen recording can be useful when creating tutorial videos or documenting processes with breaks. Take advantage of this feature to create more organized and professional-looking recordings.
- Optimize your device settings: Before starting a screen recording, consider optimizing your device settings for optimal performance. Close unnecessary apps, clear cache files, and ensure you have sufficient storage space to prevent any interruptions or lag during the recording.
- Use external accessories: If you want high-quality audio during your screen recordings, consider using external accessories such as a microphone or headphones with a built-in microphone. These accessories can provide clearer audio and improve the overall quality of your recordings.
- Experiment with different recording options: Play around with the available recording options, such as capturing touches on the screen or enabling the countdown timer. These features can add more context to your recordings and make them more informative for viewers.
- Edit and enhance your recordings: After capturing your screen recordings, take advantage of video editing apps or software to trim, add transitions, include captions, or overlay additional audio. These edits can polish your recordings and make them more engaging and professional.
- Consider using a third-party screen recording app: While Samsung devices come equipped with a built-in screen recording feature, you may want to explore third-party screen recording apps from the Google Play Store. These apps often offer additional features, such as video editing tools, live streaming capabilities, or the ability to record specific areas of the screen.
- Practice and experiment: To become proficient in screen recording, it’s important to practice and experiment with different techniques and settings. Try recording various types of content and review the recordings to identify areas for improvement. The more you practice, the better you will become at capturing high-quality screen recordings.
By incorporating these additional tips and tricks into your screen recording workflow, you can elevate the quality of your recordings and create engaging and informative content on your Samsung device.
Now that you have learned various aspects of screen recording on your Samsung device, you are ready to capture and share your screen activities with ease.
Happy recording!