
Why Schedule an Uber in Advance?
Scheduling an Uber in advance offers several benefits and can make your transportation experience more convenient and efficient. By taking a few minutes to schedule your ride ahead of time, you can save yourself from the stress of last-minute bookings and ensure that your transportation needs are met, especially during high-demand periods.
Here are some reasons why you should consider scheduling an Uber in advance:
- Guaranteed availability: By scheduling an Uber in advance, you secure your ride for the desired date and time. This is particularly useful during peak hours, holidays, or when attending important events, as it eliminates the uncertainty of finding an available Uber driver at the exact moment you need one.
- Time management: Scheduling in advance allows you to plan your day more efficiently. You won’t have to rush or waste time waiting for a ride. With a scheduled Uber, you can set the pickup time according to your schedule, ensuring you arrive at your destination on time without any unnecessary delays.
- Convenience: Need to catch an early morning flight or attend an early morning meeting? With scheduled Uber rides, you can rest assured that a driver will be ready to pick you up at the specified time, allowing you to start your day without any transportation-related hassles.
- Peace of mind: By scheduling your Uber in advance, you eliminate the worry of whether a driver will be available when you need one. This can be especially beneficial if you’re traveling to a new city or during busy events when demand is high.
- Flexibility: Uber allows you to schedule rides up to 30 days in advance, giving you the flexibility to plan and manage your transportation needs ahead of time. This is especially helpful when arranging transportation for future events or appointments.
Overall, scheduling an Uber in advance can provide you with peace of mind, convenience, and the assurance of a reliable ride when you need it the most. It’s a simple and effective way to manage your time and transportation, making your journeys more enjoyable and stress-free.
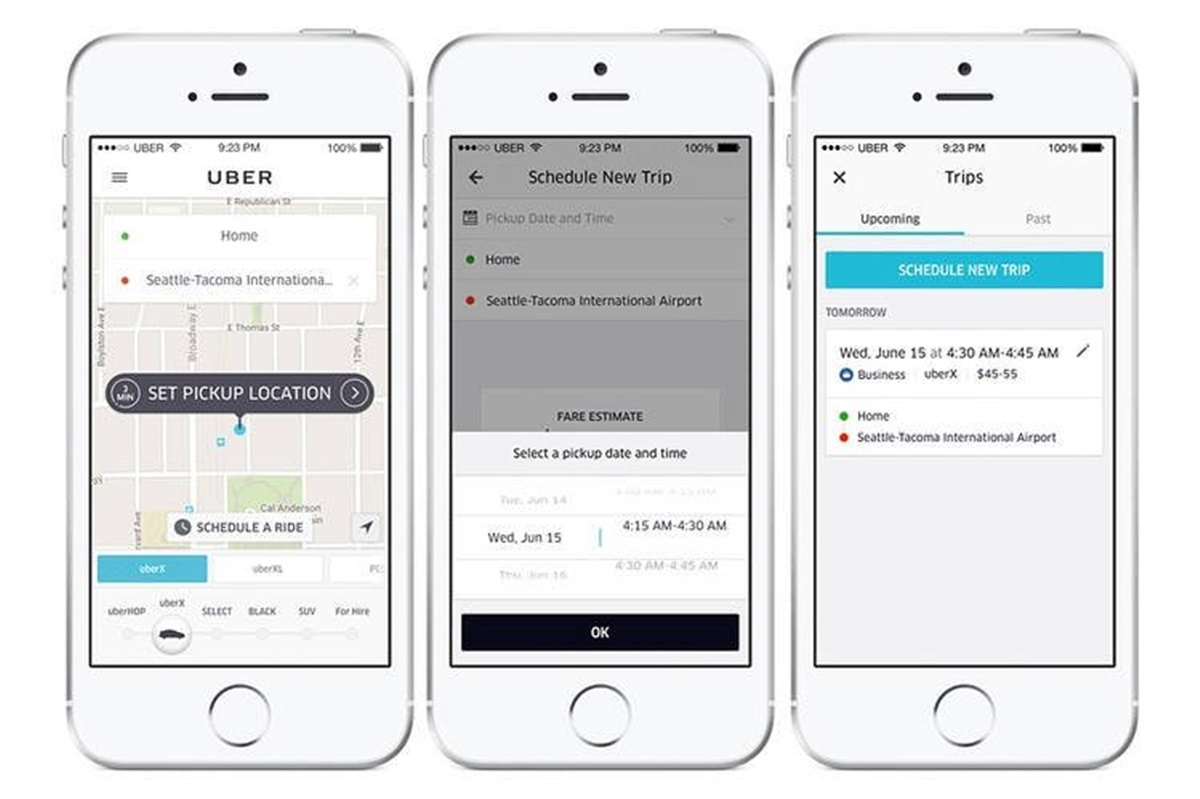
Steps to Schedule an Uber in Advance
Scheduling an Uber in advance is a straightforward process that can be done conveniently through the Uber app. Here’s a step-by-step guide on how to schedule an Uber in advance:
- Open the Uber App: Launch the Uber app on your smartphone. If you don’t have the app installed, download it from your device’s app store and create an account if you haven’t already.
- Choose Your Destination: Enter your desired destination in the “Where to?” field. You can either type in the address or choose it from the saved locations in your app.
- Set the Date and Time: Select the “Schedule a Ride” option, which usually appears below the available ride options. Set the date and time for when you want to be picked up.
- Confirm Your Pickup Location: Ensure that the pickup location displayed on the screen is correct. If necessary, adjust it by moving the map or entering a different address.
- Select Your Uber Service: Choose the type of Uber service you prefer, such as UberX, Uber Black, or Uber Pool. Each service has its own pricing and vehicle options.
- Review and Confirm Your Ride Details: Verify the ride details, including the pickup location, destination, and selected Uber service. Make sure everything is accurate before proceeding.
- Check for Availability: The app will show the availability of drivers for your scheduled time. If there are no available drivers, you may need to adjust the pickup time or choose an alternative transportation option.
- Add Any Special Instructions or Notes: If you have any specific instructions or preferences for the driver, such as a particular gate or meeting point, you can enter them in the notes section.
- Confirm Your Scheduled Ride: Once you’re satisfied with all the details, confirm your scheduled ride by tapping the “Schedule” or “Request” button, depending on the app version.
- Manage or Cancel Scheduled Rides: If you need to make any changes to your scheduled ride or cancel it altogether, you can do so through the Uber app. Navigate to the “Your Rides” section and find your upcoming scheduled ride to make the necessary adjustments.
Following these steps will enable you to easily schedule an Uber in advance, ensuring a reliable and convenient ride at your desired time.
Open the Uber App
The first step to schedule an Uber in advance is to open the Uber app on your smartphone. If you don’t have the app installed, you can download it from your device’s app store and create an account if you haven’t done so already.
Once you have the Uber app installed and your account is set up, simply tap on the app icon to launch it. The Uber app has a distinctive logo with a white square containing a black circle, representing the ride-sharing service.
Upon opening the app, you will be prompted to sign in using your Uber credentials. Enter your registered email address or mobile number, followed by your password, and tap on the “Sign In” button. If you have enabled biometric authentication, such as Face ID or Touch ID, you can also use that to log in quickly and securely.
After successfully logging in, you will be directed to the Uber app’s home screen. This is where you can access and explore various features and options, including scheduling rides in advance.
Note that the Uber app interface may vary slightly depending on the version and operating system of your device. However, the general steps for scheduling an Uber in advance remain consistent across different versions.
The Uber app provides a user-friendly and intuitive interface, designed to make the ride booking process seamless and effortless. With just a few taps, you can schedule your ride at a convenient time and ensure a hassle-free transportation experience.
Choose Your Destination
After opening the Uber app and logging in, the next step to schedule an Uber in advance is to choose your destination. This is the location where you want to be dropped off, such as your home, office, or a specific venue.
To choose your destination, follow these steps:
- On the Uber app’s home screen, you will see a search bar labeled “Where to?” at the top of the screen. Tap on this search bar to enter your desired destination.
- Type in the address or name of your destination in the search bar. As you type, the app will provide suggestions and auto-complete options to help you find the correct location quickly.
- You can also choose from your saved locations by tapping on the respective icon or selecting from the list of frequently used addresses.
- As you enter the destination, the app will start showing matches based on your input. Choose the correct destination from the available options by tapping on it.
- Once you have selected your destination, the Uber app will display the estimated fare and approximate duration for the trip.
- Take note of these details as they will help you make an informed decision regarding your scheduled Uber ride.
Choosing the correct destination is crucial for scheduling an Uber in advance. Make sure to enter the correct address to ensure a seamless pickup and drop-off experience.
Moreover, the Uber app also offers additional features such as saved locations, including frequently visited places or your home and work addresses. These saved locations can help you save time by eliminating the need to input the address each time you schedule a ride.
By selecting your destination accurately, you enable the app to calculate the most efficient route and provide you with reliable pickup and arrival times, making your Uber experience even more convenient and hassle-free.
Set the Date and Time
Once you have chosen your destination in the Uber app, the next step to schedule an Uber in advance is to set the date and time for your pickup.
Follow these steps to set the date and time for your scheduled Uber ride:
- On the Uber app’s screen, you will find the option to schedule a ride below the available ride options. Tap on this option to proceed with scheduling your ride.
- A scheduling window will appear, allowing you to select the desired date and time for your pickup. Tap on the date and time fields to open the calendar and clock interfaces.
- Select the desired date for your pickup by swiping through the calendar and tapping on the preferred date.
- Once you have chosen the date, you can set the pickup time by adjusting the hour and minute hands on the clock interface or by manually entering the time using the keyboard.
- Ensure that you select the correct time, taking into account your travel plans and any necessary buffer time for reaching your destination.
- After setting the date and time, the Uber app will display the estimated arrival time for your scheduled ride.
- Review the chosen date and time to ensure accuracy. You can also make adjustments to the date and time if needed, by tapping on the respective fields and modifying the selection.
By setting the correct date and time for your scheduled Uber ride, you ensure that a driver will be available to pick you up at the specified time. This helps you plan your day more effectively, knowing that your transportation is already arranged.
Moreover, scheduling your ride in advance allows you to secure a ride during peak hours or busy events, ensuring you won’t face any last-minute availability issues. It provides convenience and peace of mind, allowing you to focus on other aspects without worrying about transportation arrangements.
Confirm Your Pickup Location
After setting the date and time for your scheduled Uber ride, the next step is to confirm your pickup location. It is important to ensure that the pickup location displayed in the Uber app is accurate to ensure a smooth pickup experience.
Follow these steps to confirm your pickup location:
- On the Uber app’s screen, you will see the pickup location displayed prominently. This is the place where the driver will pick you up.
- Verify that the pickup location shown on the screen is correct. The Uber app uses your smartphone’s GPS signal to determine your current location and auto-populates it as the pickup point.
- If the displayed pickup location is accurate, proceed to the next step. If it is incorrect or needs adjustment, you can make the necessary changes by tapping on the pickup location field.
- The Uber app allows you to adjust the pickup location by moving the map around or entering a different address manually.
- Moving the map to the desired location will update the pickup address accordingly. You can also type in the address of your preferred pickup location if it differs from your current location.
- After confirming or adjusting the pickup location, take a moment to double-check the address to ensure accuracy. This is important to ensure that the driver arrives at the correct location to pick you up.
- If you have any specific instructions or details about the pickup location that would help the driver locate you easily, you can provide these in the “Special Instructions” or “Notes” section on the app.
- Once you have confirmed the pickup location, you can proceed to the next steps to review the ride details and confirm your scheduled Uber ride.
Confirming your pickup location ensures that the driver knows where to find you when it’s time for your ride. Accurate pickup location information helps to minimize any potential delays or confusion and ensures a smooth start to your journey.
By verifying your pickup location, you are taking a proactive step to ensure that your scheduled Uber ride starts off on the right track, providing you with a reliable and convenient transportation experience.
Select Your Uber Service
After confirming your pickup location, the next step in scheduling an Uber in advance is to select the type of Uber service you prefer. Uber offers a variety of service options, each with its own pricing, vehicle types, and features.
Follow these steps to select your Uber service:
- On the Uber app’s screen, you will see a list of available ride options. These options may include UberX, Uber Comfort, Uber Black, Uber SUV, Uber Pool, and more.
- Review the available options and consider factors such as the size of your group, your budget, and your preference for comfort or luxury.
- Tap on the desired Uber service to select it for your scheduled ride. Each service will have a different fare structure and vehicle type associated with it.
- The app will display the estimated fare for the selected service. Take note of this information to have an idea of the expected cost of your ride.
- Choosing the appropriate Uber service ensures that you obtain the level of comfort or luxury you desire for your transportation needs.
- If you are unsure about which service to choose, you can explore the service descriptions and details provided in the app for more information.
- Remember, the availability of Uber services may vary based on your location and the time of day.
Selecting the right Uber service is important to ensure that your ride meets your expectations in terms of comfort, vehicle type, and pricing. Whether you prefer a cost-effective option or a luxurious ride, Uber provides a range of services to cater to different needs.
By carefully considering your preferences and choosing the appropriate Uber service, you can enhance your overall transportation experience and enjoy a comfortable and enjoyable ride.
Review and Confirm Your Ride Details
After selecting your Uber service, it is important to review and confirm the details of your scheduled ride. This step ensures that all the information entered is correct and that you are ready to proceed with the scheduled booking.
Follow these steps to review and confirm your ride details:
- On the Uber app’s screen, you will see a summary of your ride details, including the pickup location, destination, selected Uber service, and estimated fare. Take a moment to carefully review this information.
- Verify that the pickup location displayed matches your intended pickup point. If it needs adjustment, go back to the previous step and modify the pickup location accordingly.
- Ensure that the destination address is correct and corresponds to where you want to be dropped off. If necessary, you can modify the destination by tapping on the “Change” button.
- Double-check the chosen Uber service to ensure that it aligns with your preferences, whether you opted for a standard ride, a larger vehicle, or a more luxurious option.
- Take note of the estimated fare provided by the app. This gives you an idea of the cost you can expect for the scheduled ride.
- If you have any special instructions or notes for the driver, such as a preferred gate or meeting point, make sure to mention them at this stage.
- Finally, ensure that the date and time of your scheduled ride are accurately displayed.
- If any changes or adjustments are required, you can go back and modify the relevant details accordingly. Otherwise, proceed to confirm your scheduled ride.
Reviewing and confirming your ride details is an essential step to ensure that everything is accurate before proceeding with the Uber booking. It helps to mitigate any potential errors or discrepancies, ensuring a smooth and seamless experience.
By carefully reviewing the details of your scheduled ride, you can be confident that the driver will arrive at the correct pickup location, take you to the intended destination, and provide you with the service you have selected.
Check for Availability
After reviewing and confirming your ride details, the next step in scheduling an Uber in advance is to check for the availability of drivers during your desired date and time. This step ensures that there are drivers available to pick you up at your chosen time slot.
Follow these steps to check for availability:
- On the Uber app’s screen, you will typically see a notification indicating the availability status for your scheduled time slot. The app will display if drivers are available or if there may be limited availability.
- If drivers are available, you can proceed with confidence, knowing that your scheduled Uber ride will be confirmed.
- If limited availability is indicated, you may consider adjusting the pickup time or exploring alternative transportation options to ensure a reliable ride.
- During busy periods or events, it is recommended to schedule your Uber ride well in advance to secure the availability of a driver.
- In some cases, demand may be exceptionally high, and it may not be possible to schedule an Uber ride due to the lack of available drivers. In such situations, you may need to consider alternative transportation options.
- If the availability status is uncertain or unclear, you can contact Uber support for further assistance or clarification. They can provide you with more information about the availability of drivers during your desired time slot.
Checking for availability is crucial, especially during peak hours, holidays, or events when the demand for Uber rides is high. By checking in advance, you can ensure that a driver will be available to pick you up at the scheduled time and prevent any last-minute inconveniences.
Remember that availability may depend on various factors, including location, day of the week, time of day, and local events. Hence, it is essential to check for availability to secure a reliable Uber ride.
Add Any Special Instructions or Notes
When scheduling an Uber in advance, you have the option to add any special instructions or notes for the driver. This step allows you to communicate specific details that can help ensure a smoother pickup and drop-off experience.
Follow these steps to add special instructions or notes:
- On the Uber app’s screen, look for the section where you can provide additional information or notes to the driver. It is usually labeled as “Special Instructions” or “Notes.”
- Tap on this section to open a text box where you can enter any relevant instructions or notes for the driver.
- You can include details like specific landmarks near the pickup location, preferred entrance or gate to use, or any other information that can help the driver locate you easily.
- If you have any specific preferences related to the trip, such as preferred temperature inside the vehicle or a need for extra space, you can mention them in this section.
- Be concise and clear in your instructions to ensure that the driver fully understands your requirements.
- Double-check the notes or instructions before proceeding to confirm your scheduled ride.
Adding special instructions or notes is especially useful when you have unique circumstances or specific requests that can enhance your Uber experience. Providing clear instructions can help the driver accurately fulfill your requirements and ensure a seamless journey.
Remember that while special instructions can be beneficial, it is crucial to communicate them politely and respectfully. Providing relevant and concise instructions helps promote a positive and successful interaction between you and the driver.
Confirm Your Scheduled Ride
After reviewing and finalizing all the necessary details for your scheduled Uber ride, the next step is to confirm your booking. By confirming your scheduled ride, you ensure that your requested ride is locked in and will be available at the designated time.
Follow these steps to confirm your scheduled ride:
- On the Uber app’s screen, carefully review all the details of your scheduled ride, including the pickup location, destination, selected Uber service, date, and time.
- Confirm that all the information is accurate and in line with your requirements.
- If any changes are needed, you can make adjustments by navigating back to the respective sections and modifying the relevant details accordingly.
- Once you are satisfied with all the information and ready to proceed, look for a “Confirm” or “Schedule” button on the app screen.
- Tap on the “Confirm” or “Schedule” button to finalize and confirm your scheduled Uber ride.
- You will receive a confirmation notification indicating that your ride has been successfully scheduled and is now confirmed.
- Review the confirmation details provided in the notification to ensure that they match your intended ride.
- At this stage, you can also cancel or modify your scheduled ride if any unforeseen circumstances arise or if your plans change. Check the app’s cancellation and modification policies for any applicable fees or restrictions.
- Finally, take note of the scheduled ride details, including the date, time, and any special instructions, if applicable. This information will help you prepare for your upcoming Uber ride.
By confirming your scheduled ride, you secure your booking and can be confident that a driver will be available to pick you up at the specified time. It provides you with peace of mind and ensures a smooth and convenient transportation experience.
Remember to keep track of any notifications or updates from the Uber app regarding your scheduled ride to stay informed and prepared.
Manage or Cancel Scheduled Rides
After scheduling an Uber ride in advance, you have the flexibility to manage or cancel your scheduled rides if your plans change or unforeseen circumstances arise. Uber provides options to modify or cancel your scheduled rides, ensuring convenience and flexibility for users.
Here’s how you can manage or cancel your scheduled rides:
- Open the Uber app on your smartphone and navigate to the “Your Rides” section. This section usually displays your upcoming and past rides.
- Look for the specific scheduled ride you wish to manage or cancel and tap on it to access the ride details.
- Within the ride details, you will find options to modify or cancel the scheduled ride. These options may be labeled as “Modify” or “Cancel.”
- If you need to reschedule the ride, choose the “Modify” option and follow the prompts to adjust the date and time of the ride. Make sure to select a new time slot that suits your updated plans.
- If you decide to cancel the scheduled ride, tap on the “Cancel” option and confirm your decision. Be aware of any cancellation fees or policies that may apply, especially if the cancellation is made close to the scheduled pickup time.
- After modifying or canceling the scheduled ride, the app will update accordingly, and you will receive a confirmation or cancellation notification.
- Remember to check the updated details of your ride or any notifications from the app to ensure that the changes or cancellation have been processed correctly.
- If you encounter any issues or need assistance with managing or canceling your scheduled ride, you can reach out to Uber’s customer support for further guidance.
Having the ability to manage or cancel your scheduled rides allows you to adapt to changes in your plans or unforeseen circumstances. It provides flexibility and convenience, ensuring that you can make adjustments as needed without experiencing any major inconveniences.
However, it is important to be mindful of cancellation policies and fees, especially if you cancel a ride close to the scheduled pickup time. Read and understand the terms and conditions associated with cancellations to avoid any unexpected costs.
Tips for Scheduling Uber in Advance
Scheduling an Uber in advance can streamline your transportation experience and ensure a reliable ride when you need it. To make the most out of this feature, consider the following tips:
- Plan ahead: Take advantage of the advanced scheduling feature by planning your rides well in advance, especially during peak hours, holidays, or special events. This helps secure a driver and ensures availability during high-demand periods.
- Be mindful of timing: When scheduling your ride, allow sufficient buffer time to account for traffic conditions, delays, or any unexpected circumstances that may arise. It’s better to schedule your pickup earlier than risk being late for your destination.
- Check for availability: Before confirming your scheduled ride, check for driver availability during your desired time slot. During busy periods, availability may be limited, and it might be necessary to adjust your pickup time or explore alternative transportation options.
- Double-check your details: Review the details of your scheduled ride, including the pickup location, destination, date, and time. Ensure that all information is accurate to avoid any inconvenience and ensure a smooth pickup and drop-off experience.
- Consider your preferences: Explore the different Uber services available and select one that aligns with your preferences and needs. Whether you prioritize cost-effectiveness, comfort, or luxury, choosing the right service will enhance your ride experience.
- Utilize special instructions: If you have any specific requirements or preferences, such as a preferred meeting point or temperature inside the vehicle, utilize the special instructions or notes section to communicate these details to the driver. Clear instructions can improve communication and ensure a personalized experience.
- Keep track of notifications: Stay informed by monitoring any notifications or updates from the Uber app regarding your scheduled ride. This includes information about driver allocation, delays, or any changes to your ride details.
- Be aware of cancellation policies: Understand the cancellation policies and associated fees, especially if you need to modify or cancel a scheduled ride. Familiarize yourself with the terms and conditions to avoid any unforeseen costs.
- Stay connected: Ensure that your smartphone is charged and connected to a reliable network or Wi-Fi to receive updates and communicate with the driver, if necessary.
- Provide feedback: After completing your scheduled ride, provide feedback to Uber regarding your experience. This helps maintain the quality and reliability of the service and provides valuable insights for both Uber and future riders.
By following these tips, you can make the most out of scheduling an Uber in advance. It allows you to conveniently plan your rides, ensure availability, and customize your experience, making transportation a seamless and enjoyable part of your day.
Pros and Cons of Scheduling Uber Rides
Scheduling Uber rides in advance offers several advantages, but it also comes with a few drawbacks. It’s important to consider both the pros and cons before deciding to schedule an Uber ride. Here are some key points to consider:
Pros:
- Convenience: Scheduling an Uber ride in advance saves you time and eliminates the need to wait for a ride when you need one. You can plan your day with confidence, knowing that your transportation needs are taken care of.
- Guaranteed availability: Scheduling in advance ensures that a driver will be ready to pick you up at the designated time, especially during high-demand periods or events. You won’t have to worry about struggling to find a ride amidst heavy traffic or limited availability.
- Flexibility: By scheduling Uber rides, you have the flexibility to plan your transportation well ahead of time. It’s particularly useful for important appointments, early morning flights, or time-sensitive events.
- Peace of mind: Knowing that your ride is scheduled and confirmed gives you peace of mind. You can avoid any last-minute stress or uncertainty and concentrate on other tasks or enjoy your day without the worry of arranging transportation.
- Efficient time management: By scheduling your Uber ride, you can better manage your time. You won’t have to rush or wait for a ride, ensuring that you arrive at your destination on time without unnecessary delays.
Cons:
- Less flexibility for spontaneous plans: Scheduling a ride in advance means committing to a specific time slot, which may limit your ability to make impromptu changes or adjust your plans if needed.
- Uncertainty of unforeseen circumstances: Despite careful planning, unexpected events such as traffic congestion or driver cancellations may still occur. This can sometimes result in delays or the need to adjust your plans on short notice.
- Potential cancellation fees: Depending on the timing and policies, canceling a scheduled Uber ride may incur fees. This is especially true if you cancel too close to the scheduled pickup time.
- Limited availability during peak periods: While scheduling ahead helps secure a ride during peak hours, there may still be times when availability is limited due to high demand or other factors. This can make it challenging to schedule a ride exactly when you want it.
- Requirement for advanced planning: Scheduling an Uber ride requires you to plan your transportation needs in advance. This may be an inconvenience for those who prefer more spontaneous or last-minute decision-making.
Considering the pros and cons of scheduling Uber rides allows you to make an informed decision based on your specific needs and circumstances. It’s important to weigh the benefits of convenience and reliability against any potential drawbacks to ensure an optimal transportation experience.