
Choosing the Right Scanner Tip
When it comes to using an iTero scanner, selecting the appropriate scanner tip is crucial for obtaining accurate and high-quality scans. The iTero system offers a variety of scanner tips that are designed for different purposes and patient needs. Understanding the differences between these tips will help ensure a successful scanning process.
Firstly, consider the size of the tip. The iTero system offers different sizes of scanner tips to accommodate various anatomical structures in the oral cavity. For example, a smaller tip may be suitable for scanning the posterior areas, while a larger tip may be more appropriate for capturing scans of the anterior teeth. It’s important to choose a tip that fits comfortably in the patient’s mouth and allows for easy maneuverability during the scanning process.
Additionally, consider the type of scan being performed. The iTero system offers specific scanner tips for capturing different types of scans, such as full arch scans, quadrant scans, and single-tooth scans. These specialized tips are designed to optimize the scanning process for each specific purpose, resulting in more accurate and efficient scans.
Furthermore, take into account any patient-specific factors. Some patients may have unique oral conditions or limitations that require the use of a specific scanner tip. For example, patients with a restricted mouth opening may benefit from a shorter or more maneuverable tip. It’s essential to assess the patient’s individual needs and choose a scanner tip that will facilitate the scanning process while ensuring patient comfort.
Lastly, consult the manufacturer’s guidelines. The iTero system provides detailed information about the compatibility of each scanner tip with the specific scanner model. It’s important to review these guidelines and ensure that the chosen tip is compatible with your particular iTero scanner to avoid any compatibility issues or potential damage to the equipment.
By carefully considering the size, type, patient-specific factors, and manufacturer’s guidelines, you can confidently select the right scanner tip for your iTero system. This will help ensure optimal scan quality, accuracy, and patient comfort throughout the scanning process.
Preparing the Scanner Tip for Use
Before starting the scanning process with an iTero scanner, it’s essential to properly prepare the scanner tip to ensure accurate and reliable scans. This involves a few simple steps to ensure optimal performance:
1. Inspect the scanner tip: Before each use, carefully examine the scanner tip for any signs of damage or wear. Check for cracks, deformities, or discoloration that may affect the scanning process. If any issues are detected, replace the tip with a new one to ensure accurate scans.
2. Clean the scanner tip: It’s important to keep the scanner tip clean to prevent any debris or residue from interfering with the scanning process. Use a mild soap or a disinfectant solution recommended by the manufacturer to clean the tip. Ensure that it is thoroughly rinsed and dried before use.
3. Check the connection: Ensure that the scanner tip is securely connected to the iTero scanner. A loose connection may result in poor scan quality or interruptions during the scanning process. Verify that the tip is properly attached and tightened to avoid any issues.
4. Calibrate the scanner: Before scanning, it’s crucial to calibrate the iTero scanner to ensure accurate measurements and image capture. Follow the manufacturer’s instructions to perform the calibration process correctly. This step helps maintain the precision and reliability of the scans.
5. Warm up the scanner tip: Some scanner tips require warming up before use, especially if they have been stored in a cold environment. Check the instructions provided by the manufacturer to determine if warming up the tip is necessary. If required, allow the scanner tip to reach the recommended temperature before initiating the scanning process.
By following these steps, you can ensure that the scanner tip is in optimal condition and ready for use. By starting with a clean and properly prepared tip, you can enhance the accuracy and reliability of the scanning process, leading to high-quality results for both you and your patients.
Preparing the Patient for Scanning
Preparing the patient for scanning is an essential step in ensuring a successful and comfortable experience with an iTero scanner. Proper patient preparation can significantly contribute to obtaining accurate and detailed scans. Here are some important considerations to keep in mind:
1. Educate the patient: Before the scanning process begins, explain the steps involved in the scan and inform the patient about what to expect. This will help alleviate any anxiety or discomfort they may have and ensure their cooperation during the procedure.
2. Provide instructions for oral hygiene: Instruct the patient to brush their teeth thoroughly before the scanning appointment. This helps remove any debris or plaque that could interfere with the scanning process and ensures better scan quality.
3. Inform about dietary restrictions: Advise the patient to avoid any food or drinks that may stain the teeth, such as coffee, red wine, or dark-colored foods, prior to the scan. Stains can affect the clarity of the scanned images, making it more challenging to accurately assess the patient’s oral condition.
4. Discuss any specific discomforts or concerns: Engage in a conversation with the patient to identify any unique issues or concerns they may have. For example, if the patient experiences excessive gag reflex, instruct them to take deep breaths and inform the operator immediately if they feel uncomfortable during the scan.
5. Position the patient comfortably: Ensure that the patient is in a relaxed and comfortable position before initiating the scanning process. Provide appropriate support for the head and neck to prevent any strained or awkward positions during the scan.
6. Use protective measures: If necessary, provide the patient with a disposable plastic cover or mouthguard to protect the scanner tip and maintain hygiene standards during the procedure.
By following these guidelines and adequately preparing the patient for the scanning process, you can ensure a smoother experience for both the patient and the operator. Open communication and proper patient education help create a cooperative and stress-free environment, resulting in accurate and high-quality scans.
Adjusting the Scanner Position
Positioning the scanner correctly is crucial for obtaining accurate and detailed scans with an iTero scanner. Proper alignment ensures that all areas of interest are captured effectively. Here are some important steps to consider when adjusting the scanner position:
1. Position the patient: Ensure that the patient is comfortably seated with proper head support. This helps maintain stability and reduces any potential movement during the scanning process.
2. Adjust the scanner height: Position the scanner at an appropriate height, so it aligns with the patient’s oral cavity. The scanner tip should be parallel to the occlusal plane or the reference point specified by the manufacturer. This alignment ensures consistent and accurate scans across different patients.
3. Align the scanner tip: Position the scanner tip in close proximity to the area to be scanned without touching the teeth or soft tissues. Maintain a distance of about 2-3mm between the scanner tip and the teeth. Check the display screen or feedback provided by the scanner to ensure proper alignment.
4. Maintain a steady hand: Ensure that your hand holding the scanner is stable and not trembling. Slight movements can affect the accuracy of the scans. Use the scanner’s stabilization features or utilize additional support, such as resting your hand on the patient’s cheek, to steady your movements.
5. Use rotation or angulation: Depending on the area being scanned, you may need to rotate the scanner or adjust the angulation to capture different views. Follow the recommended technique provided by the manufacturer or any specific instructions for the type of scan being performed.
6. Instruct the patient: Communicate with the patient throughout the process, providing gentle guidance on opening and closing their mouth or keeping their tongue out of the way. Clear instructions and patient cooperation contribute to better alignment and more accurate scans.
Remember to review the scan preview or live feedback provided by the scanner to ensure that the positioning is optimal before proceeding with the scanning process. Fine-tune the adjustments, if necessary, to capture all necessary areas accurately.
By following these steps and paying attention to proper scanner position, you can achieve consistent, precise, and high-quality scans using the iTero scanner.
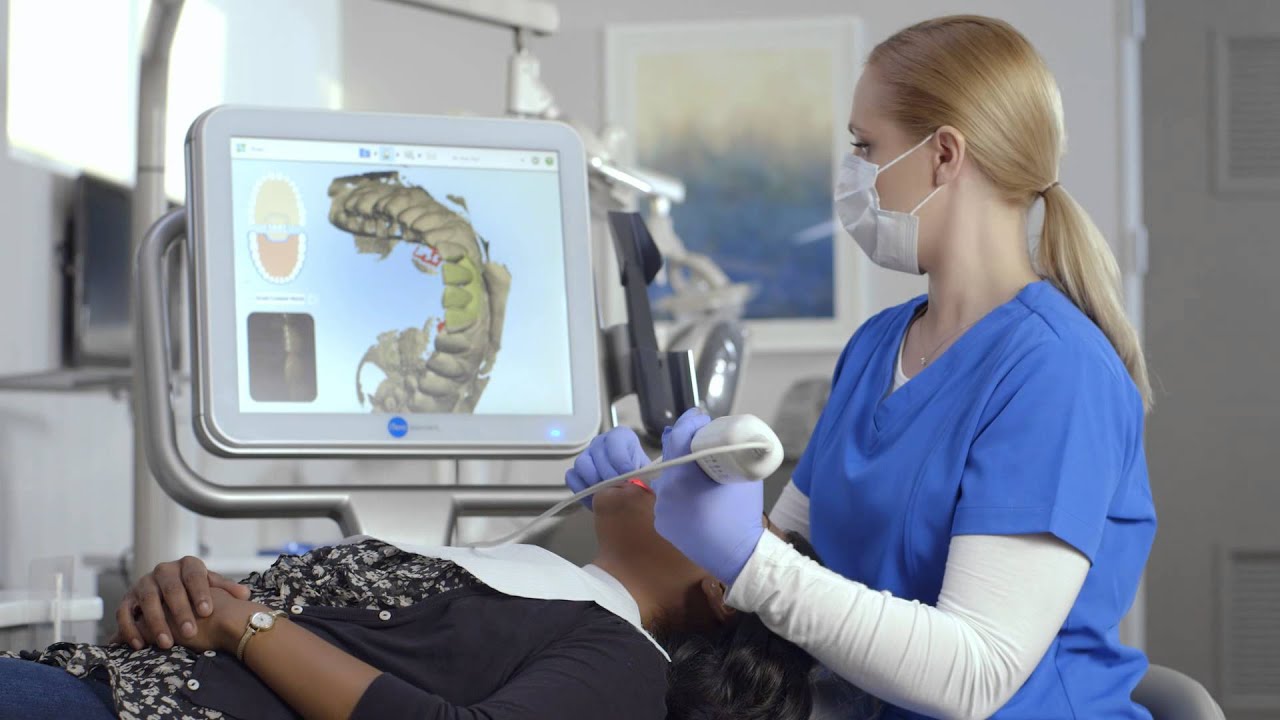
Starting the Scanning Process
Once the scanner is properly positioned and the patient is prepared, it’s time to initiate the scanning process with the iTero scanner. Starting the scan requires a systematic approach and attention to detail to ensure accurate and comprehensive results. Here’s a step-by-step guide to help you kickstart the scanning process:
1. Activate the scanner: Turn on the iTero scanner and make sure that it is connected to the necessary peripherals, such as the computer or software system, for proper functionality.
2. Select the desired scan type: Depending on the purpose of the scan, choose the appropriate scan type from the available options provided by the iTero scanner. Whether it’s a full arch scan, quadrant scan, or single-tooth scan, ensure that you have selected the correct scan mode.
3. Prepare the scanning area: Gently retract the patient’s lips and cheeks to expose the area you want to scan. Use gentle pressure with your fingers or ask the patient to assist with self-retraction if necessary. Clear any saliva or debris from the scanning area to maintain the clarity of the images.
4. Begin the scan: Position the scanner tip at the starting point of the scan and gently guide it along the dental surfaces. Follow the recommended scanning technique provided by the manufacturer and maintain a steady hand to ensure smooth and continuous movement of the scanner.
5. Cover all surfaces: Move the scanner tip systematically, making sure to capture all desired dental surfaces. Pay attention to areas that may require more detailed scanning, such as margins or interproximal spaces. Overlapping the regions slightly during the scan can improve the overall quality.
6. Follow the scanner prompts: Pay close attention to the visual cues or prompts provided by the iTero scanner software. These prompts may include instructions to pause, reposition the scanner, or adjust settings based on the scan progress. Follow these prompts to ensure a complete and accurate scan.
7. Communicate with the patient: Throughout the scanning process, maintain open communication with the patient. Provide clear instructions on when to move their tongue or close their mouth, and reassure them of the progress. This helps reduce anxiety and improves patient cooperation.
8. Review the scans: Once you have completed the scan, review the captured images on the iTero scanner’s display or the connected software. Check for any areas that may require retakes or additional attention. If needed, retake specific scans to ensure optimal accuracy and completeness.
By following these steps, you can smoothly initiate the scanning process with an iTero scanner. Pay attention to detail and communicate effectively with the patient to ensure a comfortable experience while obtaining comprehensive and accurate scans.
Scanning Each Arch
When using an iTero scanner, capturing scans of each dental arch is a vital step in obtaining a comprehensive digital impression. Scanning each arch requires attention to detail and a systematic approach to ensure accurate representation of the patient’s teeth and oral structures. Here’s a guide to help you navigate through the process of scanning each arch:
1. Begin with a clean scanner tip: Before scanning each arch, make sure to clean and dry the scanner tip thoroughly. Removing any debris or residue helps maintain scan quality and accuracy.
2. Start with the upper arch: Position the scanner tip at the starting point of the upper arch. This is typically at the posterior teeth. Begin scanning the buccal and occlusal surfaces, moving along the arch in a smooth and controlled motion. Ensure that you capture all teeth, including any restorations or prosthetics.
3. Pay attention to interproximal spaces: When scanning the upper arch, be especially careful to capture the interproximal spaces between each tooth. Adjust the angulation or use rotating motions to get into these tight areas and obtain accurate digital impressions.
4. Move to the lower arch: Once you have completed scanning the upper arch, repeat the process for the lower arch. Position the scanner tip at the starting point, typically at the posterior teeth, and systematically scan the buccal and occlusal surfaces of each tooth. Ensure that you cover all surfaces and accurately capture the lower arch’s anatomy.
5. Address any challenges or difficult areas: Some patients may have unique oral conditions or challenging areas that require extra attention. For example, patients with a high-arched palate or crowded teeth may require different scanning techniques or additional time to ensure accurate representation. Be patient and adapt your scanning technique as needed to capture these challenging areas effectively.
6. Communicate and guide the patient: Throughout the scanning process, communicate with the patient to ensure their comfort and cooperation. Provide clear instructions on when to bite down, rest, or reposition their tongue if necessary. This helps to minimize any potential movement or discomfort and ensures accurate scans.
7. Review the scanned images: After completing the scan of each arch, review the scanned images on the iTero scanner or connected software. Check for any areas that may require retakes or additional attention. If needed, retake specific scans to ensure optimal accuracy and completeness.
By following these steps and paying attention to detail, you can obtain accurate and comprehensive scans of each arch using the iTero scanner. Remember to be patient, communicate effectively with the patient, and adapt your scanning technique as needed to overcome any challenges that may arise.
Reviewing and Retaking Scans if Necessary
Once you have completed scanning each arch with the iTero scanner, it’s important to carefully review the scanned images to ensure optimal accuracy and completeness. Reviewing and retaking scans when necessary is a critical step in obtaining high-quality digital impressions. Here’s a guide to help you navigate through the process:
1. Review the scans: Take the time to carefully review each scanned image on the iTero scanner’s display or the connected software. Check for any areas that may require retakes or additional attention. Pay close attention to the quality and clarity of the scans, ensuring all necessary dental surfaces are captured.
2. Assess scan completeness: Evaluate whether the scans provide a comprehensive representation of the patient’s dental arches. Look for any missed areas, gaps, or incomplete coverage. It’s essential to have scans that accurately capture the entire dentition to ensure proper treatment planning and analysis.
3. Verify scan accuracy: Check for any areas of distortion or artifacts that may affect the accuracy of the digital impression. Look for sharp and well-defined margins, accurate gingival contours, and proper representation of any existing restorations or prosthetics. If you notice any discrepancies, consider retaking scans for better accuracy.
4. Communicate with the patient: If there are areas that need to be retaken, communicate with the patient about the reasons for the retakes. Clearly explain the importance of obtaining accurate scans for their treatment and reassure them that retakes are a normal part of the process. This helps build trust and ensures patient cooperation.
5. Retake scans if necessary: If the review highlights any issues or incomplete areas, retake the specific scans that require attention. Make sure to follow the recommended scanning technique, paying attention to proper alignment, angulation, and coverage. Retaking scans allows you to correct any inaccuracies or omissions and ensure a complete and accurate digital impression.
6. Repeat the review process: After retaking scans, review the new images for accuracy and completeness. Compare them to the previous scans and assess for improvement. Repeat this process until you are satisfied with the quality and accuracy of the digital impression.
7. Document and save the final scans: Once you are confident in the accuracy and completeness of the scans, document and save the final digital impressions in the appropriate format. Organize and label the files according to the patient’s information for easy access and future reference.
By systematically reviewing and retaking scans when necessary, you can ensure optimal accuracy and completeness in the digital impressions obtained with the iTero scanner. This attention to detail and commitment to quality ensures the best possible foundation for treatment planning and analysis.
Finishing the Scanning Process
Once you have reviewed and obtained accurate digital impressions with the iTero scanner, it’s time to wrap up the scanning process. Properly finishing the scanning process ensures that the captured scans are saved, stored, and ready for further analysis or treatment planning. Here’s a guide to help you complete the scanning process effectively:
1. Save and store the scans: Ensure that the digital impressions are properly saved and stored in the designated location or software system. Follow the recommended protocols provided by the iTero scanner or any specific guidelines from your dental practice. Properly organizing and labeling the files allows for easy retrieval and reference in the future.
2. Verify data transfer: If you are using the iTero scanner with integrated software or sending the scans to a laboratory, verify that the data transfer process is completed successfully. Double-check that all necessary scans and information have been transmitted without any errors.
3. Clean the scanner: After finishing the scans, clean the scanner thoroughly according to the manufacturer’s guidelines. Use a mild soap or a disinfectant solution recommended for the scanner. Pay attention to cleaning the scanner tip, as well as any other components that were in contact with the patient’s oral cavity.
4. Secure patient privacy: Ensure that patient privacy and confidentiality are maintained throughout the scanning process. If any personal information or images are stored digitally, adhere to the necessary privacy and data protection guidelines to safeguard patient information.
5. Document the scanning details: Keep a record of the scanning details, including the date, time, specific scans performed, and any other relevant information. This documentation can be helpful for future reference or communication with colleagues or dental laboratory technicians.
6. Provide post-scanning instructions: Before dismissing the patient, provide them with any necessary post-scanning instructions. This may include advising them about possible temporary changes in their oral hygiene routine or any precautions they need to take following the scanning process.
7. Evaluate the scan quality: Take a moment to reflect on the overall quality of the scans obtained. Assess if there are any areas for improvement, whether in technique, patient comfort, or scanner functionality. Continuous evaluation and refinement of the scanning process can help enhance future scanning experiences.
By following these steps, you can effectively finish the scanning process with the iTero scanner. Properly saving, storing, and cleaning the scanner ensures the longevity and accuracy of the digital impressions obtained. Paying attention to documentation and patient instructions contributes to a comprehensive scanning experience for both the dental professional and the patient.
Properly Cleaning the Scanner Tip
Ensuring that the scanner tip of the iTero scanner is cleaned thoroughly is essential for maintaining optimal performance and hygiene. Proper cleaning not only helps maintain the accuracy of the scans but also contributes to the longevity of the scanner tip. Here are some key steps to properly clean the scanner tip:
1. Remove debris and rinse: After completing a scan, remove any visible debris or residue from the scanner tip. Gently wipe the tip’s surfaces using a clean, soft cloth or tissue. This initial step helps remove larger particles before proceeding with a more thorough cleaning.
2. Use a mild soap or disinfectant solution: Prepare a mild soap solution or use a disinfectant solution specifically recommended for the scanner tip. Follow the manufacturer’s guidelines for the appropriate dilution ratio and duration for soaking the tip. Ensure that the soap or disinfectant solution covers the entire surface of the scanner tip.
3. Scrub with a soft brush: After soaking the scanner tip, use a soft-bristled brush to gently scrub the tip’s surfaces. Pay extra attention to areas that may have residual debris or stains. Use gentle, circular motions to scrub the tip thoroughly. Avoid using abrasive brushes or harsh cleaners that could damage the tip.
4. Rinse thoroughly: Once the scanner tip has been scrubbed, rinse it thoroughly with clean water to remove any soap or disinfectant residue. Ensure that all soap or disinfectant has been completely rinsed away to avoid any potential contamination of future scans. Inspect the tip to confirm that it is visually clean and free from any remaining residue.
5. Dry the scanner tip: After rinsing, pat the scanner tip dry using a clean, lint-free cloth or allow it to air dry in a clean and protected area. Ensure that the tip is completely dry before storing or using it for future scans. Excess moisture can affect scan quality and promote the growth of bacteria or mold.
6. Store the scanner tip properly: Once the tip is completely dry, store it in a clean and designated area, preferably in a protective case or cover to prevent any contamination or damage. Follow the manufacturer’s instructions for proper storage to maintain the tip’s integrity and performance.
7. Regularly inspect and replace the tip: Regularly inspect the scanner tip for any signs of wear, damage, or discoloration. Follow the manufacturer’s recommendations for the lifespan of the tip and replace it as necessary. Using a worn or damaged tip can compromise the accuracy of the scans and lead to suboptimal results.
By following these steps and incorporating proper cleaning into your scanning routine, you can ensure that the scanner tip of the iTero scanner remains clean, hygienic, and in optimal condition. This not only contributes to accurate and high-quality scans but also prolongs the lifespan of the scanner tip, maximizing its value and performance.
Troubleshooting Common Scanning Issues
While using the iTero scanner, you may encounter occasional scanning issues that can affect the quality and accuracy of the digital impressions. Understanding common scanning issues and knowing how to troubleshoot them can help you overcome these challenges effectively. Here are some common scanning issues and their troubleshooting steps:
1. Incomplete scans: If the scanner is not capturing the entire dental arch or missing specific areas, consider adjusting the scanner position and angulation. Ensure that the scanner tip is aligned properly and maintained at the recommended distance from the teeth. Take your time and scan at a steady pace, making sure to cover all surfaces comprehensively.
2. Distorted scans: If the scanned images appear distorted or pixelated, check for any debris or moisture on the scanner tip. Clean and dry the tip thoroughly before rescanning. Additionally, confirm that the scanner and its software are updated to the latest version. Outdated software can sometimes result in distorted scans.
3. Motion artifacts: If the scanned images contain blurriness or motion artifacts, it’s important to ensure a stable hand and smooth movement during the scanning process. Support your hand on the patient’s cheek or use the stabilization features on the iTero scanner to minimize any hand tremors or shaking. Additionally, verify that the patient is relaxed and not moving excessively during the scan.
4. Lack of detail: If the scanned images lack detail, such as insufficient definition in the margins or inaccurate gingival contours, reevaluate the angulation and position of the scanner tip. Regularly check the tip’s cleanliness and ensure that the scanning area is adequately prepared, free from saliva or debris. Adjusting lighting conditions in the scanning environment can also aid in obtaining clearer details.
5. Gaps in interproximal areas: If the interproximal areas between teeth result in gaps or incomplete scans, try angling the scanner tip slightly to reach these tight spaces. Use rotating motions or request the patient’s assistance in creating space between the teeth by using their tongue or finger. Taking time to scan these areas thoroughly can help capture accurate impressions.
6. Excessive gag reflex: For patients with a strong gag reflex, instruct them to take deep breaths through their nose and exhale slowly during the scan. Utilize distraction techniques or provide them with a mirror to focus their attention away from the scanning process. If necessary, consider using an anesthetic gel or spray to temporarily reduce sensitivity in the back of the throat.
7. Systematic errors: If you notice consistent errors occurring during the scanning process, such as recurring artifacts or incomplete scans, it may be beneficial to consult the manufacturer’s support or technical team. They can provide guidance specific to the iTero scanner model and help identify any underlying issues that require troubleshooting or maintenance.
By familiarizing yourself with these common scanning issues and their corresponding troubleshooting steps, you can overcome challenges and improve the quality and accuracy of your digital impressions with the iTero scanner. Remember to maintain good communication with the patient and continuously evaluate your scanning technique for optimal results.