
Connecting the Printer to the Computer
Before you can start scanning documents from your printer to your computer, you need to ensure that the printer is properly connected to your computer. Follow these steps to establish the connection:
- Check the cables: Make sure that the printer is connected to your computer using a USB cable or through a wireless network, depending on the type of printer you have. Ensure that the cable is securely plugged into both the printer and the computer.
- Turn on the printer: Press the power button on the printer to turn it on. Wait for the printer to initialize and be in a ready state before continuing.
- Check printer settings: Access the printer’s control panel or settings menu to verify that the printer is connected to the same Wi-Fi network as your computer, if you are using a wireless connection. Adjust the settings if necessary.
- Install printer drivers: If your computer does not already have the necessary printer drivers installed, you may need to download and install them from the printer manufacturer’s website. Follow the provided instructions to complete the installation process.
Once the printer is connected to your computer and the necessary drivers are installed, you are ready to proceed with scanning documents from the printer to your computer.
Installing the Printer Software
To scan documents from your printer to your computer, you will need to install the printer software on your computer. The software provided by the printer manufacturer includes the necessary drivers and utilities to facilitate scanning. Here’s how you can install the printer software:
- Visit the manufacturer’s website: Go to the website of the printer manufacturer and navigate to the support or downloads section. Look for the specific model of your printer.
- Download the software: Locate the software or driver package for your printer model. Ensure that you download the correct software that is compatible with your operating system.
- Run the installer: Once the software is downloaded, locate the installer file and double-click on it to run the installation wizard.
- Follow the instructions: The installation wizard will guide you through the process. Follow the on-screen instructions to install the printer software on your computer.
- Connect the printer: During the installation process, you may be prompted to connect your printer to the computer. Ensure that the printer is connected properly and turned on before proceeding.
- Complete the installation: Once the software installation is complete, you may be asked to restart your computer. Follow any additional instructions provided by the installer to finalize the installation process.
After successfully installing the printer software, you should be able to access the scanning functions and settings from your computer. The software will typically create a shortcut or icon on your desktop or in your system tray for easy access to the printer utilities. Make sure to check for any available updates for the printer software periodically, as manufacturers often release updates to enhance performance and add new features.
Preparing the Documents for Scanning
Before you scan your documents using your printer, it’s important to prepare them properly to ensure accurate and high-quality scans. Follow these steps to prepare your documents for scanning:
- Remove any staples or paper clips: Ensure that the documents you want to scan are free from any staples, paper clips, or other metal objects that could potentially damage the scanner or the documents themselves.
- Straighten out the documents: Flatten any folded or creased pages to ensure that they scan properly. Use your hands or a gentle touch to smooth out any wrinkles or curves in the paper.
- Arrange the documents in the correct order: If you have multiple pages to scan and they need to be in a specific order, make sure to arrange them accordingly before placing them in the document feeder or on the scanner glass.
- Remove any dirt or debris: Clean the documents and remove any dust, fingerprints, or smudges that could affect the scan quality. Use a clean, lint-free cloth or an appropriate cleaning solution to gently wipe the surfaces of the documents.
- Check for double-sided documents: If you have double-sided documents that you want to scan, ensure that you have selected the appropriate scanning options in the software. Some printers have a duplex scanning feature, while others may require manually flipping the pages to capture both sides.
- Consider using a document separator sheet: For multi-page documents, using a document separator sheet can help the scanner recognize the separation between pages. This can ensure that each page is scanned as an individual document, keeping them organized.
By following these preparation steps, you can optimize the scanning process and ensure that your documents are captured accurately and clearly. Taking the time to properly prepare your documents will result in better scans and save you from potential issues during the scanning process.
Selecting the Scanning Options
Once your documents are prepared, you can start scanning them by selecting the appropriate scanning options on your printer software. The scanning options allow you to customize the scan settings according to your requirements. Here’s how you can select the scanning options:
- Open the printer software: Launch the printer software on your computer. You can usually find it by searching for the printer’s name in the Start menu or by clicking on the printer icon in the system tray.
- Select the scanning function: In the printer software, look for the scanning function or a tab specifically dedicated to scanning. Click on it to access the scanning options.
- Choose the scan type: Depending on your needs, you can choose to scan your documents as images or as editable text. Select the appropriate scan type from the available options.
- Specify the file format: Decide on the file format in which you want to save your scanned documents. Common options include PDF, JPEG, or TIFF. Choose the format that best suits your requirements.
- Select the scan resolution: Adjust the scanning resolution to determine the level of detail and quality in the scanned documents. Higher resolutions result in sharper images but may also increase the file size.
- Choose the destination folder: Specify the folder on your computer where the scanned documents should be saved. You can create a new folder or select an existing one.
- Enable or disable additional settings: Depending on your printer software, you may have additional scanning options such as color mode, automatic document feeder (ADF) settings, or image enhancements. Choose the settings that align with your preferences.
By selecting the appropriate scanning options, you can customize the scanning process to meet your specific needs. Take a moment to review and confirm your selections before proceeding to the next step of adjusting the scan settings.
Adjusting the Scan Settings
After selecting the scanning options, you may need to further adjust the scan settings to ensure optimal results. The scan settings allow you to fine-tune various aspects of the scanning process according to your preferences. Follow these steps to adjust the scan settings:
- Preview the scan: Many printer software programs offer a preview feature that allows you to see a preview of the scanned document before finalizing the scan. This can be useful for cropping images, adjusting alignment, or making any necessary corrections.
- Set the page size: If your document has a specific page size, such as Legal or A4, make sure to select the appropriate page size in the scan settings. This ensures that the scanned document is accurately sized.
- Adjust the scan area: If you only want to scan a specific part of the document, you can adjust the scan area by dragging the corners or using the designated tools in the scanning software. This allows you to capture only the desired portion of the document.
- Modify the brightness and contrast: Depending on the lighting conditions and the original document quality, you may need to adjust the brightness and contrast levels of the scanned image. Use the provided sliders in the software to make the necessary adjustments.
- Apply image corrections: Some scanning software offers image correction features such as red-eye removal, background cleanup, or color adjustments. Use these tools to enhance the quality of the scanned document as needed.
- Enable OCR (Optical Character Recognition): If you want to convert the scanned document into editable text, check if your scanning software has OCR capabilities. Enable the OCR function to convert the scanned image into searchable and editable text.
- Save the settings as presets: If you frequently scan documents with similar settings, consider saving the current scan settings as a preset. This way, you can easily select the preset for future scans without needing to modify the settings each time.
By adjusting the scan settings, you can tailor the scanning process to your specific requirements and preferences. Take the time to review and fine-tune the settings before proceeding with the actual scan to ensure the best possible results.
Previewing the Scanned Document
Before finalizing the scanning process, it’s a good idea to preview the scanned document to ensure that it meets your expectations. Previewing the document allows you to make any necessary adjustments or corrections before saving the final scanned file. Follow these steps to preview the scanned document:
- Click on the preview button: In the scanning software, look for a preview button or an option that allows you to preview the scanned document. Click on it to open the preview window.
- Review the scanned image: The preview window will display the scanned document, giving you a visual representation of how it will appear in the final scanned file. Take a moment to review the image for clarity, alignment, and any potential issues.
- Adjust cropping and rotation: If the scanned document appears skewed or if there are unwanted borders or edges, use the cropping and rotation tools in the scanning software to make the necessary adjustments. Ensure that the document is properly aligned and any excess areas are removed.
- Check for image quality: Examine the scanned image for any blurriness, smudges, or other quality issues. If needed, go back to the scan settings and make adjustments to brightness, contrast, or other image-related settings to enhance the quality of the scanned document.
- Inspect OCR accuracy (if applicable): If you enabled Optical Character Recognition (OCR), carefully review the previewed text to ensure its accuracy. Check for any misspelled words, incorrect formatting, or other errors that may have occurred during the OCR process.
- Make necessary corrections: If you identify any issues during the preview, go back to the appropriate settings or tools in the scanning software to make the necessary corrections. Repeat the preview step until you are satisfied with the document’s appearance and quality.
By previewing the scanned document, you can catch any potential errors or imperfections before saving the final file. This step allows you to make necessary adjustments and ensures that you have a high-quality and accurate representation of the scanned document.
Scanning the Document
Once you have previewed and fine-tuned the settings, it’s time to proceed with scanning the document. Follow these steps to scan the document from your printer to your computer:
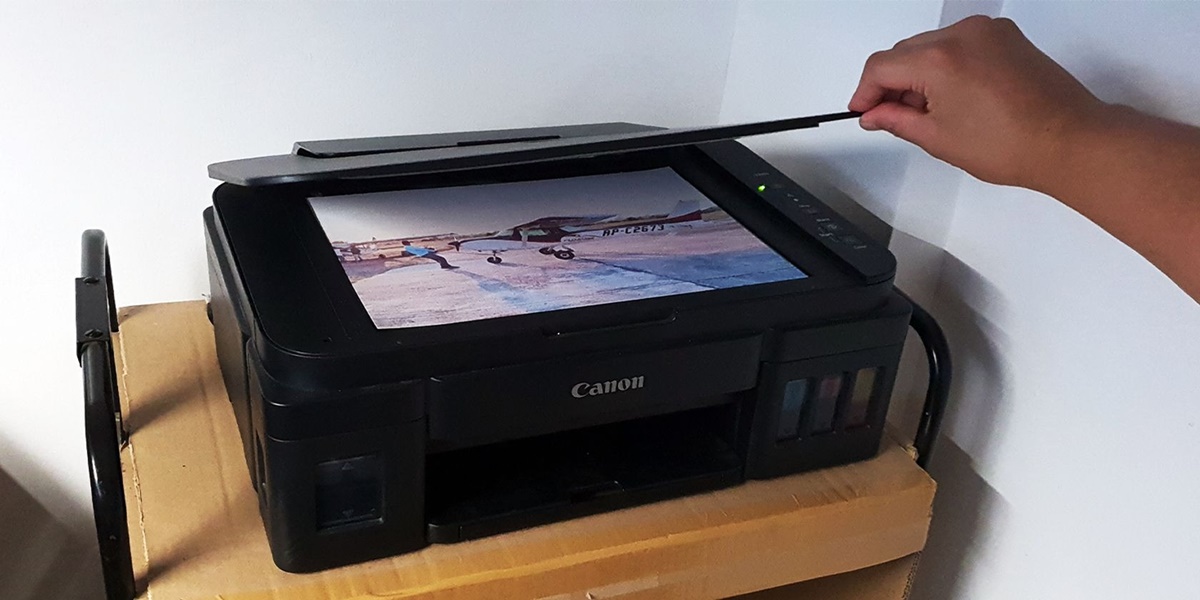
- Place the document on the scanner: If you are using a flatbed scanner, open the cover and carefully place the document face-down on the glass. Make sure it is aligned properly and close the cover. If you are using an automatic document feeder (ADF), load the document into the feeder tray.
- Start the scanning software: Open the scanning software on your computer. If it is already open, ensure that it is in the scanning mode or select the appropriate scanning function within the software.
- Choose the scanning settings: If you haven’t already done so, select the desired scanning options and adjust the settings according to your preferences. This includes selecting the file format, scan resolution, and any other relevant settings.
- Initiate the scan: Click on the “Scan” or “Start” button in the scanning software to initiate the scanning process. The scanner will start capturing the image of the document and transfer it to your computer.
- Monitor the progress: While the document is being scanned, you can monitor the progress on the screen or through any status indicators provided by the scanning software. This allows you to ensure that the scanning process is proceeding without any issues.
- Wait for the scan to complete: Depending on the size and complexity of the document, the scanning process may take a few moments. Wait for the scanning process to complete before proceeding to the next step.
- Review and save the scanned document: Once the scan is complete, the scanned document will be displayed in the scanning software. Take a moment to review the final scanned image, ensuring that it meets your expectations. If satisfied, save the document to your desired location on your computer, using the specified file name and format.
By following these steps, you can successfully scan your document from the printer to your computer. Make sure to store the scanned document in a secure location and proceed with any additional actions you require, such as editing or sharing the scanned file.
Saving the Scanned Document
After successfully scanning the document, it’s important to save it properly to ensure easy access and long-term preservation. Follow these steps to save the scanned document on your computer:
- Review the scanned document: Before saving, take a moment to review the scanned document on your computer screen. Check for any issues, such as missing pages, skewed alignment, or poor image quality.
- Choose the file name: Give the scanned document a descriptive and easily recognizable file name. This will make it easier to locate and identify the document later on.
- Select the file format: Choose the appropriate file format for your scanned document. Common file formats include PDF, JPEG, or TIFF. Consider the purpose and compatibility of the document when selecting the format.
- Specify the saving location: Select the folder or directory on your computer where you want to save the scanned document. Create a new folder if necessary, and make sure to choose a location that is easily accessible and organized.
- Set the file compression: If your scanning software offers compression options, consider adjusting the compression settings to balance file size and image quality. Higher compression can reduce file size but may affect image clarity.
- Apply any additional settings: Depending on the scanning software, you may have additional options to adjust, such as security settings, metadata inclusion, or document properties. Customize these settings as needed.
- Save the scanned document: Once you have specified all the necessary settings, click on the “Save” or “Finish” button in the scanning software to save the scanned document to the designated location on your computer.
- Validate the saved document: After saving, take a moment to open the saved document and ensure that it can be accessed and viewed properly. This allows you to verify that the document was saved correctly and is in a usable format.
By following these steps, you can save your scanned document in a well-organized and accessible manner. Remember to keep backup copies of important scanned documents and utilize appropriate file management practices to maintain a well-structured digital archive.
Troubleshooting Common Issues
While scanning documents from your printer to your computer, you may encounter some common issues that can hinder the scanning process. Here are some troubleshooting tips to help you overcome these challenges:
- Poor image quality: If the scanned documents appear blurry or pixelated, adjust the scan settings for resolution, brightness, and contrast. Make sure the document is clean and properly aligned on the scanner glass.
- Document jams: If the document feeder gets jammed during scanning, carefully remove the document and check for any obstructions or damaged parts. Make sure the documents are properly inserted and not crumpled or sticking together.
- Connection issues: If the printer is not being detected by the computer, check the USB or wireless connection. Ensure the cables are securely connected and try restarting both the printer and the computer.
- Software compatibility: If the scanning software is not functioning or causing errors, ensure that it is compatible with your operating system. Check for software updates or reinstall the software if necessary.
- File format issues: If you encounter difficulties opening or accessing the scanned files, verify that the chosen file format is supported by the applications you are using. Convert the file to a different format if needed.
- Scanner not responding: If the scanner is unresponsive, check the power connection and ensure that it is turned on. Restart the scanner and the computer to reset any temporary glitches.
- Scanned document size: If the size of the scanned document is too large, consider adjusting the scan settings for resolution, compression, or file format. This can help reduce the file size without compromising quality.
- OCR errors: If you encounter errors or inaccuracies during the OCR process, check the scan settings and ensure that the document is clear and legible. Retrain the OCR software if available or manually correct any errors in the resulting text.
If you continue to experience issues, consult the printer manufacturer’s support documentation or contact their customer support for assistance. They can provide further troubleshooting steps specific to your printer model.
By following these troubleshooting tips, you can overcome common issues and ensure a smooth and successful scanning process from your printer to your computer.