
Benefits of Saving a Web Page as a PDF
Saving a web page as a PDF offers several benefits that can enhance your online browsing experience and make it easier to share and access information. Whether you are a student, a professional, or simply someone who wants to keep a record of a webpage, converting it to a PDF format can be advantageous in many ways. Here are some key benefits:
- Preserving the webpage’s layout: When you save a web page as a PDF, it retains its original formatting, including fonts, images, and graphics. This ensures that the content is displayed as intended, regardless of the device or operating system used to view it.
- Offline accessibility: PDF files are self-contained documents that can be accessed without an internet connection. Saving a web page as a PDF allows you to store and access the information offline, ensuring you can review it at any time, even when you’re not connected to the internet.
- Easy sharing: PDF files are widely compatible and can be easily shared via email, messaging apps, or file-sharing platforms. By saving a web page as a PDF, you can share specific information with others without requiring them to visit the webpage themselves.
- Preserving hyperlinks: When you convert a web page to a PDF, the hyperlinks within the content remain active. This means that you can still click on the links to navigate to different sections of the PDF or external sources, providing a seamless reading experience.
- Information organization: By saving web pages as PDFs, you can create a digital archive of important content. This allows you to organize and categorize information for future reference, making it easier to retrieve specific details when needed.
- Printing flexibility: Saving a web page as a PDF gives you more control over how you print the content. You can adjust the page layout, choose specific sections to print, or even save paper by printing multiple pages on a single sheet.
Overall, saving a web page as a PDF provides convenience, accessibility, and flexibility, making it a valuable option for capturing and sharing online information. By leveraging this feature, you can enhance your productivity, collaborate effectively, and ensure that important web content is accessible at your fingertips.
Step 1: Choosing the Right Web Browser
Before you can save a web page as a PDF, it’s important to ensure that you are using a web browser that supports this feature. While most modern web browsers offer the ability to save web pages as PDFs, the process may vary slightly depending on the browser you are using. Here are some considerations when choosing the right web browser:
- Browser compatibility: Check if your current web browser supports the option to save web pages as PDFs. Popular web browsers such as Google Chrome, Mozilla Firefox, and Microsoft Edge have this functionality built-in.
- Update your browser: Make sure that your browser is up to date. Developers often release updates that include bug fixes and new features. Updating your browser ensures that you have the latest version and access to any PDF-saving enhancements.
- Compatibility across devices: Consider whether you need the ability to save web pages as PDFs on multiple devices. Some browsers offer the option to sync preferences and settings across different devices, making it convenient to access saved PDFs from various platforms.
- Security features: Evaluate the security features provided by your web browser. Look for browsers that offer robust privacy settings, protection against malware, and secure connections to ensure the safety of your PDF files.
- User-friendly interface: Choose a browser that provides a user-friendly interface for saving web pages as PDFs. Look for intuitive menus and clear instructions to streamline the process.
- Community support: Consider the availability of online resources and support forums. Having access to a community of users who can provide assistance or share tips and tricks can be helpful when you encounter any difficulties during the PDF-saving process.
Remember that the specific steps for saving a web page as a PDF may differ slightly depending on the browser you are using. Once you have chosen the most suitable web browser for your needs, you can proceed to the next step and start saving web pages as PDFs.
Step 2: Accessing the Print Dialog Box
Once you have selected the web browser that supports saving web pages as PDFs, the next step is to access the print dialog box. The print dialog box is the gateway to various print settings, including the option to save the web page as a PDF. Here’s how you can access it:
- Open the web page: Launch your preferred web browser and navigate to the webpage that you want to save as a PDF. Make sure that the page is fully loaded before proceeding to the next step.
- Access the print dialog box: To open the print dialog box, you can use either of the following methods:
- Keyboard shortcut: Press Ctrl + P (or Cmd + P on a Mac) to directly open the print dialog box.
- Menu option: Alternatively, you can access the print dialog box through the browser’s menu. Look for the “Print” option, typically located under the “File” menu or represented by a printer icon. Click on it to open the print dialog box.
Note: The steps to access the print dialog box may vary slightly depending on the browser you are using.
Once you have successfully accessed the print dialog box, you are ready to proceed to the next step, where you can customize the print settings to save the web page as a PDF.
Step 3: Selecting the Print Settings
After accessing the print dialog box, you need to select the appropriate print settings to ensure that the web page is saved as a PDF with the desired layout and content. The print settings allow you to customize various aspects of the PDF. Here’s how you can do it:
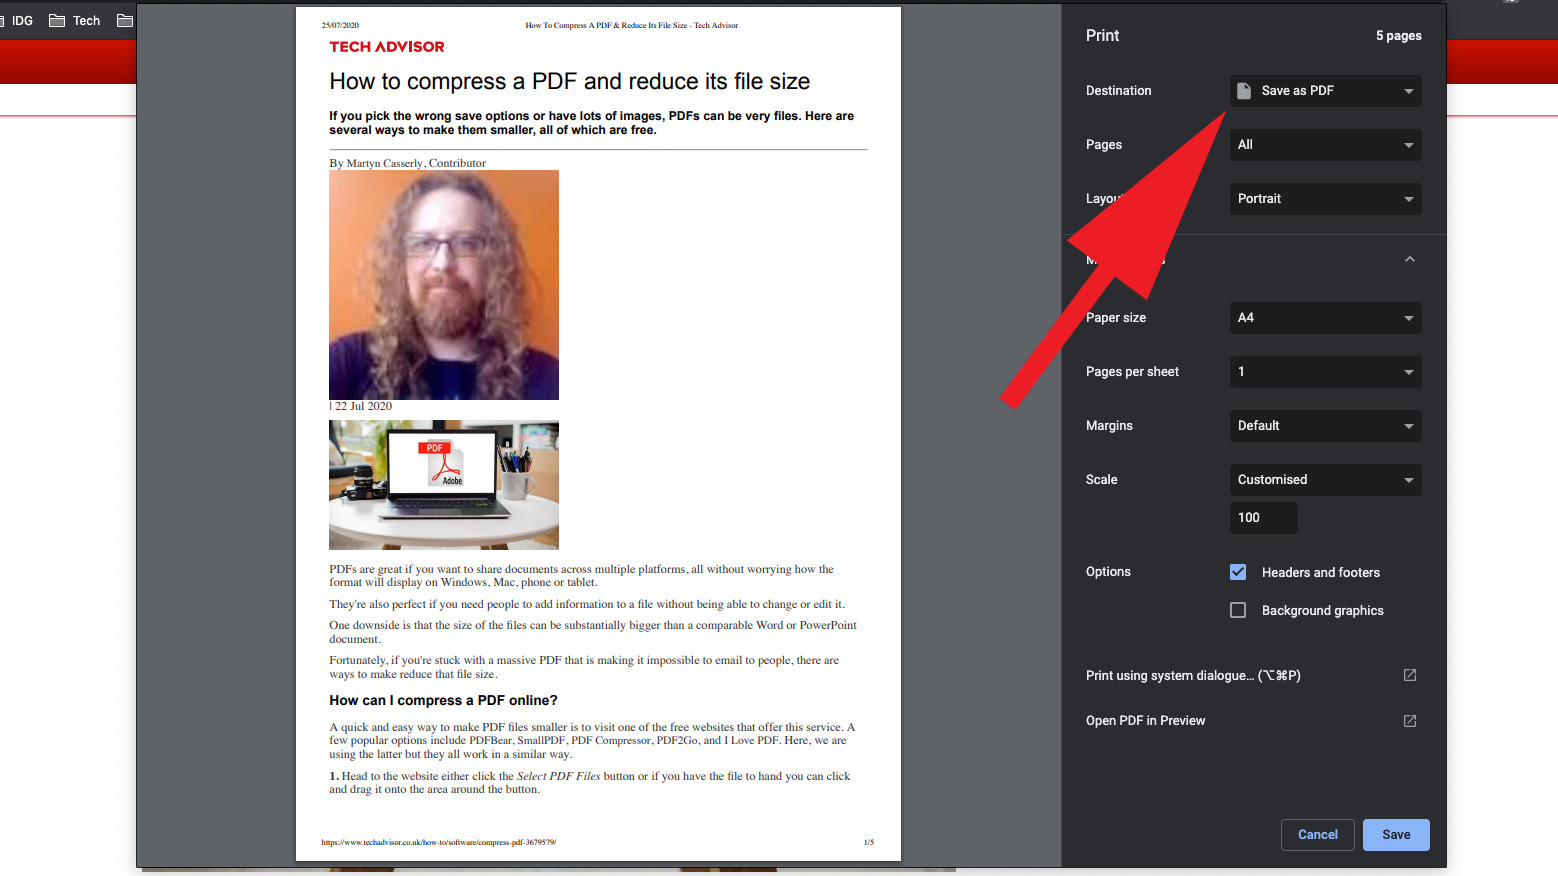
- Choose the printer: In the print dialog box, look for the “Printer” or “Destination” option. Click on the drop-down menu to select the printer as “Save as PDF” or a similar option. This ensures that the web page will be saved as a PDF file instead of being sent to a physical printer.
- Decide on the page range: Determine whether you want to save the entire web page or a specific section as a PDF. Look for the “Pages” or “Range” option in the print dialog box. Choose either “All” to save the entire web page or specify a page range using the provided fields.
- Adjust the layout: Review the available print layout options. You may have the choice to print the web page in portrait or landscape orientation. Select the orientation that best suits the content of the web page.
- Enable/disable headers and footers: Some browsers allow you to include headers and footers in the PDF. Headers typically contain information like the page title and URL, while footers may display the date and page number. Decide if you want to include or exclude this information in your PDF file.
- Set the paper size: If necessary, customize the paper size for the PDF. Look for the “Paper Size” or “Page Setup” option in the print dialog box and select the appropriate paper size, such as A4 or Letter.
- Preview the print settings: Before proceeding, take a moment to review the print settings. Some browsers provide a preview of how the web page will appear when saved as a PDF. Verify that the settings accurately reflect your preferences.
By selecting the appropriate print settings, you can ensure that the PDF version of the web page meets your requirements. Once you have made your selections, you are ready to move on to the next step and choose the PDF option for saving the web page.
Step 4: Choosing the PDF Option
After customizing the print settings, the next step is to choose the PDF option for saving the web page. This option allows you to generate a PDF file of the web page instead of sending it to a physical printer. Here’s how you can choose the PDF option:
- Select the PDF option: In the print dialog box, look for the “Destination” or “Printer” dropdown menu. Click on it and choose the “Save as PDF” option. Some browsers may have a specific PDF-related option, such as “Save as PDF” or “Print to PDF.”
- Verify PDF-related settings: Depending on your browser, there may be additional PDF-related options to configure. Ensure that the settings match your preferences. For example, you may have the option to set the PDF quality, compression, or encryption level.
By selecting the PDF option, you are instructing the browser to save the web page as a PDF file. This ensures that you can access the web page content in a portable and universally compatible format. Once you have chosen the PDF option, you can proceed to the next step and make any additional adjustments to the page layout before saving the web page as a PDF.
Step 5: Adjusting the Page Layout (Optional)
While it’s not always necessary, you have the option to adjust the page layout of the web page before saving it as a PDF. This step allows you to modify how the content is organized and displayed in the PDF file. Here’s how you can adjust the page layout:
- Page scaling: Look for the “Scale” or “Fit to Page” option in the print dialog box. This feature allows you to resize the web page content to fit within the specified page size, ensuring optimal readability.
- Page orientation: If you didn’t set the page orientation in the print settings, you can still adjust it at this stage. Most browsers provide an option to rotate the page orientation between landscape and portrait. Choose the orientation that best suits the content.
- Remove unwanted elements: Sometimes, web pages contain elements like advertisements, sidebars, or headers that are not essential for your PDF. Most browsers offer the option to remove these elements before saving the web page as a PDF. Look for the “Remove Headers and Footers” or “Clean Print” option to eliminate such distractions.
- Preview the page layout: Take a moment to preview the modified page layout before proceeding. Some browsers provide a print preview option, allowing you to see how the web page content will be organized in the PDF file.
Adjusting the page layout is an optional step that gives you control over the final appearance of the PDF. Fine-tuning the layout can improve the readability and visual appeal of the saved web page. Once you are satisfied with the page layout adjustments, you can move on to the next step and proceed with saving the web page as a PDF.
Step 6: Saving the Web Page as a PDF
Now that you have customized the print settings and adjusted the page layout (if needed), it’s time to save the web page as a PDF. This step involves specifying the file name and choosing where to save the PDF on your computer. Here’s how you can save the web page as a PDF:
- Specify the file name: In the print dialog box, look for the “File Name” or “Save As” field. Enter a descriptive name for the PDF file. This will help you identify the web page content in the future.
- Select the save location: Choose the folder or directory on your computer where you want to save the PDF file. You can click the “Browse” or “Choose” button to navigate to the desired location.
- Verify the PDF file format: Confirm that the selected output format is indeed PDF. Although it is usually the default option when choosing the PDF destination, it’s important to double-check to ensure accuracy.
- Review the save settings: Take a moment to review all the settings and configurations you have applied before saving the web page as a PDF. Make sure everything looks as expected.
Once you have completed these steps, you are ready to save the web page. Click on the “Save” or “Print” button in the print dialog box to initiate the saving process. The web page content will be converted into a PDF file and saved to the specified location on your computer.
By following this step-by-step process, you can successfully save web pages as PDF files, allowing you to access, share, and preserve online content with ease.
Step 7: Naming the PDF File
As you save the web page as a PDF, it’s important to give the file a meaningful and descriptive name. Naming the PDF file appropriately ensures that you can easily identify the content it contains. Here’s how you can name the PDF file:
- Choose a descriptive name: Consider using a name that reflects the content and purpose of the web page. For example, if you are saving a recipe from a cooking website, you can name the PDF file “Delicious_Chocolate_Cake_Recipe.pdf.”
- Avoid generic names: Try to avoid generic names like “file.pdf” or “webpage.pdf.” These names are not descriptive and can make it difficult to locate the specific content in the future.
- Include relevant details: If applicable, include additional details in the file name to provide more context. For instance, you can include the website name or the date of saving. For example, “MyFavoriteBlog_Nov2022.pdf.”
- Use hyphens or underscores: To enhance readability, use hyphens or underscores to separate words in the file name. This makes it easier to identify individual words and improves the overall file name clarity.
- Avoid special characters: Be mindful not to use special characters or symbols in the file name, as they might cause issues with compatibility or file management systems. Stick to alphanumeric characters and the basic punctuation marks if necessary.
By following these guidelines, you can create a file name that accurately reflects the content of the web page and makes it easier for you to find and organize PDF files in the future.
Once you have named the PDF file, you can proceed to the next step and specify the location where you want to save it on your computer.
Step 8: Specifying the Save Location
After naming the PDF file, the next step is to specify the location on your computer where you want to save it. Choosing the appropriate save location ensures that you can easily locate and access the PDF file whenever needed. Here’s how you can specify the save location:
- Select the desired folder: Click on the “Browse” or “Choose” button in the print dialog box to open a file browser window. Navigate to the folder or directory where you want to save the PDF file.
- Create a new folder: If you prefer to save the PDF file in a new folder, you can create one by clicking on the “New Folder” or “Create Directory” button in the file browser. Give the new folder an appropriate name and select it as the save location.
- Consider organizing by category: To keep your saved web page PDFs organized, you may want to create specific folders based on categories or topics. For example, if you frequently save research articles, you can create folders named “Science Articles” or “Technology Papers” to store them separately.
- Avoid cluttered desktop or default locations: It’s generally best to avoid saving PDF files directly to your desktop or default locations, as this can quickly become cluttered and make it difficult to locate specific files. Instead, choose a well-organized folder structure that suits your needs.
- Note the save location: Take note of the chosen save location or the path displayed in the print dialog box. This will help you quickly access the saved PDF file in the future.
By specifying the save location for the PDF file, you can ensure that it is stored in a logical and easily accessible location on your computer. This step contributes to effective file organization and reduces the time spent searching for specific PDF files.
Once you have specified the save location, you can proceed to the next step and explore any advanced options available, though these are optional and can be skipped if not required.
Step 9: Advanced Options (Optional)
While saving a web page as a PDF, you may have the option to customize advanced settings for the PDF conversion process. These options allow you to further optimize the saved PDF file according to your preferences. Here are some advanced options that you can consider:
- PDF quality: Some web browsers provide the ability to adjust the quality of the saved PDF. You can choose between different quality levels, such as “Standard” or “High,” depending on your requirements. Higher quality may result in larger file sizes.
- Compression: If file size is a concern, you can utilize compression options to reduce the size of the saved PDF. This can be particularly useful when dealing with PDFs that contain images or graphics. Experiment with the available compression options to find the right balance between file size and visual fidelity.
- Encryption and password protection: To secure the PDF file and restrict access, you can enable encryption and password protection. This ensures that only authorized individuals can open and view the content of the PDF. Choose a strong password and make sure to remember it or store it securely.
- Metadata: Consider adding metadata to the PDF file, such as the author’s name, title, and description. This information helps in organizing and categorizing the PDF files, making it easier to search for specific content in the future.
- Watermarks: Some browsers offer the option to add watermarks to the saved PDF file. Watermarks can be used to indicate the source of the web page, add copyright information, or mark the PDF as a draft or confidential document.
- Page numbering: Depending on your needs, you may want to include page numbers in the saved PDF. This can be useful for referencing and navigating through the PDF document.
These advanced options provide additional customization and security features for the saved PDF file. However, it’s important to note that not all browsers may offer these options, or the terminology and location of these settings may vary.
Once you have configured the advanced options, if applicable, you are ready for the final step—clicking “Save” to complete the process and generate the PDF file.
Step 10: Clicking “Save” to Complete the Process
After customizing the settings and options, you are ready to save the web page as a PDF. The final step is to click the “Save” or “Print” button to initiate the PDF conversion process and generate the PDF file. Here’s how you can complete the process:
- Review the settings: Before clicking “Save,” take a moment to review all the settings, including the file name, save location, and any advanced options you’ve configured. Ensure that everything is set according to your preferences.
- Click “Save” or “Print”: When you are ready, click the “Save” or “Print” button in the print dialog box to start the conversion process. The web page content will be transformed into a PDF file and saved to the specified location on your computer.
- Wait for the process to complete: The time it takes to save the web page as a PDF may vary depending on the size and complexity of the web page. During the conversion process, be patient and allow the browser to complete the task.
- Confirm the PDF file: Once the process is complete, navigate to the save location you specified earlier and locate the newly created PDF file. Verify that the saved PDF contains the web page content you intended to save.
- Open and test the PDF: Double-click the PDF file to open it and ensure that it displays the web page content accurately. Test the hyperlinks, check the layout, and review the overall presentation to ensure that the PDF meets your expectations.
By clicking “Save” and completing the process, you have successfully saved the web page as a PDF file. You can now access and share the PDF, review the content offline, or store it for future reference.
Remember to repeat these steps for each web page you wish to save as a PDF, adapting the settings and options as needed for each specific case.
Troubleshooting Tips for Common Issues
While saving a web page as a PDF is generally a straightforward process, there may be instances where you encounter common issues or face unexpected challenges. Here are some troubleshooting tips to help you overcome potential obstacles:
- Missing or distorted content: If the saved PDF is missing images or displays distorted content, try refreshing the web page before attempting to save it again. Ensure that the web page is fully loaded and that all elements are visible.
- Page breaking issues: Sometimes, the PDF version of a web page may have awkward page breaks that split content unintuitively. To address this, you can adjust the page layout settings and experiment with the scale or fit-to-page options to ensure proper content flow.
- Font or formatting discrepancies: In some cases, the font or formatting of the web page may not render correctly in the saved PDF. If you encounter font-related issues, try changing the font settings in the browser before saving the web page as a PDF.
- Missing hyperlinks: If the hyperlinks in the web page do not function in the saved PDF, ensure that the “Print Background Colors and Images” option is enabled. Disabling this option may result in missing or inactive hyperlinks.
- Large file size: If the resulting PDF file has a large file size, consider adjusting the quality or compression settings in the print dialog box. Lowering the image quality or applying stronger compression can help reduce the file size.
- Browser compatibility issues: If you experience difficulties saving a web page as a PDF, ensure that your browser is up to date. Outdated browsers may lack the necessary features or bug fixes required for seamless PDF conversion.
- Operating system limitations: Different operating systems may have certain limitations when saving web pages as PDFs. Ensure that your operating system supports PDF saving, and consider trying an alternative browser if issues persist.
Remember that specific issues may vary based on the browser, operating system, or web page content. If you encounter persistent issues, consider exploring browser-specific support forums, online communities, or seeking assistance to address them effectively.
By following these troubleshooting tips, you can overcome common issues and successfully save web pages as PDFs, ensuring that the saved PDFs accurately reflect the intended web page content.