Choosing the Right Software
When it comes to rendering digital art, selecting the right software is crucial. The software you choose will greatly influence the tools and features available to you, as well as the overall workflow and flexibility of your artistic process. Here are a few factors to consider when deciding on the best software for your needs:
- Intuitive User Interface: Look for software with an intuitive and user-friendly interface. This will help streamline your workflow and make it easier to navigate through the various tools and settings.
- Toolset and Features: Consider the range of tools and features offered by the software. Look for options that include a variety of brushes, layer styles, blending modes, and other editing capabilities that align with your artistic style and requirements.
- Compatibility: Check if the software is compatible with your preferred operating system. Whether you use Windows, macOS, or Linux, ensure that the software can run smoothly on your device without any compatibility issues.
- Community and Support: Research the software’s community and support resources. Joining a community of artists using the same software can provide valuable insights, tips, and tutorials to help you improve your skills and troubleshoot any issues that may arise.
- Cost and Licensing: Evaluate the software’s cost and licensing options. Some software may require a one-time purchase, while others may offer subscription-based models. Consider your budget and determine what pricing model works best for you.
Popular software options for digital art rendering include Adobe Photoshop, Corel Painter, Procreate, and Krita, among others. Each software has its own strengths and weaknesses, so it’s essential to research and test different options to find the one that aligns with your specific needs and artistic style.
Remember, the software you choose is a personal preference, so explore different options, experiment with their features, and find the one that best supports your artistic vision. With the right software, you’ll have the tools at your fingertips to create stunning and captivating digital art.
Understanding the Rendering Process
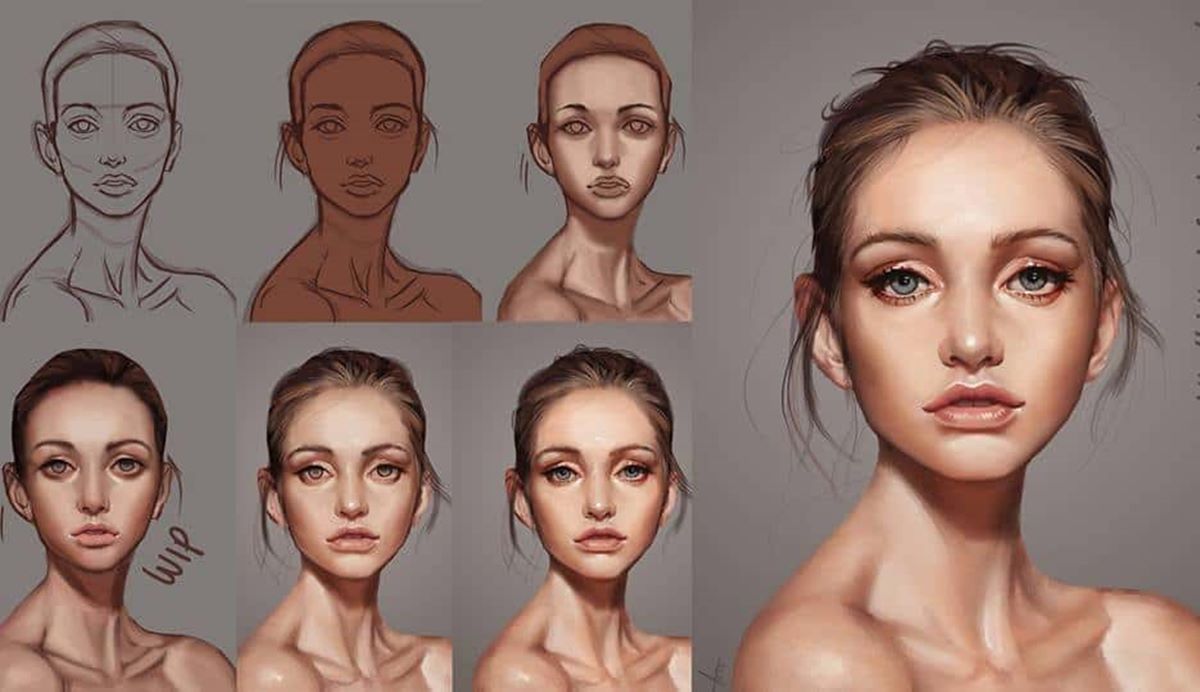
Rendering digital art involves the process of transforming a rough sketch or concept into a polished and refined artwork. It brings life to your artistic vision, adding details, lighting, textures, and effects. To effectively render your artwork, it’s important to understand the key steps involved in the rendering process:
- Planning and Sketching: Begin by planning your composition and sketching out the basic shapes and forms of your artwork. This step is crucial as it lays the foundation for the rest of the rendering process.
- Blocking in Colors: Once the initial sketch is complete, start blocking in the base colors using large brushes. This helps establish the overall color scheme and provides a starting point for further refinement.
- Adding Shadows and Highlights: Next, add shadows and highlights to create depth and volume in your artwork. Pay attention to the light source and ensure that the shadows and highlights are consistent throughout the piece.
- Refining Details: Refine the smaller details of your artwork, focusing on aspects such as facial features, textures, and intricate elements. Use smaller brushes and pay attention to the finer details that bring your artwork to life.
- Applying Textures and Effects: Consider adding textures and effects to enhance the visual appeal of your artwork. This could involve using textured brushes or applying filters to achieve a specific look or style.
- Adjusting Colors and Contrast: Fine-tune the colors and contrast of your artwork to create the desired mood and atmosphere. Use adjustment layers or color correction tools to make subtle or dramatic changes to the overall color palette.
- Review and Feedback: Take a step back and review your artwork. Seek feedback from others, whether it’s from fellow artists or online communities. This external perspective can provide valuable insights and help you refine your artwork further.
- Final Touches and Exporting: After incorporating feedback and making final adjustments, add any additional finishing touches, such as signature or watermark. Lastly, export your artwork in the desired format and resolution for sharing or printing.
Remember, the rendering process is a journey where experimentation and continuous learning play a vital role. Embrace the process, explore different techniques, and allow your creativity to guide you towards creating stunning and unique digital art.
Setting up the Canvas
Setting up the canvas is one of the first steps in the digital art rendering process. The canvas serves as the foundation for your artwork and determines its size, resolution, and orientation. Here are some key considerations when setting up the canvas:
- Size and Resolution: Determine the size and resolution of your canvas based on your intended final output. If you’re creating artwork for print, a higher resolution is recommended for better print quality. For digital sharing, consider the standard sizes for social media platforms or website display.
- Orientation: Choose whether you want a portrait (vertical) or landscape (horizontal) orientation for your artwork. Consider the composition and the visual impact you want to achieve when making this decision.
- Color Mode: Select the appropriate color mode for your artwork. RGB color mode is typically used for digital artwork, while CMYK is preferred for print. Ensure consistency in color modes across your software and editing tools.
- Background: Decide on the background color or texture for your canvas. This can be a solid color, a gradient, or even a textured pattern. Consider how the background will complement and enhance your artwork.
- Canvas Presets: Some software offers predefined canvas presets. These presets can save you time by automatically setting up the canvas with common dimensions and settings. If none of the presets fit your requirements, you can always customize the canvas manually.
When setting up the canvas, it’s essential to keep in mind the purpose and intended use of your artwork. Take into consideration the aspect ratio, quality, and compatibility with different devices or mediums. The canvas serves as the starting point for your creative journey, so take the time to set it up properly to ensure a smooth and enjoyable rendering process.
Remember, the canvas can always be resized or adjusted later on if needed. Don’t be afraid to experiment and explore different canvas setups to find the perfect fit for your artistic vision. With a well-prepared canvas, you’ll be ready to dive into the exciting world of digital art rendering.
Choosing the Right Brushes and Tools
When it comes to rendering digital art, selecting the right brushes and tools is essential. They allow you to add depth, texture, and details to your artwork. Here are some factors to consider when choosing the right brushes and tools for your digital art creation:
- Brush Types: Explore the different types of brush options available in your chosen software. This can include brushes for painting, sketching, blending, texture, and more. Experiment with various brush shapes, sizes, and textures to find the ones that best suit your artistic style and the effect you want to achieve.
- Customization Options: Look for software that offers extensive brush customization options. This allows you to adjust settings such as opacity, flow, pressure sensitivity, and brush dynamics. Customizing brushes gives you greater control over your strokes and enables you to create unique and personalized effects.
- Texture and Pattern Brushes: Consider using texture and pattern brushes to add depth and character to your artwork. These brushes simulate different textures, such as watercolor, oil paint, or charcoal, allowing you to create realistic and expressive effects.
- Specialty Brushes: Some software offers specialty brushes designed to create specific effects, such as foliage, fur, or hair. These brushes can save you time and enhance the realism of your artwork by mimicking natural elements more accurately.
- Other Tools: Apart from brushes, explore the other tools available in your software. These can include selection tools, smudge tools, gradient tools, and more. Familiarize yourself with these tools and experiment with how they can enhance your rendering process.
- Plugins: Depending on your software, you might have access to plugins or extensions that expand your brush and tool options. These plugins can offer additional brushes, textures, or effects that can take your digital art to the next level.
Keep in mind that it may take time to find the perfect brushes and tools that suit your artistic style and workflow. Don’t hesitate to experiment and mix different brushes to achieve unique effects and create your own signature style. The right brushes and tools can greatly enhance your rendering process and help you bring your creative vision to life.
Remember, the brushes and tools you choose are just tools in your artistic arsenal. The key is to practice and experiment with them to develop your skills and create artwork that speaks to your individuality and creativity.
Sketching and Blocking in the Initial Shapes
Sketching and blocking in the initial shapes are fundamental steps in the digital art rendering process. These steps establish the basic structure and composition of your artwork before refining it further. Here’s how to approach sketching and blocking in the initial shapes:
1. Planning the Composition: Start by planning the composition of your artwork. Consider the placement of the main subject, the overall balance, and the focal points. This initial planning phase helps create a solid foundation for your sketch.
2. Rough Sketching: Use a sketching brush or pencil tool to loosely sketch the basic shapes and forms of your subject. Don’t worry about details at this stage; focus on capturing the overall proportions and gestures of the main elements.
3. Blocking in Shapes: Once you’re satisfied with the rough sketch, proceed to block in the shapes using a solid color or a flat brush. Use larger brushes to define the main areas and break down your subject into simplified forms.
4. Proportions and Perspective: Pay attention to the proportions and perspective of your subject during the blocking-in stage. Ensure that the elements are properly aligned and the perspective is consistent throughout the artwork. Make adjustments as needed to create a visually harmonious composition.
5. Experiment with Values: Explore different values at this stage to establish the light and shadow areas of your artwork. Use a grayscale palette or lower the opacity of your brush to indicate areas of light and shade. This step adds depth and dimension to your initial shapes.
6. Refine and Adjust: Take a step back and assess your blocked-in shapes. Look for any areas that need refinement or adjustment. Tweaking the proportions, alignments, or overall composition at this stage helps set the stage for a more detailed rendering process.
7. Layering Approach: Consider using layers in your software to work on different elements of your composition. Creating separate layers for the background, foreground, or individual objects allows for greater flexibility and control during the rendering process.
8. Iterate and Experiment: Remember that sketching and blocking in the initial shapes are iterative processes. Don’t be afraid to make changes and explore different approaches. Allow yourself to experiment with variations until you’re satisfied with the overall structure and composition of your artwork.
Sketching and blocking in the initial shapes provide the groundwork for your digital art rendering. It’s a chance to explore ideas, establish the basic forms, and set the stage for adding more detail and refinement. Embrace these early stages of the creative process and use them as a springboard to bring your artistic vision to life.
Adding Basic Lighting and Shadows
Adding basic lighting and shadows is a crucial step in the digital art rendering process. It brings depth, dimension, and realism to your artwork by creating a sense of light and shadow. Here’s how to approach adding basic lighting and shadows:
1. Understanding Light Sources: Start by understanding the direction and intensity of the light source in your artwork. Determine whether it’s natural sunlight, artificial light, or a combination of both. This understanding will guide the placement and distribution of lighting and shadows.
2. Establishing Light and Dark Areas: Identify the areas in your artwork that will be illuminated and those that will be in shadow. Use a light or mid-tone color to mark the illuminated areas and a dark color for the shadowed areas. This initial step helps establish the basic lighting framework.
3. Layering and Blending Modes: Utilize layers in your software to create separate layers for the light and shadow elements. Experiment with blending modes to achieve the desired interaction between the layers. Overlay, multiply, and screen blending modes are commonly used to create realistic lighting effects.
4. Gradient and Brush Techniques: Use gradient tools or soft brushes to create smooth transitions between light and shadow areas. Gradually blend the colors to achieve a natural and gradual change in values. Experiment with brush opacity and pressure sensitivity to create subtle variations in lighting and shadow intensity.
5. Consider Object Interactions: Take into account how objects within your artwork interact with the light source. Reflections, caustics, and cast shadows can add additional realism to your artwork. Pay attention to the shape and form of the objects and how they affect the lighting and shadow patterns.
6. Integrate Light and Shadows: Ensure that the lighting and shadows are cohesive and integrated throughout your artwork. Check for consistency in the light direction, color temperature, and intensity. This cohesiveness will help create a believable and harmonious lighting environment.
7. Adjust and Refine: Step back and assess the overall lighting and shadow distribution in your artwork. Make any necessary adjustments and refinements to balance the light and shadow areas. This includes tweaking values, blending edges, and adding additional lighting or shadow details where needed.
8. Study Real-Life References: Look at real-life references, such as photographs or observation from life, to study how different lighting conditions affect objects. This practice will help you understand how light and shadow create volume, surface texture, and mood.
Adding basic lighting and shadows is an essential step in enhancing the realism and depth of your digital artwork. Embrace the process of studying and applying lighting principles, and watch as your artwork comes to life with a heightened sense of three-dimensionality.
Refining the Details
Refining the details is a crucial stage in the digital art rendering process. It involves working on the smaller elements of your artwork to add intricate and realistic details. Here are some key steps to consider when refining the details:
1. Zoom In and Focus: Zoom in on your artwork to get a closer look at the details. This will allow you to work on smaller areas more precisely and capture finer nuances in your artwork.
2. Use Smaller Brushes: Switch to smaller brushes to add intricate details. Choose brushes with fine tips or consider using pen tools for precise lines or shapes. This allows for greater control over the level of detail you add to your artwork.
3. Pay Attention to Textures: Incorporate textures into your artwork to make it more realistic. Consider the textures of various elements such as skin, fabric, metal, or nature. Use different brush strokes or textured brushes to recreate these textures effectively.
4. Refine Edges and Lines: Ensure that edges and lines are clean and well-defined. Smooth out any jagged edges or uneven lines. Pay attention to line weights and adjust them accordingly to create depth and visual interest.
5. Enhance Facial Features: If your artwork includes faces or characters, focus on refining the facial features. Pay attention to details like eyes, eyebrows, lips, and facial expressions. These details can greatly impact the overall look and feel of your artwork.
6. Add Fine Lighting and Shadows: Work on adding subtle variations in lighting and shadows to enhance the overall realism. Use smaller brushes to create folds in fabric, highlights on shiny surfaces, or soft shadows on textured objects. These small details can make a significant difference in the final result.
7. Incorporate Surface Details: Add surface details to objects or backgrounds to make them visually interesting. This can include scratches, texture patterns, or subtle imperfections. Consider using textured brushes or custom brushes to add these details effectively.
8. Don’t Overwork: It’s important to find a balance between adding details and maintaining a sense of simplicity and clarity. Avoid overworking your artwork by constantly assessing the overall impact of the details and being mindful of when to stop.
9. Step Back and Review: Take regular breaks and step back from your artwork to gain a fresh perspective. This will help you spot any areas that need refining or adjusting. Seeking feedback from other artists or trusted individuals can also provide valuable insights.
10. Save Iteratively: Save your progress at different stages of refinement. This allows you to experiment with different approaches and techniques while having the ability to backtrack if needed.
Remember that refining the details is a gradual and iterative process. Take your time, be patient, and enjoy the journey of bringing your artwork to life with intricate and captivating details.
Adding Texture and Surface Details
Adding texture and surface details to your digital artwork is a crucial step that brings depth and realism to your creations. It adds visual interest, enhances the tactile quality, and makes objects feel more tangible. Here are some tips for incorporating texture and surface details into your artwork:
1. Study Real-Life References: Look at real-life references to understand how different materials and surfaces appear. Observe the texture of objects such as wood, metal, fabric, or skin. Pay attention to the way they reflect light, their patterns, and their unique characteristics.
2. Custom Brush Creation: Create or find custom brushes that simulate texture and surface patterns. Many digital art software provides options for importing or creating brushes that emulate specific materials or textures. Experiment with different brush shapes and settings to achieve the desired effect.
3. Layering Techniques: Utilize layer blending modes to overlay textures on top of your artwork. Experiment with different blending modes such as overlay, soft light, or multiply to achieve the desired interaction between the base layers and the texture layers.
4. Vary Brush Opacity and Flow: Adjust the opacity and flow settings of your brushes to create variations in texture intensity. Varying the pressure or opacity while painting can also help achieve a more realistic representation of different surfaces.
5. Pay Attention to Lighting and Shadows: Consider how lighting and shadows interact with different textures. Determine the direction and intensity of light sources in your artwork and use them to determine where highlights and shadows would fall on textured surfaces.
6. Add Surface Imperfections: Incorporate subtle imperfections, such as scratches, dents, or cracks, to make your artwork appear more realistic. These details can be added with the help of custom brushes or by carefully painting them in specific areas.
7. Experiment with Layer Masks: Use layer masks to selectively apply texture and surface details. This allows for more control over where and how the textures are applied, providing a more seamless and realistic result.
8. Consider Scale and Proportions: Ensure that the scale and proportions of the texture align with the object or surface it is applied to. A texture that is too small or too large for the object can appear unrealistic. Experiment with resizing and rotating the texture to achieve the desired effect.
9. Be Mindful of Overuse: Avoid overusing textures to the point where they overpower the overall composition. Be selective and use texture strategically to highlight specific areas or objects that deserve more attention.
10. Step Back and Evaluate: Take breaks and step back from your artwork regularly to evaluate the overall impact of the texture and surface details. Assess whether they contribute to the desired effect and make adjustments as needed.
Adding texture and surface details to your digital artwork can elevate its visual appeal and make it more engaging. Through experimentation and practice, you can master the art of incorporating textures that enhance the realism and depth of your creations.
Applying Effects and Filters
Applying effects and filters to your digital artwork can add a touch of creativity, style, and visual interest. It allows you to enhance the mood, change the atmosphere, or emphasize certain elements. Here are some tips on how to effectively apply effects and filters to your artwork:
1. Experiment with Filter Gallery: Many digital art software provides a range of built-in filters or a filter gallery. Explore the various options available to discover effects that can transform your artwork. Filters like blur, sharpen, distort, or stylize can dramatically alter the look and feel of your piece.
2. use Layer Styles: Layer styles are a powerful tool to add effects to specific layers in your artwork. Drop shadow, inner glow, bevel and emboss, and gradient overlay are just a few examples of layer styles that can add depth and dimension to your artwork.
3. Experiment with Blend Modes: Blend modes offer a versatile way to blend layers and create unique effects. Overlay, screen, multiply, and soft light are commonly used blend modes that can intensify colors, adjust contrast, or create interesting texture overlays.
4. Texture Overlays: Apply texture overlays to add depth and visual interest to your artwork. These can be achieved by importing or creating textured images and blending them with your artwork using blending modes or masks.
5. Gradient Maps: Use gradient maps to change the overall color tones of your artwork. By mapping specific colors to shadows, midtones, and highlights, you can create a unified color palette or achieve a specific mood or atmosphere.
6. Focus on Lighting and Lens Effects: Consider adding lighting effects such as lens flares, glows, or bokeh to enhance the ambiance of your artwork. These effects can create a sense of depth and draw attention to specific areas or objects.
7. Motion Blur and Depth of Field: Incorporate motion blur or depth of field effects to add movement or focus to your artwork. These effects can simulate realistic blur or selective focus, further enhancing the visual impact of your composition.
8. Adjusting Opacity and Transparency: Play with the opacity and transparency of layers or objects to create subtle or dreamy effects. Gradually reducing the opacity of layer elements or adjusting their transparency can create an ethereal or magical atmosphere.
9. Be Mindful of Balance: Remember to maintain a sense of balance when applying effects and filters. Avoid overwhelming your artwork by ensuring that the effects enhance rather than overshadow the main subject or composition.
10. Save Iteratively: As you experiment with different effects and filters, save your progress at various stages. This provides the flexibility to backtrack or revisit previous versions if needed.
Applying effects and filters to your digital artwork can take it from ordinary to extraordinary. Let your creativity guide you as you experiment with different effects and discover the unique ways they can elevate your artwork.
Adjusting the Color and Contrast
Adjusting the color and contrast of your digital artwork is a crucial step in enhancing its visual impact and overall mood. It allows you to fine-tune the color palette, correct color imbalances, and create a desired atmosphere. Here are some tips for effectively adjusting the color and contrast in your artwork:
1. Color Balance: Assess the overall color balance in your artwork. Adjust the color sliders or use color balance tools to achieve the desired color temperature. This can range from warm and cozy to cool and serene, depending on the mood you want to create.
2. Saturation and Vibrancy: Control the saturation and vibrancy levels of your artwork. Increase or decrease the intensity of colors to make them more vibrant or subdued. Be mindful of finding the right balance to avoid oversaturation or desaturation.
3. Contrast and Tonal Range: Adjust the contrast to enhance the overall tonal range of your artwork. Increase contrast to make the highlights brighter and the shadows darker, or decrease contrast for a softer and more muted appearance.
4. Levels and Curves: Utilize levels and curves adjustments to fine-tune the tonal distribution in your artwork. Adjust the black and white points to ensure a full range of tones and avoid any loss of detail in the shadows or highlights.
5. Selective Color Adjustments: Make selective color adjustments to specific areas or elements in your artwork. This allows you to target and modify individual colors, such as boosting the saturation of a specific hue or adjusting the luminance of a particular tone.
6. Color Grading: Experiment with color grading techniques to achieve a specific look or mood. This involves applying a consistent color scheme or tonal shifts to your artwork, creating a unified and cohesive visual style.
7. Dodge and Burn: Use dodge and burn tools to selectively lighten or darken areas in your artwork. This technique can add depth, highlight focal points, and create a sense of three-dimensionality.
8. Check for Color Consistency: Ensure color consistency throughout your artwork. Compare different elements and objects to ensure that their colors harmonize with each other. This consistency helps create a unified and balanced composition.
9. Work in Non-destructive Layers: Make color and contrast adjustments on separate adjustment layers or in a non-destructive manner. This allows you to experiment freely without permanently altering your original artwork.
10. Regularly Step Back and Review: Take breaks and step back from your artwork regularly to evaluate the color and contrast adjustments. Assess how they contribute to the overall desired effect and make any necessary refinements.
Adjusting the color and contrast of your digital artwork is a powerful way to enhance its visual impact and convey the desired mood. Be mindful of the balance between boldness and subtlety, and let your creative vision guide you as you fine-tune the colors and contrast to achieve your artistic goals.
Exporting and Saving the Final Artwork
Once you have completed the rendering process of your digital artwork, it’s time to properly export and save your final piece. How you save and export your artwork will depend on your intended use and the desired format. Here are some key considerations when exporting and saving your finalized artwork:
1. Resolution and Size: Determine the resolution and size at which you want to save your artwork. Consider whether it will be displayed digitally or printed, and choose a resolution that ensures the details and quality of your artwork are preserved.
2. File Formats: Select the appropriate file format for your final artwork. Common formats include JPEG, PNG, and TIFF. JPEG is suitable for web sharing, while PNG and TIFF offer better quality for print and retain transparency in case of layered images.
3. Color Space: Choose the appropriate color space for your artwork. For digital use, RGB color space is typically used, while CMYK is preferred for print. Ensure that the color space is consistent with your intended output.
4. Compression and Quality: Consider the compression and quality settings when saving your artwork as a digital file. Balance the file size with the desired image quality, ensuring that the details and colors of your artwork are preserved without excessive compression artifacts.
5. Metadata and Watermarks: Add metadata such as your name, copyright information, and artwork description. This helps protect your artwork and provides relevant information to viewers. Consider adding a watermark to your artwork if you’re sharing it online to protect against unauthorized use.
6. Save Iteratively: Save your artwork at different stages of the rendering process. This allows you to go back to previous versions or experiment with different edits without losing your progress.
7. Backup Your Artwork: Create backups of your final artwork to ensure its safety. Store your files in multiple locations, such as external hard drives, cloud storage, or online platforms. This protects against potential data loss or accidental deletion.
8. Consider Multiple Versions: Create different versions of your artwork to cater to various platforms or purposes. For example, you may want a high-resolution version for printing, a lower-resolution version optimized for web sharing, and a square-cropped version for social media.
9. Test Compatibility: Before distributing or printing your final artwork, ensure its compatibility by testing it on different devices or platforms. Check how it appears on different screens, printers, or social media platforms to ensure the colors and details translate well.
10. Document Your Process: Keep a record of your rendering process, including the adjustments, techniques, and software used. This documentation can serve as a reference for future artworks or provide insights if you decide to share your process with others.
Taking the time to properly export and save your final artwork ensures that it is preserved and can be enjoyed by others. Pay attention to the details, make necessary backups, and consider the specific requirements of your intended use to achieve the best results when sharing or printing your digital masterpiece.