Why Remove the Recycle Bin?
The Recycle Bin is a useful feature in Windows that acts as a temporary storage for deleted files. It allows users to recover accidentally deleted files or empty the bin to free up disk space. However, there may be instances where you want to remove the Recycle Bin from your Windows desktop. Here are a few reasons why you might consider doing so:
- Customization: Removing the Recycle Bin can help you achieve a cleaner desktop aesthetic. If you prefer a clutter-free workspace or have a specific theme in mind, eliminating the Recycle Bin icon can contribute to a more streamlined look.
- Personal preference: Some users simply have no use for the Recycle Bin. If you have alternative file backup methods in place, such as cloud storage or external hard drives, or if you’re confident in your file management skills and rarely delete files, removing the Recycle Bin might be a logical step for you.
- Reducing visual distractions: For users who find the Recycle Bin distracting, removing it can create a more focus-oriented environment. By eliminating unnecessary desktop icons, you can minimize visual clutter and facilitate a more productive workflow.
While the Recycle Bin serves an important purpose, it is not an essential component of the Windows operating system. If any of the above reasons resonate with you, it may be worth considering removing the Recycle Bin from your Windows desktop. In the following sections, we will explore three methods to help you achieve this.
Method 1: Right-Clicking the Desktop
One of the simplest methods to remove the Recycle Bin from your Windows desktop is by using the right-click menu. Follow these steps:
- Ensure that your desktop is visible and not covered by any open windows.
- Locate an empty area on your desktop, right-click on it to bring up the context menu.
- In the context menu, navigate to the “View” option and hover over it.
- In the submenu that appears, uncheck the “Show desktop icons” option. This action will remove all the desktop icons, including the Recycle Bin.
Once you uncheck the “Show desktop icons” option, the Recycle Bin icon will disappear from your desktop. To bring it back, simply repeat these steps and check the same option.
This method offers a convenient way to temporarily remove the Recycle Bin from your desktop without permanently altering any settings. It allows you to quickly declutter your workspace when needed and restore the Recycle Bin icon at any time.
Method 2: Using the Desktop Icon Settings
If you prefer a more permanent solution for removing the Recycle Bin from your Windows desktop, you can use the Desktop Icon Settings. Follow these steps:
- Right-click on an empty area of your desktop to bring up the context menu.
- Select “Personalize” from the menu. This will open the Windows Personalization settings.
- In the Personalization settings window, click on “Themes” in the left-hand sidebar.
- Scroll down and click on “Desktop icon settings” under the “Related settings” section.
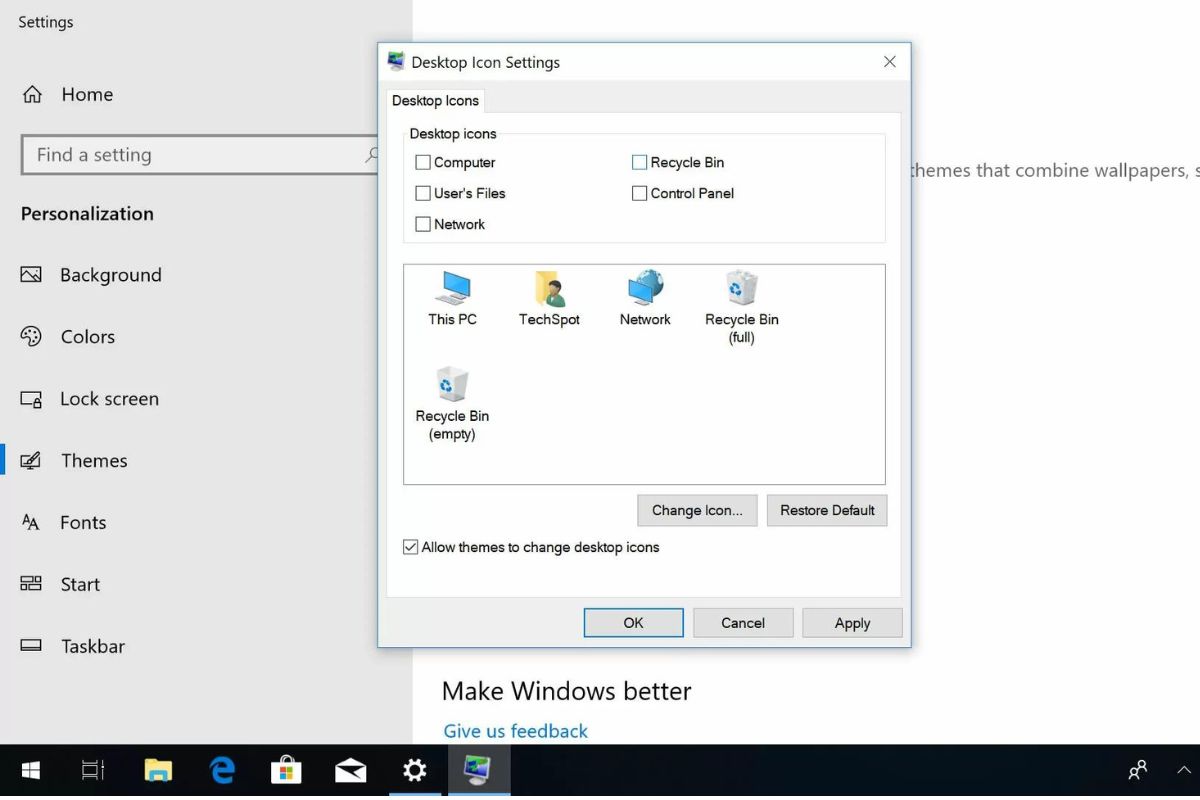
- A new window titled “Desktop Icon Settings” will appear. Here, you can customize which icons are displayed on your desktop.
- Uncheck the box next to “Recycle Bin” and click “Apply” and then “OK”. This will remove the Recycle Bin icon from your desktop.
By using the Desktop Icon Settings, you have more control over which icons are displayed on your desktop. Removing the Recycle Bin in this way ensures that it will not reappear even if you restart your computer. To bring back the Recycle Bin icon, simply follow these steps again and check the box next to “Recycle Bin”.
This method provides a permanent solution for removing the Recycle Bin icon without the need for registry modifications. It is a straightforward process that allows you to customize your desktop to suit your preferences.
Method 3: Modifying the Registry
Modifying the registry is an advanced method that allows you to remove the Recycle Bin icon from your Windows desktop. However, it’s important to note that editing the registry can have unintended consequences if not done correctly. Therefore, it is recommended to create a backup of your registry or seek assistance from a knowledgeable individual. Here’s how you can proceed:
- Press the “Windows” key on your keyboard and type “regedit” to open the Registry Editor. Click on the appropriate search result to launch the application.
- In the Registry Editor, navigate to the following location:
HKEY_LOCAL_MACHINE\SOFTWARE\Microsoft\Windows\CurrentVersion\Explorer\Desktop\NameSpace - Under the “NameSpace” folder, locate the key named “
{645FF040-5081-101B-9F08-00AA002F954E}“. - Right-click on the key and select “Delete”. Confirm the deletion when prompted.
- Close the Registry Editor.
- Once you have completed these steps, the Recycle Bin icon should no longer be visible on your desktop. If it still appears, try restarting your computer.
It is crucial to exercise caution when modifying the registry, as any incorrect changes can lead to system instability or errors. If you are uncomfortable with this method, it is advisable to use the previous methods mentioned or consult an expert for assistance.
Remember, making changes to the registry requires precision and care. Always ensure that you are modifying the correct keys and take necessary precautions to avoid any potential issues.
Potential Risks and Considerations
While removing the Recycle Bin from your Windows desktop may seem like a simple customization option, it’s important to be aware of potential risks and considerations before proceeding. Here are some factors to keep in mind:
- Accidental file deletion: Without the Recycle Bin, deleted files on your desktop will be permanently removed, bypassing the opportunity for recovery. Make sure you have alternative backup systems in place and exercise caution when deleting files.
- Confusing file management: The Recycle Bin serves as a visual indicator of deleted files. Removing it may lead to confusion or accidental file misplacement, especially if you are accustomed to relying on the Recycle Bin as a safety net for file deletion.
- Difficulty restoring the Recycle Bin: If you decide to bring back the Recycle Bin after removing it, the process may vary depending on the method you used. Ensure you understand the steps required to restore the Recycle Bin icon to your desktop.
- Registry modifications: Modifying the registry, as explained in Method 3, can have unintended consequences if not done correctly. It is crucial to exercise caution and backup your registry before making any changes. If you’re not comfortable with editing the registry, consider using the alternative methods mentioned.
Before removing the Recycle Bin, carefully weigh the need for customization against the potential risks involved. Assess the impact it may have on your file management workflow and take necessary precautions to prevent any unintended data loss or complications.
Remember, it’s always a good practice to regularly back up your important files to avoid permanent data loss, regardless of whether you choose to remove the Recycle Bin from your desktop or not.
Bringing Back the Recycle Bin
If you’ve previously removed the Recycle Bin from your Windows desktop and wish to bring it back, don’t worry! Reversing the process is relatively straightforward. Here’s how you can restore the Recycle Bin icon:
- Right-click on an empty area of your desktop and select “Personalize” from the context menu.
- In the Windows Personalization settings, click on “Themes” in the left-hand sidebar.
- Scroll down and click on “Desktop icon settings” under the “Related settings” section.
- In the “Desktop Icon Settings” window that appears, check the box next to “Recycle Bin” and click “Apply” and then “OK”.
By following these steps, the Recycle Bin icon will be restored to your Windows desktop, allowing you to benefit from its functionality once again. If the icon still does not appear, try refreshing your desktop or restarting your computer.
It’s worth noting that if you removed the Recycle Bin by modifying the registry (Method 3), you can restore it by re-creating the deleted registry key or restoring it from your registry backup. However, this process requires a deep understanding of the registry, so it’s recommended to seek expert guidance or refer to reliable resources before attempting it.
By bringing back the Recycle Bin, you can continue to take advantage of its features, such as restoring accidentally deleted files or freeing up disk space by emptying it.
Remember, the choice to remove or restore the Recycle Bin is entirely subjective and depends on your personal preferences and workflow. Whether you choose to have it on your desktop or not, it’s essential to maintain good file management practices and have alternative backup methods in place to safeguard your important data.