
Assessing the PopSocket
A PopSocket is a popular accessory that attaches to the back of a smartphone or tablet, providing an additional grip and stand functionality. Over time, you may find yourself needing to remove the PopSocket for various reasons, such as replacing it with a new design or if it becomes damaged.
Before attempting to remove the PopSocket, it is essential to assess its condition and the type of adhesive used to attach it. This will help determine the best method for removal without causing damage to your device.
Start by inspecting the edges of the PopSocket to see if it is peeling or coming loose on its own. If it is, you might be able to gently pull it away from your device without any additional tools. However, if the PopSocket is securely attached, you will need to use alternative methods to remove it.
If your PopSocket is attached with a strong adhesive that needs a bit more effort to remove, it is essential to proceed with caution. Applying excessive force or using sharp objects can potentially damage the surface of your phone or tablet. It is always recommended to use gentle techniques and follow the suggested methods below to ensure a safe removal process.
Lastly, if you are unsure about removing the PopSocket by yourself or if it appears to be strongly adhered, consider seeking assistance from a professional technician or consulting the manufacturer’s instructions for specific removal guidance.
Detaching the PopSocket from Your Phone
When it comes to detaching a PopSocket from your phone, there are a few methods you can try. Keep in mind that the level of difficulty may vary depending on the type of adhesive used and the duration the PopSocket has been attached. Here are a few techniques you can use:
- Method 1: Using Your Fingers
- Method 2: Credit Card or Pry Tool
- Method 3: Applying Heat
- Method 4: Dental Floss or Fishing Line
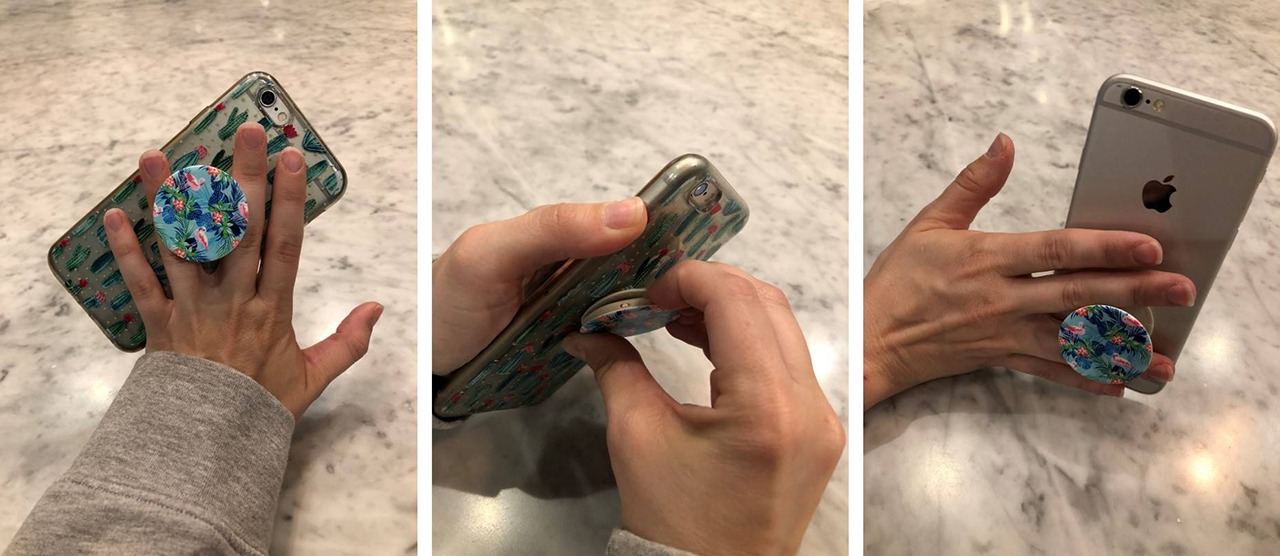
Start by placing your fingers on either side of the PopSocket and gently wiggle it back and forth. Apply steady pressure while rocking it side to side. If the adhesive is weak, the PopSocket should start to loosen and detach from your phone. Continue this motion until the PopSocket is completely removed.
If the PopSocket is stubborn and won’t come off with just your fingers, you can try using a credit card or a thin prying tool. Insert the card or tool between the PopSocket and your phone, and gently pry it upwards. Be careful not to apply too much force or damage your phone in the process. Move the card or tool around the edges of the PopSocket to loosen it until it comes off.
Another effective method is to apply heat to the PopSocket. Use a hairdryer or heat gun on a low heat setting and aim the hot air towards the edges of the PopSocket. The heat will soften the adhesive, making it easier to remove. Once the adhesive has loosened, use your fingers or a credit card to gently lift and detach the PopSocket from your phone.
If the PopSocket is firmly attached, you can try using dental floss or fishing line to detach it. Slide a piece of floss or line behind the PopSocket and carefully work it around the edges, sawing back and forth. This method helps to separate the adhesive without applying excessive force to your phone. Once the PopSocket is loosened, you can easily lift it off.
Remember to proceed with caution and take your time when detaching the PopSocket. If you encounter any resistance or find it challenging to remove, it is advisable to seek professional assistance to prevent any potential damage to your phone.
Using a Credit Card or Pry Tool to Remove the PopSocket
If your PopSocket is firmly attached and you’re unable to remove it using just your fingers, using a credit card or a pry tool can be an effective method. Here’s a step-by-step guide to using these tools:
- Gather the necessary tools: You will need a credit card or a thin, sturdy object such as a pry tool or guitar pick.
- Prepare your phone: Before starting, ensure your phone is switched off and remove any protective cases to prevent interference with the removal process.
- Insert the card or tool: Insert the card or tool between the PopSocket and your phone, positioning it at one of the edges.
- Gently pry upwards: Apply gentle pressure to lift the edge of the PopSocket. Be careful not to exert too much force or use sharp objects that can potentially damage your device’s surface.
- Move around the PopSocket: Once you have lifted one edge of the PopSocket, slowly move the card or tool around the edges, gradually prying it further away from your phone. If you encounter resistance, apply gentle pressure until the adhesive loosens.
- Continue to detach: Repeat the process of prying and moving around the edges of the PopSocket until it is completely detached from your phone.
Remember to maintain a steady and controlled motion while using the credit card or pry tool to avoid any accidental damage to your phone. If you find it difficult to slide the card or tool between the PopSocket and your phone, you can try using a hairdryer on a low heat setting to soften the adhesive slightly, making the removal process easier.
Using a credit card or pry tool can be an effective technique for removing a stubbornly attached PopSocket. However, it’s important to exercise caution and patience throughout the process to safeguard your phone’s surface and prevent any potential damage.
Applying Heat to Loosen the Adhesive
If you’re having trouble removing a PopSocket from your phone, applying heat can be a useful method to loosen the adhesive. Here’s how:
- Gather the necessary tools: You will need a hairdryer or a heat gun on a low heat setting.
- Prepare your phone: Before starting, make sure your phone is turned off to avoid any potential heat damage. Remove any phone cases or covers that may interfere with the removal process.
- Apply heat to the edge of the PopSocket: Hold the hairdryer or heat gun about 6 to 8 inches away from the edge of the PopSocket.
- Move the heat around: With the heat directed towards the PopSocket, move the hairdryer or heat gun in circular motions or back and forth. The heat will soften the adhesive, making it easier to remove.
- Gradually pry the PopSocket: As the adhesive begins to loosen, use your fingers, a credit card, or a pry tool to gently pry the PopSocket away from your phone’s surface. Be careful not to apply too much force or damage your phone.
- Repeat if necessary: If the PopSocket doesn’t come off easily, continue applying heat and prying until it is fully detached.
It’s important to note that you should be cautious while applying heat to your phone to avoid overheating or damaging its internal components. Keep the hairdryer or heat gun at a safe distance, and if you notice any excessive heat, stop the process and let your phone cool down before continuing.
Applying heat is an effective method for loosening the adhesive of a stubborn PopSocket. However, if you’re unsure or uncomfortable using heat-based methods, consider seeking professional assistance for a safe and damage-free removal.
Removing the PopSocket with Dental Floss or Fishing Line
If you have a PopSocket that is firmly attached to your phone, using dental floss or fishing line can be a handy technique to detach it. Follow these steps to remove the PopSocket using this method:
- Gather the necessary tools: You will need dental floss, fishing line, or any thin, flexible string-like material.
- Prepare your phone: Make sure your phone is switched off and remove any phone cases or covers that may interfere with the removal process.
- Insert the string-like material: Slide one end of the dental floss or fishing line behind the PopSocket, positioning it at one of the edges.
- Saw back and forth: Holding one end of the string-like material, use a back-and-forth sawing motion to work it around the edges of the PopSocket. This action helps separate the adhesive from your phone without applying excessive force.
- Continue detaching: As you saw back and forth, gradually work your way around the entire circumference of the PopSocket. This process should loosen the adhesive, allowing you to lift and detach the PopSocket from your phone.
It’s important to note that this method requires patience and a gentle touch to prevent any damage to your phone or the PopSocket. Take your time and be careful not to apply too much pressure that could potentially harm your device’s surface.
If you encounter any resistance while using dental floss or fishing line, you can try applying a moderate amount of heat with a hairdryer to soften the adhesive slightly. This can make the removal process easier and reduce the likelihood of causing any damage.
Removing a PopSocket with dental floss or fishing line provides a safe and effective alternative when other methods are not suitable. However, if you’re unsure or uncomfortable using this technique, it’s best to seek professional assistance to ensure a successful and damage-free removal.
Cleaning up Any Residue
After successfully removing the PopSocket from your phone, you may notice some adhesive residue left behind. It’s essential to clean this residue properly to restore the appearance of your device. Here are some steps to help you clean up any residue:
- Gather the necessary materials: You will need rubbing alcohol or adhesive remover, cotton pads or swabs, and a microfiber cloth.
- Dampen the cotton pad or swab: Pour a small amount of rubbing alcohol or adhesive remover onto a cotton pad or swab. Ensure it’s damp but not dripping.
- Gently rub the residue: Using the dampened cotton pad or swab, gently rub the residue left from the PopSocket. Apply light pressure and make small circular motions to lift off the adhesive.
- Repeat if necessary: If the residue persists, apply more rubbing alcohol or adhesive remover as needed and continue to gently rub until the surface is clean.
- Clean the surface: Once the adhesive residue is removed, use a microfiber cloth to clean and polish the area. This will help eliminate any streaks or smudges left behind by the cleaning solution.
It’s important to note that not all phones have the same tolerance for cleaning solutions. Before using rubbing alcohol or adhesive remover, check your phone’s manufacturer guidelines to ensure it is safe to use on your device’s surface.
If you prefer to use natural alternatives, you can try using peanut butter, coconut oil, or baking soda mixed with water to create a paste. Apply the chosen natural remedy to the adhesive residue, let it sit for a few minutes, and then gently scrub with a cloth or sponge.
Remember to be gentle while cleaning to avoid scratching or damaging the surface of your phone. If you’re uncertain about the cleaning process, it’s wise to consult the manufacturer’s instructions or seek professional advice.
By following these steps, you can effectively clean up any residue left behind after removing a PopSocket from your phone, restoring its appearance and ensuring a clean and sleek surface.
Reattaching or Swapping Your PopSocket
Once you have successfully removed the PopSocket from your phone, you may be wondering about reattaching it or swapping it for a new design. Here are some steps to help you with the reattachment or swapping process:
- Clean the surface: Before reattaching or swapping your PopSocket, ensure that the surface of your phone is clean and free from any residue or dirt. Use a microfiber cloth or a gentle cleaning solution to wipe away any debris.
- Assess the adhesive: Check the adhesive on the back of your PopSocket to ensure it is in good condition. If there are any signs of damage or wear, it’s recommended to use a new PopSocket or adhesive disc.
- Align the PopSocket: Determine the desired placement for your PopSocket on the back of your phone. Ensure that it is centered and aligned properly to your liking.
- Press and hold: Once the PopSocket is in the desired position, firmly press it onto the surface of your phone. Apply pressure for about 10 to 15 seconds to ensure a secure bond between the PopSocket and your device.
- Allow it to set: Give the PopSocket time to set and adhere to your phone. It is recommended to leave it undisturbed for at least one hour before using it to ensure the adhesive fully bonds.
- Swapping your PopSocket: If you want to swap your existing PopSocket for a new design, carefully peel off the old PopSocket from your phone. Clean any residue left behind using the methods mentioned earlier, and then follow the steps above to reattach your new PopSocket.
It’s worth noting that over time, the adhesive on your PopSocket may lose its stickiness. If you find that your PopSocket is not staying securely attached to your phone, you can purchase adhesive replacement discs from the PopSocket manufacturer or use double-sided adhesive tape as an alternative.
Remember to handle your phone with care and to avoid placing excessive weight or pressure on the PopSocket to prevent any potential damage to your device.
By following these steps, you can easily reattach or swap your PopSocket, allowing you to enjoy its functionality and style on your phone once again.