
Choosing a Fire Tablet Model
When it comes to purchasing a Fire Tablet, Amazon offers a variety of options to cater to different needs and preferences. Before making a decision, it’s important to consider factors such as budget, specifications, and usage requirements. Let’s explore the different Fire Tablet models and help you determine which one is right for you.
1. Fire 7: The Fire 7 is the most affordable option, yet it doesn’t compromise on performance. With a 7-inch display, it’s compact and great for reading, browsing the web, and watching videos on the go. While it has a sufficient battery life, its storage capacity is limited compared to other models.
2. Fire HD 8: The Fire HD 8 offers a larger 8-inch display with higher resolution, providing a better visual experience. It also boasts improved battery life and more storage options. This model is perfect for those who enjoy gaming, streaming media, or working on productivity apps.
3. Fire HD 10: If you prioritize a larger screen, the Fire HD 10 is the way to go. With its impressive 10.1-inch display, it delivers vibrant colors and sharp details. It also offers more storage options and enhanced performance, making it ideal for multimedia activities, including watching movies, playing games, and accessing the web.
4. Fire HD 8 Plus: The Fire HD 8 Plus takes the capabilities of the Fire HD 8 to the next level. It includes additional features such as wireless charging compatibility and more RAM, providing a smooth and responsive experience. This model is recommended for those who require faster performance and convenient charging options.
5. Fire HD 10 Plus: The Fire HD 10 Plus is the top-tier Fire Tablet model available. With its larger screen size, faster performance, and more RAM, it’s designed for users seeking the best of the best. If you use your tablet for resource-intensive tasks, such as video editing or graphic-intensive gaming, the Fire HD 10 Plus is the ultimate choice.
Creating an Amazon Account
Before you can register your Fire Tablet, you’ll need to create an Amazon account. Follow these steps to get started:
1. Visit the Amazon website: Open your preferred web browser and go to www.amazon.com.
2. Click on “Account & Lists”: Located at the top-right corner of the page, click on the “Account & Lists” button to access the account creation page.
3. Select “Create your Amazon account”: On the login page, click on the “Create your Amazon account” button to initiate the account creation process.
4. Provide your name and email: Enter your name, email address, and choose a secure password for your Amazon account. Make sure to use a valid email address as you’ll need it for account verification.
5. Click “Create your Amazon account”: Once you’ve entered the required information, click on the “Create your Amazon account” button to proceed.
6. Complete the verification process: Amazon will send a verification email to the email address provided during registration. Open the email and click on the verification link to confirm your account.
7. Add a payment method (optional): If you plan to make purchases on Amazon, you can add a payment method, such as a credit card or debit card, to your account for convenient and secure transactions.
8. Set your preferences: Customize your Amazon account settings by selecting your preferred language, currency, shipping address, and communication preferences.
9. Congratulations, you’ve created your Amazon account! You’re now ready to register your Fire Tablet and start enjoying all the features and benefits it has to offer.
Remember to keep your Amazon account credentials secure and update your password periodically to ensure the safety of your account. With your Amazon account ready, you’re one step closer to unlocking the full potential of your Fire Tablet.
Powering on the Fire Tablet
Once you have your Fire Tablet in hand, it’s time to power it on and get started. Follow these simple steps to turn on your Fire Tablet:
1. Locate the power button: On most Fire Tablet models, the power button is located either on the top or on the side of the device. It is usually a small button that can be easily identified.
2. Press and hold the power button: Firmly press and hold the power button for a few seconds until you see the screen light up and the Kindle logo or the Amazon logo appears on the display.
3. Release the power button: Once the device powers on and the logo appears, release the power button.
4. Wait for the device to boot up: After releasing the power button, your Fire Tablet will begin the start-up process. It may take a few moments for the system to load and for the home screen to appear.
5. Set up your device: Once the home screen appears, you’ll be prompted to go through the initial setup process. Follow the on-screen instructions to select your language, connect to Wi-Fi, and customize your device settings.
6. Congratulations, your Fire Tablet is now powered on and ready to use! You can start exploring the various apps, features, and content available on your device.
Remember to charge your Fire Tablet regularly to ensure uninterrupted usage and optimal performance. Additionally, it’s a good idea to familiarize yourself with the location of the power button for future use, such as when putting the device in sleep mode or turning it off.
Now that your Fire Tablet is powered on, let’s move on to the next steps of setting up and registering your device to fully unlock its capabilities.
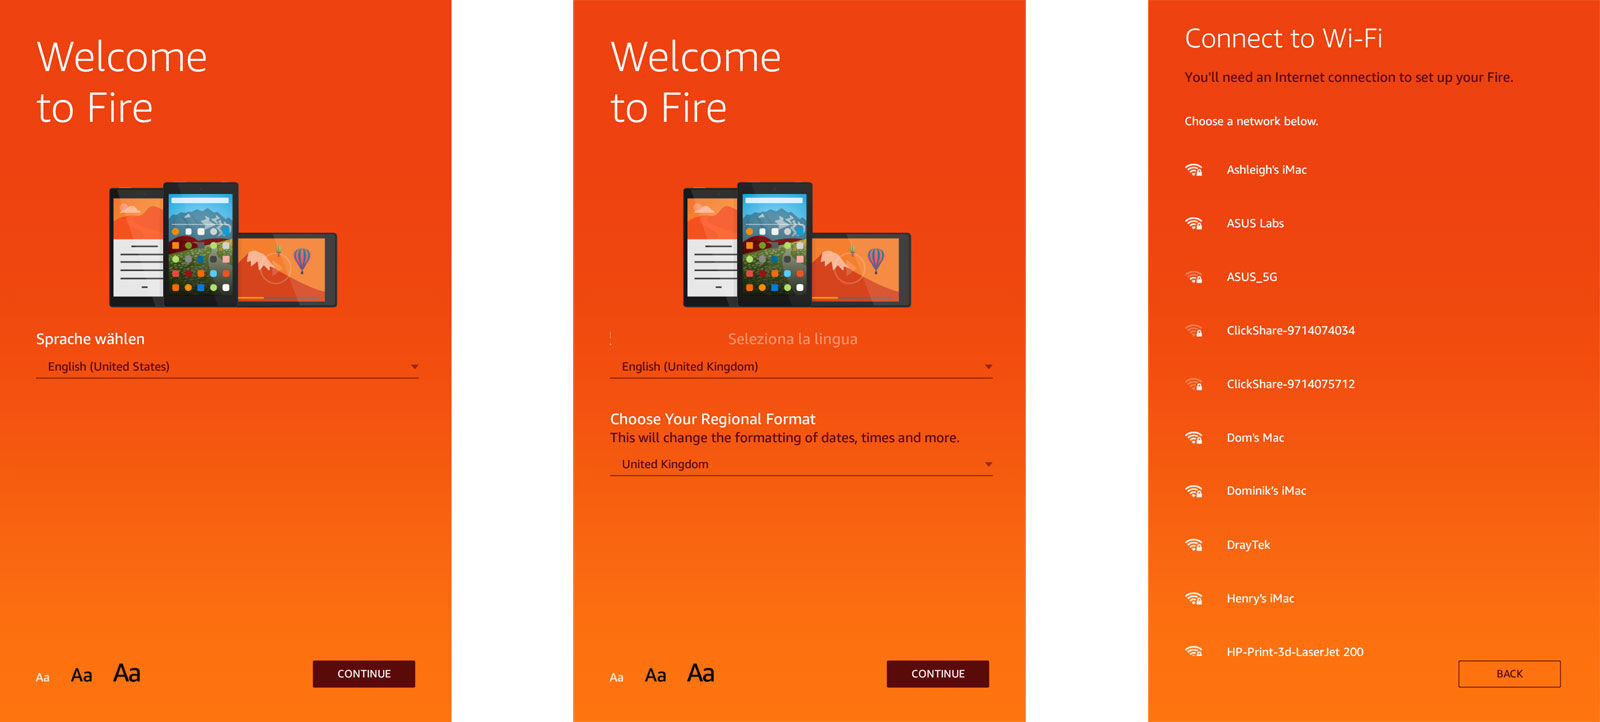
Connecting to Wi-Fi
One of the first steps in setting up your Fire Tablet is connecting to a Wi-Fi network. This will enable you to access the internet, download apps, stream media, and much more. Here’s how you can connect your Fire Tablet to Wi-Fi:
1. Open the settings: Swipe down from the top of the screen to access the Quick Settings menu. Tap on the gear icon in the top-right corner to open the settings menu.
2. Select “Wi-Fi”: In the settings menu, tap on the “Wi-Fi” option to view available Wi-Fi networks.
3. Enable Wi-Fi: Make sure the Wi-Fi toggle switch is turned on. If it’s off, tap on the switch to enable Wi-Fi.
4. Select a Wi-Fi network: Your tablet will display a list of available Wi-Fi networks. Tap on the network you want to connect to. If the network requires a password, you’ll be prompted to enter it.
5. Connect to the network: After entering the password (if required), tap on the “Connect” button to establish a connection to the selected Wi-Fi network.
6. Wait for the connection: Your Fire Tablet will attempt to connect to the Wi-Fi network. Once connected, a Wi-Fi indicator icon will appear at the top-right corner of the screen.
7. Test the connection: To ensure that your tablet is connected to the internet, open a web browser or any app that requires an internet connection and verify that you can access the content.
8. Congratulations, your Fire Tablet is now connected to Wi-Fi! You can now enjoy browsing the web, downloading apps, watching videos, and accessing online services.
Remember, your Fire Tablet will automatically connect to known Wi-Fi networks that you’ve previously connected to. If you’re in an area with multiple networks, make sure to connect to a secure and trustworthy network to protect your device and data.
In case you have trouble connecting to a Wi-Fi network, check the network settings, restart your device, or contact your internet service provider for assistance. Once your Fire Tablet is connected to Wi-Fi, you’re ready to proceed with the setup and registration process.
Setting Language and Location
Setting the language and location on your Fire Tablet is an essential step in personalizing your device and ensuring that it provides a tailored experience. Follow these steps to set the language and location on your Fire Tablet:
1. Open the settings: Swipe down from the top of the screen to access the Quick Settings menu. Tap on the gear icon in the top-right corner to open the settings menu.
2. Select “Device Options”: In the settings menu, scroll down and tap on “Device Options” to access additional device settings.
3. Tap on “Language & Keyboard”: Under the Device Options menu, tap on “Language & Keyboard” to access the language settings.
4. Select your preferred language: In the Language settings, you’ll see a list of available languages. Tap on the language you want to set for your Fire Tablet. The device will prompt you to confirm the language change.
5. Tap on “Location”: After setting the language, go back to the Device Options menu and tap on “Location” to adjust the device’s location settings.
6. Set your location: In the Location settings, select your country or region from the provided list. This helps to personalize your device and provide location-specific content and services.
7. Review additional settings: Depending on your specific device and software version, you may find additional settings related to language and location preferences. Take the time to explore these settings and customize them according to your needs.
8. Save your changes: Once you’ve set your preferred language and location, make sure to tap on the “Save” or “Apply” button to save the changes and exit the settings menu.
9. Congratulations, you’ve successfully set the language and location on your Fire Tablet! The device will now display content in your preferred language and provide location-relevant information and services.
Setting the correct language and location ensures that you receive accurate search results, localized content recommendations, and appropriate regional settings on your Fire Tablet. It also enhances your overall user experience on the device.
If you ever need to change the language or location settings in the future, simply navigate back to the Language & Keyboard or Location settings in the device options and follow the same steps as mentioned above.
Now that you’ve personalized your Fire Tablet with the right language and location settings, let’s move on to the next steps of registering your device and linking it to your Amazon account.
Registering the Fire Tablet with Amazon
To fully unlock the benefits and features of your Fire Tablet, you need to register it with your Amazon account. Registering ensures access to the vast selection of apps, e-books, music, and other content available through Amazon. Follow these steps to register your Fire Tablet:
1. Open the settings: Swipe down from the top of the screen to access the Quick Settings menu. Tap on the gear icon in the top-right corner to open the settings menu.
2. Select “Device Options”: In the settings menu, scroll down and tap on “Device Options” to access additional device settings.
3. Tap on “Device Registration” or “My Account”: Depending on your device model, you may see either “Device Registration” or “My Account” option. Tap on the corresponding option to proceed.
4. Select “Register”: On the Device Registration or My Account page, tap on the “Register” button. If you’re already signed in to your Amazon account, skip to step 6.
5. Sign in to your Amazon account: Enter your Amazon account email address and password. If you don’t already have an Amazon account, you’ll need to create one by tapping on the “Create an Account” button and following the on-screen instructions.
6. Confirm registration: After entering your Amazon account information, tap on the “Register” button to complete the registration process. Your Fire Tablet will connect to your Amazon account and sync your settings, content, and preferences.
7. Verify registration status: To ensure that your Fire Tablet is properly registered, go back to the Device Registration or My Account page in the settings and verify that it shows a confirmation message indicating successful registration.
8. Congratulations, you have successfully registered your Fire Tablet with Amazon! You can now enjoy seamless access to apps, e-books, movies, music, and other content available through your Amazon account.
By registering your Fire Tablet, you also gain access to features like cloud storage, easy content synchronization across devices, and personalized recommendations based on your usage and preferences.
If you ever need to deregister your Fire Tablet or switch to a different Amazon account, you can do so by following a similar process in the Device Registration or My Account settings.
Now that your Fire Tablet is registered, it’s time to enter your Amazon account information and link it to your device for a more personalized and convenient user experience.
Entering your Amazon Account Information
After registering your Fire Tablet with Amazon, the next step is to enter your Amazon account information. This step is crucial as it links your device to your account and allows you to access your personalized content, settings, and preferences. Follow these steps to enter your Amazon account information:
1. Open the settings: Swipe down from the top of the screen to access the Quick Settings menu. Tap on the gear icon in the top-right corner to open the settings menu.
2. Select “My Account” or “Sign in”: In the settings menu, locate and tap on either “My Account” or “Sign in” option. These options may vary depending on your device model and software version.
3. Tap on “Amazon Account”: On the My Account or Sign in page, tap on the “Amazon Account” option. This will prompt you to enter your Amazon account information.
4. Enter your Amazon email and password: In the Amazon Account page, enter the email address associated with your Amazon account and your account password. Make sure to enter the correct information to ensure a successful sign-in process.
5. Tap “Sign In”: After entering your Amazon account email and password, tap on the “Sign In” button to proceed. Your Fire Tablet will verify the account information and establish a connection with your Amazon account.
6. Wait for the account synchronization: Once you’ve signed in, your device will sync your Amazon account settings, content, and preferences. This may take a few moments depending on the amount of data to be synchronized.
7. Verify account sign-in: To confirm that you’ve successfully entered your Amazon account information, go back to the My Account or Sign In page in the settings and ensure that it displays your account information and a confirmation message.
8. Congratulations, you’ve entered your Amazon account information! Your Fire Tablet is now linked to your Amazon account, and you can enjoy access to your personalized digital content, such as e-books, apps, movies, and more.
By entering your Amazon account information, you also gain access to features like one-click purchasing, personalized recommendations, and easy synchronization of content across your devices. It enhances your overall user experience and makes it more convenient to explore and enjoy the services offered by Amazon.
If you need to change your Amazon account information in the future, simply navigate back to the My Account or Sign In page in the settings and follow the same steps as mentioned above to update your account details.
Now that your Amazon account is linked to your Fire Tablet, let’s proceed with the next steps of enabling device updates and usage data collection.
Linking your Fire Tablet to your Amazon Account
Linking your Fire Tablet to your Amazon account is an important step to seamlessly access your digital content, settings, and preferences across devices. By linking, you can enjoy a personalized experience and easily sync your content across multiple Amazon devices. Here’s how you can link your Fire Tablet to your Amazon account:
1. Open the settings: Swipe down from the top of the screen to access the Quick Settings menu. Tap on the gear icon in the top-right corner to open the settings menu.
2. Select “My Account” or “Sign in & security”: In the settings menu, locate and tap on either “My Account” or “Sign in & security” option. The option may vary depending on your device model and software version.
3. Tap on “Link My Account”: On the My Account or Sign in & security page, tap on the “Link My Account” or a similar option. This will prompt you to enter your Amazon account details.
4. Enter your Amazon account email and password: In the account linking page, enter the email address associated with your Amazon account and your account password. Double-check the information to ensure that it is accurate and up-to-date.
5. Tap “Link Account” or “Sign In”: After entering your Amazon account email and password, tap on the “Link Account” or “Sign In” button to proceed. Your Fire Tablet will verify the account information and establish a link with your Amazon account.
6. Wait for the account linking process: Once you’ve signed in, your device will link to your Amazon account. It may take a few moments for the linking process to complete, depending on the amount of data to be synchronized.
7. Verify account linking: To confirm that your Fire Tablet is successfully linked to your Amazon account, go back to the My Account or Sign in & security page in the settings. Ensure that it displays your account information and a confirmation message indicating the successful linking of your device.
8. Congratulations, you have successfully linked your Fire Tablet to your Amazon account! Your device is now synchronized with your account, and you can enjoy seamless access to your digital content, such as e-books, apps, music, and more.
By linking your Fire Tablet to your Amazon account, you can easily manage and access your content library, enjoy personalized recommendations, and effortlessly switch between devices to continue where you left off.
If you need to unlink your Fire Tablet from your Amazon account in the future or link it to a different account, navigate back to the My Account or Sign in & security page in the settings and follow the appropriate steps to manage your account preferences.
Now that your Fire Tablet is linked to your Amazon account, let’s move on to the next steps of enabling device updates and usage data collection.
Enabling Device Updates and Usage Data Collection
Enabling device updates and usage data collection on your Fire Tablet allows you to benefit from the latest software enhancements and helps Amazon improve its services based on user feedback. Follow these steps to enable device updates and usage data collection on your Fire Tablet:
1. Open the settings: Swipe down from the top of the screen to access the Quick Settings menu. Tap on the gear icon in the top-right corner to open the settings menu.
2. Select “Device Options”: In the settings menu, scroll down and tap on “Device Options” to access additional device settings.
3. Tap on “System Updates”: Under Device Options, tap on “System Updates” to access the system update settings for your Fire Tablet.
4. Enable automatic updates: In the System Updates settings, ensure that the “Automatic Updates” toggle switch is turned on. This allows your Fire Tablet to automatically download and install the latest software updates.
5. Tap on “Privacy & Security”: Go back to the Device Options menu and tap on “Privacy & Security” to access the privacy settings for your device.
6. Enable usage data collection: In the Privacy & Security settings, look for an option related to “Usage Data Collection” or “Device Usage Data.” Enable this option if it is not already enabled. By doing so, you allow your Fire Tablet to collect anonymous usage data that helps Amazon improve its services.
7. Customize data sharing preferences (optional): Depending on your device model and software version, you may have the option to customize data sharing preferences in the Privacy & Security settings. Explore these settings to adjust your data sharing preferences according to your comfort level.
8. Congratulations, you have enabled device updates and usage data collection on your Fire Tablet! Your device will now receive the latest software updates automatically, and your usage data will contribute to improving Amazon’s services.
Enabling device updates ensures that your Fire Tablet remains up to date with the latest features, bug fixes, and security patches. It helps optimize performance and enhances your overall user experience.
By allowing usage data collection, you contribute to the continuous improvement of Amazon’s services and receive more personalized recommendations and content suggestions tailored to your preferences.
If you ever wish to disable automatic updates or modify your data sharing preferences in the future, simply navigate back to the respective settings menus and adjust the toggles or preferences accordingly.
Now that you have enabled device updates and usage data collection, your Fire Tablet is optimized to deliver the best possible performance and browsing experience. You’re ready to explore and make the most out of your device!
Customizing Your Fire Tablet Settings
Customizing the settings on your Fire Tablet allows you to personalize the device to your preferences and optimize it for your specific needs. Here are some key settings you can customize on your Fire Tablet:
1. Display and Brightness: Adjust the brightness level, enable night mode for a more comfortable reading experience in low light, and customize other display settings to suit your visual preferences.
2. Sound and Notifications: Customize the sound settings, including volume levels, notification sounds, and vibration settings. You can also manage app notifications and choose which ones you want to receive.
3. App Permissions: Review and manage the permissions granted to individual apps on your device. Control what data and features each app can access to protect your privacy and ensure your device’s security.
4. Battery Optimization: Optimize battery usage by enabling battery-saving features like adaptive brightness, limiting background app activities, and choosing power-saving modes. This can extend your device’s battery life.
5. Security and Privacy: Set up lock screen security with PIN, password, or biometric authentication methods like fingerprint or face recognition. Manage privacy settings for various features, such as location services and app data collection.
6. Accessibility: Customize accessibility settings to cater to any specific needs. You can adjust font size, enable color inversion or grayscale mode, and use accessibility features like screen magnification or screen reader for enhanced usability.
7. Language and Input: Customize the language settings and choose preferred keyboards or input methods for typing. You can also enable features like auto-correction, word suggestions, and gesture typing for smoother text input.
8. Alexa Integration: If your Fire Tablet supports Alexa, you can customize various settings related to voice commands, smart home devices, and Alexa notifications. Set up routines and personalized voice profiles for a more tailored experience.
9. Storage Settings: Check your device’s storage usage and manage installed apps, media files, and downloaded content. You can also set up your device to automatically upload photos and videos to cloud storage for backup and easy access.
10. Parental Controls: If you’re using your Fire Tablet for family use, customize parental control settings to ensure child-friendly content, set time limits, and restrict access to certain apps or web browsing.
By customizing these settings, you can optimize your Fire Tablet to suit your preferences, enhance usability, and prioritize security and privacy. Take some time to explore these options and make adjustments according to your needs.
Remember, customizing your Fire Tablet settings is a personal preference, and you can always revisit and modify them based on your changing preferences or requirements. Enjoy tailoring your device to create a personalized and enjoyable user experience!