
How Does Outlook Handle Read Receipt Requests?
Outlook, the popular email client developed by Microsoft, provides users with a useful feature known as read receipt requests. When enabled, this feature allows the sender to receive a notification when the recipient opens and reads the email. However, Outlook’s handling of read receipt requests may not always align with the preferences of users. Understanding how Outlook handles read receipts is crucial for those who wish to have more control over their email communication.
By default, Outlook automatically notifies the sender when the recipient opens an email that includes a read receipt request. This notification is sent without any action required from the recipient. Although this feature can be beneficial in certain situations, it can also be an invasion of privacy or simply an inconvenience for some users.
When a read receipt request is received, Outlook prompts the recipient with a popup dialog box asking whether they want to send a read receipt. The recipient can choose to send the read receipt, ignore the request, or even decline all future read receipt requests from the sender. It’s important to note that the recipient has full control over whether or not to send read receipts. The sender cannot force the recipient to provide a read receipt if it is declined or ignored.
Outlook also provides the option to set a default response for read receipt requests. Users can choose to always send a read receipt, never send a read receipt, or manually respond to each request individually. This flexibility allows users to tailor their response based on their preferences and the specific circumstances surrounding the email.
Additionally, Outlook provides the ability to track the status of read receipt requests. This feature enables users to see whether the read receipt was successfully sent or declined by the recipient. Tracking read receipt statuses can be helpful for determining if an email has been read by the recipient, especially in situations where a response is expected.
Overall, Outlook’s handling of read receipt requests offers users a range of options to control their email communication. Whether you prefer to always send read receipts, never send read receipts, or manually respond to each request, Outlook provides the flexibility you need to manage your email in a way that suits your preferences and privacy concerns.
Why Would You Want to Prevent Outlook from Answering Read Receipt Requests?
While read receipt requests can serve as a valuable tool for email communication, there are several reasons why you may want to prevent Outlook from automatically answering these requests.
Firstly, privacy concerns are a common reason for disabling read receipts. Some individuals prefer to maintain their privacy and not disclose when they have read an email. This can be especially important for sensitive or confidential information. Disabling read receipts allows you to maintain control over what information you choose to share with the sender.
Another reason to prevent Outlook from answering read receipt requests is to avoid unnecessary interruptions. When you receive an email with a read receipt request, Outlook prompts you with a dialog box, requiring you to make a decision. This interruption can disrupt your workflow and be distracting, especially if you receive numerous read receipt requests throughout the day. Disabling automatic responses to read receipts allows you to focus on your work without constant interruptions.
In some cases, read receipt requests can be used as a tracking mechanism by senders to monitor your email activity. By disabling automatic responses, you can prevent senders from receiving confirmation that you have opened and read their email. This can be particularly useful in maintaining your autonomy and avoiding potential surveillance.
Additionally, if you find that read receipt requests are being abused or misused by certain senders, disabling automatic responses can help alleviate the issue. Some individuals may excessively request read receipts or use them as a way to confirm whether you are actively using your email account. By preventing Outlook from answering these requests, you can avoid engaging in unwanted email interactions.
Lastly, preventing Outlook from automatically answering read receipt requests can help streamline your email management. By disabling this feature, you can save time and energy by not having to constantly respond to read receipt requests. This allows you to focus on more important tasks and prioritize your email communication according to your own discretion.
Method 1: Changing Outlook’s Default Read Receipt Settings
If you frequently find yourself wanting to prevent Outlook from answering read receipt requests, one effective method is to change the default read receipt settings. By adjusting these settings, you can customize how Outlook handles read receipt requests for all your incoming emails.
To change Outlook’s default read receipt settings, follow these steps:
- Open Outlook and navigate to the “File” tab located in the top-left corner of the screen.
- Click on “Options” in the left-hand menu to access the Outlook Options window.
- In the Outlook Options window, select “Mail” from the left-hand menu.
- Scroll down the Mail settings until you reach the “Tracking” section.
- In the Tracking section, you will find the option “Automatically process meeting requests and responses to meeting requests and polls.” Uncheck this box to prevent Outlook from automatically responding to read receipt requests.
- Click on “OK” to save the changes and exit the Outlook Options window.
By disabling the automatic processing of meeting requests and responses, Outlook will no longer send read receipts without your explicit consent. Instead, you will have the freedom to choose whether to send a read receipt for each individual email that includes a request.
It’s important to note that changing the default read receipt settings will apply to all incoming emails. If there are specific senders or emails for which you still want to allow read receipts, you can manually enable them on a case-by-case basis.
By adjusting Outlook’s default read receipt settings, you can regain control over how your email client handles read receipt requests. This method provides a convenient solution for preventing automatic responses and allows you to actively choose when to send read receipts.
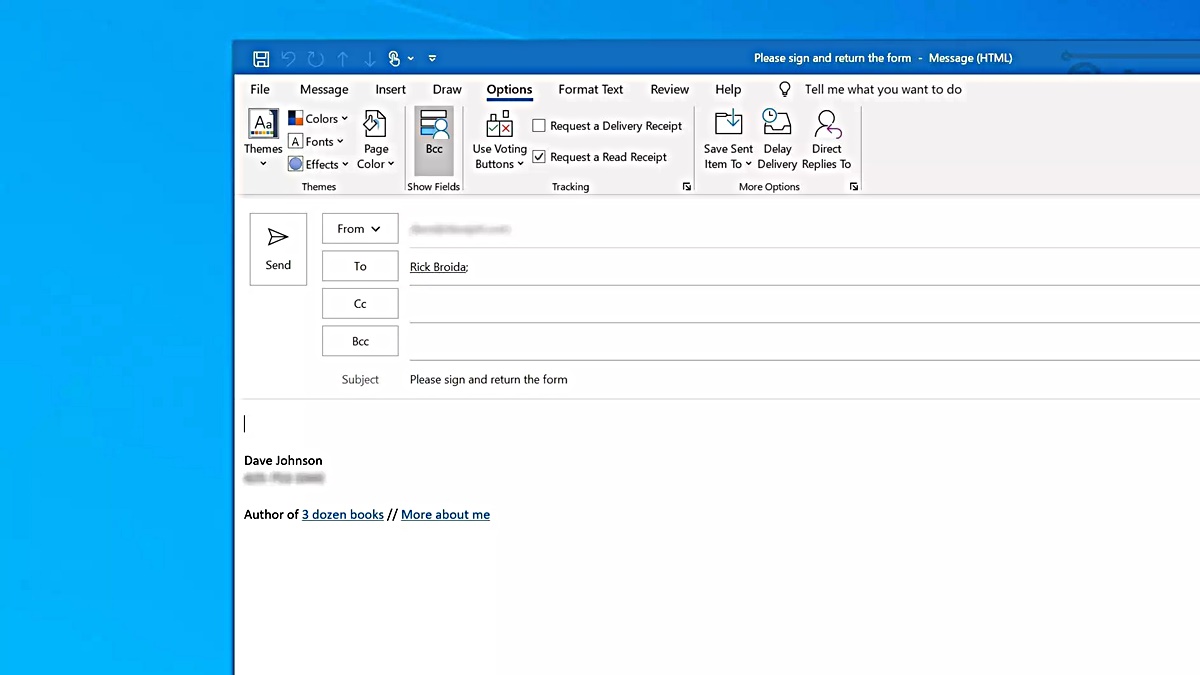
Method 2: Disabling Read Receipts for an Individual Email
If you want to prevent Outlook from answering read receipt requests for specific emails, you can disable read receipts on an individual basis. This method allows you to have more control over which emails trigger a read receipt response.
To disable read receipts for an individual email in Outlook, follow these steps:
- Open Outlook and compose a new email or open an existing email that you want to disable read receipts for.
- In the email window, navigate to the “Options” tab located in the ribbon at the top of the screen.
- In the “Tracking” group, you will find the “Request a Read Receipt” checkbox. Simply uncheck this box to disable read receipts for this specific email.
By disabling the read receipt request for a specific email, Outlook will not automatically answer read receipt requests sent by the sender of that email. This gives you the freedom to choose when to send read receipts and when to keep your reading status private.
It’s important to note that this method needs to be applied individually to each email for which you want to disable read receipts. By default, read receipt requests will still be answered for other emails unless you change the default read receipt settings as mentioned in Method 1 or apply method 3 or method 4 mentioned later in this article.
Disabling read receipts for an individual email is especially useful when you only want to prevent Outlook from answering read receipt requests for specific conversations or sensitive communication. By having the option to disable read receipts on a case-by-case basis, you can maintain better control over your email interactions and protect your privacy when needed.
Method 3: Using Rules in Outlook to Automatically Decline Read Receipts
If you consistently receive read receipt requests from certain senders and want to automatically decline them without any manual intervention, you can use rules in Outlook. By setting up a rule, you can instruct Outlook to automatically decline read receipt requests based on specific criteria, such as the sender’s email address or subject line.
To use rules in Outlook to automatically decline read receipt requests, follow these steps:
- Open Outlook and navigate to the “File” tab located at the top-left corner of the screen.
- Click on “Options” in the left-hand menu to access the Outlook Options window.
- In the Outlook Options window, select “Mail” from the left-hand menu.
- Click on the “Rules” button to open the Rules and Alerts window.
- In the Rules and Alerts window, click on the “New Rule” button to create a new rule.
- Choose “Apply rule on messages I receive” and click “Next”.
- Select the criteria that will trigger the rule, such as “from people or public group” or “with specific words in the subject”.
- In the rule description section, choose the option “Decline”/”Do not send a response” for read receipt requests.
- Click “Next” to add any additional conditions or exceptions if desired, and then specify the actions to be taken for matching emails.
- Click “Finish” to save the rule.
Once the rule is set up, Outlook will automatically decline read receipt requests based on the conditions you specified. This method allows you to have more control over managing read receipt requests and ensures that specific senders or emails won’t receive read receipts from you.
Using rules to automatically decline read receipt requests can save you time and effort by eliminating the need to manually decline them for each email. It’s a convenient way to customize your email management and focus on more important tasks without the interruption of read receipt notifications.
Method 4: Adding Read Receipt Blockers to Your Outlook Account
If you want to proactively prevent Outlook from answering read receipt requests from all senders, you can add read receipt blockers to your Outlook account. These blockers are third-party add-ins or extensions that can be installed to provide additional control over read receipt notifications.
To add read receipt blockers to your Outlook account, follow these steps:
- Research and select a reputable read receipt blocker add-in or extension that is compatible with Outlook.
- Download and install the chosen read receipt blocker onto your computer.
- Follow the installation instructions provided by the read receipt blocker to integrate it into your Outlook application.
- Once the read receipt blocker is installed, you can customize its settings to disable automatic answers to read receipt requests.
Read receipt blockers work by intercepting read receipt requests and preventing Outlook from sending automatic responses. They provide an extra layer of control to ensure that no read receipt requests are answered without your consent.
These blockers can also offer additional features and customization options, such as allowing you to selectively send read receipts for certain emails or setting up different response actions based on specific criteria. The exact capabilities and settings will vary depending on the specific read receipt blocker you choose to install.
By adding read receipt blockers to your Outlook account, you gain more flexibility and control over how read receipt requests are handled. This method ensures that no read receipt is sent without your explicit approval, regardless of the sender or the content of the email.
When considering read receipt blockers, it is important to choose a reliable and reputable add-in or extension from trusted sources to ensure the security and stability of your Outlook account.
Method 5: Using Third-Party Add-ins to Disable Read Receipts in Outlook
If you’re looking for even more options and flexibility in disabling read receipts in Outlook, you can consider using third-party add-ins. These add-ins are designed specifically to provide advanced features and customization options for managing read receipt requests.
To use third-party add-ins to disable read receipts in Outlook, follow these steps:
- Research and select a reputable third-party add-in that offers read receipt management features.
- Visit the provider’s website and follow the instructions to download and install the add-in on your computer.
- Once the add-in is installed, it will integrate with Outlook and provide additional options and settings for managing read receipt requests.
- Configure the settings according to your preferences, such as disabling automatic responses or customizing read receipt behavior for specific senders or emails.
Third-party add-ins can offer a wide range of features and customization options beyond what is available in the default Outlook settings. Some add-ins allow you to selectively enable or disable read receipts on a per-email basis, set up advanced rules and filters, or provide additional privacy and tracking control.
These add-ins are often developed by specialized companies or developers who focus on enhancing Outlook’s functionality. They can provide a higher degree of control over read receipt requests, allowing you to tailor the handling of read receipts to your specific needs and preferences.
Before installing a third-party add-in, make sure to research and choose a reputable and trusted provider. Read reviews, check user ratings, and consider recommendations from trusted sources to ensure the add-in is reliable, secure, and compatible with your version of Outlook.
By using third-party add-ins to disable read receipts in Outlook, you can take advantage of advanced features and customization options that go beyond the capabilities of the built-in read receipt settings. This method allows you to have even greater control over your email communication and ensures that read receipts are managed according to your preferences and privacy requirements.