
Why Powerwash Your Chromebook
Powerwashing your Chromebook is a useful troubleshooting technique that can help resolve various software issues. It essentially resets your device back to its factory settings, giving you a clean slate to work with. Here are a few reasons why you might consider powerwashing your Chromebook:
- Performance Optimization: Over time, your Chromebook may start to slow down due to cached data, residual files, or conflicting applications. Powerwashing can help improve its performance and restore its original speed.
- Resolving Software Glitches: If you’re experiencing frequent crashes, freezes, or unresponsive apps, a powerwash can eliminate any software glitches that may be causing these issues.
- Removing Malware: Malicious software or adware can sometimes find its way onto your Chromebook, impacting its performance and security. By powerwashing, you can remove any potentially harmful programs and start fresh.
- Troubleshooting Network Connectivity: If you’re having trouble connecting to Wi-Fi networks or experience intermittent connection drops, a powerwash can help resolve networking issues and ensure smoother connectivity.
- Personalization Reset: If you’ve customized your Chromebook’s settings extensively and want to start fresh with the default configurations, a powerwash will revert your device to its original state.
It’s worth noting that powerwashing your Chromebook will erase all locally stored data, such as downloaded files and applications. However, your Chromebook’s cloud-based features, such as synced bookmarks, apps, and settings, will be restored once you sign back in with your Google account.
Now that you understand the benefits of powerwashing, let’s delve into the necessary steps to back up your data before proceeding.
Backup Your Data
Before you powerwash your Chromebook, it’s essential to back up any important data to ensure you don’t lose any valuable information. Here’s how you can safely backup your data:
- Google Drive: One of the easiest and most convenient options is to save your files to Google Drive. Google Drive provides free cloud storage for your documents, photos, and other files. Simply drag and drop your files into Google Drive or use the sync feature to automatically backup specific folders on your Chromebook.
- External Storage: If you prefer to have a physical backup, you can connect an external hard drive or USB flash drive to your Chromebook and copy your important files onto it. Make sure to organize your files into folders for easy access later on.
- Cloud Storage Services: In addition to Google Drive, other cloud storage services like Dropbox, OneDrive, and Box can be used to backup your data. Install their respective apps on your Chromebook and upload your files to their cloud servers.
- Email or Messaging Apps: For smaller files or frequently accessed documents, you can email them to yourself or send them via messaging apps like Slack or Telegram. This ensures that you’ll have easy access to your files once you’ve completed the powerwash.
Remember to double-check your backup to ensure that all the necessary files are securely stored before proceeding with the powerwash. Once you’ve successfully backed up your data, you can proceed to sign out of your Google account on your Chromebook.
Sign Out of Your Google Account
Before performing a powerwash on your Chromebook, it’s crucial to sign out of your Google account to ensure that your personal data remains private and secure. Here’s how you can sign out of your Google account:
- Click on your profile picture: Located in the bottom right corner of the screen, click on your profile picture to open the account menu.
- Select “Sign out”: From the account menu, choose the “Sign out” option. The Chromebook will log you out of your Google account.
By signing out of your Google account, you’re ensuring that no one else can access your personal information or browsing history. Additionally, this step will help safeguard your privacy and prevent any potential data syncing issues during the powerwash process.
Now that you’ve successfully signed out, you’re ready to perform a powerwash on your Chromebook. In the following section, we’ll guide you through the steps of executing a powerwash and resetting your device to its factory settings.
Performing a Powerwash
Performing a powerwash on your Chromebook is a straightforward process that allows you to reset your device to its factory settings. Follow these steps to perform a powerwash:
- Access the Settings: Click on your profile picture in the bottom right corner of the screen, then select the settings gear icon to open the settings menu.
- Scroll down and click on “Advanced”: In the settings menu, scroll down until you see the “Advanced” section. Click on it to expand the options.
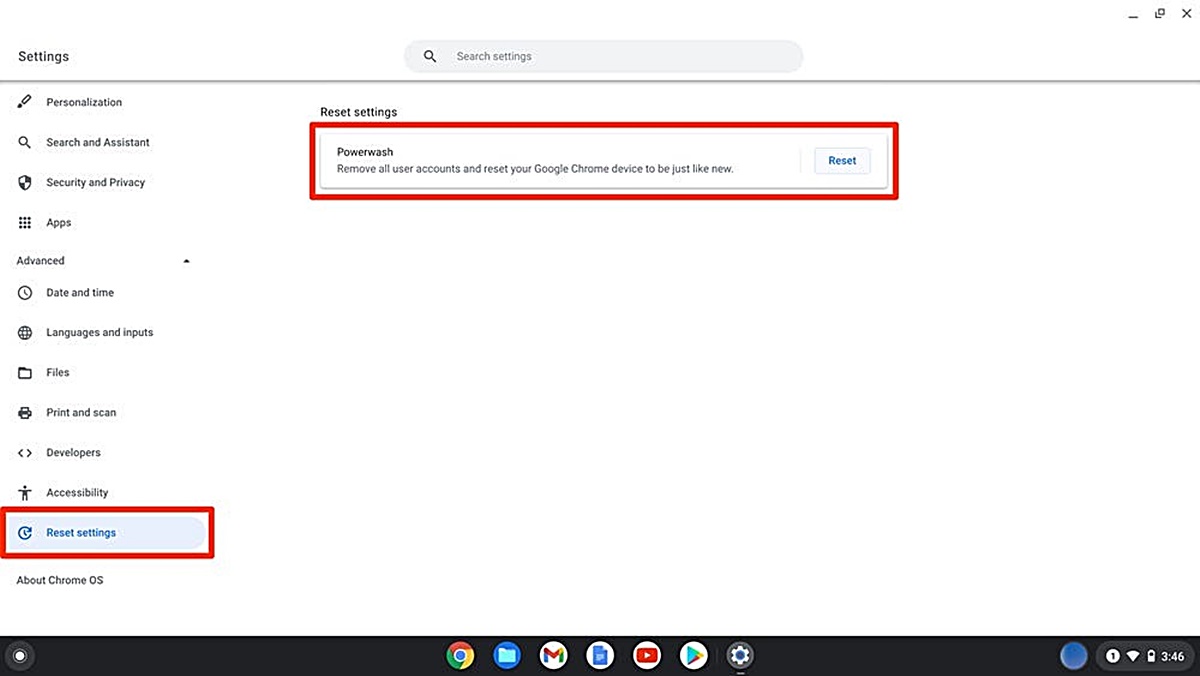
- Click on “Reset settings”: Once you’re in the “Advanced” section, locate the “Reset settings” option and click on it.
- Click on “Powerwash”: In the “Reset settings” menu, you’ll see a “Powerwash” option. Click on it.
- Confirm the powerwash: A pop-up window will appear, asking you to confirm the powerwash. Read the information provided and click on “Powerwash” to proceed.
Once you’ve confirmed, your Chromebook will begin the powerwash process. It may take a few minutes for the powerwash to complete, during which your device will restart. When the powerwash is done, your Chromebook will be restored to its original factory settings.
It’s important to note that performing a powerwash will delete all locally stored files, applications, and settings on your Chromebook. However, your Google account and associated cloud-based data, such as bookmarks and apps, will remain intact and can be easily restored once you set up your Chromebook again.
Now that you’ve successfully completed a powerwash, let’s move on to the next section, which covers resetting your Chromebook to its factory settings.
Resetting Chromebook to Factory Settings
Resetting your Chromebook to its factory settings is a crucial step after performing a powerwash. This process will ensure that your device is completely erased and ready to be set up again. Here’s how you can reset your Chromebook:
- Power on your Chromebook: Press the power button to turn on your Chromebook.
- Press and hold the appropriate keys: Depending on the model of your Chromebook, you will need to press and hold a combination of keys. The most common combination is the “Esc” + “Refresh” + “Power” buttons. Refer to your device’s documentation or manufacturer’s website to find the correct key combination.
- Wait for the “Chrome OS is missing or damaged” screen: After holding the keys, you will see a screen that says “Chrome OS is missing or damaged.” This is normal and indicates that you’re in recovery mode.
- Press “Ctrl” + “D” to enter developer mode: Once you see the “Chrome OS is missing or damaged” screen, press the “Ctrl” + “D” keys on your keyboard. This will allow you to reset your Chromebook.
- Follow the on-screen instructions: After entering developer mode, you will be prompted with on-screen instructions. Simply follow these instructions to reset your Chromebook to its factory settings.
Once the process is complete, your Chromebook will be restored to its original factory settings, similar to when you first purchased it. This means that all your personal data, locally stored files, and installed applications will be erased.
Now that your Chromebook is reset, you’re ready to set it up again. In the next section, we’ll guide you through the process of setting up your Chromebook by signing in with your Google account.
Setting Up Your Chromebook Again
After resetting your Chromebook to its factory settings, you’ll need to set it up again to start using it. Follow these steps to set up your Chromebook:
- Select your language and network: On the welcome screen, choose your preferred language and connect to a Wi-Fi network. Make sure to select a network that has an active internet connection.
- Sign in with your Google account: On the sign-in screen, enter your Google account email address and password. If you have two-factor authentication enabled, you’ll need to provide the verification code as well.
- Agree to the terms and conditions: Read and accept the terms and conditions presented on the screen. These terms outline the use of your Chromebook and its associated services.
- Set up Chromebook preferences: Customize your Chromebook preferences, such as language settings, privacy options, and window management, according to your preferences.
- Wait for the device to sync: Once you’ve completed the setup process, your Chromebook will automatically start syncing your Google account data, including bookmarks, apps, and settings. This may take a few minutes, depending on the amount of data being synced.
After the sync is complete, your Chromebook is ready to use. You can now take advantage of its features, browse the web, install applications from the Chrome Web Store, and fully enjoy the Chrome OS ecosystem.
If you had previously backed up your important data, you can now restore it to your Chromebook. In the next section, we’ll cover the steps to restore your data after setting up your Chromebook.
Restoring Your Data
After setting up your Chromebook again, you can restore your data from the backup you created before performing the powerwash. Here’s how you can restore your data:
- Google Drive: If you backed up your files to Google Drive, simply sign in to your Google account and navigate to Google Drive. You’ll find all your backed-up files and folders ready to be accessed and restored. You can download the files or sync them back to your Chromebook for offline access.
- External Storage: Connect the external hard drive or USB flash drive that contains your backed-up data. Open the File Manager on your Chromebook and locate the external storage device. Copy the desired files and folders back to your local storage on the Chromebook.
- Cloud Storage Services: If you used other cloud storage services like Dropbox or OneDrive to back up your data, install their respective apps on your Chromebook if you haven’t already. Sign in to your account and sync your files back to your Chromebook.
- Email or Messaging Apps: Retrieve your emailed files or files sent via messaging apps such as Slack or Telegram. Download the attachments or directly access the files to restore them to your Chromebook.
Ensure that you have a stable internet connection for a smooth and efficient data restoration process. Take your time to organize and manage your files after restoring them to your Chromebook to maximize productivity and ease of access.
With your data restored, you can now continue using your Chromebook with all your files and settings in place. In the next section, we’ll address any potential issues you may encounter during the powerwash or setup process and provide troubleshooting suggestions.
Troubleshooting Powerwash Issues
While powerwashing your Chromebook is generally a straightforward process, you may encounter some issues along the way. Here are a few common problems that users may face during the powerwash or setup process, along with some troubleshooting suggestions:
- Stuck at the “Chrome OS is missing or damaged” screen: If you’re unable to proceed past this screen, try pressing the “Ctrl” + “D” keys to enter developer mode. Alternatively, performing a hard reset by holding down the power button for 10 seconds and then powering on the Chromebook again may help.
- Internet connectivity issues: If you’re having trouble connecting to a Wi-Fi network during the setup process, ensure that you’re within range of a stable network and that the network’s credentials are entered correctly. You can also try rebooting your router or using an Ethernet cable connection for a more reliable setup.
- Syncing errors: If your Chromebook is not syncing your Google account data properly after the powerwash, sign out of your Google account and sign back in. This action will trigger the syncing process again. Additionally, check your internet connection and ensure that you have enough available storage space.
- Failed data restoration: If you’re unable to restore your data from your backup, double-check that you have the correct files and storage device. If you’re using cloud storage services, verify that you’re signed in to the correct account and that the files are synced properly. If the problem persists, try restoring the data from another backup source or consult the support documentation for the specific cloud storage service.
- Chromebook not turning on: If your Chromebook fails to turn on after the powerwash, ensure that it’s charged or connected to a power source. Try holding down the power button for at least 30 seconds to perform a hard reset. If the issue persists, contact the Chromebook manufacturer’s support for further assistance.
If you encounter any other issues during the powerwash or setup process that are not mentioned here, be sure to consult the official support documentation for your Chromebook or reach out to the manufacturer’s customer support for personalized assistance.
By troubleshooting powerwash issues, you can overcome any obstacles that may arise and successfully restore your Chromebook to its factory settings, ensuring a fresh start for optimal performance and usability.