
What is a Legacy Account on Trezor?
A Legacy Account on Trezor is a type of Bitcoin account that uses an older address format known as P2PKH (Pay-to-Public-Key-Hash). This format was widely adopted in the early days of Bitcoin and is still supported by many wallets and exchanges. The addresses generated by a Legacy Account start with the number “1”.
When Bitcoin first emerged, the P2PKH address format was the standard, and most users created their wallets using this format. However, as the Bitcoin network grew and evolved, a new address format called Segregated Witness (SegWit) was introduced to address scaling issues and improve transaction efficiency.
Legacy Accounts continue to function properly, allowing users to send and receive Bitcoin. However, there are some drawbacks to using Legacy Accounts, especially in terms of transaction fees and network congestion. Transactions from Legacy Accounts tend to be larger in size, resulting in higher fees and slower confirmations.
It’s important to note that Legacy Accounts can still store and manage Bitcoin securely. However, in order to take advantage of the benefits offered by SegWit, such as lower fees and faster transactions, it is recommended to move your Bitcoin from a Legacy Account to a SegWit Account on your Trezor device.
Next, we will delve into what a SegWit Account is and why you should consider making the switch.
What is a SegWit Account on Trezor?
A SegWit (Segregated Witness) Account on Trezor is a Bitcoin account that uses the newer SegWit address format. SegWit was introduced to Bitcoin in 2017 as a solution to some of the network’s scalability issues. It separates the transaction signature data from the transaction data, allowing for more efficient use of block space.
SegWit addresses are denoted by the prefix “bc1” and are typically shorter than Legacy addresses. By using SegWit, you can benefit from lower transaction fees and faster confirmation times, as the smaller transaction sizes are prioritized by the network.
One of the main advantages of SegWit is its ability to support the Lightning Network, a second-layer scaling solution that enables faster and cheaper microtransactions. By moving your Bitcoin to a SegWit Account on your Trezor device, you can take advantage of these advanced features and contribute to the overall scalability of the Bitcoin network.
It’s worth noting that most major exchanges and wallets now support SegWit, making it easier than ever to transact with SegWit-enabled addresses. By switching to a SegWit Account, you can not only save on fees but also help reduce network congestion for the entire Bitcoin ecosystem.
Now that we have covered what a SegWit Account is, it’s important to understand why you should consider moving your Bitcoin from a Legacy Account to a SegWit Account on your Trezor device. Let’s explore the benefits in the following section.
Why should you move your Bitcoin from a Legacy Account to a SegWit Account?
There are several compelling reasons why you should consider moving your Bitcoin from a Legacy Account to a SegWit Account on your Trezor device:
- Lower transaction fees: SegWit addresses generate smaller transaction sizes, resulting in lower fees compared to Legacy addresses. By moving your Bitcoin to a SegWit Account, you can save money on transaction fees, especially during periods of high network congestion.
- Faster confirmations: With SegWit, transactions are more likely to be included in the next block, leading to faster confirmations. This is advantageous in time-sensitive situations or when you need to execute multiple transactions quickly.
- Compatibility: Most wallets and exchanges now support SegWit, making it seamless to transact with SegWit-enabled addresses. By migrating to a SegWit Account, you ensure compatibility with the broader Bitcoin ecosystem and facilitate smoother transactions.
- Support for Lightning Network: SegWit paves the way for the Lightning Network, a second-layer scaling solution built on top of the Bitcoin network. By moving your Bitcoin to a SegWit Account, you can participate in the Lightning Network and benefit from its fast and inexpensive microtransactions.
- Contributing to network scalability: By adopting SegWit, you contribute to the overall scalability of the Bitcoin network. SegWit enables more transactions to be processed within a block, alleviating network congestion and improving the efficiency of the entire system.
Given these advantages, it is clear that migrating your Bitcoin from a Legacy Account to a SegWit Account on your Trezor device is beneficial. Now, let’s move on to the steps involved in moving your Bitcoin from a Legacy Account to a SegWit Account.
Step 1: Make sure you have the latest firmware and software
Before proceeding with the migration of your Bitcoin from a Legacy Account to a SegWit Account on your Trezor device, it is crucial to ensure that you have the latest firmware and software installed. This step is essential to guarantee the smooth operation of your device and to access all the necessary features and updates.
To check if you have the latest firmware, follow these steps:
- Connect your Trezor device to your computer using the USB cable.
- Visit the official Trezor website and download the Trezor Bridge software if you haven’t done so already.
- Install the Trezor Bridge software on your computer. This software allows your device to communicate with the Trezor Wallet.
- Once the installation is complete, open the Trezor Wallet on your computer.
- Unlock your Trezor device using your PIN.
- In the Trezor Wallet interface, click on “Device Manager.”
- You will see a prompt if there is a firmware update available. Follow the instructions to install the latest firmware. Make sure to keep your device connected throughout the update process.
After updating the firmware, you should also check if there are any software updates available for the Trezor Wallet. To do this, click on the settings icon in the Trezor Wallet interface and navigate to the “Available Updates” section. If there are any updates, follow the instructions to install them.
By keeping your firmware and software up to date, you ensure that your Trezor device is equipped with the latest security patches, bug fixes, and new features. This step is vital to maintain the integrity and functionality of your device when migrating your Bitcoin from a Legacy Account to a SegWit Account.
Now that you have ensured that your Trezor device is up to date, you are ready to proceed to the next step: connecting your device to your computer.
Step 2: Connect your Trezor device to your computer
In order to migrate your Bitcoin from a Legacy Account to a SegWit Account, you need to connect your Trezor device to your computer. Follow these steps to establish the connection:
- Take your Trezor device and the USB cable that came with it.
- Plug one end of the USB cable into the USB port on your computer.
- Connect the other end of the USB cable to the micro USB port on your Trezor device.
- Ensure that the Trezor device is powered on and ready for use.
- Once connected, your computer should recognize the Trezor device and install any necessary drivers, if required.
After connecting your Trezor device to your computer, it should be ready to interact with the Trezor Wallet software.
By establishing a reliable connection between your Trezor device and your computer, you can securely manage and transfer your Bitcoin between accounts without exposing your private keys to potential threats. This connection ensures the encrypted communication necessary for managing your cryptocurrencies on the Trezor device through the Trezor Wallet software.
Now that your Trezor device is connected to your computer, you can proceed to the next step: unlocking your device and opening the Trezor Wallet.
Step 3: Unlock your Trezor device and open the Trezor Wallet
To migrate your Bitcoin from a Legacy Account to a SegWit Account on your Trezor device, you need to unlock your device and open the Trezor Wallet. Follow these steps:
- Make sure your Trezor device is connected to your computer as described in Step 2.
- On your computer, open the Trezor Wallet by launching the Trezor Wallet software.
- On the Trezor Wallet interface, you will be prompted to enter your PIN on your Trezor device. Use the device’s touchscreen to input your PIN and confirm by pressing the corresponding buttons.
- After entering the correct PIN, your Trezor device will be unlocked, and the Trezor Wallet interface will display your account balances.
Unlocking your Trezor device and opening the Trezor Wallet provides you with access to your Bitcoin accounts. It is essential to keep your PIN secure and not share it with anyone. The PIN acts as an additional layer of protection for your funds stored on the Trezor device.
By using the Trezor Wallet interface, you can easily manage your Bitcoin accounts, including sending and receiving transactions. Now that you have successfully unlocked your Trezor device and opened the Trezor Wallet, you can proceed to the next step: accessing your Legacy Account on the Trezor Wallet.
Step 4: Access your Legacy Account on Trezor Wallet
In this step, you will learn how to access your Legacy Account on the Trezor Wallet. Follow these steps:
- Ensure that your Trezor device is connected to your computer and unlocked, as mentioned in the previous steps.
- On the Trezor Wallet interface, click on the “Accounts” tab or navigate to the “Accounts” section.
- You will see a list of your Bitcoin accounts. Look for the Legacy Account you want to access and click on it.
- The Trezor Wallet will then display the details of your Legacy Account, including your transaction history and current balance.
Accessing your Legacy Account on the Trezor Wallet allows you to view and manage your Bitcoin stored in that account. From here, you can decide to transfer your Bitcoin to a SegWit Account to take advantage of its benefits, such as lower fees and faster confirmations.
It’s a good idea to carefully review the details of your Legacy Account before proceeding with the migration. Verify the account balance and transaction history to confirm that it is the account you want to transfer your Bitcoin from.
Now that you have accessed your Legacy Account on the Trezor Wallet, you are ready to create a new SegWit Account and transfer your Bitcoin. Let’s move on to the next step.
Step 5: Create a new SegWit Account on Trezor Wallet
In order to migrate your Bitcoin from a Legacy Account to a SegWit Account on the Trezor Wallet, you need to create a new SegWit Account. Follow these steps:
- On the Trezor Wallet interface, navigate to the “Accounts” tab or section.
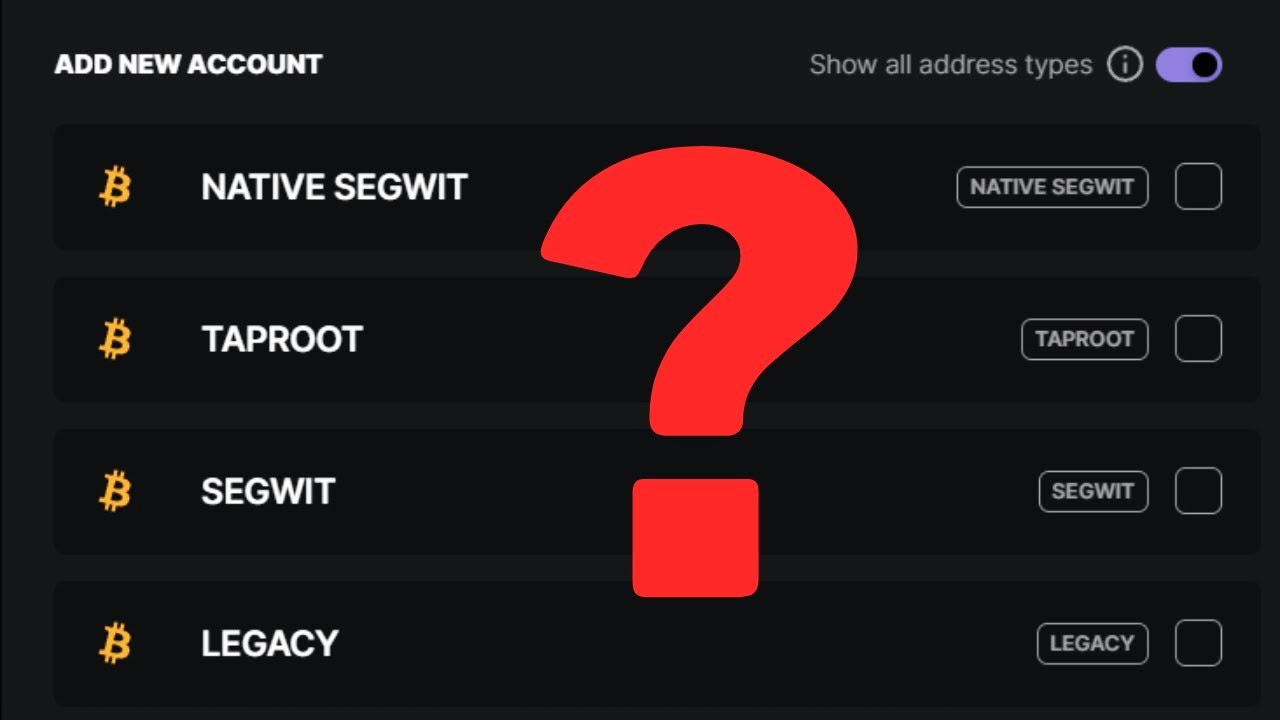
- Click on the option to “Add Account” or “Create Account.”
- Choose the account type you want to create. In this case, select “SegWit Account.”
- Follow the prompts and instructions provided by the Trezor Wallet to complete the account creation process. You may need to confirm the account creation on your Trezor device by reviewing the transaction details and verifying the address.
- Once the SegWit Account is successfully created, the Trezor Wallet will display the newly created account along with its unique address.
By creating a new SegWit Account, you are preparing to transfer your Bitcoin from your Legacy Account to this new address format. The SegWit Account will allow you to enjoy the benefits of lower fees and faster confirmations for your Bitcoin transactions.
It’s important to note that the SegWit Account will have a different address than your Legacy Account. You will need to provide this new SegWit address to receive Bitcoin in the SegWit Account.
Now that you have successfully created a new SegWit Account, it’s time to proceed to the next step and transfer your Bitcoin from your Legacy Account to the SegWit Account.
Step 6: Transfer your Bitcoin from Legacy Account to SegWit Account
Now that you have created a new SegWit Account on your Trezor Wallet, it’s time to transfer your Bitcoin from the Legacy Account to the SegWit Account. Follow these steps:
- On the Trezor Wallet interface, navigate to the “Accounts” tab or section.
- Click on your Legacy Account to access its details.
- Look for the option to “Send” or “Transfer” your Bitcoin from the Legacy Account. Click on it.
- Enter the amount of Bitcoin you want to send from the Legacy Account to the SegWit Account.
- Specify the destination address by entering the SegWit address of your newly created SegWit Account. You can copy and paste the address to ensure accuracy.
- Review the transaction details, including the amount, fees, and destination address, to ensure everything is correct. Double-check that you are sending the Bitcoin from the Legacy Account to the SegWit Account.
- Click on “Send” or “Confirm” to initiate the transaction.
- Follow any additional prompts on the Trezor device, confirming the transaction details and approving the transfer from the Legacy Account to the SegWit Account.
Once the transaction is successfully confirmed and broadcasted to the blockchain, your Bitcoin will be transferred from your Legacy Account to your SegWit Account.
It’s important to note that the transaction may take some time to be confirmed on the blockchain, depending on network congestion and transaction fees. Keep an eye on the transaction status and wait for the required confirmations before considering the transfer complete.
Congratulations! You have successfully transferred your Bitcoin from your Legacy Account to your new SegWit Account. Now, let’s move on to the next step and confirm the transaction on your Trezor device.
Step 7: Confirm the transaction on your Trezor device
After initiating the transfer of your Bitcoin from your Legacy Account to your new SegWit Account on the Trezor Wallet, you will need to confirm the transaction on your Trezor device. Follow these steps:
- On the Trezor Wallet interface, you will see a prompt indicating that the transaction requires approval on your Trezor device.
- Verify that the transaction details displayed on your Trezor device match the information you entered on the Trezor Wallet, including the amount, destination address, and fees.
- If all the details are correct, follow the instructions on your Trezor device’s screen to confirm and sign the transaction.
- On your Trezor device, you may be required to enter your PIN or passphrase (if enabled) to authorize the transaction.
- After verifying and confirming all the necessary information, your Trezor device will sign the transaction and provide the signed transaction back to the Trezor Wallet.
It’s crucial to carefully review the transaction details on both the Trezor Wallet interface and your Trezor device before providing your approval. This step ensures the security and accuracy of your transaction.
Once the transaction is confirmed and signed by your Trezor device, the transaction will be broadcasted to the blockchain for processing and confirmation. The timing of the confirmation may vary depending on network congestion and transaction fees.
By confirming the transaction on your Trezor device, you maintain full control and ownership of your Bitcoin throughout the transfer process. This provides an additional layer of security and enhances the integrity of your transaction.
Now that you have successfully confirmed the transaction on your Trezor device, let’s move on to the final step: verifying the transaction on the blockchain.
Step 8: Verify the transaction on the blockchain
Once you have confirmed and signed the transaction on your Trezor device, it is important to verify the transaction on the blockchain. This step ensures that your Bitcoin transfer from your Legacy Account to your SegWit Account has been successfully processed. Follow these steps to verify the transaction:
- Open a web browser and go to a blockchain explorer, such as blockchain.com, btc.com, or blockchair.com.
- In the search bar or transaction lookup field, enter the transaction ID or your SegWit Account’s address.
- Wait for the blockchain explorer to display the details of the transaction.
- Review the transaction details, including the transaction ID, the amount sent, and the receiving address (which should match your SegWit Account’s address).
- Check the confirmation status of the transaction. Depending on network congestion, it may take some time for the transaction to be confirmed and included in a block.
- If the transaction is confirmed and the details match what you expected, congratulations! Your Bitcoin transfer from your Legacy Account to your SegWit Account has been successfully completed.
Verifying the transaction on the blockchain provides an extra layer of assurance that your Bitcoin has been securely transferred to your SegWit Account. It allows you to independently confirm the transaction’s status and ensure that it has been processed as intended.
It’s important to note that blockchain explorers may have slight variations in their interface and search functionality. However, the process of entering the transaction ID or address and reviewing the transaction details should be similar across most blockchain explorers.
By verifying the transaction on the blockchain, you can have peace of mind knowing that your Bitcoin transfer has been successfully completed and confirmed by the network.
Congratulations! You have now completed all the necessary steps to move your Bitcoin from a Legacy Account to a SegWit Account on your Trezor device. Enjoy the benefits of lower fees and faster transactions enabled by the SegWit technology.