
Safety Precautions
When it comes to manually charging a laptop battery, safety should always be your top priority. By following a few precautionary measures, you can ensure a smooth and risk-free charging process. Here are some safety tips to keep in mind:
- 1. Read the Manual: Before attempting to charge your laptop battery manually, it is essential to thoroughly read the manufacturer’s instructions. Familiarize yourself with the specific guidelines and warnings provided in the manual.
- 2. Unplug Power Sources: Before proceeding, make sure to disconnect your laptop from any power sources, including the AC adapter and any external devices that may be connected to it.
- 3. Create a Safe Workspace: Find a clean and well-ventilated area to work in. Avoid charging your laptop battery near flammable materials or in cluttered spaces to minimize any potential risks.
- 4. Do Not Overcharge: Keep a close eye on the charging process and avoid overcharging your laptop battery. Overcharging can lead to battery damage and reduced lifespan.
- 5. Inspect for Damage: Before charging, thoroughly inspect the laptop battery for any signs of physical damage, such as dents, leaks, or corrosion. If you notice any damage, it is best to consult a professional for assistance.
- 6. Use Genuine Equipment: Only use chargers and cables provided by the laptop manufacturer or reputable third-party sellers. Using counterfeit or incompatible equipment can put your laptop and battery at risk.
- 7. Handle with Care: When handling the laptop battery, ensure a gentle touch. Avoid unnecessary jarring or dropping, as it can cause internal damage.
- 8. Avoid Extreme Temperatures: Extreme temperatures can negatively impact the charging process and the performance of your laptop battery. Keep your laptop in a moderate temperature environment.
- 9. Stay Alert: Throughout the manual charging process, stay vigilant and attentive. Look for any signs of overheating, smoking, or unusual smells. If you notice anything unusual, immediately disconnect the battery and seek professional advice.
By adhering to these safety precautions, you can charge your laptop battery manually with confidence, minimizing any risks and ensuring the longevity of your device.
Determine If Your Battery Is Removable
Before attempting to manually charge your laptop battery, it is important to determine whether your laptop battery is removable or not. While most laptops have removable batteries, there are some newer models that come with sealed, non-removable batteries. Here’s how you can check if your laptop battery is removable:
- 1. Consult the Manual: The first step is to refer to the laptop’s user manual. Look for the battery section to find out if the battery is removable or not. The manual should provide clear instructions on how to remove the battery if it is indeed removable.
- 2. Inspect the Battery Compartment: If you don’t have the manual handy, you can physically inspect the laptop to determine if the battery is removable. Look for a latch, switch, or sliding mechanism near the battery compartment. If you find any of these, it indicates that the battery is most likely removable.
- 3. Search Online: If you’re still unsure, you can search for your laptop model online to find out if the battery is removable. Laptop manufacturers often provide detailed specifications and support documentation on their websites, which can help you determine the type of battery your laptop has.
If you find that your laptop battery is removable, you can proceed with the manual charging process. However, if your laptop has a sealed, non-removable battery, it is highly recommended to avoid attempting to charge it manually. Instead, contact the manufacturer or a professional technician for assistance.
Disconnect the Laptop from Any Power Sources
Before you begin manually charging your laptop battery, it is crucial to disconnect it from any power sources. This step ensures your safety and prevents any potential damage to the laptop or battery during the charging process. Here’s what you need to do:
- Unplug the AC Adapter: If your laptop is connected to an external power source using an AC adapter, unplug it from the wall outlet. This will cut off the electrical supply to the laptop and prevent any incoming power during the charging process.
- Remove any External Devices: Disconnect any peripheral devices that might be connected to your laptop, such as USB devices, external hard drives, or printers. This will ensure that there are no additional power sources drawing power from the laptop while you charge the battery.
- Turn Off the Laptop: Before proceeding, shut down your laptop properly. This will help prevent any potential issues that may arise if the charging process is interrupted while the laptop is in use.
- Remove the Power Cord: If your laptop is still connected to the power outlet with a power cord, unplug it as well. This will eliminate any residual power flowing to the laptop, providing a safe environment for the manual charging process.
By disconnecting your laptop from all power sources, you ensure that no external power is interfering with the manual charging process. This step is essential to prevent any potential electrical hazards and ensure a smooth and safe charging experience for your laptop battery.
Remove the Laptop Battery
Once you have disconnected your laptop from all power sources, the next step in manually charging the battery is to remove it from the laptop itself. Removing the battery allows you to access the battery terminals and ensures a direct connection for the charging process. Here’s how you can remove the laptop battery:
- Locate the Battery Release Mechanism: Look for a latch, switch, or button on the bottom or side of your laptop that is specifically designed to release the battery. The location and type of release mechanism may vary depending on the laptop model, so consult the user manual or check online resources for instructions specific to your laptop.
- Use Caution When Removing the Battery: Gently slide or press the battery release mechanism to unlock it. Be cautious and handle the battery with care to avoid any damage or accidental dropping. Slowly and evenly pull the battery out of its compartment, making sure to do so at a straight angle to prevent any undue strain on the battery or laptop.
- Set the Battery Aside in a Safe Location: Once the battery is removed, place it on a stable, non-metallic surface, such as a desk or table. Ensure that the location is free from any liquid spills or potential hazards to avoid any damage to the battery.
Removing the laptop battery allows you to have direct access to its terminals for manual charging. By following these steps, you can safely remove the battery from your laptop in preparation for the charging process. Remember to handle the battery carefully and store it in a secure location until you are ready to reinstall it.
Clean the Battery Contacts
Before proceeding with the manual charging of your laptop battery, it is important to ensure that the battery contacts are clean and free from any dust, dirt, or debris. Dirty contacts can interfere with the charging process and hinder proper connection between the battery and the charger. Here’s how you can clean the battery contacts:
- Gather the Cleaning Supplies: Prepare a soft, lint-free cloth or a cotton swab and a small amount of isopropyl alcohol. Avoid using excessive amounts of alcohol as it may damage the battery contacts or other components.
- Remove the Battery: If you haven’t already done so, remove the battery from your laptop according to the manufacturer’s instructions and set it aside.
- Dampen the Cloth or Cotton Swab: Dip the cloth or cotton swab in a small amount of isopropyl alcohol. Make sure it is slightly damp, not dripping wet, to avoid any liquid from entering the battery compartments.
- Gently Wipe the Battery Contacts: Carefully, but firmly, wipe the battery contacts using the dampened cloth or cotton swab. Ensure that you cover all the contact points on the battery, removing any dirt or residue that may have accumulated over time. Use light pressure and avoid scratching or damaging the contacts.
- Allow Time to Dry: After cleaning the contacts, allow them to air dry completely before reinserting the battery. This will help prevent any damage that could occur if there is residual moisture present.
By cleaning the battery contacts, you establish a clean and solid connection between the battery and the charger, maximizing the effectiveness of the manual charging process. Take care to handle the battery gently while cleaning to prevent any accidental damage. Once the contacts are clean and dry, you’re ready to proceed with the charging process.
Prepare the Charging Equipment
To manually charge your laptop battery, you will need the appropriate charging equipment. It is crucial to use the right tools and accessories to ensure a safe and effective charging process. Here are the steps to prepare the charging equipment:
- Check the Charger Compatibility: Ensure that you have a charger specifically designed for your laptop model. Using an incompatible charger may damage the battery or even pose a risk of electrical hazards. Refer to the laptop’s user manual or check the manufacturer’s website for recommended charging equipment.
- Inspect the Charging Cable: Examine the charging cable for any signs of wear, fraying, or damage. If you notice any issues, replace the cable with a new one to prevent any electrical issues or safety concerns.
- Connect the Charger to a Power Outlet: Plug the charger into a wall outlet or power strip that is in good working condition. Ensure that the outlet is grounded to minimize the risk of electrical accidents.
- Verify Proper Voltage: Check the voltage requirements of your laptop and ensure that the charger matches the specified voltage. Using a charger with the wrong voltage can cause damage to the laptop or battery.
- Position the Charger: Place the charger in a secure and stable position, ensuring that it won’t get accidentally disconnected or fall during the charging process. Keep the charger away from any liquids or potential hazards.
- Turn Off the Charger: If the charger has an on/off switch, make sure it is turned off before proceeding to the next step. This will prevent any accidental electrical currents during the setup process.
By properly preparing the charging equipment, you ensure that you have the right tools for the job and minimize any potential risks during the charging process. Take the time to verify compatibility, inspect the cable, and place the charger in a safe position. With the charging equipment ready, you can move on to the next step of connecting it to the battery.
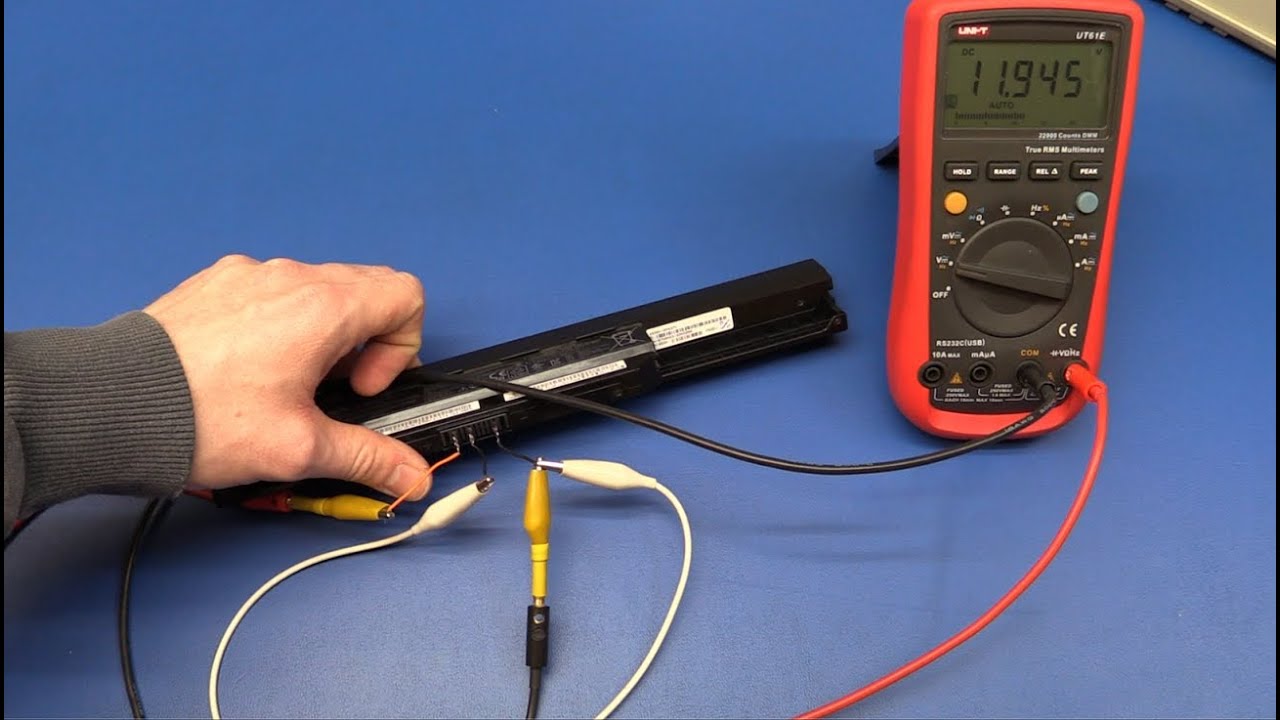
Connect the Charging Equipment to the Battery
Once you have prepared the charging equipment, the next step is to connect it to the laptop battery for the manual charging process. By establishing a proper connection, you can ensure a steady flow of power to the battery. Here’s how you can connect the charging equipment to the battery:
- Inspect the Charging Port: Locate the charging port on your laptop where the charger needs to be inserted. Ensure that the port is clean and free from any debris that could hinder the connection.
- Align the Charger Plug: Gently align the charging plug with the charging port on your laptop. Take care not to apply excessive force or misalign the plug, as it can cause damage to the laptop or the charger.
- Insert the Charger Plug: Insert the charger plug into the charging port, and push it in gently until it fits snugly. Make sure the connection is secure and there are no loose connections that can disrupt the charging process.
- Verify the Charging Indicator: Once the charger is connected, check for any charging indicators on your laptop. Some laptops have LED lights or display screens that show the charging status. Ensure that the indicators confirm the charging process has begun.
Connecting the charging equipment to the battery establishes the flow of power needed to charge the laptop battery manually. Take care to align the plug properly and ensure a secure connection. By verifying the charging indicators, you can monitor the progress of the charging process. With the equipment connected, you are now ready to monitor the battery charge and proceed accordingly.
Monitor the Battery Charge
Once you have connected the charging equipment to the laptop battery, it is important to monitor the battery charge to ensure a safe and effective charging process. Keeping an eye on the battery’s progress allows you to prevent overcharging or any potential issues that may arise. Here are some tips for monitoring the battery charge:
- Check the Charging Indicator: Most laptops have an indicator light or display that shows the charging status. Monitor this indicator to ensure that the battery is receiving power and charging properly. If the indicator shows any anomalies or does not indicate charging, double-check the connection and troubleshoot accordingly.
- Set a Timer: To prevent overcharging, consider setting a timer to regularly check the battery. Depending on the initial charge level, you can set intervals of 30 minutes to a few hours. Once the battery reaches a full charge, disconnect the charger to avoid any potential damages or reduced battery life.
- Observe the Battery Temperature: Keep an eye on the battery temperature during the charging process. If you notice excessive heat or the battery becoming uncomfortably hot to touch, disconnect the charger immediately. Overheating can indicate a malfunction and should be addressed promptly.
- Be Patient: Manual charging can take longer than the standard charging process. Be patient and allow the battery enough time to charge fully. Avoid interrupting the charging process prematurely, as it may result in an incomplete charge or inaccurate battery readings.
- Use Battery Monitoring Software: Some laptops come with built-in battery monitoring software that provides accurate information about the battery’s charge level and health. Utilize these tools to have more precise control and insight into the charging process.
Regularly monitoring the battery charge ensures a safe and efficient charging process for your laptop. Pay attention to the charging indicator, battery temperature, and use any available monitoring software to have better control over the charging progress. By keeping a close eye on the battery, you can make informed decisions and ensure optimal performance and longevity.
Reinstall the Laptop Battery
After monitoring the battery charge and ensuring it has reached an adequate level, the next step is to reinstall the laptop battery. Reinstalling the battery allows the laptop to run on its internal power source, providing the necessary energy for normal operation. Here’s how you can reinstall the laptop battery:
- Check the Battery and Laptop Alignment: Before inserting the battery, ensure that the contacts on the battery align with the contacts in the battery compartment of your laptop. Make sure the battery is facing the correct way and that there are no obstructions preventing a proper fit.
- Gently Insert the Battery: Hold the battery by its edges and align it with the battery compartment. Carefully slide the battery into place, applying light and even pressure until it is fully seated. Ensure that the battery is snugly fit and secure within the compartment.
- Lock the Battery in Place: If your laptop has a locking latch or mechanism to hold the battery in place, engage it to secure the battery firmly within the compartment. This will prevent any accidental dislodging of the battery during usage.
- Double-Check the Connection: Give the battery a gentle wiggle or slight push to ensure it is tightly connected. The battery should not easily move or shift within the compartment.
Reinstalling the laptop battery restores the internal power source required for normal operation. Take care to align and insert the battery correctly, ensuring a secure fit within the compartment. Once the battery is securely in place, you can proceed to reconnect the laptop to its power sources and resume using your device.
Reconnect the Laptop to Power Sources
After reinstalling the laptop battery, the final step is to reconnect the laptop to its power sources. By doing so, you can provide the necessary external power to supplement the internal battery and ensure continuous operation. Here’s how you can reconnect the laptop to power sources:
- Plug in the AC Adapter: Connect the AC adapter to the power port on your laptop. Make sure the adapter is securely plugged into both the laptop and the power source, such as a wall outlet or power strip.
- Verify Power Connection: Check for any indicators or lights on the laptop that confirm the power connection. This may include a power LED or charging icon on the laptop display. Ensure that the laptop registers the power source and shows signs of charging or being connected to external power.
- Turn on the Laptop: Press the power button on your laptop to turn it on. The laptop should boot up normally and indicate that it is running on both the internal battery and external power source.
- Charge the Battery to Full: Allow the laptop to remain connected to the power source until the battery is fully charged. This may take some time depending on the initial charge level. Monitor the charging indicator or use any built-in battery monitoring software to keep track of the battery’s progress.
- Observe Proper Charging Practices: While charging the laptop, avoid using intensive applications or performing resource-heavy tasks that may drain the battery faster than it can charge. This allows the battery to charge efficiently and reach its full capacity.
Reconnecting the laptop to power sources ensures the availability of external power, supplementing the internal battery. Make sure that the AC adapter is securely connected and the power source is functioning properly. Once the laptop is connected, you can start using it while the battery continues to charge to full capacity.