
What is Autofill?
Autofill is a convenient feature available on Android devices that automatically fills in information on forms and fields, saving you time and effort. Whether you’re filling out an online registration form, making a purchase, or entering your login credentials, Autofill can automatically input the necessary information, such as your name, address, email, and even credit card details.
With Autofill, you no longer need to manually type in your information every time you encounter a form. This feature uses a combination of machine learning and your saved data to intelligently predict and input the appropriate information for you.
Autofill is designed to make your life easier and streamline your online interactions. By seamlessly populating form fields, it eliminates the need for repetitive data entry, reducing the chances of errors and saving you precious time. Whether you’re filling out a long registration form or completing a payment transaction, Autofill helps make the process smooth and hassle-free.
Android’s Autofill feature is integrated with the system, allowing it to work across different apps and websites. This means that once you’ve set up Autofill, it will be available in various scenarios where you need to enter information, providing a consistent experience across different platforms.
Autofill is a secure feature that ensures the protection and privacy of your personal information. It utilizes encryption and other security measures to safeguard your data. Additionally, Android gives you control over which information is stored and how it is used, allowing you to customize the Autofill settings to suit your preferences.
In short, Autofill is a time-saving and convenient feature on Android that automatically fills in forms and fields with your saved information. It enhances productivity, reduces errors, and provides a seamless experience across different apps and websites. With the assurance of data security and privacy controls, Autofill offers a hassle-free solution for managing and entering information on your Android device.
Enabling Autofill on Android
Enabling Autofill on your Android device is a simple process that can be done in a few easy steps. Follow the instructions below to enable this convenient feature:
- Open the Settings app on your Android device. You can usually find it in your app drawer or by swiping down and selecting the gear icon.
- Scroll down and tap on “System” or “System & Notifications” (depending on your device).
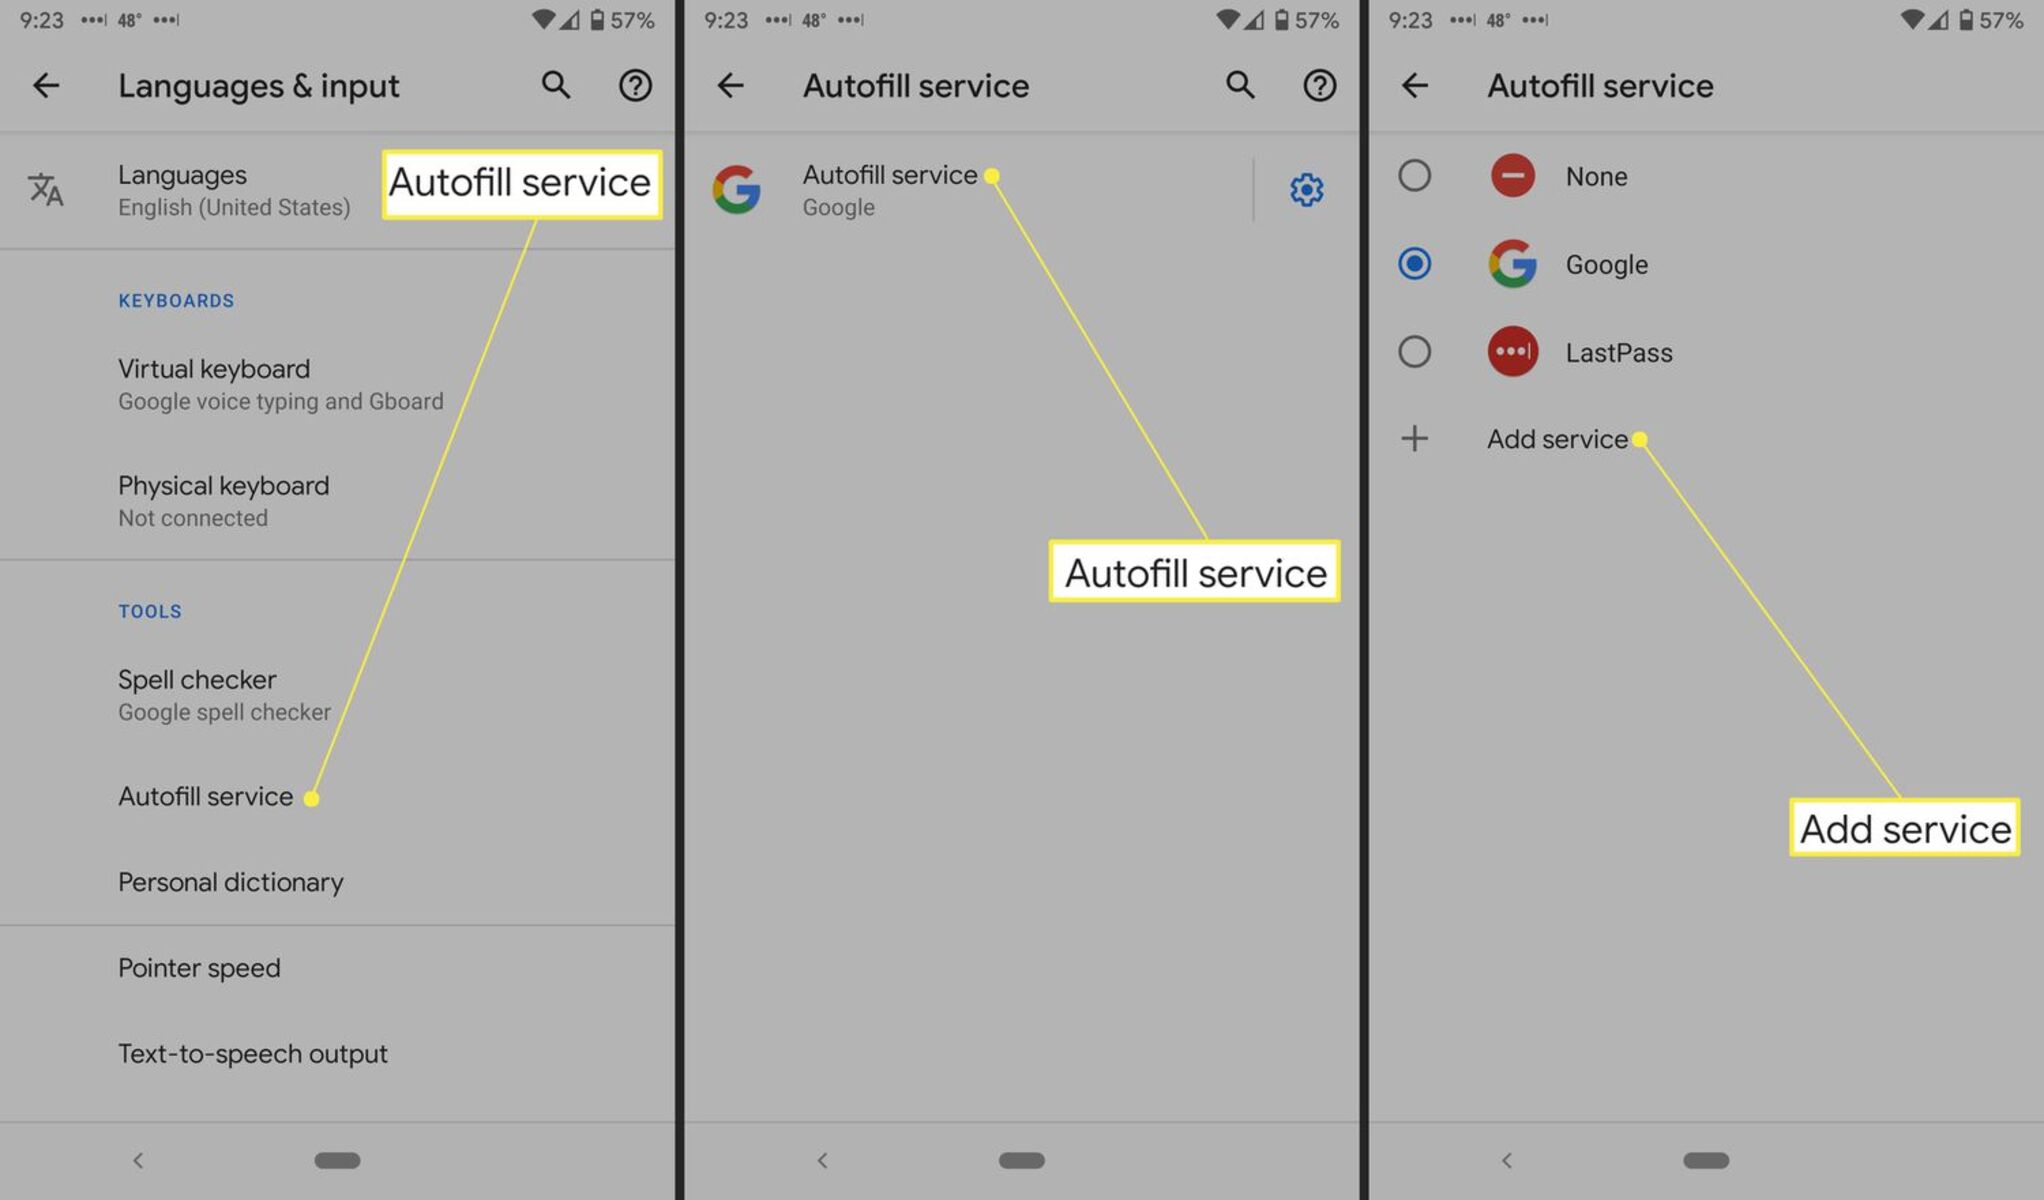
- Locate and select “Language & Input.”
- Tap on “Advanced” or “Additional settings” (again, depending on your device).
- Look for “Autofill service” and tap on it.
- You will see a list of available Autofill services. Choose the one you want to use by tapping on it. If you haven’t installed any additional Autofill services, the default service will be selected by default.
- Once you’ve selected the Autofill service, you can customize its settings by tapping on the three-dot menu icon or the gear icon next to it. This will allow you to control how the Autofill service works and what information it can access.
- That’s it! Autofill is now enabled on your Android device, and you can start enjoying its time-saving benefits.
Enabling Autofill on Android ensures that the feature is activated and ready to assist you whenever you encounter forms or fields that require input. Keep in mind that different Android devices may have slightly different menu options and settings organization, but the overall process remains similar.
By enabling Autofill, you open up a world of convenience, allowing your device to automatically fill in your information as you navigate through apps and websites. This eliminates the need for repetitive data entry and lets you focus on what matters most.
Remember to periodically check the Autofill settings to make sure they align with your preferences and to stay in control of your personal information. With Autofill enabled, you can breeze through online tasks and save time, making your Android experience even more efficient.
How to Choose Autofill Service
Choosing the right Autofill service for your Android device is essential to ensure a seamless and personalized autofill experience. Follow these steps to select the Autofill service that best suits your needs:
- Open the Settings app on your Android device.
- Scroll down and tap on “System” or “System & Notifications”.
- Find and select “Language & Input”.
- Tap on “Advanced” or “Additional settings”.
- Locate and select “Autofill service”.
- You will see a list of available Autofill services compatible with your device. These may include Google’s Autofill service, as well as third-party options such as LastPass, 1Password, or Dashlane.
- Review the available options, paying attention to their features, compatibility, and security measures.
- To enable a specific Autofill service, simply tap on it. Your selection will be indicated by a checkmark beside it.
- If you haven’t installed any additional Autofill services, the default service may be selected by default.
- If you choose to use a third-party Autofill service, you may need to download and install the corresponding app from the Google Play Store.
- Once the service is installed and selected, you can customize its settings by tapping on the three-dot menu icon or the gear icon next to it.
- Adjust the settings according to your preferences, such as the types of information the service can remember and auto-fill.
Choosing an Autofill service allows you to take advantage of advanced features and integration options with other apps and websites. Consider factors such as ease of use, compatibility, security features, and any additional functionalities offered by the service.
It’s important to note that some Autofill services may require a subscription or offer premium features for a fee. Take this into consideration when making your decision.
Once you’ve selected and customized your preferred Autofill service, your Android device will automatically use it to provide accurate and efficient autofill suggestions, simplifying your online interactions and saving you time.
Remember to regularly review and update your Autofill service settings to ensure they align with your preferences and security requirements.
Managing Autofill Settings
Managing Autofill settings on your Android device allows you to customize how the feature works, control the types of information it stores, and ensure the privacy and security of your data. Here’s how you can manage Autofill settings:
- Open the Settings app on your Android device.
- Scroll down and tap on “System” or “System & Notifications”.
- Find and select “Language & Input”.
- Tap on “Advanced” or “Additional settings”.
- Locate and select “Autofill service”.
- You will see the currently selected Autofill service. Tap on it to access the service’s settings.
- Within the Autofill service settings, you can customize various options. This may include managing the types of information the service can store and autofill, toggling on or off specific fields, and adjusting any advanced settings provided by the Autofill service.
- Review the available options and adjust them according to your preferences. Be mindful of the privacy and security implications of each setting.
- Some Autofill services may also offer additional features such as syncing your data across devices or generating secure passwords. Explore these options to maximize the benefits of the service.
- Once you’ve made your desired changes, exit the settings. The Autofill service will now operate based on your customized settings.
Managing Autofill settings gives you control over how your information is stored and utilized. You can tailor the autofill feature to meet your specific needs and prioritize your privacy and security concerns.
Regularly reviewing and updating your Autofill settings is recommended to ensure that the feature remains aligned with your preferences. As your online habits and information change, you may want to adjust the settings to reflect your current requirements.
By effectively managing Autofill settings, you can harness the full potential of this feature while maintaining control over your personal data.
Customizing Autofill with Personal Data
Customizing Autofill with your personal data allows you to streamline the autofill process and ensure accuracy when filling out forms and fields on your Android device. By adding and managing your personal data in the Autofill settings, you can enjoy a tailored and efficient autofill experience. Here’s how you can customize Autofill with your personal data:
- Open the Settings app on your Android device.
- Scroll down and tap on “System” or “System & Notifications”.
- Find and select “Language & Input”.
- Tap on “Advanced” or “Additional settings”.
- Locate and select “Autofill service”.
- You will see the currently selected Autofill service. Tap on it to access its settings and customization options.
- Within the Autofill service settings, look for an option related to managing or adding personal data. This may be labeled as “Saved Passwords,” “Addresses,” “Payment Methods,” or similar.
- Select the appropriate category (e.g., passwords, addresses, or payment methods) that you want to customize or add data to.
- Tap on “Add” or a similar option to enter your personal data and save it for future autofill use. The specific fields may vary depending on the category you selected.
- Ensure that you enter the correct and up-to-date information as accurately as possible to ensure the autofill accuracy.
- Repeat the process for each category you wish to customize with your personal data.
- Review and manage your saved personal data periodically to ensure its accuracy and relevance.
Customizing Autofill with your personal data allows you to quickly and accurately fill out forms and fields, eliminating the need for manual entry. Whether it’s your address, payment details, or frequently used usernames and passwords, having this information readily available can greatly enhance your online experience.
Be cautious when saving and managing personal data in Autofill, ensuring that you only enter information in secure and authorized locations. Regularly review and update your saved data to keep it current, removing any outdated or unnecessary entries.
Customizing Autofill with your personal data empowers you to take full advantage of this time-saving feature and optimize your productivity on your Android device.
Saving and Deleting Autofill Data
Managing your Autofill data is crucial to maintain accuracy, privacy, and security. Android allows you to save and delete Autofill data easily, giving you control over the information that is stored. Follow these steps to save and delete Autofill data on your Android device:
- Open the Settings app on your Android device.
- Scroll down and tap on “System” or “System & Notifications”.
- Find and select “Language & Input”.
- Tap on “Advanced” or “Additional settings”.
- Locate and select “Autofill service”.
- You will see the currently selected Autofill service. Tap on it to access its settings.
- Within the Autofill service settings, look for an option related to managing or editing your saved data. This may be labeled as “Saved Passwords,” “Addresses,” “Payment Methods,” or similar.
- Select the category that contains the data you want to manage or delete, such as “Passwords” or “Addresses”.
- You will see a list of your saved data entries. To save a new entry, tap on “Add” or a similar option, and provide the necessary information.
- To delete an entry, simply tap and hold on the item you want to remove, and select the “Delete” or trash bin icon option.
- You may be prompted to confirm the deletion. Confirm the action to permanently remove the selected entry from your Autofill data.
- Repeat the process for each category as needed, ensuring that your saved Autofill data remains accurate and up-to-date.
By saving and deleting Autofill data based on your needs, you can maintain an organized and secure list of information that is used for autofilling forms and fields.
Regularly reviewing and managing your Autofill data is important to ensure that outdated or unnecessary information is purged, minimizing the risk of using incorrect or outdated details.
As you save new data, double-check its accuracy and relevancy to maintain a reliable collection of information. Be mindful of the sensitivity of the data you choose to save, particularly when it comes to payment methods or personal addresses.
By effectively managing your Autofill data, you not only maintain an organized and reliable database of information but also ensure the privacy and security of your data.
Disabling Autofill
If you decide that Autofill is not the right feature for you or if you simply want to disable it temporarily, Android allows you to easily turn off Autofill. Here’s how you can disable Autofill on your Android device:
- Open the Settings app on your Android device.
- Scroll down and tap on “System” or “System & Notifications”.
- Find and select “Language & Input”.
- Tap on “Advanced” or “Additional settings”.
- Locate and select “Autofill service”.
- You will see the currently selected Autofill service. Tap on it to access its settings.
- Look for the option to toggle Autofill on or off. It may be labeled as “Autofill service” or “Enable Autofill”.
- Disable Autofill by toggling the switch or selecting the “Disabled” or “OFF” option.
- Confirm your selection if prompted.
By disabling Autofill, you can prevent your device from automatically filling in forms and fields, offering you more control over the information you input. This may be useful in scenarios where you have concerns about privacy or security, or simply prefer to manually enter your data.
If you want to re-enable Autofill in the future, you can follow the same steps outlined above and toggle the switch back on or select the “Enabled” or “ON” option.
It’s worth noting that disabling Autofill does not delete any previously saved data. If you want to remove your saved Autofill data, you should follow the steps in the “Saving and deleting Autofill data” section.
Disabling Autofill can be a temporary or permanent choice, depending on your preferences. Whether you choose to disable Autofill for privacy reasons or to have more manual control over inputting your information, Android gives you the flexibility to enable or disable this feature easily.