
What is Philips Hue Sync?
Philips Hue Sync is a software application that allows you to synchronize your Philips Hue smart lights with your entertainment media. By connecting your lights to the app, you can create a captivating and immersive lighting experience that syncs with the colors and rhythm of your movies, music, and games.
Whether you’re hosting a movie night, having a party, or simply want to enhance your daily media consumption, Philips Hue Sync transforms your living space into a dynamic and visually stunning environment. The app analyzes the content on your screen in real-time and replicates the colors and ambiance through your Hue lights, adding a whole new dimension to your entertainment.
Compatible with both Windows and Mac, Philips Hue Sync is an easy-to-use and intuitive application. With its user-friendly interface, you can customize various settings to match your personal preferences and create the perfect lighting atmosphere for every occasion.
With Philips Hue Sync, you have the freedom to adjust the intensity, brightness, and speed of the light effects to suit your mood. Whether you prefer subtle and relaxing tones or vibrant and energetic colors, the app offers a wide range of options to cater to your individual style and taste.
Additionally, Philips Hue Sync is compatible with a variety of media sources, including streaming services, gaming consoles, and music players. This means that you can enjoy the synchronized lighting experience while watching your favorite movies, playing video games, or listening to your most-loved songs.
Overall, Philips Hue Sync allows you to go beyond traditional lighting and immerse yourself in a world of vibrant colors and captivating visuals. It adds an element of excitement and intensity to your entertainment experience, making it truly memorable and enjoyable.
Step 1: Setting up Philips Hue Lights
Before you can start using Philips Hue Sync, you will need to set up your Philips Hue lights. Here is a step-by-step guide to help you get started:
- Choose and purchase your Philips Hue lights: Philips offers a wide range of smart lights, including light bulbs, light strips, and lamps. Determine which type of lights suit your needs and purchase them from an authorized retailer.
- Install the Philips Hue Bridge: The Philips Hue Bridge is the central hub that connects your Philips Hue lights to your smartphone or computer. Simply plug the bridge into your Wi-Fi router using the provided Ethernet cable and power adapter.
- Download the Philips Hue app: To control and set up your Philips Hue lights, you will need to download the Philips Hue app. It is available for free on both the App Store and Google Play Store.
- Connect the Philips Hue Bridge to the app: Open the Philips Hue app and follow the on-screen instructions to connect the Hue Bridge to the app. This will establish a connection between your lights and the app, allowing you to control them remotely.
- Set up your Philips Hue lights: Once your Hue Bridge is connected, the app will guide you through the process of setting up your lights. Simply screw in the Philips Hue bulbs or connect the light strips to the desired locations and power them on. The app will automatically detect and add the lights to your system.
- Assign rooms to your lights: To organize your lights, you can assign them to specific rooms within the app. This way, you can easily control the lights in each room separately or create synchronized lighting effects across multiple rooms.
- Create scenes and routines: With the Philips Hue app, you can create custom scenes and routines to further personalize your lighting experience. Set up specific lighting configurations for different activities, such as “Movie Time” or “Party Mode,” and easily activate them with a tap.
Setting up your Philips Hue lights is the foundation for using Philips Hue Sync and enjoying a mesmerizing lighting experience that complements your media content. Once your lights are set up and connected, you can move on to the next step of installing the Philips Hue Sync app.
Step 2: Installing Philips Hue Sync App
To start synchronizing your Philips Hue lights with your entertainment media, you need to install the Philips Hue Sync app on your computer. Follow these steps to get the app up and running:
- Check your system requirements: Before downloading the Philips Hue Sync app, ensure that your computer meets the necessary system requirements. The app is available for both Windows (Windows 7 or later) and Mac (Mac OS X Mavericks or later) operating systems.
- Visit the Philips Hue website: Open your web browser and navigate to the official Philips Hue website. Look for the “Software” or “Downloads” section, where you can find the Philips Hue Sync app.
- Select the appropriate download option: On the Philips Hue Sync download page, choose the version of the app that corresponds to your computer’s operating system. Click on the download link to initiate the download process.
- Run the installer: Once the download is complete, locate the downloaded file on your computer and run the installer. Follow the on-screen instructions to install the Philips Hue Sync app on your computer.
- Launch the app: After the installation is complete, you can launch the Philips Hue Sync app from your computer’s applications or programs menu. Depending on your operating system, you may find it in the Start menu (Windows) or the Applications folder (Mac).
- Log in with your Philips Hue account: When you first launch the app, you will be prompted to log in or create a Philips Hue account. If you already have an account, enter your credentials to sign in. If not, you can create a new account within the app.
- Connect to your Philips Hue Bridge: Once you are logged in, the app will search for the Philips Hue Bridge on your network. Make sure your Bridge is connected to the same Wi-Fi network as your computer. Follow the on-screen instructions to establish a connection between the app and the Bridge.
After completing these steps, you will have successfully installed the Philips Hue Sync app on your computer. You can now move on to the next step, which involves connecting your Philips Hue Bridge to ensure seamless communication between the app and your lights.
Step 3: Connecting Philips Hue Bridge
Now that you have installed the Philips Hue Sync app on your computer, it’s time to connect your Philips Hue Bridge to establish communication between the app and your Philips Hue lights. Follow these steps to ensure a seamless connection:
- Ensure the Hue Bridge is powered on: Make sure that the Philips Hue Bridge is plugged into a power outlet and turned on. The power indicator light on the Bridge should be lit or blinking.
- Ensure your computer is on the same network: To connect the Philips Hue Bridge to the app, both the Bridge and your computer running the Hue Sync app need to be connected to the same Wi-Fi network. Check your computer’s Wi-Fi settings to confirm that you are connected to the correct network.
- Open the Philips Hue Sync app: Launch the Philips Hue Sync app on your computer. If you have already logged in, the app will open to the main control panel.
- Click on the “Settings” or “Preferences” tab: Look for the settings or preferences section in the app. This is usually represented by a gear or cog icon. Click on it to access the settings menu.
- Select “Bridge” or “Bridge Connection”: Within the settings menu, look for the option to connect your Bridge. It may be labeled as “Bridge” or “Bridge Connection.” Click on this option to proceed.
- Press the button on the Philips Hue Bridge: On the Philips Hue Bridge, locate the round button. Press and hold this button for a few seconds until the indicator lights on the Bridge start to blink.
- Complete the connection process: While the indicator lights on the Bridge are blinking, go back to the Philips Hue Sync app and click on the “Search” or “Connect” button. The app will search for the Bridge and establish a connection once it is found.
- Verify the connection: Once the connection is established, you will receive a notification or confirmation message in the app. The Bridge light on the app’s main control panel should now show a green checkmark or indicator, indicating a successful connection.
With the Philips Hue Bridge connected to the Hue Sync app, you can now proceed to customize the Hue Sync settings to create stunning lighting effects that sync with your media. This will be covered in the next step of the setup process.
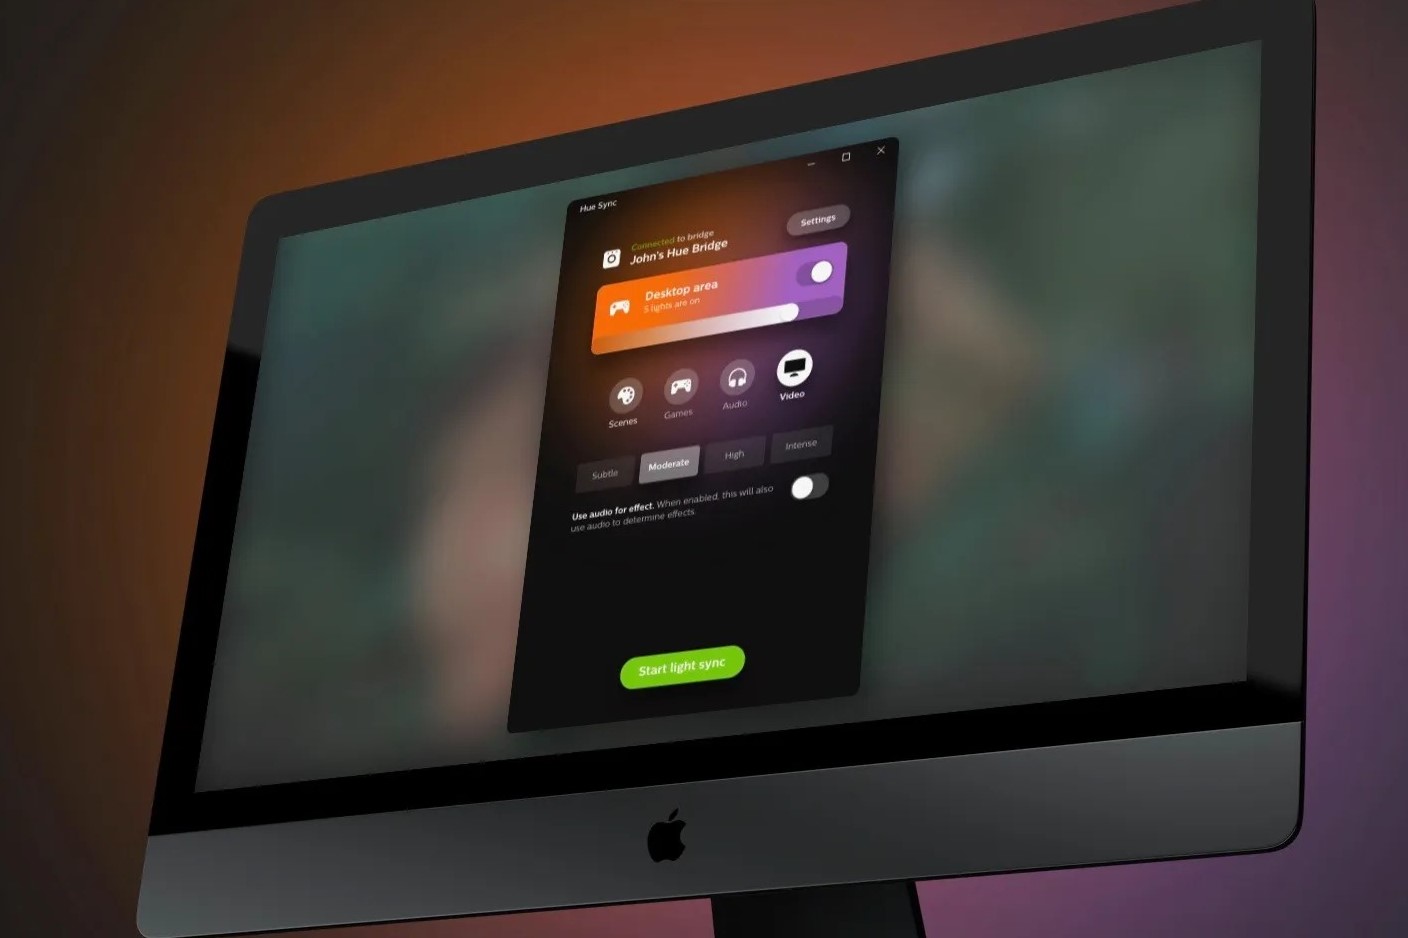
Step 4: Adjusting Hue Sync Settings
Once you have successfully connected your Philips Hue Bridge to the Hue Sync app, it’s time to adjust the settings to customize your lighting experience. Here are the steps to help you fine-tune the Hue Sync settings:
- Launch the Philips Hue Sync app: Open the Hue Sync app on your computer. Ensure that your Hue Bridge is connected and that your lights are within range.
- Select your Bridge and lights: In the app’s main control panel or settings menu, locate the section where you can select your Bridge and lights. Choose the appropriate Bridge and make sure all the lights you want to sync are selected.
- Explore the different sync modes: The Hue Sync app offers different sync modes to suit your preferences. Experiment with the “Video,” “Music,” and “Game” modes to see which one delivers the desired lighting effects for your entertainment media.
- Adjust the intensity and brightness: Customize the intensity and brightness of your lights to match your preferences. Use the app’s sliders or controls to increase or decrease the overall effect and luminosity of the synchronized lighting.
- Modify the sync delay: If you experience any syncing issues, such as lights not matching the media or delays in response, you can adjust the sync delay in the app’s settings. This ensures that the lights react in real-time to the content on your screen.
- Experiment with different color palettes: The Hue Sync app offers various color palettes to enhance your lighting experience. Try different options and find the one that best complements your media content and creates the desired ambiance.
- Save and name your settings: Once you have fine-tuned the Hue Sync settings, you can save and name your configuration. This allows you to recall your preferred settings easily for future use.
- Preview and test the sync: Before enjoying your media content, preview and test the sync to ensure that the lights are responding as expected. Use the app’s preview feature, which allows you to see a sample of your chosen media synced with your lights.
- Make adjustments as needed: If you are not fully satisfied with the lighting effects, feel free to make further adjustments to the settings. The Hue Sync app provides a range of options for you to customize and perfect your lighting experience.
By adjusting the Hue Sync settings, you can achieve a personalized and mesmerizing lighting experience that truly enhances your entertainment media. Once you are satisfied with your settings, you can move on to the next step and start syncing your lights with your preferred media sources.
Step 5: Selecting Light Presets
After adjusting the Hue Sync settings to your liking, you can further enhance your lighting experience by selecting specific light presets. These presets provide pre-configured lighting schemes that are tailored to different types of media content. Follow these steps to select light presets in the Philips Hue Sync app:
- Launch the Philips Hue Sync app: Open the Hue Sync app on your computer and ensure that your Hue Bridge is connected and your lights are within range.
- Access the preset options: In the app’s main control panel or settings menu, look for the section dedicated to light presets. This is where you can choose from a variety of pre-configured lighting schemes.
- Explore the available presets: Browse through the list of presets to find the one that matches the type of media content you will be enjoying. The presets may include options such as “Subtle,” “Intense,” “Dynamic,” and more.
- Select a preset: Click or tap on the preset that appeals to you and aligns with the mood you want to create. The app will apply the preset’s lighting effects to your Hue lights.
- Preview and test the preset: Before fully committing to the preset, take advantage of the app’s preview feature. This allows you to see a sample of your chosen media synced with the preset’s lighting effects.
- Customize the preset (optional): If you feel that the preset’s effects need some adjustments, you can further customize them using the Hue Sync settings. Modify the intensity, brightness, or color palette to better suit your preferences.
- Save and name your preset: If you are satisfied with the preset and any customized changes you made, you can save it for future use. Assign a name to your preset so that you can easily recall it for specific media content.
- Experiment with different presets: Don’t be afraid to try out different presets and see how they transform the ambiance according to the type of media you’re enjoying. Each preset brings a unique lighting experience, allowing you to fully immerse yourself in the content.
- Switch presets as needed: While enjoying your media, you can switch between different presets to find the one that best complements and enhances the specific scenes or moments in your content.
By selecting light presets in the Philips Hue Sync app, you can effortlessly create captivating lighting effects that perfectly match and enhance your media experience. Explore the different presets and have fun discovering the perfect combination of lights and content synchronization.
Step 6: Syncing Lights with Media
Now that you have customized your lighting settings and selected light presets, it’s time to sync your Philips Hue lights with your media content. Follow these steps to seamlessly synchronize your lights with your preferred movies, music, or games:
- Launch your media source: Open the movie, music, or game on the device you are using to watch or play.
- Open the Philips Hue Sync app: Start the Hue Sync app on your computer and ensure that your Hue Bridge is connected and your lights are within range.
- Select the media sync mode: In the Hue Sync app, choose the appropriate mode for your media content – “Video,” “Music,” or “Game.” This mode determines how the lights react to the audio and visual elements of the media.
- Start the media playback: Begin playing the movie, music, or game. Make sure the sound is routed through the same device where the Hue Sync app is running.
- Watch your lights come to life: As the media plays, your Philips Hue lights will sync in real-time with the audio and visual elements. Experience a captivating display of lights that perfectly complement the content on your screen.
- Pause or stop the media: If you need to pause or stop the media playback, the lights will pause or return to their default state. Resume playback to reactivate the light synchronization.
- Adjust the light effects (optional): While the media is playing, you can fine-tune the light effects in real-time using the Hue Sync app. Modify the intensity, brightness, or color palette to match your preferences and create the desired ambiance.
- Enjoy your media with synchronized lights: Sit back and immerse yourself in a captivating multimedia experience with perfectly synced lights. Whether it’s the dramatic scenes of a movie, the pulsating beats of music, or the action-packed moments of a game, the synchronized lights will elevate your entertainment to a whole new level.
- Experiment with different media sources: Don’t limit yourself to a single type of media. Explore how the Hue Sync app interacts with various movies, music genres, or games. Each piece of content offers unique opportunities for vibrant and dynamic lighting effects.
By syncing your Philips Hue lights with your media, you can create a truly immersive and captivating entertainment environment. Enjoy the synchronized lights that enhance every moment and bring your media content to life.
Step 7: Customizing Light Placement
As you continue to enhance your lighting experience with Philips Hue Sync, you have the option to further customize the placement of your lights. By strategically positioning your lights, you can create unique and immersive lighting effects that amplify your entertainment. Follow these steps to customize light placement:
- Survey your entertainment area: Take a moment to assess your entertainment area, whether it’s a living room, home theater, or gaming setup. Consider the layout, furniture, and available surfaces where you can place your lights.
- Locate suitable positions for lights: Identify areas where you can place your Philips Hue lights for optimal effect. This could include behind your TV, along the walls, on the ceiling, or behind furniture.
- Experiment with different light types: Depending on your setup, you may have different types of Philips Hue lights available, such as bulbs, light strips, or lamps. Explore how each type can be used to create different lighting effects and placements.
- Position lights behind the TV: Placing lights behind the TV can create an immersive backlighting effect that enhances the contrast and depth of the on-screen content. Use light strips or position bulbs behind the TV to achieve this effect.
- Highlight architectural features: If your entertainment area has interesting architectural or design features, showcase them by placing lights nearby. Illuminate alcoves, shelves, or artwork to create a visually engaging ambiance.
- Create wall wash effects: Position lights along the walls to create a wall wash effect. This spreads the light across the room, providing a soft and diffuse glow that adds depth and atmosphere to the space.
- Place lights on shelves or furniture: Utilize shelves, side tables, or other furniture to position Philips Hue lights. This can provide focused lighting in specific areas and help to create a more immersive environment.
- Consider floor or ceiling placement: Experiment with placing lights on the floor, pointing upward, or on the ceiling, pointing downward. This can add a unique dimension to your lighting setup and create dramatic effects.
- Use the Hue Sync app to fine-tune: Once your lights are positioned, use the Hue Sync app to fine-tune the lighting effects and synchronize them with your media. Adjust the color palette, brightness, and intensity to suit your preferences and create the desired ambiance.
- Experiment and adjust as needed: Don’t be afraid to experiment with different light placements and make adjustments based on your preferences and the specific media you’re enjoying. Take the time to find the perfect balance and combination of lights for an optimal viewing experience.
By customizing the placement of your Philips Hue lights, you can take your lighting experience to the next level. Create a personalized setup that complements your entertainment area and enhances the immersive nature of your media content.
Troubleshooting Common Issues
While using Philips Hue Sync, you may encounter some common issues that can affect the performance of your lighting synchronization. Here are a few troubleshooting tips to help you resolve these issues:
- No lights detected: If the Hue Sync app is unable to detect your Philips Hue lights, ensure that your lights are powered on and within range of the Hue Bridge. Confirm that your lights are connected to the Bridge and that you are using the latest version of the Hue Sync app.
- Sync delay: If you notice a delay in the synchronization of your lights with your media, adjust the sync delay settings in the Hue Sync app. Increase or decrease the delay time to align the lighting effects with your media content in real-time.
- Unresponsive lights: If your lights are not responding to the commands from the Hue Sync app, check the internet connection and ensure that your Bridge is connected to the same Wi-Fi network as your computer. Restart the app, Bridge, and lights if necessary.
- Interference: Wireless interference from other devices can sometimes disrupt the communication between the Hue Sync app and your lights. Move devices like cordless phones, Bluetooth speakers, and baby monitors away from your Hue Bridge and lights to minimize interference.
- Inconsistent color accuracy: If the color accuracy of your lights is not as expected, calibrate your lights within the Hue Sync app. This will ensure that the colors produced by your lights are synchronized accurately with the media on your screen.
- Outdated software: Ensure that you are using the latest version of the Philips Hue Sync app and that your Hue Bridge firmware is up to date. Regularly check for app updates and firmware upgrades to ensure compatibility and access to the latest features and improvements.
- Software conflicts: Other software applications or plugins on your computer may interfere with the functionality of the Hue Sync app. Disable or exit other applications temporarily to determine if they are causing any conflicts.
- Hardware issues: If none of the troubleshooting steps resolve the issue, check for any hardware issues. Ensure that all connections between the Hue Bridge, lights, and power supply are secure. Contact Philips Hue support if you suspect a faulty device.
By following these troubleshooting tips, you can overcome common issues that may arise while using Philips Hue Sync. Remember to stay patient and persistent, seeking support from Philips Hue’s customer service if necessary. With the right troubleshooting efforts, you can enjoy a seamless lighting synchronization experience with your entertainment media.
Frequently Asked Questions
Here are some frequently asked questions about using Philips Hue Sync:
-
Can I use Philips Hue Sync with any Philips Hue lights?
Yes, you can use Philips Hue Sync with any Philips Hue lights, including bulbs, light strips, and lamps. As long as the lights are connected to your Hue Bridge, you can synchronize them with the app.
-
Is Philips Hue Sync compatible with both Windows and Mac?
Yes, Philips Hue Sync is compatible with both Windows (Windows 7 or later) and Mac (Mac OS X Mavericks or later) operating systems.
-
Can I sync my lights with multiple media sources at the same time?
Unfortunately, Philips Hue Sync can only synchronize lights with one media source at a time. However, you can switch between different media sources and select the appropriate sync mode within the app.
-
Can I adjust the brightness and intensity of the synchronized lights?
Yes, you can adjust the brightness and intensity of the synchronized lights within the Hue Sync app. You have full control over the lighting effects to match your preferences and create the desired ambiance.
-
Do I need an internet connection to use Philips Hue Sync?
No, an internet connection is not required to use Philips Hue Sync. However, your computer running the Hue Sync app and your Philips Hue Bridge need to be connected to the same Wi-Fi network.
-
Can I create custom lighting effects or presets?
While you can’t create custom lighting effects within the Hue Sync app, you can adjust the settings and save customized presets. This allows you to easily access your preferred lighting configurations for specific media.
-
Is there a limit to the number of lights I can sync with Philips Hue Sync?
There is no specific limit to the number of lights you can sync with Philips Hue Sync. However, the performance might be affected if you have a large number of lights or complex lighting configurations.
-
Can I control the synchronized lights with voice commands or through a smart assistant?
Yes, if you have a compatible smart home assistant, such as Amazon Alexa, Google Assistant, or Apple HomeKit, you can control your synchronized Philips Hue lights using voice commands or through the respective smart assistant app.
If you have any further questions or encounter specific issues while using Philips Hue Sync, you can refer to the Philips Hue documentation or reach out to their customer support for assistance.