
Choosing the Right Materials
When it comes to making concrete in Minecraft, it’s important to start with the right materials. By combining these materials in the correct proportions, you can create a strong and durable concrete block. Here’s what you’ll need:
- Sand: The first ingredient you’ll need is sand. Sand can be found in various biomes in Minecraft, such as deserts or beaches. Ensure you have a sufficient amount of sand to create the desired quantity of concrete.
- Gravel: Gravel is another crucial component of concrete. Look for gravel clusters or mine it from the bottom of bodies of water. Make sure you collect enough gravel to match the amount of sand you have.
- Water: Water is essential for creating concrete powder and transforming it into solid concrete. You can obtain water by using a bucket to collect it from a water source block, such as a river or a lake.
Remember, the quality of your concrete will depend on the materials you use. Opt for sand and gravel that are of high quality and do not contain any impurities. This will ensure that your concrete is strong and visually appealing.
Gathering Sand and Gravel
Now that you know the importance of choosing the right materials, let’s dive into gathering sand and gravel for your Minecraft concrete-making project. Here’s how you can acquire these essential components:
Sand: Sand can be found in various biomes, but the most common and easily accessible source is the desert biome. Head over to a nearby desert and start digging! Digging with a shovel will yield sand blocks, which you can collect and use for making concrete. Remember to gather an adequate amount of sand to ensure you have enough for your project.
Gravel: Gravel is typically found in river biomes or at the bottom of bodies of water such as lakes or oceans. When you come across a river or a lake, dive underwater and start mining the gravel blocks using a shovel. Gather as much gravel as you need for your concrete production. Be careful of any underwater dangers, like drowning or hostile mobs.
Once you have collected a sufficient amount of sand and gravel, you are ready to move on to the next step of the concrete-making process. Remember, the quality and quantity of sand and gravel you gather will directly impact the strength and appearance of your concrete, so it’s crucial to gather them in appropriate amounts and from reliable sources.
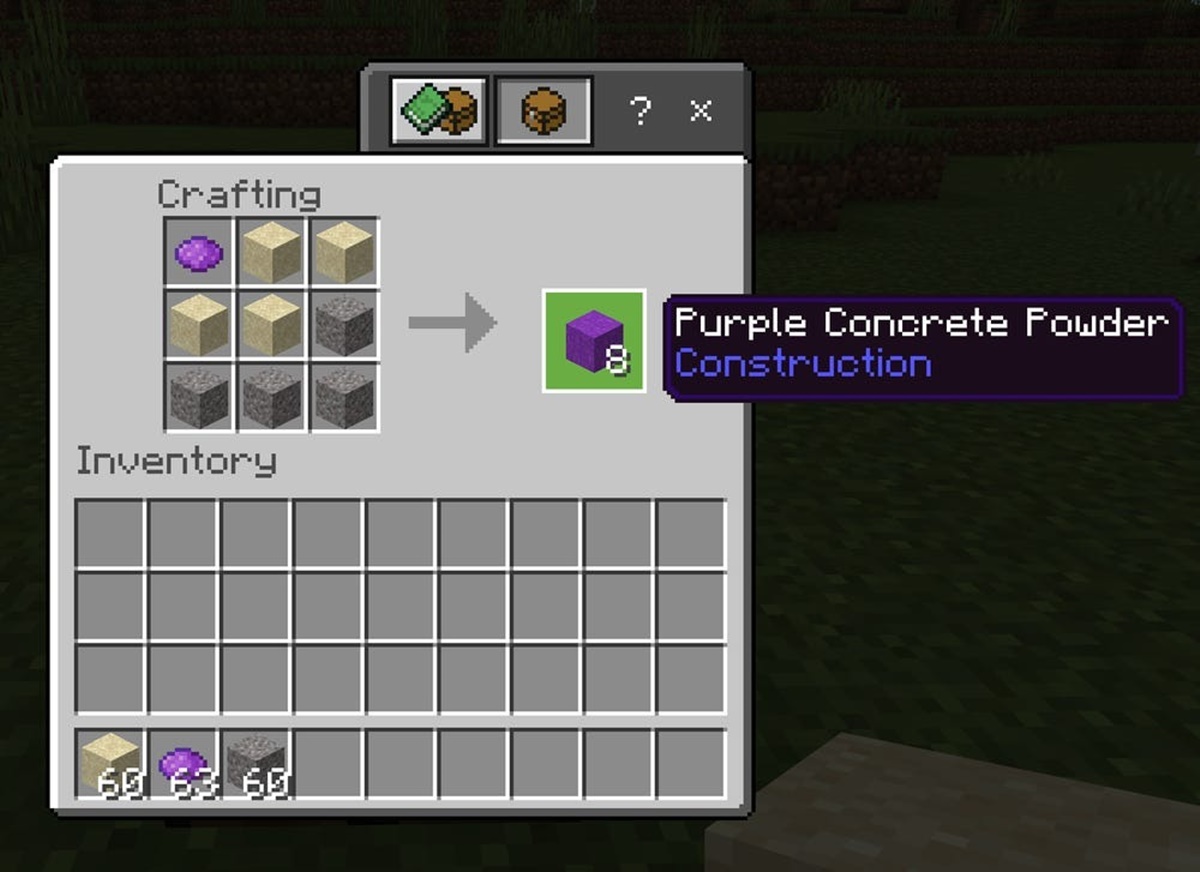
Crafting Concrete Powder
Now that you have gathered the necessary sand and gravel, it’s time to craft concrete powder in Minecraft. Concrete powder is the initial form of concrete that you can later transform into solid concrete. Here’s how to craft it:
1. Open your crafting table or use the 2×2 crafting grid in your inventory.
2. Place four blocks of sand in a square formation, filling all four slots of the crafting grid.
3. In the remaining four empty slots of the crafting grid, place four blocks of gravel in a square formation as well.
4. Once you have arranged the sand and gravel, you will see four concrete powder blocks appear in the result box.
5. Move the concrete powder blocks to your inventory, and you are now ready to proceed to the next step.
Keep in mind that the color of the concrete powder will depend on the color of the sand used in the crafting process. If you want to create concrete of a particular color, ensure you have obtained colored sand by finding it in naturally generated structures, such as terracotta biomes or mesa biomes. You can also dye the concrete powder later in the process for additional color options.
With your freshly crafted concrete powder in hand, you’re one step closer to creating beautiful concrete structures in Minecraft. But before you can place the powder, you may want to consider dyeing it to achieve your desired colors. Let’s explore the dyeing process in the next section.
Dyeing Concrete Powder
To add a splash of color to your concrete structures, you can dye concrete powder in Minecraft. Dyeing concrete allows you to create vibrant and customized designs. Here’s how to dye your concrete powder:
1. Obtain the desired dye: Dyes can be obtained by various means such as crafting with flowers, obtaining from wandering traders, or using bone meal on specific plants. Each dye will give a different color to the concrete powder, so choose the dye that matches your desired color scheme.
2. Craft and access a crafting table: If you haven’t already, craft a crafting table by placing four wooden planks in a square formation in your personal crafting grid. With the crafting table in hand, place it on the ground and right-click to access it.
3. Place the concrete powder and dye: In the crafting table, place the concrete powder in any slot except the center one. Then, place the dye of your choice in the center slot. This will dye all the concrete powder of that color.
4. Collect the dyed concrete powder: Once you have placed the concrete powder and dye in the crafting table, you will see the dyed concrete powder appear in the result box. Move it to your inventory to use it for building.
You can repeat this process with different dyes to create a wide range of colored concrete powder. Experiment with different combinations to achieve unique and visually appealing designs.
Remember that the color of the concrete powder will change when it transforms into solid concrete, so it’s important to keep that in mind when planning your build. With your colorful concrete powder in hand, it’s time to start placing it and turning it into solid concrete blocks, which we will cover in the next section.
Placing Concrete Powder
Now that you have your colored concrete powder ready, it’s time to start placing it and bringing your creative ideas to life. Here’s how you can place concrete powder in Minecraft:
1. Select the concrete powder: Open your inventory and locate the dyed concrete powder in your toolbar or inventory. Make sure it is selected for placement.
2. Identify your placement area: Choose the location in your Minecraft world where you want to place the concrete powder. Keep in mind that concrete powder behaves like a gravity-affected block, meaning it will fall when not supported by another solid block.
3. Place the concrete powder: Right-click or left-click (depending on your settings) on the block where you want to place the concrete powder. The powder will drop onto the selected block or fall to the ground if there is no solid block beneath it.
4. Repeat and create patterns: Continue placing the dyed concrete powder blocks in a pattern or design of your choice. You can create solid colored sections or mix different colors to achieve exciting patterns and combinations.
5. Be mindful of support: Remember that concrete powder requires support from solid blocks to remain in place. If you remove the supporting block, the concrete powder will fall and turn into a gravity-affected block again. Ensure your structure has enough supporting blocks to maintain the desired shape.
By placing the concrete powder blocks strategically, you can create stunning structures, pathways, or decorative designs in your Minecraft world. Use your creativity and imagination to experiment with different placements and combinations.
Now that you have successfully placed the concrete powder, the next step is to turn it into solid concrete blocks. Let’s explore how to do that in the following section.
Turning Concrete Powder into Solid Concrete
Now that you have placed the colorful concrete powder in your desired pattern, it’s time to transform it into solid concrete blocks in Minecraft. Follow these steps to complete the process:
1. Acquire a water source: You will need a bucket filled with water to hydrate the concrete powder and turn it into solid concrete. If you don’t have a bucket, you can craft one using three iron ingots arranged in a “V” shape in the crafting grid.
2. Pour water onto the concrete powder: Approach the concrete powder blocks and right-click or interact with them while holding the water bucket. The water will flow onto the concrete powder, changing it into solid concrete.
3. Wait for the transformation: Once the water comes into contact with the concrete powder, it will undergo a transformation process. Be patient and allow the blocks to gradually change color and become solid blocks of concrete. The transformation time may vary depending on your Minecraft version and settings.
4. Collect the solid concrete blocks: Once the concrete powder has fully transformed into solid concrete, you can use any tool, such as a pickaxe, to mine and collect the blocks. The type of pickaxe you use will not affect the collection process.
5. Integrate the concrete blocks into your build: Now that you have solid concrete blocks, you can use them to complete your construction project. Whether it’s building walls, floors, or decorative elements, the solid concrete blocks will add a sturdy and stylish touch to your Minecraft creations.
Keep in mind that the color of the concrete blocks will match the dyed concrete powder you used initially. If you want to change the color of the blocks, you will need to repeat the dyeing process with different colors before transforming the concrete powder into solid concrete.
With the transformation complete, you can now experiment with different building techniques and incorporate your solid concrete blocks into your Minecraft world with confidence.
Tips and Tricks for Working with Concrete
Working with concrete in Minecraft can be a fun and rewarding experience. To help you make the most of your concrete projects, here are some valuable tips and tricks:
1. Plan your design: Before you start placing concrete, it’s helpful to plan out your design in advance. Sketch it out or use block palettes to visualize the colors and patterns you want to create. This will save you time and ensure a cohesive and aesthetically pleasing result.
2. Use water strategically: When pouring water onto concrete powder, you can control the flow to create interesting effects. Let the water trickle down the blocks or create small waterfalls for added visual appeal. Experiment with different water placements to achieve the desired outcome.
3. Combine colors: Mixing different colored concrete blocks can result in eye-catching patterns and combinations. Try blending complementary colors or creating gradients for a more dynamic look. Be bold and experiment with different color combinations to make your builds truly unique.
4. Add texture: Concrete blocks can look even more realistic and visually interesting when combined with other block types to add texture. Consider incorporating stone bricks, slabs, or even plant life into your design. This can create depth and make your structures stand out.
5. Protect against erosion: Unlike regular blocks, concrete is affected by gravity and can be washed away by water. To prevent erosion, use water-resistant materials like glass or fences as barriers or incorporate landscaping elements to divert the flow of water.
6. Experiment with lighting: Illuminating your concrete structures with various light sources, such as glowstone or sea lanterns, can enhance their overall appearance. Play with different placements and colors of lighting to create a captivating atmosphere for your builds.
7. Use concrete for functional purposes: Concrete blocks are not only visually appealing but also functional. They can be used for creating paths, roads, stairs, or any other structural elements in your Minecraft world. Consider their durability and versatility when planning your builds.
8. Regularly back up your world: It’s always a good idea to make regular backups of your Minecraft world, especially when working on important projects like concrete builds. This ensures that you won’t lose your progress in the event of any unforeseen accidents or issues.
By implementing these tips and tricks, you can take your concrete creations to the next level and showcase your creativity and skills in building with Minecraft’s versatile building material.