
Why make a Spotify playlist private?
Spotify has revolutionized the way we listen to music, allowing us to create and share personalized playlists that reflect our musical tastes and moods. While sharing our playlists with others can be a great way to discover new songs and connect with friends, there are certain instances where you may want to make your Spotify playlist private.
Privacy is a paramount concern for many users, and making your playlist private ensures that only you have access to it. This can be particularly important if you have a personal playlist that contains sensitive or private songs, or if you simply prefer to keep your musical preferences to yourself. Making your playlist private also prevents others from adding or removing songs without your permission, giving you complete control over your music collection.
Another reason to make your Spotify playlist private is to avoid unwanted attention or judgment. We all have guilty pleasure songs or guilty pleasure playlists that we may not feel comfortable sharing with others. By keeping your playlist private, you can indulge in your musical guilty pleasures without worrying about others’ opinions.
Moreover, privacy settings can be especially beneficial if you’re using Spotify for professional purposes. DJs, musicians, and music industry professionals often create playlists for their work or promotional material. Making these playlists private ensures that they are only accessible to the intended audience, allowing for exclusivity and controlled release of music.
Lastly, making your Spotify playlist private can help maintain a sense of exclusivity and intimacy. It can create a more personal connection between you and your music, allowing you to curate a selection of songs that resonate deeply with you. It also gives you the freedom to experiment and explore different genres and styles without the fear of judgment or influence from others.
How to access your Spotify playlist settings
Before you can make your Spotify playlist private, you need to know how to access the playlist settings. Fortunately, Spotify makes it easy for users to customize their playlists and adjust the privacy settings to their liking.
To access your playlist settings, you can follow these simple steps:
- Open the Spotify app on your desktop or mobile device.
- Navigate to the “Your Library” tab located at the bottom of the screen.
- In the “Your Library” section, find and select the “Playlists” tab.
- Scroll through your playlists and find the one you want to make private.
- Once you’ve located the desired playlist, click on it to open it.
- On the playlist page, look for the three horizontal dots (also known as the “More Options” button) located next to the playlist name.
- Click on the three dots to open a drop-down menu.
- In the drop-down menu, you will find various options, including the option to make your playlist private.
- Click on the “Make Private” option to change the privacy settings of your playlist.
By following these steps, you can easily access the playlist settings and make the necessary changes to ensure your playlist is private and secure.
It is important to note that the specific steps may vary slightly depending on the device and version of the Spotify app you are using. However, the general process remains the same across platforms, making it easy for you to access the playlist settings and customize your privacy preferences.
Steps to make your playlist private on desktop
If you primarily use Spotify on your desktop and want to make a playlist private, you can easily modify the privacy settings directly from the desktop app. Here are the steps to follow:
- Open the Spotify app on your desktop and log in to your account if prompted.
- Click on the “Your Library” option located in the left-hand sidebar.
- In the “Your Library” section, click on the “Playlists” tab.
- Browse through your playlists and find the playlist that you want to make private.
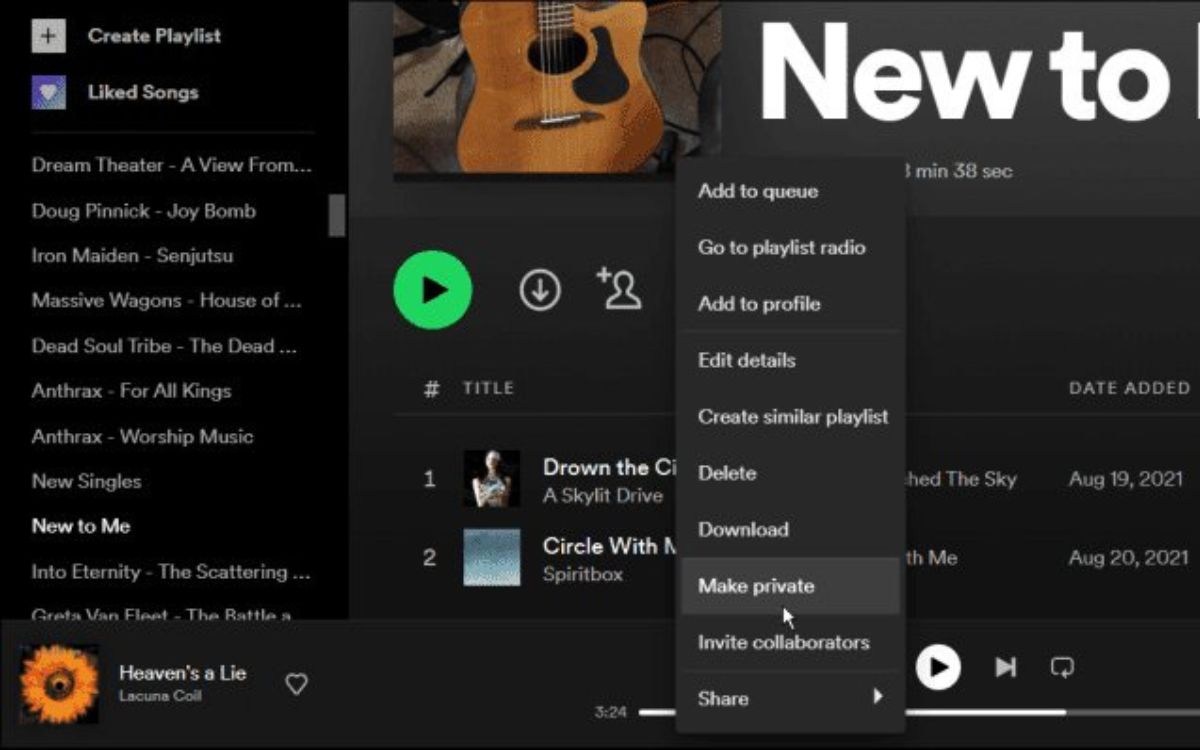
- Right-click on the playlist’s name to open a drop-down menu of options.
- In the drop-down menu, select “Make Private.” This action will change the playlist’s privacy settings to private.
- Once you’ve clicked on “Make Private,” the playlist will no longer be visible to other Spotify users.
By following these simple steps, you can easily make your playlist private on the Spotify desktop app. This ensures that only you have access to the playlist and can control its content and settings.
It’s worth mentioning that making a playlist private on desktop only affects the playlist on the device you’re using. If you want to make the playlist private on other devices where you use Spotify (such as mobile devices or other computers), you will need to repeat the process on those respective devices.
Furthermore, keep in mind that making a playlist private does not prevent others from seeing the songs in your playlist if they are individually shared or added to a collaborative playlist. To maintain complete privacy, it’s important to ensure that the individual songs within the playlist are also not shared or added to unauthorized collaborative playlists.
Steps to make your playlist private on mobile
If you primarily use Spotify on your mobile device and want to make a playlist private, you can easily adjust the privacy settings within the Spotify mobile app. Here’s how you can do it:
- Open the Spotify app on your mobile device and log in to your account if prompted.
- Tap on the “Library” tab located at the bottom of the screen.
- Within the “Library” section, tap on the “Playlists” tab.
- Scroll through your playlists and find the playlist you want to make private.
- Long-press on the playlist’s name to bring up additional options.
- In the options that appear, tap on the three dots (also known as the “More Options” button).
- In the pop-up menu, select “Make Private.” This action will change the privacy settings of the playlist to private.
- Once you’ve tapped on “Make Private,” the playlist will be private, and only you will have access to it.
By following these simple steps, you can easily make your playlist private within the Spotify mobile app. This ensures that your playlist is secure and can only be accessed by you.
It’s important to note that making a playlist private on mobile only affects the playlist on the device you’re using. If you want to make the playlist private on other devices where you use Spotify, such as your desktop, you will need to repeat the process on those respective devices.
Remember that making a playlist private does not prevent others from seeing the songs within the playlist if they have been shared individually or added to a collaborative playlist. To maintain complete privacy, you should ensure that the individual songs within the playlist are also not shared or added to unauthorized collaborative playlists.
Privacy options for collaborative playlists
Collaborative playlists are a fun feature of Spotify that allows multiple users to contribute and curate a single playlist. While collaborative playlists can be a great way to discover new music and collaborate with friends, it’s important to understand the privacy options available for these playlists.
When you create a collaborative playlist on Spotify, it is set to be accessible to anyone who has the link to the playlist. This means that anyone with the link can view and add or remove songs from the playlist. However, if you want to impose more privacy restrictions on collaborative playlists, Spotify offers the following options:
- Allowing followers to collaborate: By default, a collaborative playlist is open to anyone with the link. However, you can choose to only allow your followers to collaborate on the playlist. This restricts access to users who are following your Spotify account.
- Restricting access to specific users: Spotify also allows you to specify which users can have access to a collaborative playlist. This means that only the selected users will be able to view and collaborate on the playlist. You can add or remove users from the access list at any time.
- Setting an expiration date: If you want to limit the duration of a collaborative playlist, you can set an expiration date. After the specified date, the playlist will no longer be collaborative, and others will not be able to contribute to it.
To access these privacy options for a collaborative playlist, you can follow these steps:
- Open the Spotify app and go to the playlist you want to modify.
- Click on the three dots (More Options) button next to the playlist name.
- In the drop-down menu, select “Collaborative Playlist Settings.”
- From there, you can choose the privacy options that best suit your preferences.
By taking advantage of these privacy options, you can control who can contribute to your collaborative playlists and ensure that only trusted individuals can make changes to the playlist you’ve created.
How to hide your recently played playlists
Spotify allows users to view their recently played playlists, making it easy to revisit and listen to your favorite songs. However, there may be times when you prefer to keep your recently played playlists private. Whether you want to maintain a sense of privacy or simply declutter your profile, hiding your recently played playlists is a simple process. Follow these steps to hide your recently played playlists:
- Launch the Spotify app on your desktop or mobile device and log in to your account.
- Click or tap on the “Settings” gear icon, located in the top-right corner of the screen.
- In the settings menu, scroll down and select “Privacy.”
- Within the privacy settings, locate the “Recently Played” section.
- To hide your recently played playlists, toggle off the switch or tap on the option provided.
- Once you have disabled the display of your recently played playlists, they will no longer be visible to others.
By following these simple steps, you can easily hide your recently played playlists on Spotify. This feature provides you with the option to maintain a sense of privacy and control over your listening history.
It’s important to note that hiding your recently played playlists does not affect your listening experience or the songs you can access. You will still be able to listen to the same songs and playlists you enjoy but without them being displayed on your profile or visible to others.
If you decide to enable the display of your recently played playlists again in the future, you can easily go back to the privacy settings and toggle the switch back on or select the appropriate option. Spotify gives you the flexibility and control to customize your profile and listening experience according to your preferences.
Making your Spotify profile private
If you value your privacy and want to control who can see your Spotify profile and activities, you have the option to make your profile private. By making your Spotify profile private, you can limit the visibility of your listening history, playlists, and followers. Here’s how you can make your Spotify profile private:
- Open the Spotify app on your desktop or mobile device and log in to your account.
- Click or tap on the “Settings” gear icon, typically located in the top-right corner of the screen.
- In the settings menu, scroll down and select “Privacy.”
- Within the privacy settings, you will find options to control the visibility of your profile.
- To make your profile private, toggle off the respective switches or select the desired options.
- Some options may include hiding your listening activity, making your playlists private, and disabling the ability for others to follow you.
- Once you have adjusted the privacy settings to your preference, your Spotify profile will be private, and only the information you choose to share will be visible to others.
By taking advantage of these privacy settings, you can personalize your Spotify experience and maintain a higher level of control over your profile and listening habits.
Keep in mind that making your profile private affects how other users can interact with your account and view your activities. For example, if you choose to make your playlists private, others will not be able to see or follow your playlists, and your listening activity will not be visible to them. However, your profile will still be accessible to your approved followers.
If you ever decide to adjust your privacy settings in the future, you can revisit the privacy section of the Spotify settings and modify the options according to your preferences.
Remember, privacy is important, and Spotify provides you with the flexibility to customize your profile’s visibility and sharing options to suit your needs.
Importing private playlists from other platforms
If you have private playlists on other music streaming platforms and want to bring them over to Spotify while maintaining their privacy, Spotify provides a handy import feature. This allows you to transfer your private playlists seamlessly. Here’s how you can import private playlists from other platforms:
- Make sure you have the Spotify app installed and that you are logged in to your Spotify account.
- Open your preferred music streaming platform, where you have the private playlists you want to import.
- Access the playlist you wish to transfer to Spotify and make sure it is set to private.
- On your computer, find and open the Spotify app.
- In the Spotify desktop app, click on the “File” menu at the top-left corner of the screen.
- From the drop-down menu, select “Import Playlist.”
- A window should appear, displaying a list of compatible music streaming platforms.
- Choose the platform where your private playlist is located; this will initiate the importing process.
- Follow the prompts to log in to your account on that platform and authorize the transfer of the playlist.
- After authorizing the transfer, Spotify will begin importing the private playlist into your Spotify account.
- Once the transfer is complete, you should now see the imported private playlist in your Spotify library.
By following these steps, you can successfully import private playlists from other platforms to Spotify while maintaining their privacy settings. This allows you to continue enjoying your private playlists within the Spotify ecosystem.
It is essential to note that the availability of the import feature may vary depending on your geographic location and the specific music streaming platforms supported by Spotify. Additionally, Spotify may require you to have an active subscription and the appropriate access permissions to import playlists from certain platforms.
Keep in mind that while the playlist’s privacy settings are retained during the import process, it’s always a good practice to double-check the privacy settings of the imported playlist in Spotify to ensure it remains private and secure.
FAQs about making playlists private on Spotify
Here are answers to some frequently asked questions regarding making playlists private on Spotify:
1. Can I make my existing public playlists private on Spotify?
Yes, you can! Simply access the playlist settings for any of your public playlists and toggle the privacy settings to make it private.
2. Will making my playlist private affect the songs within it?
Making a playlist private only affects its visibility and the ability for others to add or remove songs. The songs themselves remain the same, and you will still be able to listen to them.
3. Can I still share a private playlist with specific users?
Yes, you can share a private playlist with specific Spotify users by inviting them to collaborate on the playlist. Keep in mind that they will only have access to the playlist if they are added as collaborators.
4. Can I change the privacy settings of a collaborative playlist?
Yes, you can modify the privacy settings of a collaborative playlist. Simply access the playlist settings and adjust the privacy options accordingly, such as allowing only your followers to collaborate or restricting access to specific users.
5. Will my private playlists still appear in Spotify search results?
No, private playlists are not visible in Spotify search results. They are only accessible to you and anyone who has been granted explicit permission to view or collaborate on them.
6. Can I make my entire Spotify profile private?
While you can’t make your entire Spotify profile private, you have the option to control the visibility of your listening activity, playlists, and followers through the privacy settings.
7. If I make a playlist private, can people still see that I have it in my library?
If you make a playlist private, others can no longer see that you have the playlist in your library. All information about the playlist will be hidden from public view.
8. Can I make the individual songs within a playlist private?
No, you cannot make individual songs within a playlist private. The privacy settings apply to the entire playlist as a whole.
9. How do I know if a playlist is private or public?
Public playlists have a globe icon displayed next to their name, indicating that they are visible to others. Private playlists, on the other hand, do not have any specific icon next to their name.
10. Can I change the privacy settings of a playlist on Spotify’s web player?
Yes, you can change the privacy settings of a playlist using Spotify’s web player. Simply log in to your account on the web player, navigate to the playlist, and access the settings to modify the privacy options.
These FAQs provide clarification on common queries related to making playlists private on Spotify. By understanding how to control the privacy settings, you can tailor your Spotify experience to your preferred levels of visibility and sharing.