
Selecting the Right Image Editing Software
When it comes to resizing images, having the right image editing software is crucial. There are several options available, each with its own set of features and capabilities. Whether you’re a professional designer or a casual user, choosing the right software will greatly enhance your ability to make images smaller without compromising their quality.
One popular choice among professionals is Adobe Photoshop. With its powerful tools and extensive features, Photoshop allows you to resize images with precision and maintain excellent image quality. It offers options like resampling, which ensures that the image retains its sharpness, and anti-aliasing, which smooths out rough edges. However, Photoshop can be expensive and may have a steeper learning curve for beginners.
If you’re looking for free software, GIMP (GNU Image Manipulation Program) is an excellent choice. Similar to Photoshop in functionality, GIMP provides resizing options that allow you to adjust the dimensions of your image while maintaining quality. It also supports various file formats and offers a wide range of tools for editing and enhancing images.
Another popular option for Windows users is Paint.NET. It’s a user-friendly and lightweight image editing software that supports resizing images without sacrificing quality. Paint.NET also provides several plugins that offer additional functionality, making it a versatile choice for basic image editing tasks.
For those using a Windows computer, Microsoft Paint can also be used for basic image resizing. While it may lack the advanced features of other software, Paint is simple to use and can effectively shrink images without significant loss of quality. It’s a quick and accessible option for users who want to resize images without any technical complications.
If you own a Mac, you can use the Preview application for basic image editing tasks, including resizing. Preview offers a straightforward and intuitive interface to resize images on macOS. It allows you to select the desired dimensions and optimizes the image size while ensuring good image quality.
In addition to desktop software, there are various online image resizers that allow you to resize images without the need for downloading or installing any software. These tools typically offer a user-friendly interface and allow you to choose the desired dimensions or percentage to reduce the image size. They are a convenient option if you don’t have access to image editing software or prefer a quick and hassle-free process.
When selecting your image editing software, consider your specific needs and level of expertise. Whether you opt for professional software like Adobe Photoshop, free options like GIMP or Paint.NET, or online image resizers, it’s important to choose software that suits your requirements and can deliver the desired results.
Understanding Image Resolution
Image resolution plays a crucial role in resizing images effectively. It refers to the number of pixels that make up an image and determines the quality and clarity of the image when displayed or printed. Understanding image resolution is essential to ensure that your resized images maintain their visual integrity.
Resolution is typically measured in dots per inch (DPI) or pixels per inch (PPI). The higher the resolution, the more detail and clarity the image will have. High-resolution images are ideal for printing and projects that require high levels of detail. On the other hand, low-resolution images have fewer pixels and are suitable for web use or images that will be displayed on screens.
When resizing images, it’s important to keep in mind the intended use and the resolution requirements. For example, if you’re resizing an image for web use, a resolution of 72 DPI/PPI is commonly used as screens typically display images in this resolution. However, if you’re resizing an image for high-quality printing, a resolution of 300 DPI/PPI is typically recommended to ensure crisp and clear results.
Resizing an image without adjusting the resolution can lead to unwanted effects such as pixelation or loss of detail. If you’re decreasing the size of the image, the resolution will automatically increase, resulting in a higher level of detail. However, if you’re increasing the size of the image, the resolution may decrease, causing a loss of clarity. In such cases, it’s crucial to strike a balance between the desired size and the resolution to maintain image quality.
It’s worth noting that not all image editing software can handle resolution adjustments in the same way. Professional software like Adobe Photoshop offers advanced features that allow you to resample the image and maintain its resolution while resizing. This means that the image quality remains intact even after resizing. Free software like GIMP and online image resizers also provide options to adjust the resolution during the resizing process.
To ensure that your resized image retains its quality, be mindful of the resolution settings during the resizing process. Consider the intended use, whether it’s for web or print, and select the appropriate resolution to achieve the desired results. By understanding image resolution and its impact on resized images, you can effectively maintain image quality and clarity.
Resizing an Image with Adobe Photoshop
Adobe Photoshop is a powerful software widely used for image editing and manipulation. It offers advanced tools and features that make resizing images a breeze while maintaining excellent image quality. Here’s a step-by-step guide on how to resize an image using Adobe Photoshop:
- Open Adobe Photoshop and go to File > Open to import the image you want to resize.
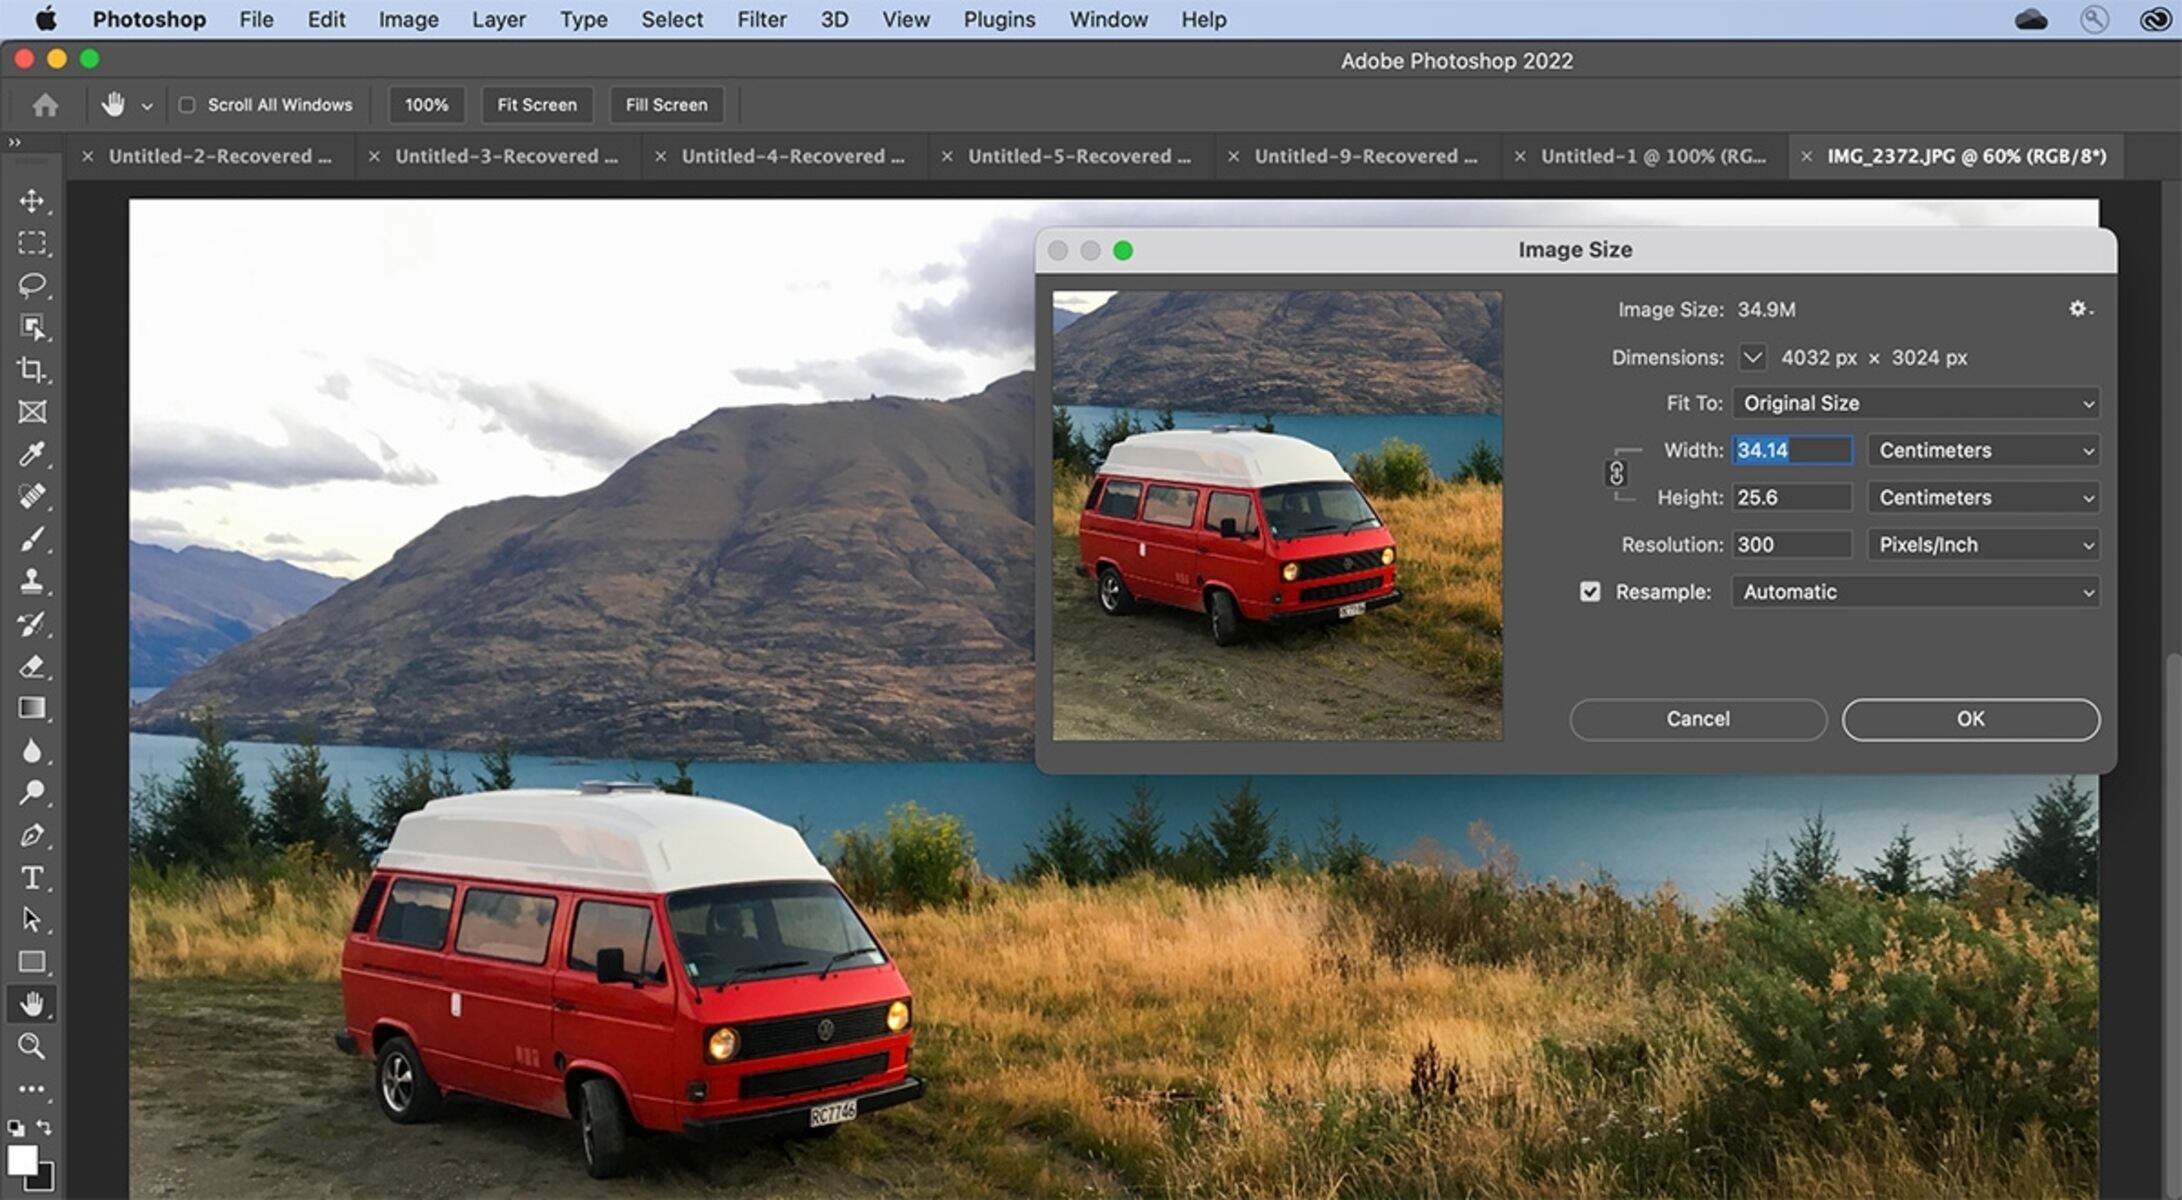
- Select the Image tab at the top of the screen, then choose Image Size. A dialog box will appear, displaying the current dimensions and resolution of the image.
- To maintain the aspect ratio of the image, ensure that the Constrain Proportions option is checked. This will automatically adjust the width and height proportionally.
- Enter the desired dimensions in the Width and Height fields. You can specify the dimensions in pixels, inches, or other units based on your preference.
- Choose the desired Resolution for your resized image. A resolution of 72 DPI is commonly used for web images, while a higher resolution like 300 DPI is suitable for print.
- Under the Resample Image section, select the appropriate resampling method. Bicubic resampling is recommended for most resizing purposes as it provides good results.
- Click OK to apply the changes and resize the image.
- To save the resized image, go to File > Save As. Choose your preferred file format (JPEG, PNG, etc.) and specify the destination folder.
- Enter a file name for the resized image and click Save.
By following these steps, you can easily resize images in Adobe Photoshop while maintaining their quality. Remember to save the resized image with a new file name to preserve the original image and avoid overwriting it.
Adobe Photoshop provides additional options and tools for further image editing, such as adjusting brightness, contrast, and applying filters. You can explore these features to enhance your resized image further.
Keep in mind that Adobe Photoshop is a paid software and may require a subscription or one-time purchase. However, it offers a free trial period, and there are alternatives available for those who prefer free options, such as GIMP and online image resizers. Choose the software that best suits your needs and preferences for resizing images.
Resizing an Image with GIMP
GIMP (GNU Image Manipulation Program) is a popular and free image editing software that provides powerful features for resizing images while maintaining their quality. Here’s a step-by-step guide on how to resize an image using GIMP:
- Launch GIMP and open the image you want to resize by selecting File > Open.
- Go to Image > Scale Image to open the image scaling dialog box. This will display the current dimensions and resolution of the image.
- Enter the desired values for width and height in the appropriate fields. You can select different units of measurement, such as pixels or inches, based on your preference.
- Ensure that the Keep aspect ratio option is checked. This will maintain the original proportions of the image when resizing.
- Choose the desired Interpolation method for resampling. The default Cubic option usually provides good results for most resizing purposes.
- Review the changes in the Preview section to see how the resized image will look. Make adjustments as needed.
- Click Scale to apply the changes and resize the image.
- Save the resized image by selecting File > Export As. Choose your preferred file format (JPEG, PNG, etc.) and specify the destination folder.
- Enter a file name for the resized image and click Export.
By following these steps, you can resize images effectively using GIMP while retaining their quality and aspect ratio. It’s important to note that GIMP also offers various additional editing options, such as adjusting color levels, applying filters, and adding text. You can explore these features to further enhance your resized image.
GIMP is compatible with different operating systems, including Windows, Mac, and Linux. It’s a versatile and free alternative to professional image editing software like Adobe Photoshop. However, GIMP has a slightly different user interface and may have a learning curve for beginners. Nevertheless, with its wide range of features and community support, it remains a popular choice for resizing images.
If you prefer an online-based image resizer, there are also several websites available that allow you to resize images without installing any software. Online resizers provide a convenient and accessible option, especially for quick resizing needs.
Consider your specific requirements and level of expertise when choosing the software or method for resizing images. Whether you opt for GIMP, other software like Adobe Photoshop, or online resizers, it’s important to select the option that best suits your needs and can deliver the desired results.
Resizing an Image with Paint.NET
Paint.NET is a popular lightweight image editing software for Windows users. It provides a user-friendly interface and a range of useful features, making it easy to resize images while maintaining their quality. Here’s a step-by-step guide on how to resize an image using Paint.NET:
- Open Paint.NET and select File > Open to import the image you want to resize.
- Go to Image > Resize to open the resize dialog box. This will display the current dimensions and resolution of the image.
- Enter the desired values for width and height in the appropriate fields.
- Ensure that the Maintain aspect ratio option is checked. This will keep the original proportions of the image intact when resizing.
- Choose the desired Resampling method. The default Bicubic option is generally recommended for most resizing purposes.
- Preview the changes in the Preview section to see how the resized image will look. Adjust as needed.
- Click OK to apply the changes and resize the image.
- To save the resized image, select File > Save As. Choose your preferred file format (JPEG, PNG, etc.) and specify the destination folder.
- Enter a file name for the resized image and click Save.
By following these steps, you can easily resize images using Paint.NET. The software is known for its simplicity and accessibility, making it a great option for basic image editing tasks.
While Paint.NET may not have as many advanced features as professional software like Adobe Photoshop or GIMP, it offers enough tools and functionality to resize images effectively. It’s especially useful if you’re looking for a lightweight and straightforward image editing solution.
Paint.NET also supports various plugins that can extend its functionality, providing additional options for editing and enhancing images. These plugins can be downloaded from the Paint.NET website or other online sources, allowing you to further customize your editing experience.
If you’re a Windows user and prefer a simple and user-friendly software for resizing images, Paint.NET is a reliable choice. It’s free to download and use, making it accessible to a wide range of users.
However, if you’re using a different operating system or require more advanced features, alternatives like Adobe Photoshop, GIMP, or online image resizers may better suit your needs. Consider your specific requirements and level of expertise before deciding on the software or method to resize your images.
Resizing an Image with Microsoft Paint
Microsoft Paint is a basic image editing software that comes pre-installed on most Windows computers. While it may not have all the advanced features of professional image editing software, it provides a simple and accessible option for resizing images. Here’s a step-by-step guide on how to resize an image using Microsoft Paint:
- Open Microsoft Paint by searching for it in the Windows search bar or locating it in the Windows Accessories folder.
- Click on the File tab at the top left corner of the Paint window and select Open to import the image you want to resize.
- Go to the Home tab, click on the Resize button, and a dialog box will appear.
- In the resize dialog box, you have two options – to resize by percentage or by pixels.
- If you choose to resize by percentage, select the percentage of the original image size that you want to resize to. For example, if you enter 50%, the image will be shrunk to half its original size.
- If you choose to resize by pixels, enter the desired width and height values for the resized image. You can also choose to maintain the aspect ratio by checking the box labeled Maintain aspect ratio.
- Once you have selected the resizing option and entered the desired values, click OK to resize the image.
- To save the resized image, click on the File tab and select Save As. Choose your preferred file format (JPEG, PNG, etc.) and specify the destination folder.
- Enter a file name for the resized image and click Save.
By following these steps, you can easily resize images using Microsoft Paint. While it may not have the advanced features of other image editing software, it provides a quick and accessible solution for basic image resizing needs.
Keep in mind that Microsoft Paint may have limitations when it comes to more complex resizing tasks or maintaining high image quality during the process. If you require more advanced features or precise control over the resizing process, consider using other software options such as Adobe Photoshop, GIMP, or online image resizers.
However, if you’re a Windows user looking for a simple and straightforward way to resize images without the need for additional software, Microsoft Paint can be a convenient tool. It’s already available on your computer and provides an easy-to-use interface for resizing images.
Consider your specific requirements and level of expertise before deciding on the software or method to resize your images. Whether you choose Microsoft Paint or another option, the goal is to find a solution that suits your needs and allows you to resize images efficiently.
Resizing an Image with Preview on Mac
Preview is a default image viewing and editing application on Mac that provides basic image editing capabilities, including image resizing. With Preview, you can easily resize images while maintaining their quality. Here’s a step-by-step guide on how to resize an image using Preview:
- Open the image you want to resize in Preview by double-clicking the image file or selecting it and choosing Open With > Preview.
- Click on the Tools menu at the top of the screen and select Adjust Size. This will open the resize dialog box.
- In the resize dialog box, you’ll see the current dimensions and resolution of the image. Enter the desired values for width and height in the appropriate fields.
- Ensure that the Scale proportionally option is selected. This will maintain the original aspect ratio of the image when resizing.
- You can choose to specify the desired resolution for the resized image in the Resolution field, or leave it unchanged to maintain the current resolution.
- Preview provides additional options for resizing, such as changing the measurement units and selecting different resampling algorithms. Adjust these settings based on your preferences and needs.
- Preview offers a visual representation of how the resized image will look in the Preview section. Take a moment to review it and make any necessary adjustments.
- Click OK to apply the changes and resize the image.
- To save the resized image, go to the File menu and select Export. Choose your preferred file format (JPEG, PNG, etc.) and specify the destination folder.
- Enter a file name for the resized image and click Save.
By following these steps, you can resize images using Preview on your Mac. Preview offers a simple and intuitive interface, making it easy to resize and edit images without the need for third-party software.
Although Preview is not as feature-rich as professional image editing software like Adobe Photoshop or GIMP, it provides sufficient tools for basic resizing needs. It’s a convenient option for Mac users who want to quickly resize images without the hassle of installing additional software.
Keep in mind that if you require more advanced resizing features or precise control over the resizing process, you may want to consider using other software options or online image resizers. Evaluate your specific requirements and the complexity of the resizing task to determine the best approach.
Whether you use Preview or other software, the goal is to find the solution that suits your needs and allows you to resize images efficiently while maintaining their quality.
Resizing an Image with Online Image Resizers
When it comes to resizing images quickly and conveniently, online image resizers provide a practical solution. These web-based tools allow you to resize images without the need to download or install any software. Here’s a step-by-step guide on how to resize an image using online image resizers:
- Choose a reputable online image resizer. There are numerous options available, such as Pixlr, FotoFlexer, and ResizeImage.net.
- Upload the image you want to resize by either clicking on the “Upload” button or by dragging and dropping the image onto the website. Some online resizers may require you to select the image from your computer or provide a URL to an image hosted online.
- Select the desired dimensions for the resized image. Some online resizers allow you to specify the width and height in pixels, while others provide options like percentage scaling or predefined sizes.
- Choose any additional preferences or settings offered by the online resizer. This may include options to maintain the aspect ratio, adjust the image quality, or apply specific resizing algorithms.
- Click on the “Resize” or “Submit” button to initiate the resizing process. The online resizer will efficiently process the image and generate the resized version.
- Once the resizing is complete, the online resizer will typically provide a download link or option to save the resized image to your computer. Select the appropriate option to save the resized image in your desired file format (JPEG, PNG, etc.).
Online image resizers offer a convenient and accessible solution for those who don’t have specialized image editing software or prefer a hassle-free resizing process. These tools are particularly useful for quick image resizing needs, such as preparing images for social media, websites, or online platforms.
However, it’s important to note that online image resizers may lack the advanced features and customization options available in dedicated image editing software. They may also have file size limitations or reduce image quality to some extent during the resizing process.
Furthermore, consider the privacy and security implications when using online image resizers. Ensure that you choose a trustworthy and reputable service that takes appropriate measures to protect your data.
While online image resizers provide a convenient option, it’s worth exploring other software options like Adobe Photoshop, GIMP, or the built-in tools like Preview or Paint.NET for more comprehensive editing and resizing needs.
Ultimately, the choice of resizing method depends on your specific requirements, level of expertise, and the convenience you seek. Evaluate your needs and choose the option that best aligns with your preferences to achieve the desired results.
Tips for Maintaining Image Quality while Resizing
When resizing images, it’s important to take certain steps to maintain the image quality and prevent any loss of detail or clarity. Here are some tips to help you resize images while preserving their visual integrity:
- Start with a high-resolution image: Begin with an image that has a higher resolution than what you need for the final resized version. This allows you to maintain better image quality throughout the resizing process.
- Keep the original aspect ratio: To avoid distortion, it’s generally best to maintain the original aspect ratio of the image when resizing. This ensures that the image’s proportions remain intact.
- Use the appropriate resampling method: When resizing an image, select the appropriate resampling method offered by your chosen software or online resizer. Options like bicubic or Lanczos resampling can provide better results compared to simpler interpolation methods.
- Preview the resized image: Take the time to preview the resized image before saving it. This allows you to assess the quality and make any necessary adjustments to ensure a satisfactory result.
- Avoid excessive resizing: Repeatedly resizing an image can cause cumulative loss of quality. Try to resize an image only when necessary and avoid making multiple size adjustments.
- Balance size and resolution: When resizing an image, consider the desired dimensions as well as the resolution needed for the intended use. Finding the right balance between size and resolution ensures optimal image quality.
- Use professional software: If possible, utilize professional image editing software like Adobe Photoshop or GIMP, as they often provide advanced resizing options that can help maintain image quality.
- Regularly save backups: It’s always a good practice to save a backup of your original image before resizing it. This ensures that you can revert back to the original if needed.
Remember that while these tips can help maintain image quality, there may still be some quality loss when significantly resizing images, especially when reducing their size. It’s important to strike a balance between the desired image dimensions and maintaining satisfactory quality.
Applying these tips, along with practicing with different resizing methods and understanding the capabilities of your chosen software or online resizer, will help you achieve the best results when resizing images while preserving their quality.
Saving the Smaller Image
Once you have successfully resized your image, it’s important to save the smaller version properly to ensure its accessibility, compatibility, and longevity. Here are some guidelines for saving the resized image:
- Choose the appropriate file format: Select the file format that best suits your needs and the intended purpose of the image. Common formats include JPEG, PNG, and GIF. JPEG is ideal for photographs, while PNG is suitable for images with transparency, and GIF is commonly used for simple graphics.
- Select the optimal compression level: When saving as JPEG or PNG, consider adjusting the compression level to balance file size and image quality. Higher compression reduces file size but may slightly affect image clarity, while lower compression maintains better quality but results in a larger file size.
- Consider metadata preservation: Depending on your preferences, you can choose to preserve or remove metadata such as EXIF or IPTC data when saving the image. Metadata can include valuable information about the image, such as camera settings or copyright information.
- Organize and name the file appropriately: Use a descriptive and relevant file name for the resized image. This will make it easier to identify and locate the image in the future. Ensure proper file organization by storing the image in an appropriate folder or directory.
- Keep a backup of the original image: It’s always a good practice to keep a backup of the original image, especially if you have made significant changes during the resizing process. This allows you to revert back to the original if necessary and helps avoid permanent loss of information.
- Store the image in a secure location: Once you have saved the resized image, store it in a safe and secure location, such as a local hard drive or a cloud storage service. This ensures that the image is accessible and protected from accidental deletion or loss.
- Periodically check and update the image: Over time, you may need to reevaluate the resized image and make further adjustments or save it in different file formats as technology and file formats evolve. Stay updated and periodically review the quality and compatibility of the resized image.
By following these guidelines, you can ensure that the smaller version of your image is saved properly and remains accessible and usable in the future. Taking the necessary steps to save and organize the resized image helps to maintain its quality, integrity, and longevity.
Remember to consider the specific requirements of your project or usage scenario when making decisions about file formats, compression, and metadata. Every image may have unique considerations, so it’s important to tailor your saving approach accordingly.