
Choosing the Right Tools and Software
When it comes to creating a digital planner, the first step is to choose the right tools and software. This crucial decision will determine the functionality and ease of use of your planner. Here are a few key factors to consider:
- Device Compatibility: Ensure that the software you choose is compatible with your preferred devices. Whether you use a smartphone, tablet, or computer, you’ll want to make sure your digital planner can be accessed and edited across all your devices.
- User-Friendly Interface: Look for software with an intuitive and user-friendly interface. A clean and organized layout will make it easier for you to navigate and customize your digital planner without feeling overwhelmed or lost.
- Customization Options: Opt for software that allows you to customize the design and layout of your planner. The ability to choose fonts, colors, and templates that reflect your personal style will ensure that your planner is visually appealing and personalized to your preferences.
- Syncing and Cloud Storage: Consider software that offers syncing capabilities and cloud storage. This will enable you to access your digital planner from multiple devices and ensure that your planner is always up-to-date and accessible.
- Community Support: Look for software that has an active community of users. Having access to forums, tutorials, and support can be invaluable as you navigate the process of creating and customizing your digital planner.
By carefully considering these factors and conducting thorough research on various tools and software options, you can make an informed decision that meets your needs and preferences. Remember to take advantage of free trials or demos to test out the software before committing to a subscription or purchase. Now that you have chosen the right tools, you are ready to move on to designing the layout of your digital planner.
Designing the Layout of Your Digital Planner
Designing the layout of your digital planner is a creative and exciting process. The layout will determine the organization and functionality of your planner. Here are some key considerations to keep in mind:
- Structure: Decide on the overall structure of your planner. Will it have a monthly, weekly, or daily view? Will it include sections for notes, goals, or habit trackers? Planning out the structure will help you create a cohesive and logical flow.
- Navigation: Ensure that your digital planner is easy to navigate. Incorporate a menu or navigation bar that allows users to quickly jump between sections or pages within the planner. Intuitive navigation will enhance the user experience and make your planner more user-friendly.
- Color Scheme: Select a color scheme that reflects your personal style and preferences. Consider using a limited color palette to create a cohesive and visually appealing design. Use contrasting colors for important elements or to differentiate between sections.
- Typography: Choose fonts that are easy to read and visually pleasing. Experiment with different font styles and sizes to create a hierarchy of information within your planner. Be consistent with font choices to maintain a cohesive and professional look.
- Whitespace: Keep the layout clean and uncluttered by utilizing whitespace effectively. Whitespace allows for easier reading and provides a sense of balance and clarity. Use margins, padding, and spacing between elements to create a visually pleasing composition.
- Functional Elements: Incorporate functional elements such as checkboxes, dropdown menus, and buttons to enhance the usability of your planner. These elements will make it easier for users to interact with and utilize your digital planner effectively.
Remember to consider the intended purpose and audience of your digital planner when designing the layout. Keep it visually appealing, user-friendly, and aligned with your personal style. Once you have finalized the layout, you can move on to adding pages and sections to your digital planner.
Adding Pages and Sections
Adding pages and sections to your digital planner is where you can truly customize it to meet your specific needs. This step allows you to create a personalized and comprehensive planner that caters to your unique requirements. Here are some tips for adding pages and sections:
- Identify Key Sections: Determine the key sections you want to include in your planner. This could be sections for monthly calendars, weekly spreads, to-do lists, notes, or any other categories you find useful. Think about the information you need to track and organize in your planner.
- Create Section Dividers: Use section dividers to separate different parts of your planner. This not only improves the visual appeal but also makes it easier to navigate through the different sections. Consider incorporating tabs or clickable links to enhance the user experience and improve accessibility.
- Design Unique Page Layouts: Customize the layout of each page within your sections. Experiment with different formats and element arrangements to find a layout that is both functional and visually appealing. Consider including space for titles, dates, headers, and content areas to organize your information effectively.
- Add Functional Pages: Include functional pages that cater to your specific needs. This could be pages for goal-setting, habit tracking, meal planning, budgeting, or any other activities or areas of focus that are important to you. Tailor your planner to encompass all the aspects of your life that you want to manage and track.
- Consider Custom Templates: Utilize pre-designed templates or create your own templates for specific pages or sections. This can save time and effort in formatting and designing consistently across your planner. Templates also provide a cohesive look and feel throughout your planner.
- Keep it Organized: Maintain a logical and organized structure as you add pages and sections. Group related pages together and consider using numbering or labeling systems to make it easier to locate specific information in your planner.
Remember, the beauty of a digital planner is its flexibility. You can easily add, remove, or rearrange pages and sections to accommodate changing needs or preferences. Take the time to plan out your pages and sections, and don’t be afraid to experiment and customize until you achieve a layout that suits your style and workflow.
Customizing the Cover and Background
One of the most exciting aspects of creating a digital planner is the ability to customize the cover and background. Adding a personalized touch to these elements can make your planner truly unique and reflective of your style and personality. Here are some tips for customizing the cover and background of your digital planner:
- Select a Theme: Choose a theme or concept that resonates with you. This could be a specific color palette, a nature-inspired theme, a minimalist design, or any other theme that captures your interest. Having a theme in mind can guide your customization decisions and create a cohesive look throughout your planner.
- Create or Choose a Cover Design: Design a cover that represents the overall vibe of your planner. You can create a custom cover using graphic design software or opt for pre-designed cover templates that suit your preferred aesthetic. Include the planner’s title and any other elements that you want to showcase on the cover.
- Add Personal Photos or Artwork: Incorporate personal photos or artwork into the cover or background of your digital planner. This personal touch adds a sentimental value and makes your planner feel more personal and unique. Whether it’s a photo of loved ones, a favorite quote, or your own artwork, make sure it aligns with your planner’s theme.
- Experiment with Background Patterns or Textures: Explore different background patterns or textures to add visual interest to your planner. Consider using subtle patterns or textures that complement the overall design. Be mindful not to choose backgrounds that are too distracting, as it may interfere with the readability of your planner’s content.
- Use Custom Fonts: Incorporate custom fonts for the cover or headings to further enhance the visual appeal of your planner. There are numerous font resources available online where you can find fonts that align with your desired aesthetic. Ensure that the chosen fonts are legible and easy to read.
- Consider Seasonal or Festive Themes: Customize your planner’s cover and background to reflect the current season or upcoming holidays. This adds a fun and timely element to your planner’s design and can make it feel fresh and exciting throughout the year.
Remember, the cover and background customization is your chance to infuse your personality into your digital planner. Take your time to design or select elements that truly reflect your style and preferences. With a beautifully customized cover and background, you’re ready to move on to the next step of adding tabs and dividers to your digital planner.
Incorporating Tabs and Dividers
Adding tabs and dividers to your digital planner is a practical and visually appealing way to organize and navigate different sections. Tabs and dividers make it easy to locate specific pages and provide a clear separation between various sections. Here’s how you can incorporate tabs and dividers into your digital planner:
- Choose a Tab Style: There are various tab styles to choose from, such as traditional rectangular tabs, rounded tabs, or even custom-shaped tabs. Consider the overall design and aesthetic of your digital planner when selecting a tab style that fits seamlessly with the overall theme.
- Create Clickable Tabs: Make your tabs clickable, allowing users to easily jump to specific sections or pages within the planner. Link each tab to the corresponding section or page to enhance the user experience and efficiency of navigation.
- Label the Tabs: Clearly label each tab with the relevant section or page title. This provides a quick reference for users and helps them find the information they need at a glance. Consider using clear and legible fonts to ensure that the tab labels are easily readable.
- Add Dividers: Incorporate dividers between different sections to visually separate them. Dividers can be horizontal lines, decorative elements, or even custom graphics that align with your planner’s theme. Dividers not only enhance the aesthetics but also provide a clear visual distinction between different parts of your digital planner.
- Keep it Consistent: Maintain consistency in the positioning and style of tabs and dividers throughout your digital planner. Consistency creates a harmonious and organized visual experience for users and ensures that they can navigate through your planner effortlessly.
- Consider a Table of Contents: If your planner consists of multiple sections and subsections, consider including a table of contents at the beginning. A table of contents provides a comprehensive overview of the planner’s structure and makes it easier for users to locate specific information quickly.
Remember that the goal of incorporating tabs and dividers is to improve the organization and usability of your digital planner. By adding these elements, you’ll enhance the overall user experience and make it easier for users to navigate through your planner with ease. Now that you’ve incorporated tabs and dividers, you’re ready to move on to the next step of creating interactive elements and hyperlinks.
Creating Interactive Elements and Hyperlinks
One of the advantages of a digital planner is the ability to create interactive elements and hyperlinks. These features can greatly enhance the functionality and user experience of your planner. Here are some tips for incorporating interactive elements and hyperlinks:
- Create Interactive Checkboxes: Instead of using traditional checkboxes, consider using interactive checkboxes that users can check off with a click or tap. This allows for a more interactive and intuitive experience when marking tasks as completed or tracking habits.
- Use Hyperlinks: Utilize hyperlinks within your planner to create easy navigation and access to external resources. You can link to relevant websites, documents, or even specific sections within your planner. Hyperlinks make it convenient for users to access additional information or resources with just a click or tap.
- Add Dropdown Menus: Incorporate dropdown menus to provide a streamlined way of organizing and accessing additional options or information. Dropdown menus can be used for selecting categories, filtering data, or providing additional details on certain topics within your digital planner.
- Explore Interactive Calendars: Include interactive calendars that allow users to select dates, add events, set reminders, or view details of scheduled activities. Interactive calendars provide a visual representation of time and make it easier to manage and track important dates and appointments.
- Create Navigation Buttons: Design navigation buttons that allow users to move between different sections or pages within your digital planner effortlessly. These buttons can be placed strategically for easy access and provide a visual cue for users to navigate through your planner intuitively.
- Embed Interactive Forms or Surveys: If applicable, embed interactive forms or surveys within your planner. This can be a helpful feature for gathering feedback, conducting assessments, or collecting data directly within your planner.
- Add Interactive Media: Enhance the visual appeal of your planner by incorporating interactive media elements, such as videos or audio clips, that provide additional information or instruction. This can be especially useful for tutorials, presentations, or motivational content.
Remember to consider the purpose and functionality of your planner when incorporating interactive elements and hyperlinks. These features can greatly enhance the user experience and make your planner more engaging and interactive. By adding interactive elements and hyperlinks, you’re ensuring that your digital planner is more than just a static document. Now that your planner is equipped with interactive features, you can move on to the next step of adding templates and layouts.
Adding Templates and Layouts
Adding templates and layouts to your digital planner can save you time and provide consistency throughout your planner. Templates serve as pre-designed pages with common elements and layouts that you can easily customize. Here are some tips for adding templates and layouts to your digital planner:
- Explore Pre-Made Templates: Search for pre-made templates that align with your planner’s theme and structure. Many websites and online marketplaces offer a wide variety of templates for different planner styles and layouts. Browse through these templates and choose ones that are visually appealing and suit your needs.
- Create Your Own Templates: If you have a specific vision for your planner, consider creating your own templates. You can use graphic design software or specialized planner software to design templates that match your desired aesthetic and functionality. This allows for more customization and flexibility in your planner’s design.
- Include a Variety of Layouts: Incorporate different layouts to cater to different types of information or tasks. For example, include weekly spreads, monthly calendars, financial trackers, habit trackers, or goal-setting pages. Each layout should be specifically designed to serve its purpose effectively.
- Consider Functional Elements: When designing or selecting templates, keep functionality in mind. Include sections for important information such as goals, to-do lists, notes, and reminders. Ensure that there is enough space for users to jot down their thoughts and plans.
- Experiment with Design Elements: Customize the design elements within your templates to match your planner’s theme. Adjust colors, fonts, and graphics to create a cohesive and visually appealing look. Incorporate your brand colors or personal style for a unique touch.
- Leave Room for Customization: While templates can be a time-saver, it’s essential to leave room for customization. Make sure there is flexibility to modify the template to suit your specific needs and preferences. Users should be able to adjust the layout, add or remove sections, and personalize the template according to their requirements.
Whether you choose pre-made templates or create your own, adding templates and layouts to your digital planner provides structure and saves you time during the planning process. With templates, you can maintain consistency throughout your planner while still having the freedom to customize and personalize. Now that you have your templates and layouts in place, it’s time to move on to setting up a monthly and weekly view in your digital planner.
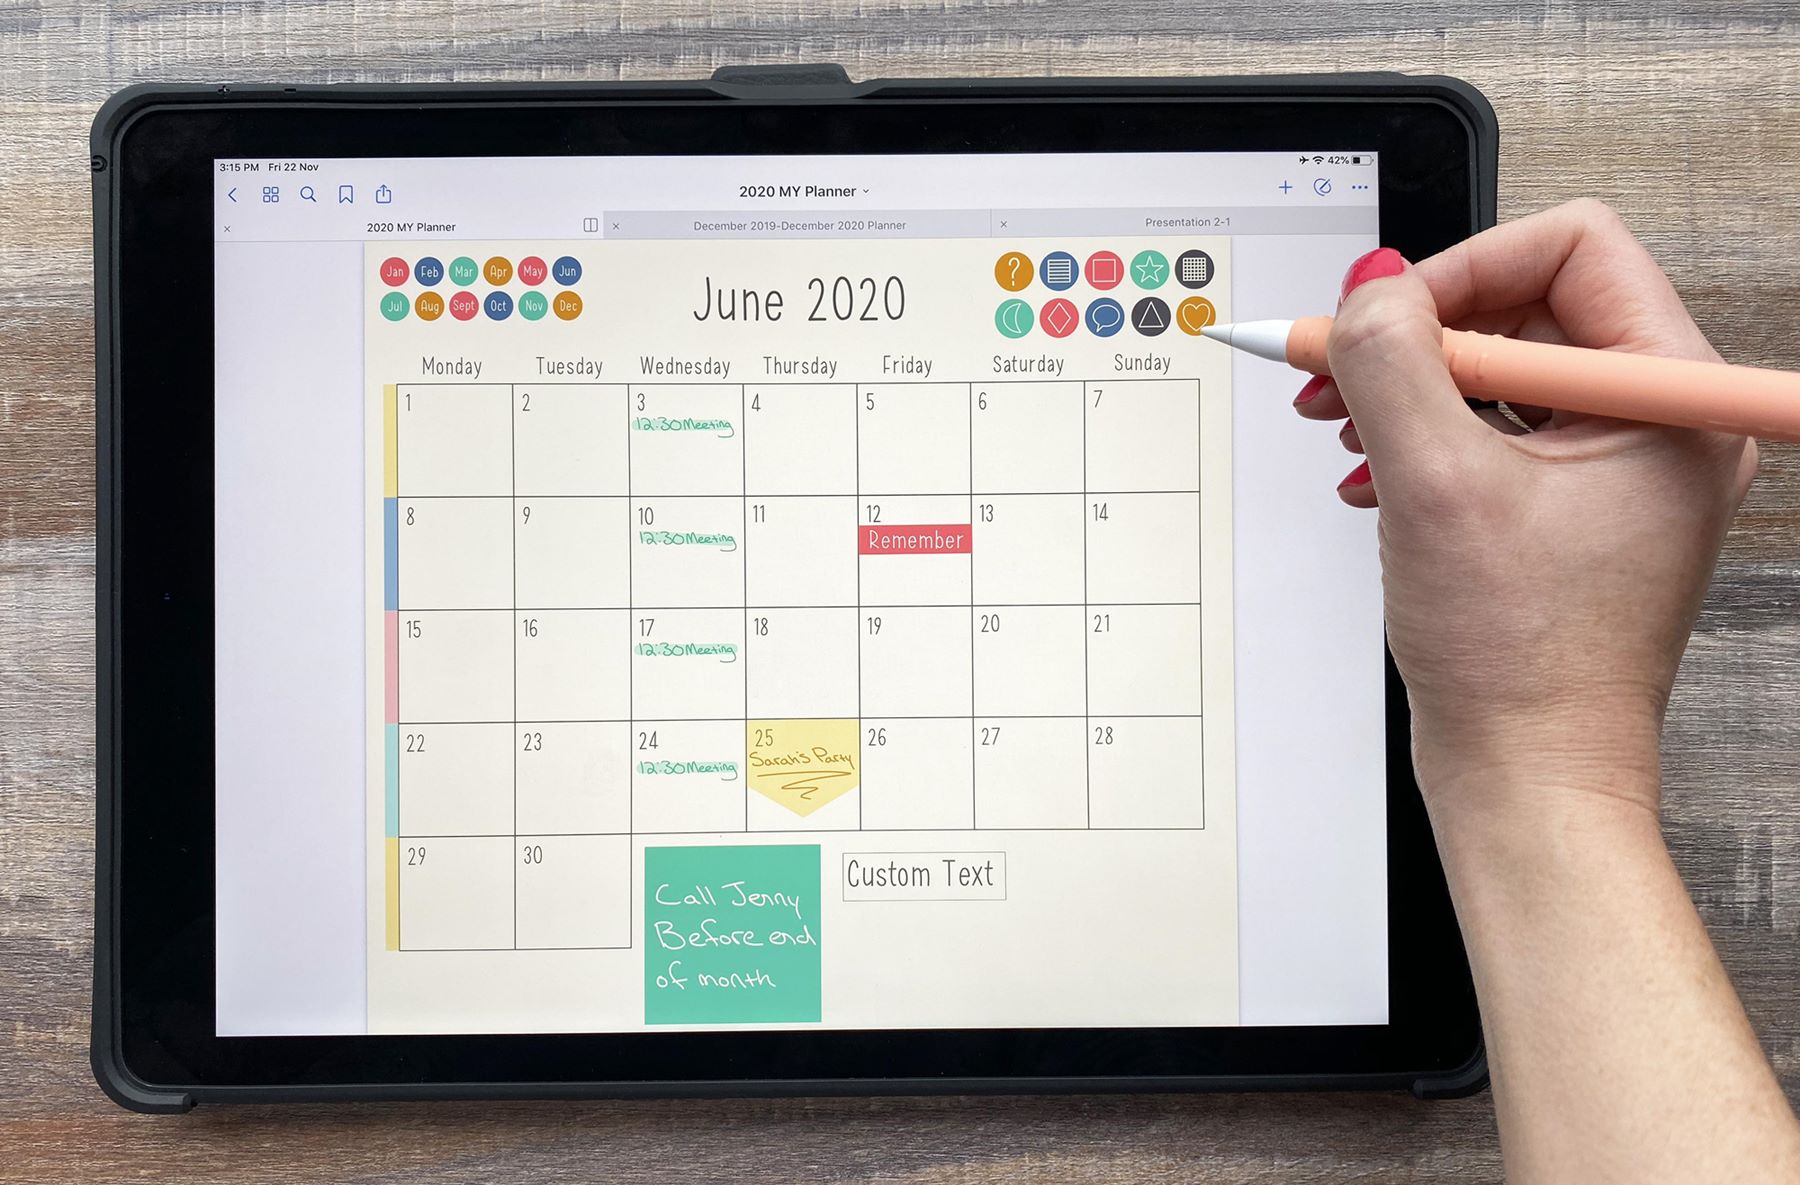
Setting Up a Monthly and Weekly View
The monthly and weekly view is the core of your digital planner as it allows you to plan and track your activities, appointments, and goals on a larger time scale. Here are some steps to help you effectively set up your monthly and weekly view:
- Create a Monthly Calendar: Dedicate a section of your planner to a monthly calendar view. Include all the days of the month and leave enough space for users to add important events or appointments. Consider highlighting weekends or important dates by using different colors or graphics.
- Include Key Dates: Populate your monthly calendar with important dates such as birthdays, anniversaries, holidays, or upcoming deadlines. This ensures that you have a clear overview of what’s coming up and allows you to plan accordingly.
- Set Monthly Goals: Leave space in your monthly view to set and track your goals for the month. Whether it’s personal, professional, or health-related, having a space to visualize and monitor your progress towards your goals can be highly motivating.
- Create a Weekly Spread: Design a layout for your weekly view that enables you to break down your tasks, priorities, and appointments for each day. Include sections for each day of the week, allowing you to allocate time and plan your activities in detail.
- Use Color Coding: Incorporate a color coding system to visually organize your monthly and weekly view. Assign specific colors to different categories such as work, personal, fitness, or social. This helps you quickly identify and manage different types of tasks and activities.
- Add Space for Notes and Reflections: Reserve space for notes and reflections in your monthly and weekly views. This provides an opportunity to jot down thoughts, ideas, or observations that arise during the planning process. Notes and reflections help you capture insights and make adjustments as needed.
- Review and Update: Regularly review your monthly and weekly views to assess your progress, update your goals, and make any necessary adjustments to your plans. This ensures that your digital planner remains up-to-date and aligned with your current priorities and events.
Setting up the monthly and weekly view in your digital planner allows you to have a clear overview of your schedule, accomplish your goals, and stay on top of your tasks. With well-structured monthly and weekly views, you’re ready to move forward and include additional features like goal tracking and habit trackers in your digital planner.
Including Goal Tracking and Habit Trackers
Goal tracking and habit trackers are valuable tools that help you stay focused and accountable in achieving your goals and developing positive habits. By including these features in your digital planner, you can monitor your progress and make adjustments along the way. Here’s how to effectively incorporate goal tracking and habit trackers:
- Set Clear Goals: Start by defining your goals and breaking them down into smaller, actionable steps. Specify the desired outcomes, deadlines, and the steps you need to take to achieve each goal.
- Create Goal Tracking Pages: Design dedicated pages for tracking your goals. Include sections for each goal, allowing you to note your progress, reflect on challenges, and adjust your action plan as needed.
- Use Visual Progress Indicators: Consider using visual elements, such as progress bars, charts, or graphs, to track your progress towards each goal. Visual representations make it easy to see your progress at a glance and provide motivation to keep working towards your objectives.
- Include Habit Trackers: Dedicate space in your digital planner for habit trackers. Identify the habits you want to develop or maintain and create a dedicated area to track your daily progress. Use checkboxes, charts, or other visual representations to monitor your consistency.
- Set Reminders and Notifications: Leverage the functionality of your digital planner to set reminders and notifications for your goals and habits. This gentle nudge will help you stay accountable and ensure you don’t overlook any important tasks or habits.
- Review and Reflect: Regularly review your goal tracking and habit tracking pages. Reflect on your progress, celebrate milestones, and identify any patterns or obstacles that may be impacting your success. Adjust your strategies when necessary to stay on track.
- Celebrate Achievements: Acknowledge and celebrate your achievements along the way. This will boost your motivation, encourage positive reinforcement, and inspire you to keep striving towards your goals.
By incorporating goal tracking and habit trackers into your digital planner, you can stay focused, organized, and motivated throughout your journey. These features provide a visual representation of your progress and help you cultivate positive habits that contribute to your overall success. With effective goal tracking and habit trackers in place, you’re ready to move forward with integrating a task manager and to-do lists in your digital planner.
Integrating a Task Manager and To-Do Lists
An integral part of staying organized and productive is effectively managing your tasks and to-do lists. Integrating a task manager and to-do lists into your digital planner can help you prioritize, track, and complete tasks efficiently. Here’s how to seamlessly incorporate a task manager and to-do lists:
- Select a Task Manager: Explore different task management tools or apps that integrate well with your digital planner. Choose a tool that suits your workflow and offers features like task categorization, due dates, reminders, and the ability to sync across devices.
- Create Daily To-Do Lists: Designate a section for daily to-do lists in your digital planner. Write down all the tasks you need to complete for the day, prioritizing them based on importance and urgency.
- Break Down Larger Tasks: If you have complex tasks, break them down into smaller actionable steps. This makes tasks more manageable and allows you to track progress more effectively.
- Set Deadlines and Reminders: Assign deadlines to tasks and set reminders to ensure you stay on track. Use the notification features of your task manager to receive timely alerts and keep yourself accountable for completing your tasks.
- Use Categories or Labels: Categorize your tasks or use labels to classify them based on projects, priority levels, or specific areas of focus. This makes it easier to locate and prioritize tasks within your to-do lists.
- Employ Time Blocking: Allocate specific blocks of time for different tasks or projects in your digital planner. Time blocking helps you manage your schedule effectively and ensures that you allocate enough time for important tasks.
- Track Progress: Use checkboxes or progress indicators to track your progress with completing tasks. Updating the status of completed tasks provides a sense of accomplishment and motivates you to move forward.
- Regularly Review and Update: Set aside time to review your task manager and to-do lists daily or weekly. Assess your progress, reprioritize tasks if needed, and add any new tasks that arise.
Integrating a task manager and to-do lists into your digital planner streamlines your workflow, allowing you to focus on your priorities and manage tasks efficiently. With these features in place, you can tackle your to-do lists with confidence and stay on top of your responsibilities. Now you’re ready for the next step, which is adding digital stickers and decorative elements to enhance the visual appeal of your digital planner.
Including Digital Stickers and Decorative Elements
Adding digital stickers and decorative elements to your digital planner can bring visual interest and personalization to your pages. These elements allow you to express your creativity and make your planner visually appealing. Here’s how to effectively incorporate digital stickers and decorative elements:
- Find or Create Digital Stickers: Search for pre-made digital stickers online or create your own using graphic design software. Look for stickers that match your planner’s theme or create custom designs that reflect your personal style.
- Determine Placement: Decide where you want to place the stickers within your planner. You can use them to highlight important events, mark completed tasks, or simply add a decorative touch to your pages.
- Organize Sticker Sheets: If you have a collection of digital stickers, consider organizing them into sticker sheets. Arrange the stickers by category or theme to make it easier to find the ones you want to use.
- Use Decorative Elements: Aside from stickers, incorporate other decorative elements such as borders, frames, dividers, or illustrations. These elements add visual interest and can help separate different sections or highlight important information.
- Consider Seasonal or Themed Elements: Change up your stickers and decorative elements based on seasons, holidays, or special events. This allows you to keep your planner fresh and aligned with the current time of year or specific themes you want to incorporate.
- Experiment with Layering: Get creative with layering stickers and decorative elements to create unique visual compositions. Play around with different placements and arrangements to find a layout that is visually appealing and complements the content on the page.
- Balance Functionality and Aesthetics: While it’s important to make your planner aesthetically pleasing, ensure that the usage of stickers and decorative elements doesn’t hinder the functionality of your planner. Strike a balance between adding visual interest and maintaining readability and usability.
- Personalize with Handwritten Text: If you have a digital planner that supports digital handwriting, use it to add a personal touch. Write on your planner pages using digital handwriting tools to jot down notes or add handwritten quotes and thoughts.
By including digital stickers and decorative elements in your digital planner, you can infuse your own unique style and make your planner truly stand out. These elements allow for creativity and customization, making your planner a reflection of your personality. With colorful stickers and decorative elements, you’re ready to move on to the next step of adding a digital handwriting tool to your planner.
Adding a Digital Handwriting Tool
Adding a digital handwriting tool to your digital planner provides you with the flexibility to write, draw, and annotate directly on your planner pages. This tool allows for a more personalized and natural feel, giving you the freedom to express your thoughts and ideas in your own handwriting. Here’s how to incorporate a digital handwriting tool into your planner:
- Select a Compatible Digital Handwriting Tool: Choose a digital handwriting tool or app that is compatible with your device and software. Look for a tool that offers a smooth writing experience and a variety of brush types and colors to match your preferences.
- Designate a Handwriting Section: Determine where you want to include a designated handwriting section within your digital planner. This section can be used for jotting down quick notes, brainstorming ideas, or adding personal reflections to your pages.
- Utilize Digital Pen Styles: Experiment with different digital pen styles, such as ballpoint, marker, or brush, to imitate the look and feel of various writing instruments. Choose a pen size that suits your handwriting style and matches the overall aesthetic of your planner.
- Write, Draw, and Annotate: Use the digital handwriting tool to write down tasks, add important notes, draw diagrams, or annotate sections in your planner. This feature allows for greater customization and the ability to emphasize specific details.
- Highlight and Color Code: Take advantage of digital highlighting and color-coding tools to bring attention to important information or categorize different sections within your planner. Use different colors to differentiate between tasks, events, or priorities.
- Correct and Edit Effortlessly: Enjoy the ease of correcting mistakes and editing your digital handwriting with the convenience of the digital tools. Erase or move text, resize or reshape drawings, and make adjustments without any visible traces of correction.
- Import Handwritten Notes: If you prefer to write on paper, you can still incorporate your handwritten notes into your digital planner. Simply take a photo of your handwritten notes and import them into your planner using the digital handwriting tool.
- Organize and Search: With a digital handwriting tool, you can organize your handwritten content by creating notebooks or sections. Additionally, the search functionality allows you to easily find specific handwritten entries by keywords or dates.
By adding a digital handwriting tool to your digital planner, you can enjoy the benefits of pen and paper writing while retaining the advantages of a digital platform. It allows you to add a personal touch and enhances the overall usability of your planner. With your digital handwriting tool ready to go, you can now move on to the next step of exporting and sharing your digital planner.
Exporting and Sharing Your Digital Planner
After putting in all the effort to create and customize your digital planner, you may want to share it or export it in different formats. This allows you to access your planner across multiple devices or share it with others. Here’s how you can easily export and share your digital planner:
- Choose the Right Export Format: Determine the format in which you want to export your digital planner. Common formats include PDF, image files (JPEG, PNG), or specific file formats compatible with various planner applications or software.
- Export Individual Pages or the Entire Planner: Decide whether you want to export individual pages or the entire planner. Exporting individual pages enables you to share specific sections or information, while exporting the entire planner provides a complete snapshot of your planner.
- Save Files Locally or to Cloud Storage: Select the location where you want to save your exported files. You can save them locally on your device or to cloud storage services like Google Drive, Dropbox, or iCloud for easy access across multiple devices.
- Create a Digital Planner Archive: Consider creating an archive or master file of your digital planner. This allows you to preserve the original formatting, layers, and hyperlinks for future reference or modification without altering the individual exported pages.
- Share Your Planner Digitally: Use various digital platforms to share your digital planner with others. You can send it via email, share it through messaging apps, or upload it to file-sharing platforms to collaborate with colleagues, friends, or clients.
- Print Your Planner: If you prefer having a physical copy of your planner, you can print the exported PDF or image files. Adjust the printing settings to ensure that the layout, size, and quality match your preferences before printing the pages.
- Protect Your Planner with Passwords or Watermarks: If you’re sharing your planner online or with others, consider adding passwords to protect sensitive information. You can also add watermarks to your exported files to ensure they are attributed to you and discourage unauthorized use.
- Regularly Back Up Your Planner: Remember to back up your digital planner regularly to avoid any data loss or accidental deletion. This ensures that you have a copy of your planner saved in case of any unforeseen issues with your device or software.
By following these steps, you can easily export and share your digital planner, whether it’s for personal use, collaboration, or distribution. Exporting and sharing your planner allows you to enjoy the benefits of digital planning while ensuring accessibility and convenience. With your digital planner exported and shared, you’ve successfully completed the process of creating and sharing your digital planner.
Syncing Your Digital Planner Across Devices
One of the key advantages of using a digital planner is the ability to access and update it across multiple devices. Syncing your digital planner ensures that you have the most up-to-date version of your planner on all your devices. Here’s how you can easily sync your digital planner across devices:
- Choose a Cloud Storage Solution: Select a reliable cloud storage solution that suits your needs and preferences. Popular options include Google Drive, Dropbox, iCloud, or OneDrive. Ensure that the cloud storage service is compatible with your chosen digital planner application or software.
- Save Your Planner to the Cloud: Save your digital planner file or folder to the cloud storage solution of your choice. This will enable all your devices to access and sync the planner automatically.
- Install the Planner App: If you’re using a specific planner application, make sure to install the app on all your devices. This will allow you to access and edit your planner seamlessly across different platforms, such as smartphones, tablets, and computers.
- Sign In and Enable Syncing: Sign in to your planner app using the same account credentials on all your devices. Enable syncing within the app’s settings to automatically sync your planner data across devices.
- Ensure Internet Connectivity: Syncing requires an internet connection, so ensure that your devices are connected to the internet. This will allow real-time updates and syncing of changes made to your planner on any device.
- Verify Syncing Settings: Double-check the syncing settings within your planner app to ensure they are properly configured. Review options such as automatic syncing intervals or manual syncing preferences and adjust as desired.
- Make Changes and Monitor Syncing: Edit, update, or add new entries to your digital planner on any synced device. As you make changes, monitor the syncing process and ensure that the updates reflect across all your devices.
- Resolve Conflicts and Manual Syncing: In the rare event of conflicts or syncing issues, manually initiate a sync or resolve any conflicts following the instructions provided by your planner app. This ensures that all your devices stay up-to-date with the latest changes.
- Regularly Backup Your Data: While syncing provides automatic updates, it’s still important to regularly back up your digital planner data. Create periodic backups of your planner files to a separate location or cloud storage to prevent data loss.
By following these steps, you can easily sync your digital planner across all your devices, ensuring that you always have access to the most recent version of your planner and the ability to seamlessly work on it from any device. Syncing your planner enhances convenience, productivity, and the overall user experience. With your digital planner synced across devices, you can effectively manage your tasks, events, and goals wherever you go.