
Understanding the Nest Thermostat
The Nest thermostat is a smart thermostat that not only allows you to control the temperature of your home but also learns your preferences and adjusts accordingly. It is equipped with advanced technology that helps you maintain a comfortable and constant temperature in your living space. Understanding how the Nest thermostat works is crucial to optimizing its performance and enjoying its benefits.
One of the key features of the Nest thermostat is its ability to learn your schedule and adapt to your daily routine. It utilizes sensors and algorithms to track your activities and temperature preferences. Over time, it learns when you typically arrive and depart from home and adjusts the temperature accordingly, ensuring optimal comfort while also saving energy.
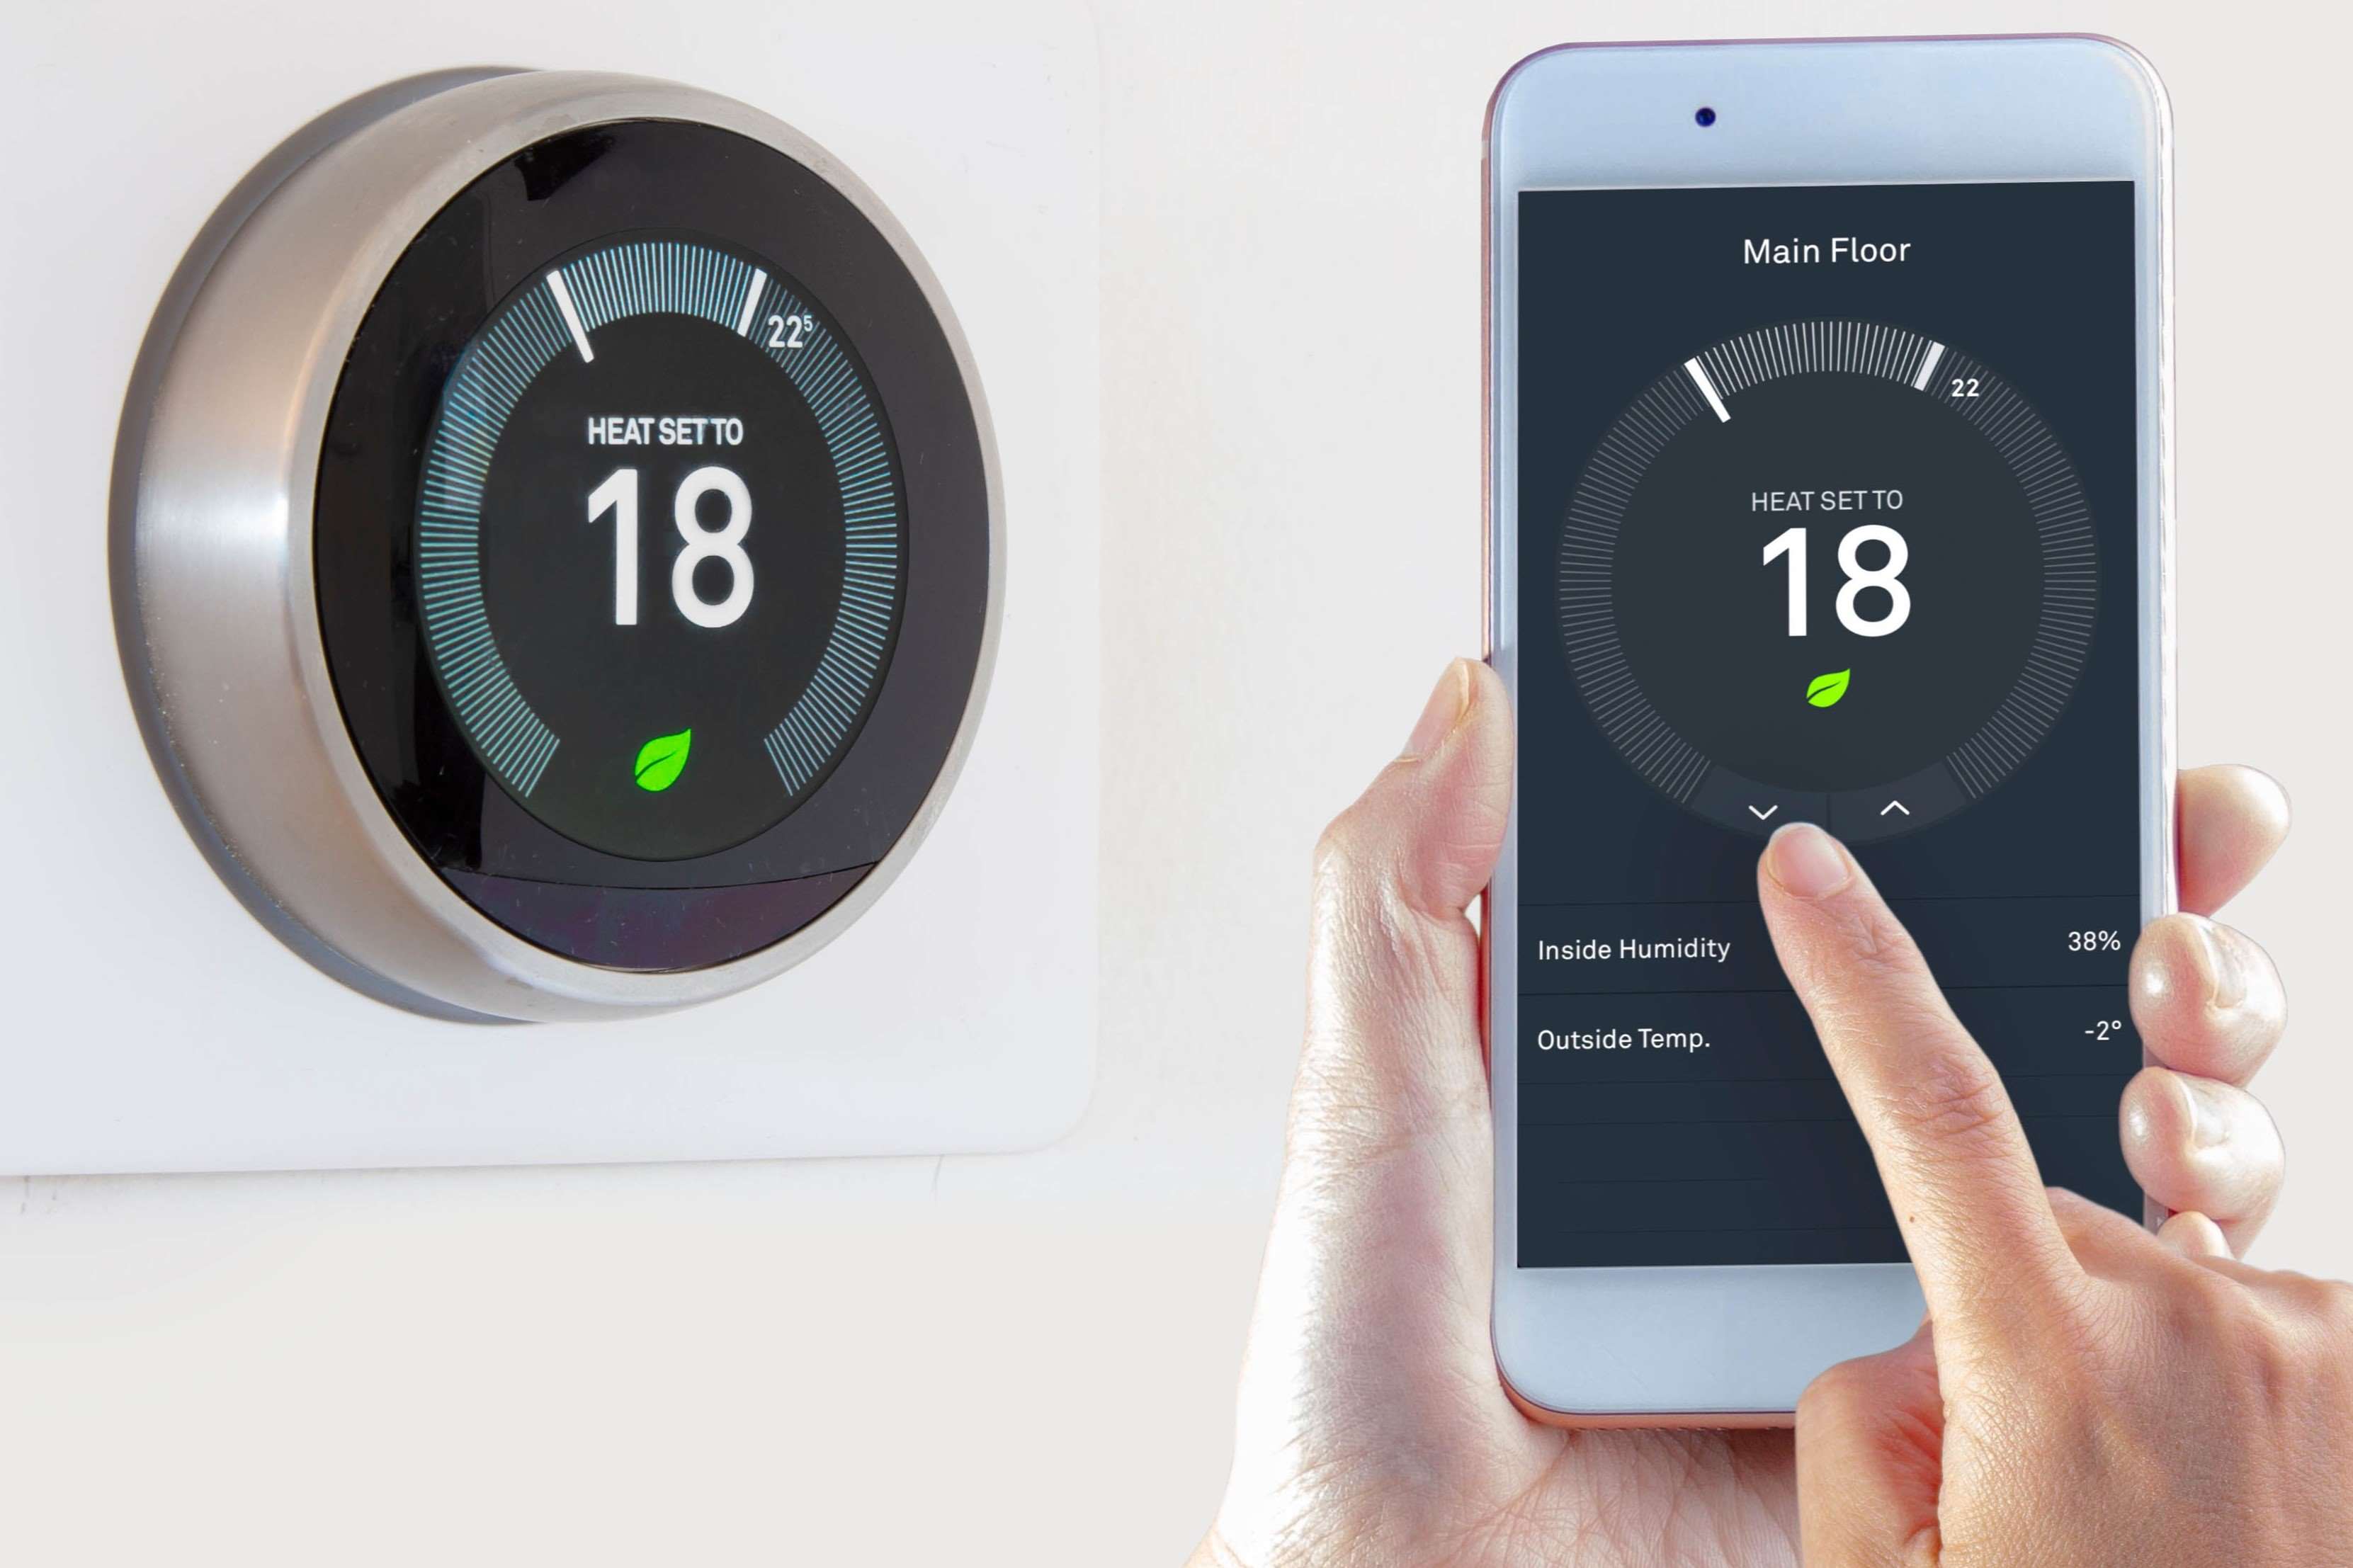
Another important aspect of the Nest thermostat is its ability to connect to your smartphone or tablet through the Nest app. This allows you to control the temperature remotely, so you can adjust it even when you’re away from home. The app also provides you with valuable insights and energy usage reports, helping you make informed decisions to reduce energy consumption.
The Nest thermostat offers various modes to suit different needs and situations. For example, the “Heat” mode sets the thermostat to maintain a warm temperature, while the “Cool” mode sets it for cooling. There is also an “Auto” mode that automatically switches between heating and cooling to maintain a desired temperature range.
Additionally, the Nest thermostat allows you to manually adjust the temperature whenever needed. With a simple turn of the dial or a swipe on the touchscreen, you can increase or decrease the temperature according to your preferences. This gives you instant control over the comfort of your home.
Furthermore, the Nest thermostat is equipped with a scheduling feature that allows you to create temperature schedules for different times of the day. You can set different temperatures for morning, afternoon, and night, ensuring that the thermostat automatically adjusts the temperature based on your predefined preferences.
The Nest thermostat also has an auto-schedule feature that learns your temperature adjustments and creates a customized schedule based on your preferences. This makes it even more convenient, as you don’t have to manually set the schedule yourself.
For those who want more precise control over the temperature in specific areas of their home, the Nest temperature sensor is a useful accessory. It can be placed in different rooms, allowing the thermostat to prioritize the temperature of those areas. This ensures that each room is comfortable, regardless of the overall temperature setting.
Finally, if you encounter any issues or have questions about the Nest thermostat, there are troubleshooting tips and resources available to help you. The Nest website provides comprehensive guides and a support community where you can find answers to common problems or seek assistance from other Nest users.
Understanding the features and capabilities of the Nest thermostat enables you to optimize its performance and enjoy a constant and comfortable temperature in your home. By taking advantage of its learning capabilities, remote control options, scheduling features, and additional accessories, you can truly experience the benefits of a smart and efficient thermostat.
Setting Up Your Nest Thermostat
The initial setup of your Nest thermostat is a quick and straightforward process that ensures proper installation and optimal performance. By following a few simple steps, you’ll have your thermostat up and running in no time.
Firstly, you need to ensure that your home’s heating and cooling system is compatible with the Nest thermostat. The Nest website provides a compatibility check tool that allows you to confirm if your system meets the requirements. If compatibility is confirmed, you can proceed with the installation process.
The next step is to turn off the power to your heating and cooling system. This can be done at the breaker box or by switching off the system’s power switch. Safety should always be your priority when working with any electrical components.
Once you’ve turned off the power, you can remove your existing thermostat from the wall. Take note of the wiring connections and labels to ensure you reconnect them correctly to the Nest thermostat.
Now, it’s time to mount the Nest baseplate onto the wall. The baseplate should be installed at a location that is easily accessible and close to your HVAC system. Use the provided screws to securely attach the baseplate to the wall.
After mounting the baseplate, you can connect the wires from your HVAC system to the corresponding terminals on the Nest base. The Nest thermostat comes with a built-in level, which will help you ensure that the device is straight and properly aligned.
Once the wires are connected, gently push the Nest thermostat onto its base until it clicks into place. The thermostat should sit securely on the wall without any wobbling or movement.
Now, it’s time to turn the power back on to your heating and cooling system. The Nest thermostat will begin its startup process, guiding you through the initial setup with on-screen instructions.
During the setup, you’ll be prompted to connect the Nest thermostat to your home’s Wi-Fi network. This will enable remote control and access to the Nest app on your mobile device. Follow the instructions on the thermostat’s display to connect it to your Wi-Fi network.
Once the Wi-Fi connection is established, you’ll need to configure the basic settings, such as your location, temperature preferences, and scheduling options. These settings can be adjusted later through the Nest app or on the thermostat itself.
After completing the setup process, take a moment to explore the various features and settings of your Nest thermostat. Familiarize yourself with the interface, buttons, and menus to ensure you can easily navigate and make adjustments as needed.
Setting up your Nest thermostat is a simple and important step to enjoy its full range of features and benefits. Proper installation and setup ensure accurate temperature control, energy efficiency, and a seamless user experience.
Using the Nest App for Temperature Control
The Nest app is a powerful tool that allows you to control and manage your Nest thermostat from your smartphone or tablet. With its user-friendly interface and intuitive features, the app provides you with convenient access to temperature control, energy usage information, and personalized settings.
Firstly, you need to download and install the Nest app from your device’s app store. Once installed, open the app and sign in to your Nest account. Ensure that your Nest thermostat is connected to your home’s Wi-Fi network, as this will enable the app to communicate with the thermostat.
Upon launching the app, you’ll be greeted with the home screen that displays the current temperature in your home and various controls. You can easily adjust the temperature by swiping up or down on the temperature scale. The changes made in the app will be reflected on the Nest thermostat.
In addition to temperature control, the Nest app provides you with insights into your energy usage. You can view detailed reports and graphs that show how your heating and cooling patterns impact your energy consumption. This information can help you make informed decisions and adjust your settings to maximize energy efficiency.
One of the standout features of the Nest app is its ability to create and manage temperature schedules. You can easily set up different temperature preferences for various times of the day, ensuring that your home is always at the desired temperature. The app allows you to make changes to the schedule with just a few taps, providing flexibility and convenience.
Furthermore, the Nest app enables remote control of your thermostat, even when you’re away from home. This means that you can adjust the temperature before you arrive, ensuring a comfortable environment upon your return. Remote control also comes in handy if you forget to change the temperature before leaving the house.
The app also offers additional features such as Home/Away Assist, which uses your phone’s location to automatically adjust the temperature based on your presence. It can detect when you leave the house and switch to an energy-saving mode, and when you return, it can bring your home back to the desired temperature.
Another useful feature of the Nest app is the ability to receive notifications and alerts. You can set up notifications for things like extreme temperature changes, reminders to change air filters, and more. These notifications can help you stay informed and take prompt action to maintain a comfortable and efficient home environment.
Using the Nest app for temperature control provides you with convenience, real-time control, and energy savings. Whether you’re at home or away, the app empowers you to adjust and manage your thermostat settings with ease, giving you complete control over your home’s comfort.
Understanding the Different Modes on Your Nest Thermostat
The Nest thermostat offers various modes to suit different temperature needs and preferences. Understanding the different modes can help you optimize your comfort and energy efficiency by choosing the most appropriate setting for your situation.
The first and most common mode is the “Heat” mode. When the Nest thermostat is set to Heat mode, it will only activate your heating system to maintain a warm temperature in your home. This mode is ideal for colder seasons or when you specifically want to warm up your living space.
Conversely, the “Cool” mode is used to activate your cooling system. When your Nest thermostat is set to Cool mode, it will only activate your air conditioning system to maintain a cool and comfortable temperature. This mode is perfect for hot weather or when you want to lower the temperature indoors.
In addition to Heat and Cool modes, the Nest thermostat also offers an “Auto” mode. In Auto mode, your thermostat will automatically switch between heating and cooling based on the temperature range you specify. For example, if you set your desired temperature range between 68°F and 72°F, the thermostat will activate heating or cooling as needed to keep the temperature within that range.
The Auto mode is beneficial when you want to maintain a consistent temperature regardless of the outside conditions. It eliminates the need to manually switch between Heat and Cool modes, providing convenience and energy efficiency.
Another useful mode offered by the Nest thermostat is the “Off” mode. When the thermostat is set to Off mode, it will disable both the heating and cooling systems. This mode is suitable when you want to conserve energy or when you’ll be away from home for an extended period. By turning off the HVAC systems, you can limit unnecessary energy consumption and reduce utility costs.
It’s important to note that the Nest thermostat also adapts to your preferences and schedules. It learns your preferred temperature settings based on your usage patterns, and it automatically adjusts to maintain those settings. This personalized adaptation ensures maximum comfort while optimizing energy usage.
Understanding the different modes on your Nest thermostat allows you to make informed decisions about temperature control in your home. Whether you need heating, cooling, or a combination of both, the Nest thermostat provides versatile options to suit your needs. By choosing the appropriate mode, you can achieve optimum comfort and energy efficiency throughout the year.
Adjusting the Temperature Manually
While the Nest thermostat excels in learning your preferences and automatically adjusting the temperature, there may be times when you want to manually control the temperature in your home. Whether you prefer a temporary adjustment or a more permanent change, the Nest thermostat allows for easy manual temperature adjustments to suit your immediate needs.
To manually adjust the temperature on your Nest thermostat, start by finding the control panel located on the device. Depending on the model you have, it may be a physical dial or a touchscreen interface. Simply turn the dial or swipe your finger across the screen to change the temperature to your desired setting.
When making manual adjustments, keep in mind that the Nest thermostat operates on a setback principle. This means that if you lower the temperature to a cooler setting, it will stay at that temperature until the next scheduled change. On the other hand, if you raise the temperature to a warmer setting, it will automatically revert to the regular schedule once the temperature is reached.
Manually adjusting the temperature comes in handy in various situations. For example, if you’re feeling a bit chilly, you can increase the temperature a few degrees to warm up the room. Similarly, if you’re too warm, you can lower the temperature to create a more comfortable environment.
Additionally, manual temperature adjustments can be useful if you have unexpected guests or need to accommodate different preferences. For instance, if you have visitors who prefer a different temperature than what your schedule is set for, you can manually change the temperature to ensure their comfort during their stay.
It’s important to note that manual temperature adjustments won’t affect the Nest thermostat’s learning capabilities. The thermostat will continue to gather data and adapt its schedule based on your temperature preferences over time. This ensures that the thermostat continues to provide personalized comfort while also maximizing energy efficiency.
Using manual temperature adjustments in conjunction with the Nest thermostat’s learning capabilities and scheduling features allows for greater control over your home’s temperature. It provides flexibility to make immediate changes when needed, without compromising the overall energy efficiency and comfort offered by the thermostat.
So, whether you want a temporary adjustment or a more permanent change, the Nest thermostat makes it easy to manually adjust the temperature to achieve the desired comfort in your home.
Using the Scheduling Feature on Your Nest Thermostat
The scheduling feature on your Nest thermostat allows you to set up a customized temperature schedule for different times of the day. This feature is incredibly beneficial as it ensures that your home is always at the desired temperature without the need for constant manual adjustments.
To begin using the scheduling feature, access the settings menu on your Nest thermostat. Navigate to the scheduling option, where you’ll find the ability to create and manage temperature schedules. The process involves setting specific temperatures for various time blocks throughout the day.
For example, you can set a higher temperature during the morning when everyone is preparing to leave for work or school. This will help conserve energy while no one is at home. Then, you can program the thermostat to lower the temperature during the day when the house is typically unoccupied. Finally, you can set a comfortable temperature for the evening when everyone returns home.
By creating a temperature schedule that aligns with your daily routine, you can enjoy a comfortable living environment while also optimizing energy efficiency. The thermostat will automatically adjust the temperature according to the schedule, eliminating the need for manual changes and providing a seamless experience.
The scheduling feature is particularly useful if you have a consistent daily routine. You can set up multiple schedules to cover weekdays and weekends separately, allowing for different temperature preferences on those days. This flexibility ensures that you have complete control over your living environment based on your specific needs.
In addition to the convenience of pre-set schedules, the Nest thermostat’s learning capabilities also come into play. Over time, the thermostat will learn your temperature preferences and usage patterns. It will adapt and refine the schedule to better align with your lifestyle, ensuring maximum comfort while minimizing energy usage.
Managing and adjusting schedules is straightforward with the Nest app. You can easily make changes to the temperature settings, add or remove time blocks, or even set up temporary overrides for special occasions. The app provides a user-friendly interface that allows you to modify your schedules on the go, giving you full control over your home’s temperature.
Using the scheduling feature on your Nest thermostat provides convenience, energy savings, and a comfortable living environment. By pre-setting temperature preferences for different times of the day, you can enjoy effortless temperature control, allowing you to focus on other tasks and activities without worrying about manual adjustments.
So, take advantage of the scheduling feature on your Nest thermostat and experience the benefits of a customizable and automated temperature schedule in your home.
Using the Auto-Schedule Feature on Your Nest Thermostat
The auto-schedule feature on your Nest thermostat takes convenience and automation to the next level by learning your temperature adjustments and creating a customized schedule based on your preferences. This feature eliminates the need for manual scheduling and ensures a comfortable living environment without the hassle of constantly adjusting temperature settings.
When you first install and set up your Nest thermostat, it begins learning your temperature preferences from your manual adjustments. Over time, the thermostat analyzes the patterns and frequency of these adjustments to create a personalized schedule that aligns with your routine.
The auto-schedule feature takes into account factors such as the time of day, day of the week, and whether you’re typically at home or away during specific times. By analyzing this information, the Nest thermostat intelligently adjusts the temperature based on your historical temperature preference patterns.
For example, if you consistently lower the temperature during the evenings, the auto-schedule feature will automatically create a schedule that reflects this preference. As a result, when the evening comes, the temperature will automatically be adjusted to your preferred setting without any manual input.
The auto-schedule feature is incredibly beneficial for busy households where daily routines may vary. Instead of manually adjusting the temperature every time your schedule changes, the Nest thermostat effortlessly adapts and maintains optimal comfort throughout the day.
Furthermore, the Nest thermostat’s auto-schedule feature continuously refines and updates the schedule as it continues to learn from your temperature adjustments. If your preferences change over time, the thermostat will adjust accordingly, ensuring that it always reflects your current temperature needs and preferences.
Using the auto-schedule feature is seamless and effortless. Once the schedule is created, you can view and modify it through the Nest app or directly on the thermostat. The app provides an easy-to-navigate interface that allows you to make adjustments and override the schedule for temporary changes or special occasions.
Additionally, the auto-schedule feature works in conjunction with other Nest thermostat functionalities. For example, if you have activated the Home/Away Assist feature, the thermostat will automatically adjust the temperature based on your presence in the house, further optimizing energy efficiency and comfort.
The auto-schedule feature on your Nest thermostat brings convenience and automation to your temperature control. By learning your temperature preferences and creating a customized schedule for you, the thermostat ensures that your home is always at your ideal temperature, without the need for manual adjustments. Experience the benefits of a smart and effortless temperature schedule with the auto-schedule feature on your Nest thermostat.
Using the Nest Temperature Sensor for Precise Control
The Nest temperature sensor is an accessory that can be used in conjunction with your Nest thermostat to provide precise temperature control in specific areas of your home. By adding the temperature sensor, you can ensure that each room is comfortable and that the thermostat prioritizes the temperature in those areas.
To utilize the Nest temperature sensor, you’ll need to pair it with your Nest thermostat through the Nest app. Once paired, you can place the sensor in any room where you want to monitor and control the temperature more precisely. Common areas include bedrooms, nurseries, or rooms with unique temperature needs.
The Nest temperature sensor is equipped with advanced technology that allows it to communicate with your Nest thermostat wirelessly. This means that it can provide real-time temperature readings to the thermostat, allowing it to adjust the HVAC system accordingly.
One of the key benefits of using the Nest temperature sensor is customized comfort. By having sensors in specific areas, you can set different temperature preferences for those rooms. For example, if someone in your home prefers a cooler temperature for sleeping, you can place a sensor in their bedroom and adjust the temperature settings accordingly. This ensures personalized comfort and avoids conflicts over temperature preferences.
In addition to personalized comfort, the Nest temperature sensors also enable more precise energy management. The thermostat takes into consideration the temperature readings from the sensors when determining how often and at what level the HVAC system should operate. This allows for more efficient energy usage and can result in energy savings.
Furthermore, the temperature sensors can be particularly useful in larger homes or multi-level buildings where there may be temperature variations between different areas. The sensors help to balance the temperature throughout the space, ensuring a consistent and comfortable environment in every room.
Managing and configuring the Nest temperature sensors is simple through the Nest app. You can view the temperature readings from each sensor, adjust the settings, and even create schedules for different areas of your home. This level of control gives you the flexibility to fine-tune the temperature according to your preferences and needs.
It’s worth noting that the Nest temperature sensors are compatible with most Nest thermostat models. However, it’s always a good idea to check the compatibility and specifications of both your thermostat and the temperature sensors before purchasing.
The Nest temperature sensor enhances the precision and control of your Nest thermostat by allowing you to monitor and adjust the temperature in specific areas of your home. With the ability to provide customized comfort, maximize energy efficiency, and ensure a consistent temperature throughout your space, the temperature sensor is a valuable accessory for anyone seeking precise temperature control.
Common Troubleshooting Tips for Maintaining a Constant Temperature on Your Nest Thermostat
While the Nest thermostat is designed to provide consistent and precise temperature control, there may be instances where you encounter issues that affect its performance. Fortunately, there are several troubleshooting tips that can help you maintain a constant temperature and resolve common problems.
1. Check the thermostat’s location: Ensure that your Nest thermostat is installed in a central location away from direct sunlight, drafts, and other heat or cooling sources. Placing the thermostat in an optimal location helps it accurately measure and maintain the temperature of your home.
2. Verify the thermostat’s connection: Confirm that your Nest thermostat is securely connected to the wall plate. Loose connections can lead to inaccurate temperature readings and inefficient performance. Check the wiring and tighten any loose connections if necessary.
3. Calibrate the thermostat: If you notice a significant difference between the temperature displayed on your Nest thermostat and the actual temperature in your home, you can calibrate the thermostat to correct any discrepancies. Refer to the Nest app or website for instructions on how to calibrate your thermostat.
4. Check the settings and schedule: Review the settings and temperature schedules programmed on your Nest thermostat. Make sure the desired temperature range and schedule align with your preferences and daily routine. Adjust as necessary to maintain a constant temperature throughout the day.
5. Ensure proper insulation and sealing: An insufficiently insulated home or gaps around windows and doors can lead to temperature fluctuations. Check for any areas that may require additional insulation or sealing to enhance the efficiency of your HVAC system and maintain a constant temperature inside your home.
6. Clean the thermostat and sensors: Over time, dust and debris can accumulate on the thermostat and temperature sensors, affecting their accuracy. Regularly clean the thermostat and sensors with a soft, dry cloth to ensure optimal performance and consistent temperature readings.
7. Update the firmware: Keeping your Nest thermostat’s firmware up to date is crucial for resolving any known issues and benefiting from software enhancements. Check for available updates through the Nest app and follow the prompts to install the latest firmware.
8. Restart or reset the thermostat: If you’re experiencing persistent issues with your Nest thermostat, a simple restart or factory reset may help. Restarting the thermostat can resolve minor glitches, while a factory reset restores the thermostat to its default settings. Refer to the Nest app or website for instructions on how to restart or reset your thermostat.
If these troubleshooting tips do not resolve the issue or if you have additional concerns, it’s advisable to consult the Nest support resources available on their website. They provide comprehensive guides, troubleshooting articles, and a support community where you can find further assistance for specific problems.
By following these common troubleshooting tips, you can maintain a constant temperature in your home and ensure that your Nest thermostat performs optimally. Troubleshooting any issues promptly helps you enjoy the full benefits of a comfortable and efficient living environment.