
Prerequisites
Before you begin the installation process, there are a few prerequisites that you need to have in place. Here’s what you’ll need:
- Windows Operating System: Node JS can be installed on various versions of Windows, including Windows 7, Windows 8, and Windows 10. Make sure you have a compatible operating system.
- Administrator Access: You will need administrative access to your computer to install Node JS. If you don’t have the necessary privileges, contact your system administrator for assistance.
- Internet Connection: A stable internet connection is required to download the Node JS installer as well as any additional packages or dependencies that may be needed during the installation process.
- Available Disk Space: Ensure that you have enough free disk space to accommodate the Node JS installation. The exact amount required depends on the version of Node JS you are installing, but a minimum of 150 MB is typically recommended.
Once you have these prerequisites in place, you’re ready to move on to the next step in the installation process. Make sure to follow the instructions carefully to ensure a smooth and successful installation of Node JS on your Windows system.
Step 1: Download Node JS
The first step in installing Node JS on your Windows system is to download the Node JS installer. Here’s how you can do it:
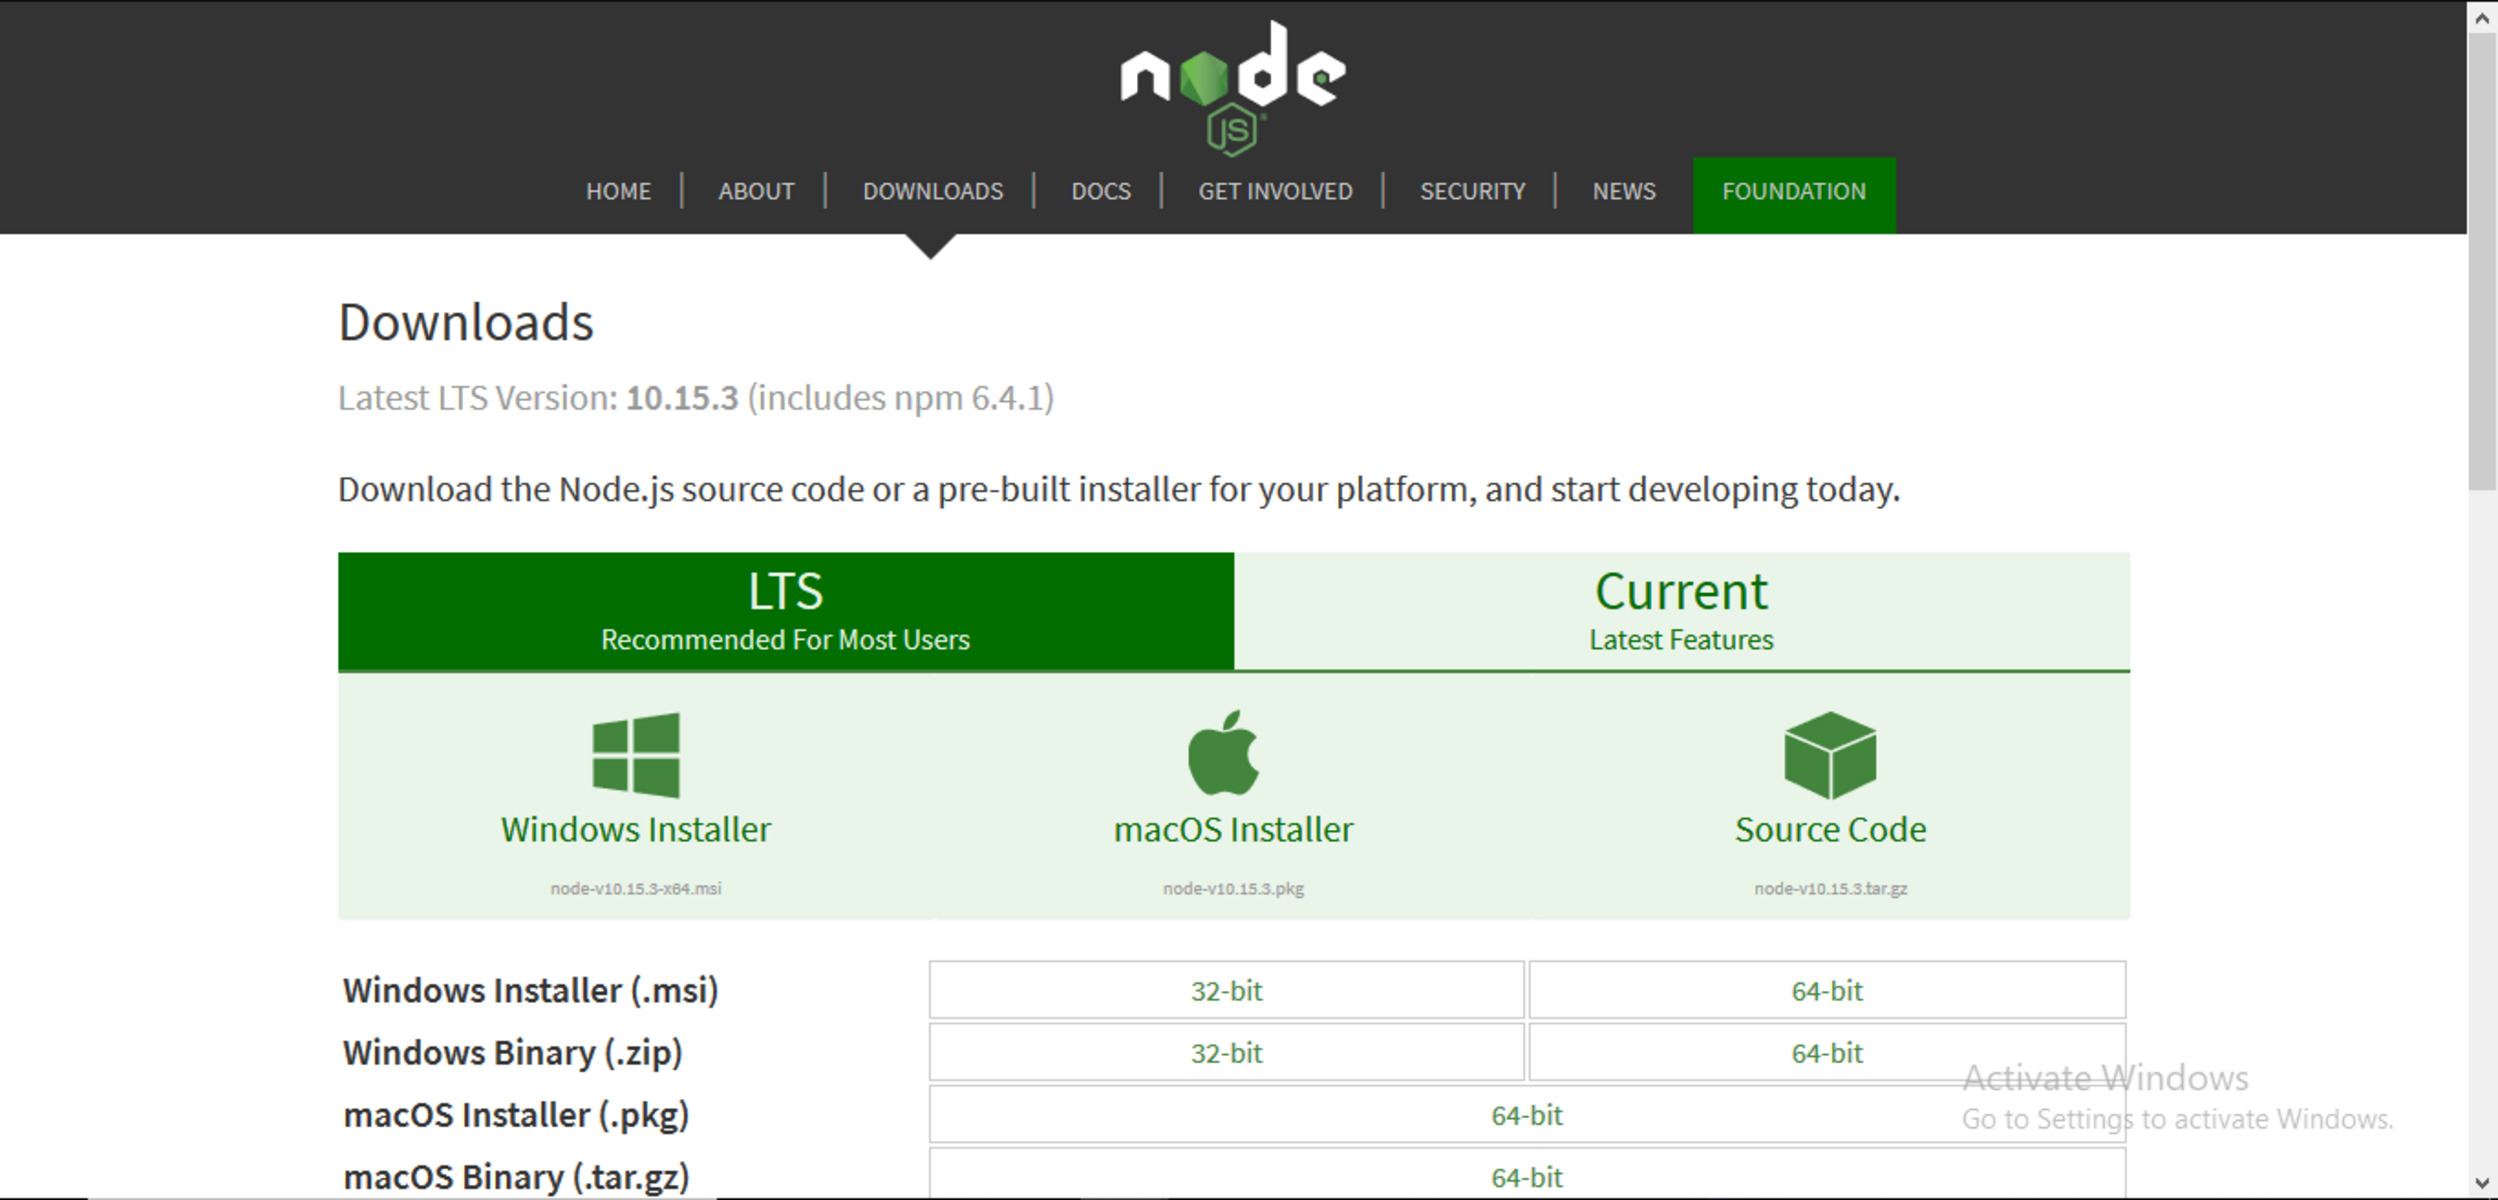
- Open your preferred web browser and navigate to the official Node JS website at https://nodejs.org.
- On the homepage, you’ll see a prominent “Download” button. Click on it to proceed.
- Node JS offers two versions: LTS (Long-Term Support) and Current. The LTS version is recommended for most users as it provides a stable and well-tested environment. However, if you want to access the latest features and improvements, you can opt for the Current version. Choose the version that suits your requirements.
- Next, you’ll see options for various operating systems. Since we are installing Node JS on a Windows system, click on the “Windows Installer” option.
- The download will begin automatically. Wait for the download to complete.
Once the Node JS installer has finished downloading, you’re ready to move on to the next step. Keep the downloaded installer file handy as you’ll need it in the upcoming installation process.
Step 2: Run the Installer
After downloading the Node JS installer, the next step is to run the installer and initiate the installation process. Follow these steps:
- Navigate to the location where you saved the Node JS installer file.
- Double-click on the installer file to run it.
- You might see a security warning prompt from Windows User Account Control (UAC) asking for permission to run the installer. Click on “Yes” to proceed.
- The Node JS installer will launch, presenting you with the initial setup screen. Read through the information presented and click on the “Next” button to continue.
- You’ll be presented with the “License Agreement” screen. Read the terms and conditions carefully, and if you agree, select the checkbox indicating your acceptance. Click on “Next” to proceed.
- Choose the destination folder where you want to install Node JS. The default location is usually fine for most users, but you can change it if you prefer. Click on “Next” to continue.
- On the “Select components” screen, you can choose which additional components you want to install along with Node JS. In most cases, it’s best to keep the default selections. Click on “Next” to proceed.
- On the “Advanced Installation Options” screen, you can choose advanced configuration options if needed. For a standard installation, you can leave the options as they are. Click on “Next” to continue.
- Finally, you’ll reach the “Ready to Install” screen. Review the installation settings and click on “Install” to start the installation process.
- The installer will extract and install all the necessary files and dependencies for Node JS on your system. This may take a few moments.
Once the installation is complete, you’re ready to proceed with customizing the installation or jump straight to verifying the installation.
Step 3: Customize the Installation (Optional)
While the default installation settings of Node JS are suitable for most users, you have the option to customize the installation according to your preferences. Here’s how you can do it:
- During the installation process, you will reach the “Select components” screen. This screen allows you to choose which additional components you want to install alongside Node JS.
- You’ll see a list of optional components available for installation, such as npm (Node Package Manager), Chocolatey package manager, and various development tools. By default, all of these components are selected.
- If you want to customize the installation, you can deselect any components that you don’t need. However, keep in mind that some components, like npm, are commonly used and recommended for working with Node JS.
- Once you have made your selections, click on “Next” to proceed with the installation.
- The installer will update the installation settings according to your customizations and continue the installation process as usual.
Customizing the installation is entirely optional. If you’re new to Node JS or unsure about the additional components, it’s best to stick with the default settings. You can always install or remove components later as per your requirements.
Step 4: Complete the Installation
After the installation process begins, you’ll need to follow a few more steps to complete the installation of Node JS on your Windows system. Here’s what you need to do:
- Wait for the installation process to finish. The progress bar will indicate the status of the installation.
- Once the installation is complete, you’ll see a “Completing the Node.js Setup Wizard” screen.
- On this screen, you may be prompted to select additional tasks to complete. Typically, the options include automatically launching the Node.js command prompt or running the npm package manager during startup. You can choose to select or deselect these options based on your preferences.
- After making your selections, click on the “Finish” button to complete the installation process.
- The Node JS installation wizard will close, and you’ll have successfully installed Node JS on your Windows system.
With the installation process now complete, you are ready to verify that Node JS is working correctly on your Windows system. Let’s move on to the next step to ensure a successful installation.
Step 5: Verify the Installation
After installing Node JS on your Windows system, it is important to verify that the installation was successful before using it for your projects. Here’s how you can verify the installation:
- Open the Command Prompt on your Windows system by pressing the
Windows key + Rand typingcmdin the “Run” dialog. Hit Enter or click on “OK” to open the Command Prompt. - In the Command Prompt window, type
node -vand press Enter. This command will display the version of Node JS that is installed on your system. If you see a version number, it means Node JS is installed correctly. - Next, type
npm -vand press Enter. This command will display the version of npm (Node Package Manager) that is installed along with Node JS. If you see a version number, it means npm is installed correctly. - You can also test Node JS by running a simple script. Create a new file with a
.jsextension, such astest.js, and open it in a text editor. Write a simple console log statement, such asconsole.log("Hello, Node JS!");. Save the file. - Go back to the Command Prompt, navigate to the directory where you saved the
test.jsfile, and typenode test.jsto run the script. If you see the message “Hello, Node JS!” displayed in the Command Prompt, it means Node JS is running correctly and executing the script.
If all of the above steps completed without any errors or issues, congratulations! You have successfully verified the installation of Node JS on your Windows system. You can now start exploring the vast world of Node JS and building powerful applications and websites.
Step 6: Update Node JS (Optional)
Node JS releases new versions periodically, which often come with bug fixes, performance improvements, and new features. It’s a good practice to keep your Node JS installation up to date to benefit from these updates. Here’s how you can update Node JS:
- Open the Command Prompt on your Windows system as an administrator.
- Check the current version of Node JS installed on your system by typing
node -vand pressing Enter. - Visit the official Node JS website at https://nodejs.org to check for the latest stable release.
- If a newer version is available, download the Node JS installer for your Windows system from the website.
- Run the downloaded installer, following the same installation steps as described earlier in this guide.
- During the installation, the Node JS installer will detect the existing installation and prompt you to choose whether to uninstall the old version or install the new version side by side. Select the option that works best for you.
- Follow the remaining steps in the installation wizard to complete the update process.
Once the update is complete, you can verify that the latest version of Node JS is installed by using the node -v command in the Command Prompt.
Remember that updating Node JS may also update npm. You can check the version of npm using the npm -v command.
While updating Node JS is optional, it is recommended to keep your installation up to date to benefit from the latest improvements and enhancements.
Step 7: Uninstall Node JS
If, for any reason, you need to uninstall Node JS from your Windows system, you can follow these steps:
- Open the Control Panel on your Windows system by pressing the
Windows key + Rand typingcontrol panelin the “Run” dialog. Hit Enter or click on “OK” to open the Control Panel. - In the Control Panel, navigate to “Programs” or “Programs and Features”, depending on your Windows version.
- Scroll through the list of installed programs and locate “Node.js” or “Node JS”.
- Right-click on “Node.js” or “Node JS” and select “Uninstall” from the context menu.
- Follow the prompts in the uninstallation wizard to remove Node JS from your system.
- Once the uninstallation process is complete, Node JS will be removed from your system.
- Optionally, you can delete any remaining folders or files related to Node JS manually. These can typically be found in the installation directory or in the system’s “Program Files” or “Program Files (x86)” folder.
It’s worth noting that uninstalling Node JS will also remove npm (Node Package Manager) and any globally installed packages or dependencies.
Remember to backup any files or projects you want to keep before uninstalling Node JS.
By following these steps, you can safely and completely uninstall Node JS from your Windows system whenever necessary.