
What is Magisk?
Magisk is a powerful root tool for Android devices that allows users to gain administrative privileges, also known as “root access,” over their devices. Rooting your Android device gives you complete control and access to the entire operating system, allowing you to customize and optimize your device’s performance and functionality.
What sets Magisk apart from other rooting methods is its ability to bypass SafetyNet, a security measure implemented by Google to detect rooted devices. This means that with Magisk, you can enjoy the benefits of rooting without compromising the functionality of certain apps that rely on SafetyNet, such as mobile banking apps or streaming services.
With Magisk, you can not only install and use root-enabled apps but also enjoy additional features such as installing custom ROMs, modifying system files, and even enhancing your device’s battery life. Magisk provides a convenient and modular framework that allows users to install various modules, which are essentially small extensions that add specific features or tweaks to your rooted device.
In addition to its powerful features, Magisk also offers a user-friendly interface through its companion app called Magisk Manager. This app provides you with a centralized hub to manage your root permissions, install modules, and even update the Magisk framework.
Overall, Magisk is a versatile and reliable tool that allows you to unleash the full potential of your Android device while maintaining compatibility with essential apps and services. Whether you’re an enthusiast who wants to explore advanced customization options or someone looking to optimize their device’s performance, Magisk is an excellent option to consider.
Why should you root your Android device?
Rooting your Android device is a decision that offers a range of benefits and possibilities. While it may not be suitable for everyone, those who are willing to explore the world of Android customization can find several compelling reasons to root their device.
One of the primary reasons to root your Android device is the ability to unlock its full potential. Root access allows you to delve deep into your device’s operating system, giving you complete control over system files and settings. This means that you can customize your device to your liking, from tweaking the appearance of the user interface to uninstalling pre-installed bloatware.
Beyond aesthetics, rooting opens up doors to powerful performance enhancements. By removing unnecessary system apps and processes, you can free up valuable system resources, resulting in improved speed and responsiveness. Additionally, you can install custom ROMs that offer enhanced features, improved battery life, and greater customization options.
Another advantage of rooting is the ability to install and use root-only apps. These apps provide advanced functionalities and options that are not available in the standard versions. You can use these apps to overclock your device’s processor, automate tasks, backup and restore apps and data, and much more.
Rooting your device also allows you to take full backups of your device’s system and data. With root access, you can use powerful backup tools to create complete backups of your device, so you can easily restore it to a previous state if anything goes wrong during customization or experimentation.
While rooting offers numerous advantages, it is important to note that there are also potential risks involved. Rooting your device can void its warranty, and if not done correctly, it may lead to system instability or even brick your device. Therefore, it is crucial to research and follow the proper rooting procedures to minimize any potential risks.
Preparing your device for rooting
Before you begin the rooting process, it is essential to prepare your Android device to ensure a smooth and successful root. Taking the necessary precautions will help minimize any potential risks and ensure that your device is ready for the rooting procedure.
The first step in preparing your device is to backup all your important data. Rooting your device involves making changes to the system files, and there is a small possibility of data loss or device malfunction. By backing up your data, you can easily restore it in case anything goes wrong during the rooting process.
Next, make sure that your device is sufficiently charged or connect it to a power source. This step is crucial to prevent the device from turning off during the rooting process, as interruptions can lead to a bricked device or incomplete root.
Additionally, it is recommended to enable USB debugging on your device. USB debugging allows your device to communicate with your computer, making it easier to transfer files and execute commands during the rooting process. To enable USB debugging, go to the Developer Options in your device’s Settings and toggle the USB debugging option.
Furthermore, it is crucial to check if there are any specific requirements or instructions for your device model or manufacturer. Different devices may have different rooting methods, and failing to follow the correct procedure can lead to errors or unsuccessful rooting attempts. Research online or consult reliable sources to ensure you are using the appropriate method for your device.
Lastly, it is important to remember that rooting your device may void its warranty. If your device is still under warranty and you are concerned about losing it, consider whether the benefits of rooting outweigh the potential loss of warranty. Keep in mind that some manufacturers and service providers may even be able to detect whether your device has been rooted, so proceed with caution.
By following these preparation steps, you can ensure that your device is ready for the rooting process. Taking the time to backup your data, charge your device, enable USB debugging, and understand any specific requirements for your device will help increase the chances of a successful root without jeopardizing your device’s functionality or warranty.
Unlocking the bootloader
Unlocking the bootloader is a crucial step in the process of rooting your Android device, as it allows you to gain complete control over the device’s software and install custom firmware or modifications. However, it’s important to note that the process of unlocking the bootloader varies between different device manufacturers and models. Here is a general guide on how to unlock the bootloader of most Android devices:
1. Backup your data: Before proceeding with unlocking the bootloader, it’s essential to back up all your important data, as the process may erase everything on your device. Use the built-in backup options or third-party applications to create a complete backup of your device’s data.
2. Enable Developer Options: To unlock the bootloader, you will need to enable Developer Options on your device. Go to the device settings, scroll down to the “About Phone” section, and tap on the “Build Number” seven times to enable Developer Options. Then, go back to the main settings menu, and you will find Developer Options listed there.
3. Enable OEM Unlocking: In the Developer Options, locate the “OEM Unlocking” option and enable it. This option allows the bootloader to be unlocked on your device.
4. Enable USB Debugging: While still in the Developer Options, find the “USB Debugging” option and enable it. USB Debugging allows your device to communicate with your computer during the bootloader unlocking process.
5. Connect your device to the computer: Use a USB cable to connect your device to the computer. Make sure to trust the computer if prompted on your device.
6. Install necessary drivers: In some cases, you may need to install the appropriate USB drivers for your device on your computer. Visit the manufacturer’s website or search online for the appropriate drivers and follow the installation instructions.
7. Open the command prompt or terminal: On your computer, open the command prompt (for Windows) or terminal (for macOS and Linux).
8. Boot your device into bootloader/fastboot mode: Different devices have different key combinations to enter the bootloader/fastboot mode. Commonly used combinations include holding down the power button and volume down button simultaneously or using ADB commands to reboot into the bootloader.
9. Verify device connectivity: In the command prompt or terminal, enter the command “fastboot devices“. This command will display the connected devices, confirming that your device is recognized by your computer.
10. Unlock the bootloader: Enter the command “fastboot oem unlock“. This command will initiate the bootloader unlocking process. Follow the on-screen instructions on your device, which may involve confirming the unlocking process and voiding the warranty.
11. Reboot your device: Once the bootloader is unlocked, enter the command “fastboot reboot“. This will reboot your device, and now the bootloader should be unlocked, allowing you to proceed with the rooting process.
It is crucial to note that unlocking the bootloader will erase all data on your device, so make sure to take the necessary backups before proceeding. Additionally, unlocking the bootloader may void your device’s warranty, so proceed with caution and understand the risks involved.
Installing a custom recovery
Once you have successfully unlocked the bootloader of your Android device, the next step in the rooting process is to install a custom recovery. A custom recovery is a powerful tool that allows you to perform various advanced tasks on your device, such as installing custom ROMs, creating backups, and flashing system modifications.
There are several popular custom recoveries available, with TWRP (Team Win Recovery Project) being one of the most widely used. Here is a general guide on how to install TWRP on your Android device:
1. Download the TWRP image: Visit the official TWRP website or reputable XDA Developers forums to download the TWRP image file (.img) for your specific device model. Make sure to download the correct file to avoid compatibility issues.
2. Enable Developer Options and USB Debugging: If you haven’t done so already, enable Developer Options and USB Debugging on your device. Follow the same steps mentioned in the previous section to enable these options.
3. Connect your device to the computer: Use a USB cable to connect your device to the computer. Make sure to trust the computer if prompted on your device.
4. Open the command prompt or terminal: On your computer, open the command prompt (for Windows) or terminal (for macOS and Linux).
5. Boot your device into bootloader/fastboot mode: Similar to unlocking the bootloader, enter the bootloader/fastboot mode on your device using the appropriate key combination or ADB commands.
6. Verify device connectivity: In the command prompt or terminal, enter the command “fastboot devices“. This command will display the connected devices, confirming that your device is recognized by your computer.
7. Flash TWRP recovery: In the command prompt or terminal, enter the command “fastboot flash recovery twrp.img“. Replace “twrp.img” with the actual filename of the TWRP image you downloaded. This command will flash the TWRP recovery onto your device.
8. Reboot into recovery mode: Enter the command “fastboot reboot recovery“. This will reboot your device directly into the newly installed TWRP recovery.
9. Check if TWRP is successfully installed: Once in TWRP recovery, you can navigate the touch-based interface to ensure that TWRP is functioning correctly on your device. Take this opportunity to make a full backup of your device’s data to a safe location.
That’s it! You have now successfully installed TWRP recovery on your Android device. TWRP provides a range of advanced options and features, allowing you to fully customize and modify your device. From this point forward, you can use TWRP as your go-to custom recovery for any future rooting or system modification tasks.
Downloading and installing Magisk Manager
Now that you have unlocked the bootloader and installed a custom recovery on your Android device, the next step in the root process is to download and install Magisk Manager. Magisk Manager is the companion app for Magisk, which allows you to manage root permissions, install modules, and update the Magisk framework.
Here is a step-by-step guide on how to download and install Magisk Manager:
1. Download the Magisk Manager APK: Since Magisk Manager is not available on the Google Play Store, you will need to download the APK file. Visit the official Magisk website or reputable sources like XDA Developers forums to download the latest version of Magisk Manager APK.
2. Enable Unknown Sources: Before installing an APK file, you need to enable installation from unknown sources in your device’s settings. Go to the device settings, then navigate to “Security” or “Privacy” settings, and enable the “Unknown Sources” option.
3. Locate the downloaded APK file: Once the APK file is downloaded, use a file manager to navigate to the location where it is saved.
4. Tap on the APK file: Tap on the Magisk Manager APK file to start the installation process.
5. Grant necessary permissions: During the installation, you may be prompted to grant various permissions. Allow the app to access the required permissions for it to function properly.
6. Complete the installation: Follow the on-screen prompts to complete the installation process. Once the installation is finished, you will see the Magisk Manager app icon on your device’s app drawer.
7. Launch Magisk Manager: Tap on the Magisk Manager app icon to open the app.
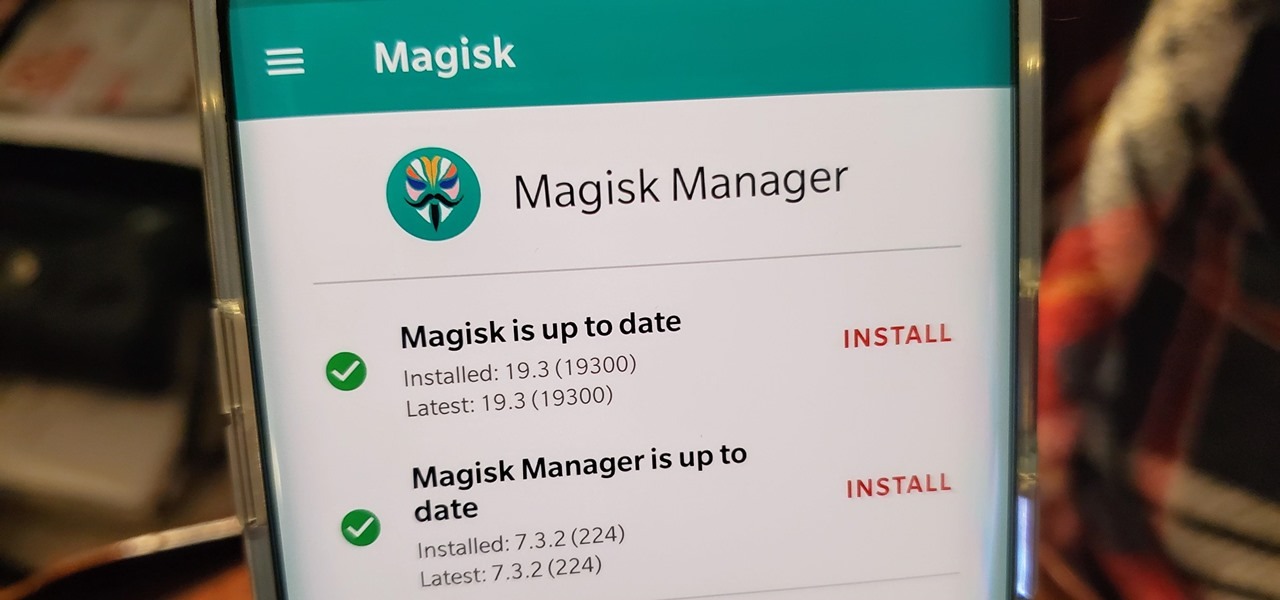
8. Verify the Magisk installation: Upon launching Magisk Manager, it will automatically check for the presence of the Magisk framework on your device. If the framework is installed correctly, you will see a message indicating successful installation.
9. Update Magisk if necessary: If a newer version of the Magisk framework is available, Magisk Manager will prompt you to update. Follow the prompts to update Magisk to the latest version.
10. Customize and manage root permissions: Now that Magisk Manager is installed, you can use it to manage root permissions for individual apps, install modules for additional features, and explore various settings and options to customize your rooted device.
By following these steps, you can successfully download and install Magisk Manager on your Android device. Magisk Manager provides a user-friendly interface to manage your root access and take full advantage of the powerful customizations and features offered by Magisk.
Rooting your Android device using Magisk
Now that you have Magisk Manager installed on your device, you can proceed with rooting your Android device using the Magisk framework. Follow these steps to root your device using Magisk:
Note: Rooting your device can have risks and may void your device warranty. Make sure to understand the risks involved and proceed with caution.
1. Launch Magisk Manager: Open the Magisk Manager app on your device.
2. Check Magisk status: In the Magisk Manager app, check the status of Magisk. It should show “Magisk is not installed” or “Magisk is not properly installed”. If Magisk is already installed and working, you can skip to Step 5.
3. Download Magisk: Tap on the “Install” or “Download” button in the Magisk Manager app to download the Magisk framework. Make sure you have a stable internet connection during the download process.
4. Install Magisk: Once the Magisk framework is downloaded, tap on the “Install” button to install Magisk on your device. The installation process may take a few seconds to complete.
5. Reboot your device: After the installation, tap on the “Reboot” button to reboot your device.
6. Verify root access: Once your device has rebooted, launch the Magisk Manager app again. It should now indicate that Magisk is installed and working properly. You can also use root checker apps from the Play Store to verify the root status of your device.
7. Manage root permissions: With Magisk successfully installed, you can now manage root permissions for individual apps using the Magisk Manager app. It provides an interface where you can grant or deny root access to specific applications on your device.
8. Explore Magisk modules: Magisk Manager also allows you to install modules, which are add-ons that offer additional features and customizations. You can browse the available modules within the app or download modules from third-party sources and install them manually.
By following these steps, you can successfully root your Android device using Magisk. Having root access opens up a world of possibilities, allowing you to customize your device, install root-only apps, and benefit from advanced features and optimizations.
Checking the root status of your device
After rooting your Android device with Magisk, it’s important to verify the root status to ensure that the process was successful. Here are a few methods to check the root status of your device:
1. Magisk Manager app: Open the Magisk Manager app on your device. On the main screen, you will see a status message indicating whether Magisk is installed and functioning correctly. It will display “Magisk is installed” or a similar message if root access is enabled.
2. Root checker apps: There are several root checker apps available on the Google Play Store. Install one of these apps, launch it, and it will automatically check if your device has root access. The app will provide a result indicating whether your device is rooted or not.
3. Terminal emulator: If you are comfortable using the command line interface, you can use a terminal emulator app to manually check the root status of your device. Open the terminal emulator app on your device and enter the command “su“. If your device is rooted, the command will execute and grant you superuser access, indicating successful root access.
4. App behaviors: After rooting your device, you may notice app behaviors that require root access, such as additional settings or features becoming available. Some root-enabled apps will also prompt you for root access when launched.
It’s important to note that the process of checking root status may vary depending on the device and the root method used. Additionally, certain devices may implement additional security measures that could affect the root status checking process.
If the root status check indicates that your device is not rooted, double-check that you have followed all the steps correctly and that Magisk is properly installed. It is also possible that your device’s firmware or software update may have introduced changes that prevent root access. In such cases, you may need to research alternative root methods or wait for an updated version of Magisk.
Remember that rooting your device can have certain risks, including voiding your device warranty and potential security vulnerabilities. Make sure to understand the implications and proceed with caution. It’s essential to exercise care while using root access and only grant it to trusted apps or make changes that you fully understand.
Managing root permissions with Magisk Manager
One of the key features of Magisk Manager is the ability to manage root permissions for individual apps on your Android device. With Magisk, you have control over which apps have access to root privileges, allowing you to fine-tune the level of permissions granted. Here’s how you can manage root permissions with Magisk Manager:
1. Open Magisk Manager: Launch the Magisk Manager app on your device. If prompted, grant it the necessary permissions.
2. Access the “MagiskHide” feature: In the Magisk Manager app, go to the menu and navigate to the “Settings” section. Look for the “MagiskHide” option and enable it. This feature allows you to hide the root status of your device from certain apps that may not work properly on rooted devices.
3. Grant or deny root access: Return to the main screen of Magisk Manager and you will see a list of installed apps on your device. Each app has a toggle switch next to it. By default, most apps will be set to “Allow” root access. Toggle the switch to either “Deny” or “Grant” root access for each app based on your preferences.
4. Configure auto-grant option: If you prefer to automatically grant root access to certain apps without being prompted every time, you can set them as “Auto Grant”. This can be done by long-pressing on the app’s name and selecting the “Auto Grant” option.
5. Review and manage settings: In the Magisk Manager settings, you can further customize your root permissions by enabling or disabling options such as “Mount Namespace Separation” or “Core Only Mode”. These options allow you to fine-tune the behavior of root access and optimize compatibility with various apps.
6. Monitor app access log: Magisk Manager also provides an app access log that allows you to review which apps have requested root access and when. This log can help you keep track of app activities and manage root permissions accordingly.
By managing root permissions with Magisk Manager, you can have granular control over which apps have root access on your device. This ensures that sensitive operations and system modifications are only performed by trusted apps or when explicitly granted by the user, enhancing the security and stability of your rooted device.
Remember to use caution when granting root access to apps. Only grant access to apps that you trust and understand their functionality, as granting root access to malicious apps can potentially compromise your device’s security.
Updating Magisk and Magisk Manager
Keeping your Magisk framework and Magisk Manager app up to date is important to ensure you have the latest features, bug fixes, and compatibility with new Android versions. Here is a guide on how to update Magisk and Magisk Manager:
Updating the Magisk Framework:
1. Launch Magisk Manager: Open the Magisk Manager app on your device.
2. Check for updates: Once the app is open, it will automatically check for updates to the Magisk framework. If an update is available, you will be notified on the main screen.
3. Download the update: Tap on the “Download” button to start downloading the latest version of the Magisk framework.
4. Install the update: After the download is complete, tap on the “Install” button to install the updated Magisk framework. The installation process may take a few seconds.
5. Reboot your device: Once the installation is complete, tap on the “Reboot” button to reboot your device. The updated Magisk framework will be active after the reboot.
Updating Magisk Manager:
1. Launch Magisk Manager: Open the Magisk Manager app on your device.
2. Check for updates: Go to the app’s menu and navigate to the “Settings” section. Look for the “Update” or “Check for Updates” option and tap on it to check for updates to Magisk Manager.
3. Download the update: If an update is available, you will be prompted to download the latest version of Magisk Manager. Tap on the “Download” button to start the download.
4. Install the update: Once the download is complete, tap on the “Install” button to install the updated Magisk Manager app.
5. Launch the updated app: After the installation, you can launch the updated Magisk Manager app to access the latest features and improvements.
By regularly updating both the Magisk framework and Magisk Manager app, you ensure that you have the most up-to-date experience and compatibility with the latest Android versions and security patches. Staying updated also helps to stay on top of any bug fixes or enhancements made by the Magisk team.
If you encounter any issues during the update process, such as failed downloads or installation errors, make sure to consult reliable sources, such as official Magisk forums or XDA Developers, for troubleshooting steps or possible solutions.
Unrooting your Android device with Magisk
If you decide that you no longer want to have root access on your Android device, Magisk provides a straightforward method for unrooting. Here’s how you can unroot your Android device using Magisk:
1. Launch Magisk Manager: Open the Magisk Manager app on your device.
2. Access the settings: From the app’s main screen, go to the menu and navigate to the “Settings” section.
3. Scroll down to find the “Uninstall” option: In the Settings section, scroll down until you see the “Uninstall” option. Tap on it to initiate the unrooting process.
4. Select the uninstallation method: Magisk Manager provides two options for unrooting: “Restore Images” or “Complete Uninstall”.
- Restore Images: This option allows you to restore the stock images of your device’s system partitions. It will remove Magisk and any modifications made by Magisk while preserving the stock firmware.
- Complete Uninstall: This option completely removes Magisk from your device and restores it to its original, unrooted state. It will remove Magisk, the Magisk Manager app, and any modifications made by Magisk. Please note that this method may also remove your device’s data, so ensure you have a backup before proceeding.
5. Select the desired option and confirm: Choose the uninstallation method that suits your needs and tap on the “Next” or “Confirm” button to initiate the unrooting process.
6. Wait for the process to complete: Magisk Manager will perform the necessary operations to unroot your device based on your selected method. This may take a few minutes, so be patient and avoid interrupting the process.
7. Reboot your device: Once the unrooting process is complete, Magisk Manager will prompt you to reboot your device. Tap on the “Reboot” button to restart your device and complete the unrooting process.
By following these steps, you can effectively unroot your Android device using Magisk and return your device to its original, unrooted state. Once unrooted, your device can regain certain benefits, such as the ability to install official OTA updates and maintain a higher level of security offered by the manufacturer.
It’s important to note that unrooting your device does not guarantee the restoration of your device’s warranty. Some manufacturers can still detect if a device has been rooted even after unrooting. To confirm the warranty status, it’s recommended to check with the manufacturer or service provider directly.