
Why Use Page Breaks in Word?
When working on a lengthy document in Microsoft Word, you may find yourself needing to insert page breaks to control the layout and formatting. Page breaks are important for maintaining the visual structure of your document, especially when dealing with large chunks of text or complex formatting requirements.
Here are a few reasons why you may need to use page breaks in Word:
- Separating sections: Page breaks allow you to divide your document into logical sections, such as chapters, sections, or subsections. By adding page breaks at the end of each section, you can ensure that each section starts on a new page, making it easier to navigate and read.
- Controlling text flow: Sometimes, you may want to ensure that a specific paragraph or block of text begins on a new page. By inserting a page break before that section, you can control where the text flows, avoiding awkward page breaks in the middle of paragraphs.
- Formatting requirements: Certain documents, such as research papers or reports, may have specific formatting guidelines that require page breaks at certain points. This could include starting a new section with a title on a fresh page, or ensuring that figures or tables start on a new page for clarity.
- Improved readability: Long documents without proper page breaks can become visually overwhelming. Adding page breaks allows readers to easily navigate through the document by visually separating different sections. This enhances the readability and comprehension of your content.
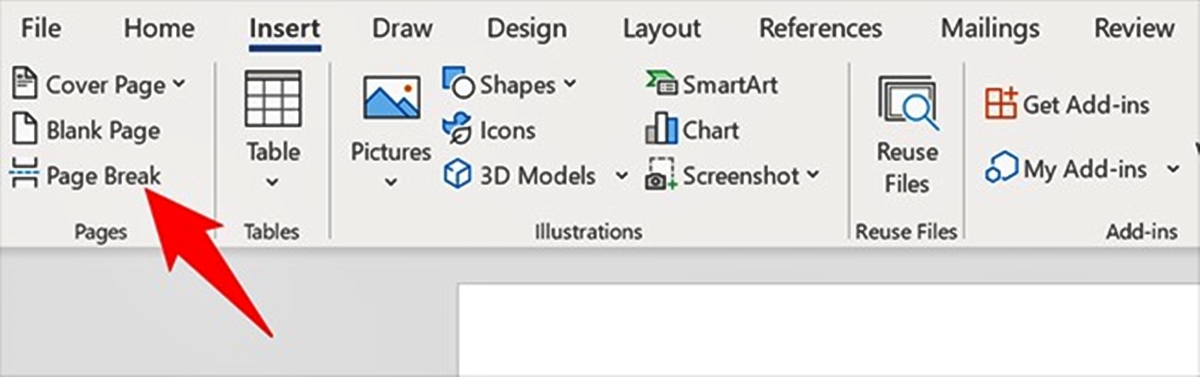
Option 1: Using the Page Break Button
The simplest way to insert a page break in Word is by using the Page Break button. Follow these steps to do it:
- Place your cursor at the end of the content or paragraph that you want to separate.
- Go to the ‘Insert’ tab in the Word toolbar.
- In the ‘Pages’ group, click on the ‘Page Break’ button.
- A new page will be inserted, starting from the point where your cursor was placed.
Using the Page Break button is a quick and straightforward method to add a page break to your document. It is especially useful when you only need to insert a single page break without any specific formatting requirements. However, keep in mind that if you make any changes to the content before the page break, the position of the page break may shift accordingly.
Additionally, you can also use the keyboard shortcut ‘Ctrl + Enter’ to insert a page break in Word, which is a handy alternative to using the Page Break button. This shortcut can save you time and effort by allowing you to quickly insert a page break at your desired location without having to navigate through the toolbar.
Option 2: Using the Keyboard Shortcut
If you prefer using keyboard shortcuts, Word provides a convenient keyboard shortcut to insert a page break. Here’s how you can do it:
- Place your cursor at the end of the content or paragraph where you want to insert the page break.
- Press the ‘Ctrl’ key and the ‘Enter’ key simultaneously.
- A page break will be inserted at the cursor’s position, creating a new page.
The keyboard shortcut ‘Ctrl + Enter’ is a quick and efficient way to insert a page break in Word. It allows you to seamlessly continue working on your document without having to move your hands away from the keyboard to access the toolbar.
By using this keyboard shortcut, you can easily add page breaks whenever you need to control the layout and formatting of your document. Whether you want to start a new section, ensure a specific paragraph begins on a new page, or follow specific formatting guidelines, the ‘Ctrl + Enter’ shortcut has got you covered.
Remember, using keyboard shortcuts can significantly boost your productivity, allowing you to work more efficiently in Word. So, if you find yourself frequently needing to insert page breaks, mastering this keyboard shortcut will save you time and effort in the long run.
Option 3: Inserting a Page Break from the Navigation Pane
Another method to insert a page break in Word is by using the Navigation Pane. The Navigation Pane provides a helpful visual overview of your document’s structure, making it easier to navigate and edit. Here’s how you can insert a page break using the Navigation Pane:
- Go to the ‘View’ tab in the Word toolbar.
- In the ‘Show’ group, check the ‘Navigation Pane’ box. The Navigation Pane will appear on the left side of your screen.
- Select the section or paragraph where you want to insert the page break.
- Right-click on the selection and choose the ‘Insert Page Break’ option from the context menu.
By using the Navigation Pane, you can easily navigate to the specific section or paragraph where you want to place a page break. This method comes in handy, especially when working with lengthy documents with multiple sections or subheadings.
Additionally, the Navigation Pane offers a more visual approach to document organization, allowing you to see the entire structure of your document in one place. This can help you make informed decisions about where to insert page breaks for optimum readability and document flow.
Once you’ve inserted the page break using the Navigation Pane, the new page will appear at the appropriate location, separating the content as desired. Remember to adjust the formatting and layout as needed to ensure a polished and professional-looking document.
Option 4: Using the Breaks Option in the Page Layout Tab
If you’re looking for more flexibility and control over your page breaks, Word offers the option to insert different types of breaks through the Page Layout tab. Here’s how you can utilize the Breaks option:
- Click on the ‘Page Layout’ tab in the Word toolbar.
- In the ‘Page Setup’ group, locate the ‘Breaks’ button.
- Click on the arrow next to the ‘Breaks’ button to display a drop-down menu with various break options.
- Select the type of break you want to insert. Options include ‘Next Page’, ‘Continuous’, ‘Even Page’, ‘Odd Page’, ‘Column’, and more.
- A page break of the selected type will be inserted into your document, based on the chosen option.
The Breaks option in the Page Layout tab provides additional options for inserting breaks other than just page breaks. For example, if you select the ‘Column’ option, it will create a break where the content flows into multiple columns on the page.
This method is particularly useful when you need to customize the layout of specific sections in your document. For instance, you may want a certain section to start on the next page, or you may require different odd and even page layouts for a book or report.
By utilizing the Breaks option, you can easily tailor the formatting and document structure according to your specific requirements, ensuring a professional and polished result.
Option 5: Inserting a Page Break from the Insert Tab
In addition to the Page Layout tab, you can also insert a page break in Word using the Insert tab. Here’s how you can do it:
- Go to the ‘Insert’ tab in the Word toolbar.
- In the ‘Pages’ group, locate the ‘Page Break’ button.
- Click on the ‘Page Break’ button to insert a page break.
- A new page will be created at the position of the cursor, separating the content accordingly.
The ‘Page Break’ button in the Insert tab offers another convenient way to insert a page break in your document. It provides a quick and easily accessible option, especially if you frequently need to insert page breaks during your editing process.
Using this method, you can place page breaks precisely where you want them, ensuring optimal layout and formatting. It comes in handy when you want to separate specific sections, paragraphs, or elements onto separate pages for clarity and readability.
Remember, in addition to the Page Break button, the Insert tab also offers other useful tools and options for enhancing your documents, such as inserting images, tables, or hyperlinks. Expanding your knowledge of the Insert tab’s capabilities can help you make the most out of Word’s features and create professional-looking documents.
Option 6: Using Section Breaks for More Control
In certain cases, a simple page break may not provide enough control over the layout and formatting of your document. If you need more specific control, you can use section breaks in Word. Here’s how to insert section breaks:
- Place your cursor at the end of the section where you want to insert a section break.
- Go to the ‘Layout’ tab in the Word toolbar.
- In the ‘Page Setup’ group, locate the ‘Breaks’ button.
- Click on the arrow next to the ‘Breaks’ button to access the drop-down menu.
- Select the type of section break you want to insert, such as ‘Next Page’ or ‘Continuous’.
- A section break will be inserted, allowing you to apply different page formatting settings, headers, footers, margins, or page orientation to each section.
Using section breaks provides greater flexibility and enables you to have different formatting options within a single document. You can have separate headers or footers, apply different margins, or even change the orientation of specific sections.
This option is particularly useful when working on documents that require distinct sections, such as reports with chapters, manuscripts with cover pages, or documents with mixed portrait and landscape pages.
By strategically using section breaks, you gain greater control over the layout and presentation of your document, ensuring it meets the formatting requirements and enhances the overall reader experience.
Option 7: Inserting a Page Break in a Table
If you have a table within your Word document and need to separate its content onto different pages, you can insert a page break specifically within the table. Here’s how:
- Place your cursor within the table at the point where you want to insert the page break.
- Go to the ‘Layout’ tab in the Word toolbar.
- In the ‘Table’ group, click on the ‘Breaks’ button.
- Select the ‘Insert Page Break’ option from the menu that appears.
- A page break will be inserted within the table, allowing the table’s content to flow onto a new page.
Inserting a page break within a table is beneficial when you need to control the placement of data and ensure that specific rows or columns are not split across pages. It is particularly useful for large tables that span multiple pages, where maintaining the integrity of the table structure and readability is important.
By adding a page break within the table, you can avoid situations where table rows are disjointed or data becomes difficult to interpret due to spanning pages.
Remember, when using page breaks within tables, it’s essential to review the table’s layout and adjust the formatting if necessary. This may include adjusting column widths, row heights, or even restructuring the table itself for better readability and presentation.
Option 8: Deleting a Page Break
If you need to remove a page break from your Word document, you can easily delete it. Here’s how:
- Place your cursor just before the page break you want to remove.
- Go to the ‘Home’ tab in the Word toolbar.
- In the ‘Editing’ group, click on the ‘Show/Hide ¶’ button. This will display non-printable characters, including the page break.
- Select the page break symbol (¶) by clicking just before it.
- Press the ‘Delete’ or ‘Backspace’ key on your keyboard to remove the page break.
- The page break will be deleted, and the content from the previous and next pages will be merged into a single page.
Deleting a page break can be necessary if you need to revise the document layout or adjust the content flow. By removing unwanted page breaks, you can create a more seamless and cohesive document structure.
It’s important to note that deleting a page break may cause the subsequent content to shift. Always double-check the document after removing a page break to ensure that the formatting and layout remain intact and cohesive.
Remember, page breaks are crucial for maintaining the visual structure and readability of your document. Removing a page break should be done judiciously and with careful consideration for the overall document layout and formatting requirements.
Option 9: Formatting Page Breaks
In addition to inserting and deleting page breaks, you can also format page breaks in Word to customize their appearance and behavior. Here are some formatting options you can explore:
- Changing the page break style: By default, page breaks appear as a solid line in Word. You can customize the line style by going to the ‘Page Layout’ tab, clicking on the ‘Page Borders’ button in the ‘Page Background’ group, and selecting a different line style or applying a custom border.
- Adding headers and footers to page breaks: If you want to differentiate the content before and after a page break, you can insert different headers or footers. You can go to the ‘Insert’ tab, click on ‘Header’ or ‘Footer,’ and choose ‘Edit Header’ or ‘Edit Footer’ to modify the content specifically for the section following the page break.
- Applying page break control settings: Word offers control settings for page breaks that influence how they behave within the document. You can access these settings by clicking on the ‘Page Setup’ dialog box launcher in the ‘Page Layout’ tab, and then navigating to the ‘Layout’ tab in the dialog box. Here, you can specify whether a page break should enable or disable widow/orphan control, keep with next, or allow page break before or after specific paragraphs.
- Modifying page break behavior in tables: When working with tables, you can adjust the page break behavior to control how table elements are split across pages. To modify table properties, right-click within the table, choose ‘Table Properties,’ go to the ‘Row’ or ‘Column’ tab, and enable or disable the ‘Allow row to break across pages’ or ‘Allow column to break across pages’ options as desired.
By formatting page breaks, you can add visual appeal, enhance document organization, and customize the behavior of page breaks within your Word document. These formatting options help you maintain consistency, improve readability, and meet specific formatting requirements for various types of documents.
Remember, when formatting page breaks, consider the overall design and visual flow of your document. Ensure that the formatting choices you make align with your document’s purpose and enhance the reader’s experience without compromising the integrity of the content.