
Finding a Flimsy Axe Recipe
Getting an axe in Animal Crossing: New Horizons is essential for various activities, from harvesting wood to clearing paths. The first step in obtaining an axe is finding the recipe for a Flimsy Axe. Here’s how you can find it:
1. Talk to Tom Nook: After you’ve set up your tent and completed a few basic tasks on your island, talk to Tom Nook. He will provide you with a DIY workshop where you can learn how to craft tools.
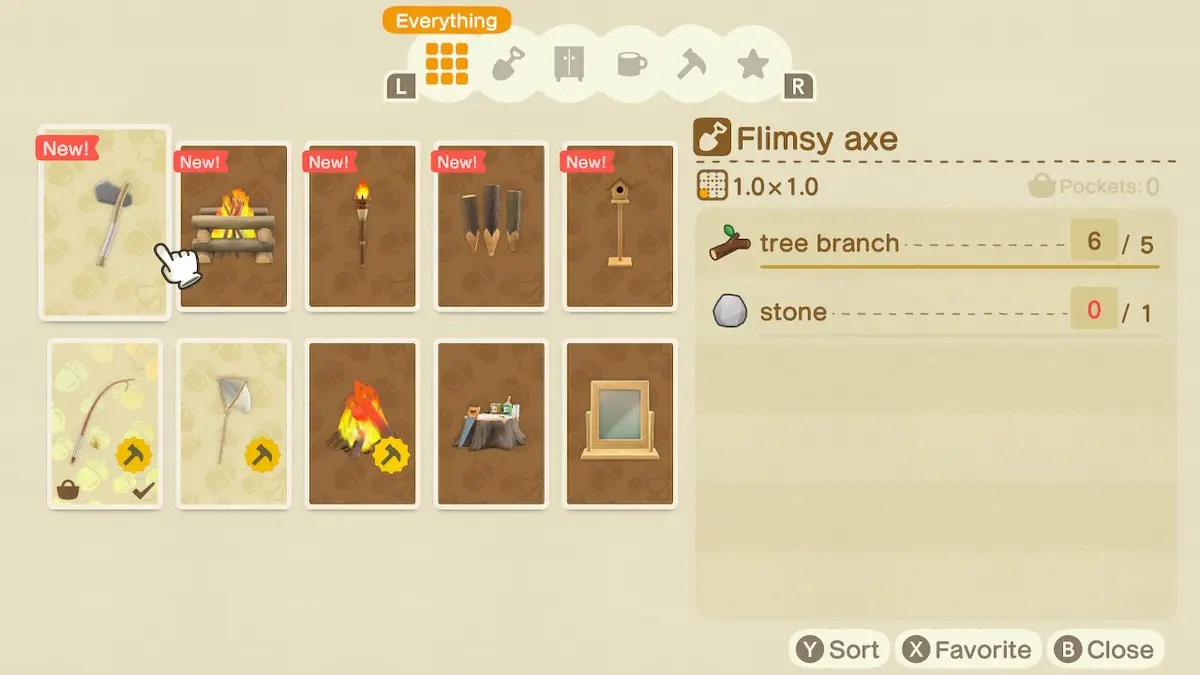
2. Collect Supplies: To unlock the Flimsy Axe recipe, you’ll need to gather a few crafting materials. The required resources include five tree branches and one stone. You can easily find tree branches scattered around your island or shake trees to knock them loose. Stones can be found by hitting rocks with your shovel or axe.
3. Learn the Recipe: Once you have the required materials, head over to your DIY workshop and interact with it. Select the “Craft Something” option and look for the Flimsy Axe recipe. If you have collected the necessary resources, you can now learn the recipe and start crafting your very own Flimsy Axe.
4. Craft the Flimsy Axe: With the recipe in hand, exit the DIY workshop and find a suitable crafting spot. Open your crafting menu with the “+” button and locate the Flimsy Axe recipe. Select it, and you will be prompted to gather the necessary materials. Once you have the required items, you can craft your Flimsy Axe.
By following these steps, you will be able to obtain the recipe for a Flimsy Axe and craft it for your use in Animal Crossing: New Horizons. With this essential tool in hand, you can start exploring your island, chopping down trees, and customizing your island to your heart’s content.
Crafting a Flimsy Axe
Once you’ve acquired the Flimsy Axe recipe in Animal Crossing: New Horizons, you can start crafting your very own axe. Here’s a step-by-step guide on how to craft the Flimsy Axe:
1. Gather Materials: To craft the Flimsy Axe, you will need five tree branches and one stone. Collect tree branches by either picking them up from the ground or shaking trees. Stones can be obtained by hitting rocks with your shovel or axe.
2. Find a Crafting Spot: Look for a suitable location to craft your Flimsy Axe. It’s best to choose a spot near your DIY workbench for convenience. If you don’t have a workbench yet, you can use the one provided in your tent or the Resident Services building.
3. Open the Crafting Menu: Stand near the crafting spot and press the “+” button on your Nintendo Switch controller to open the crafting menu.
4. Locate the Flimsy Axe Recipe: Scroll through the list of available DIY recipes until you find the Flimsy Axe recipe. It should be under the “Tools” category. Select it to begin the crafting process.
5. Craft the Flimsy Axe: After selecting the Flimsy Axe recipe, you will see a list of required materials. If you have the necessary items, choose the “Craft It!” option. Your character will then start crafting the Flimsy Axe.
6. Collect Your Flimsy Axe: Once the crafting process is complete, your character will hold the newly crafted Flimsy Axe. You can now use this tool to chop down trees, gather wood, and transform your island.
Crafting a Flimsy Axe is a straightforward process that requires common resources found on your island. With your newly crafted Flimsy Axe in hand, you can now explore your island further and begin shaping it to your liking.
Gathering Materials for a Stone Axe
To upgrade from a Flimsy Axe to a more efficient tool, you’ll need to gather the materials required to craft a Stone Axe in Animal Crossing: New Horizons. Follow these steps to gather the necessary resources:
1. Obtain an Axe: Before you can gather materials for a Stone Axe, make sure you have a Flimsy Axe in your inventory. If you haven’t crafted one yet, refer to the previous section on how to craft a Flimsy Axe.
2. Identify Rocks: Look for rocks scattered across your island. They can be found both on the cliffs and on the ground. Hit the rocks multiple times (up to eight times) with your Flimsy Axe to break them apart. Be prepared, as sometimes hitting rocks can cause wasps to emerge or knock you back.
3. Collect Crafting Materials: After breaking apart a rock, a variety of crafting materials will appear. These include stones, clay, iron nuggets, and sometimes even gems. Stones are the key material you need to craft your Stone Axe, so be sure to collect as many as possible. You will need a total of 3 stones.
4. Explore Mystery Islands: Using a Nook Miles Ticket, you can visit mystery islands by redeeming your Nook Miles at the Resident Services building. Mystery islands can provide additional opportunities to find rocks and gather stones. Remember to bring your Flimsy Axe along to break those rocks and gather the needed materials.
5. Trade with Other Players: If you’re having difficulty finding enough stones on your own island, consider connecting with other Animal Crossing players through online communities or friends. You can trade resources to obtain the stones required for crafting a Stone Axe.
By following these steps, you will be able to gather the necessary materials to craft a Stone Axe in Animal Crossing: New Horizons. Once you have the required stones, you’re ready to craft your more durable and efficient tool.
Crafting a Stone Axe
Once you’ve collected enough stones, it’s time to upgrade your Flimsy Axe to a more durable tool – the Stone Axe. Follow these steps to craft a Stone Axe in Animal Crossing: New Horizons:
1. Make Sure You Have the Required Materials: Before you begin crafting a Stone Axe, ensure that you have gathered the necessary resources. You will need 3 stones. If you haven’t collected enough stones yet, refer to the previous section on how to gather materials for a Stone Axe.
2. Locate a Crafting Spot: Find a suitable location to craft your Stone Axe. It’s best to choose a spot near your DIY workbench for easy access. If you don’t have a workbench yet, you can use the one provided in your tent or the Resident Services building.
3. Open the Crafting Menu: Stand near the crafting spot and press the “+” button on your Nintendo Switch controller to open the crafting menu.
4. Find the Stone Axe Recipe: Scroll through the list of available DIY recipes until you locate the Stone Axe recipe. It should be under the “Tools” category. Select the recipe to proceed to the crafting process.
5. Craft the Stone Axe: After selecting the Stone Axe recipe, you will see a list of required materials. If you have the necessary items, choose the “Craft It!” option. Your character will then start crafting the Stone Axe using the collected stones.
6. Obtain Your Stone Axe: Once your character completes the crafting process, you will have your very own Stone Axe. Congrats! The Stone Axe is a stronger and more durable tool compared to the Flimsy Axe. It allows you to chop down trees more efficiently and last longer before breaking.
With your newly crafted Stone Axe, you can continue exploring your island and making progress in Animal Crossing: New Horizons. Remember to use the Stone Axe wisely and take care of it, as it will be an essential tool for your endeavors on the island.
How to Use an Axe
Now that you have your trusty axe in hand, it’s time to learn how to use it effectively in Animal Crossing: New Horizons. Here are the steps to follow:
1. Equip Your Axe: Open your inventory and select the axe from your tool collection. Once equipped, you can see your character holding the axe.
2. Approach a Tree: Walk up to any tree you want to chop down or gather resources from. Position yourself in front of the tree to interact with it.
3. Swing Your Axe: Press the “A” button on your controller to swing the axe at the tree. Your character will strike the tree with the axe, causing it to shake and release various materials.
4. Collect the Resources: After striking the tree, it may drop items such as wood, tree branches, and occasionally fruits. Walk towards the tree to collect these resources. Simply walk over them, and they will automatically be added to your inventory.
5. Repeating the Process: You can continue using your axe on trees to gather more materials or to chop down trees entirely. Remember that fully chopping down a tree removes it from your island, so be mindful of which trees you decide to remove.
6. Repair and Care for Your Axe: Over time, your axe will begin to wear down and eventually break. To repair a damaged axe, you can either craft a new one using the recipe or visit a non-player character (NPC) on your island who can repair it for you.
Using an axe in Animal Crossing: New Horizons is not limited to chopping down trees. You can also use it to break rocks, dig up stumps, or to create custom designs on the ground. Experiment with using your axe in different situations to discover its versatile uses.
Remember to practice responsible tree management and conservation on your island. Be mindful of the trees you chop down, as they play a vital role in maintaining the ecosystem and contributing to the overall aesthetic of your island.
Upgrading to a Regular Axe
As you progress in Animal Crossing: New Horizons, you’ll have the opportunity to upgrade your axe from a Stone Axe to a more durable tool – the Regular Axe. The Regular Axe provides certain advantages and unlocks additional features. Follow these steps to upgrade your axe:
1. Unlock the Able Sisters Shop: In order to upgrade your axe, you need to have the Able Sisters clothing shop open on your island. This shop becomes available after you’ve upgraded your Resident Services building and have been playing for a few days.
2. Visit the Able Sisters Shop: Once the Able Sisters Shop is open, head over to their store and interact with Sable, one of the shopkeepers. Talk to her every day for a few days to build a relationship and unlock her trust.
3. Receive the DIY Recipe: After building a relationship with Sable, she will eventually offer you the DIY recipe for the Regular Axe as a sign of her appreciation. Accept the recipe to unlock the ability to craft the Regular Axe.
4. Gather the Materials: To craft the Regular Axe, you will need to gather the required resources. The materials needed include three wood and one iron nugget. Wood can be obtained by chopping trees or purchasing it from Timmy and Tommy at Nook’s Cranny. Iron nuggets can be found by hitting rocks with your shovel or axe.
5. Craft the Regular Axe: Once you have the necessary materials, head to a crafting spot or your DIY workbench to craft the Regular Axe. Open your crafting menu and select the Regular Axe recipe. Follow the prompts to gather the materials and craft your upgraded tool.
The Regular Axe provides more durability and strength compared to the Stone Axe, allowing you to chop down trees more efficiently. Additionally, the Regular Axe has the added feature of being able to create special tree stump patterns when placed on a cut tree.
Upgrading your axe to the Regular Axe not only provides functional benefits but also adds a touch of aesthetic customization to your island. Enjoy your new and improved tool as you continue to shape and enhance your Animal Crossing: New Horizons island.
How to Get an Axe from a Non-Player Character
In addition to crafting your own axe, you also have the opportunity to obtain an axe from non-player characters (NPCs) in Animal Crossing: New Horizons. Here’s how to get an axe from an NPC:
1. Visit an Event or Special Occasion: Throughout the year, Animal Crossing: New Horizons hosts various events and special occasions. During these times, there is a chance that an NPC will offer you an axe as a reward or for participating in an event. Keep an eye out for announcements or special visitors on your island.
2. Interact with Visitors: When visitors come to your island, be sure to interact with them and engage in conversations. Sometimes, they may offer you an axe or provide you with hints on how to obtain one. Listen to what they have to say and follow any instructions or tasks they give you.
3. Complete Quests or Tasks: NPCs on your island or visiting your island may have specific quests or tasks for you to complete. These quests often reward you with valuable items, including an axe. Pay attention to any requests or favors NPCs may have and fulfill them to receive your reward.
4. Participate in Island Tours: Through the multiplayer feature or Dodo Code, you can visit other players’ islands or invite them to yours. Sometimes, the host may have an NPC present who offers axes as rewards for participating in island tours or activities. Don’t hesitate to join these tours and explore new islands for a chance to obtain an axe.
5. Trade or Buy from Other Players: If you’re unable to obtain an axe through the above methods, consider connecting with other Animal Crossing players through online communities or friends. You can trade items or purchase an axe from someone who may have an extra one or is willing to part with theirs.
Keep in mind that the availability of axes from NPCs may vary. Some NPCs may offer them as a one-time reward or during specific events, while others may have axes for sale at a given time. Pay attention to the opportunities presented by NPCs and take advantage of them to acquire axes for your island.
Remember to be patient and keep playing Animal Crossing: New Horizons regularly, as new NPCs and events may appear over time, offering you more chances to get an axe and other valuable items.
Using an Axe for Tree Surgery
In Animal Crossing: New Horizons, the axe not only serves the purpose of gathering resources but can also be used for tree surgery, allowing you to shape and manage your island’s trees. Here’s how you can effectively use an axe for tree surgery:
1. Shaping Trees: If you want to create a specific tree shape or maintain a tree’s growth, you can use the axe to prune branches. Stand in front of the tree and swing the axe to cut off unwanted branches. This helps in shaping trees into neat, symmetrical forms or creating designated areas for fruit trees.
2. Preventing Overgrowth: Trees in Animal Crossing: New Horizons have the tendency to grow and spread. If you want to prevent trees from overcrowding a certain area, use the axe to cut down excess trees. Be careful not to cut down all the trees, as they contribute to the island’s appeal and provide resources.
3. Removing Stumps: After chopping down a tree, a tree stump is left behind. These stumps can be eyesores and may obstruct the development of your island. Use the axe to remove these stumps by swinging it at the stump repeatedly until it disappears. Removing stumps opens up space for new plantings or decorative items.
4. Creating Tree Patterns: Another unique feature of using the axe is the ability to create special tree stump patterns. To do this, dig a hole in the ground next to a tree and then chop it down. The stump left behind will have a distinct custom pattern. By placing custom designs on the ground and planting new saplings in the pattern’s place, you can create artistic designs and unique spaces on your island.
5. Planting Fruit Trees: The axe also plays a role in planting fruit trees. Use it to dig a hole in the ground, then select a fruit from your inventory and choose the option to bury it. The fruit will grow into a new tree, which can provide a steady supply of fruits for you to sell or share with friends.
When using the axe for tree surgery, it’s essential to plan your actions strategically and consider the long-term impact on your island’s aesthetics and functionality. Ensure you maintain a balance between preserving the natural beauty of trees and aligning them with your design preferences.
Remember to exercise caution while using the axe to avoid accidentally chopping down important trees or damaging the overall environment. With practice and careful consideration, you can utilize the axe as a versatile tool for tree management and crafting a perfectly designed island in Animal Crossing: New Horizons.
Customizing Your Axe
In Animal Crossing: New Horizons, you have the opportunity to personalize and customize your tools, including your axe. By adding your personal touch to the axe, you can make it stand out and match your island’s style. Here’s how you can customize your axe:
1. Unlock the Customization Feature: Before you can customize your axe, you’ll need to unlock the customization feature. This becomes available after you’ve upgraded your Resident Services building and Nook’s Cranny shop is open on your island.
2. Obtain Customization Kits: To customize your axe, you’ll need customization kits. These can be purchased from the Nook’s Cranny shop for 600 Bells each. Stock up on customization kits so you’re ready to personalize your tools whenever you choose.
3. Head to a DIY Workbench: Locate a DIY workbench on your island, either in your home, in Resident Services, or in a villager’s house. Stand in front of the workbench with your axe in hand.
4. Access the Customization Menu: Interact with the DIY workbench to access the customization menu. Choose the “Customize Something” option.
5. Select Your Axe: Once you’re in the customization menu, scroll through the list of available tools. Locate and select your axe to begin the customization process.
6. Choose a Custom Design: A variety of customization options will be available for your axe. Scroll through the designs and patterns to choose the one that suits your preference and island theme. You can also select the option to remove any customization you’ve previously applied.
7. Customize Your Axe: After choosing the design, confirm your selection to apply it to your axe. The customization process will consume one customization kit. Your axe will now be personalized with your chosen design.
8. Experiment with Designs: Don’t be afraid to experiment with different designs and patterns for your axe. Try using custom designs created by yourself or other players to add unique flair to your tools. Be creative and make your axe truly one-of-a-kind.
By customizing your axe, you can express your creativity and make your tool collection more visually appealing. Whether it’s a pattern representing your favorite fruit or a design that complements your island’s theme, personalizing your axe adds a touch of individuality and style to your gameplay in Animal Crossing: New Horizons.
Repairing an AxeAs you use your axe in Animal Crossing: New Horizons, it will gradually wear down and eventually break. However, you have the option to repair your axe rather than constantly crafting a new one. Here’s how you can repair your axe:
1. Assess the Damage: Before deciding to repair your axe, take a look at its durability. When you select the axe in your inventory, you’ll see a durability bar indicating its current state. If the bar is almost empty or the axe is broken, it’s time to repair it.
2. Gathering the Repair Materials: To repair your axe, you’ll need to gather the necessary materials. The materials required for repair depend on the type of axe. For a Flimsy Axe, you’ll need one tree branch. For a Stone Axe, you’ll need one stone. For a Regular Axe, you’ll need one iron nugget.
3. Open Your Crafting Menu: Stand near a DIY workbench or your crafting table to access the crafting menu.
4. Locate the Axe Recipe: Scroll through the list of available recipes until you find the recipe for the type of axe you want to repair. Select the recipe to begin the repair process.
5. Craft the Axe: Gather the required repair materials and choose the “Craft It!” option. Your character will then craft a new axe, replacing the broken one in your inventory.
6. Taking Advantage of Non-Player Characters: If you don’t have the necessary resources to repair your axe, some non-player characters (NPCs) on your island may offer repair services. For example, Wisp or Gulliver can repair your tools in exchange for completing their tasks.
7. Stocking Up on Spare Axes: To avoid the need for immediate repairs, consider keeping spare axes crafted and ready to use. This way, when one axe breaks, you can easily replace it with a new one without interrupting your gameplay.
Repairing your axe is a cost-effective option in Animal Crossing: New Horizons and allows you to extend the lifespan of your tools. By staying prepared with the necessary repair materials or taking advantage of repair services offered by NPCs, you can ensure that your axe is always in working condition and ready for your island adventures.