
Restart Your Surface Pro
One of the simplest and most effective solutions to fix a non-working camera on your Surface Pro is to restart the device. Restarting can help resolve any temporary software glitches that may be causing the camera to malfunction.
To restart your Surface Pro, follow these steps:
- Swipe in from the right edge of the screen or select the “Start” button.
- Tap or click on the “Power” button.
- Select “Restart” from the menu that appears.
This will restart your device and refresh the system, potentially resolving any issues with the camera. Once your Surface Pro has restarted, check if the camera is now functioning properly. If not, proceed to the next troubleshooting step.
If restarting your device does not resolve the camera issue, do not worry. There are several more troubleshooting steps you can try to get your Surface Pro camera working again. Continue reading to learn more!
Check for Camera App Updates
If your Surface Pro camera is not working, it may be due to outdated camera app software. Checking for updates and installing the latest version can often resolve compatibility issues and improve camera performance.
Follow these steps to check for camera app updates:
- Swipe in from the right edge of the screen or select the “Start” button.
- Type “Microsoft Store” in the search bar and open the Microsoft Store app.
- Click on the three dots in the top-right corner and select “Downloads and updates.”
- Click on the “Get updates” button to check for available updates.
If there are any updates available for your camera app, you’ll see them listed under “Available updates.” Click on the “Update” button next to the camera app to install the latest version.
Once the update is complete, restart your Surface Pro and try using the camera again. Check if the camera is now functioning properly. If not, proceed to the next troubleshooting step.
Note: If you have already installed the latest camera app updates and are still experiencing camera issues, move on to the next troubleshooting step.
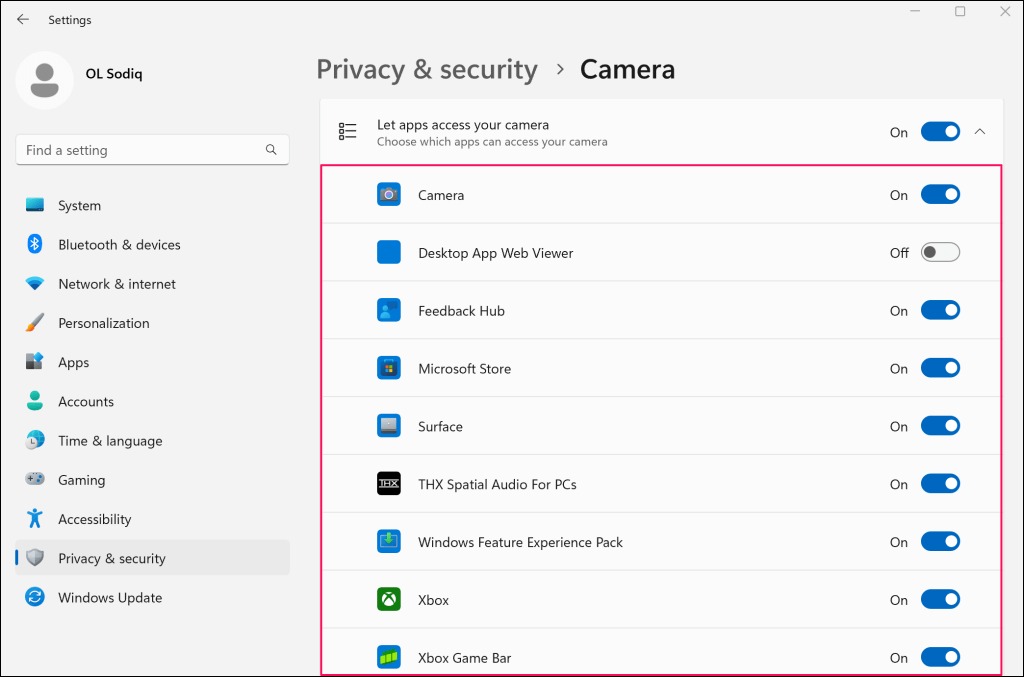
Check Camera Privacy Settings
If your Surface Pro camera is not working, it’s possible that the camera privacy settings are blocking its access. Checking and adjusting these settings can help resolve the issue.
Follow these steps to check your camera privacy settings:
- Swipe in from the right edge of the screen or select the “Start” button.
- Select “Settings” and then click on “Privacy.”
- In the left-hand menu, select “Camera.”
Ensure that the “Allow apps to access your camera” toggle switch is turned on. This will allow apps and programs to use the camera on your Surface Pro.
If the toggle switch is already on, but the camera still isn’t working, scroll down to the “Choose which Microsoft Store apps can access your camera” section.
Make sure that the toggle switches for the apps you want to use with the camera are turned on. If the toggle switch for a particular app is off, turn it on to grant the app permission to access the camera.
After adjusting the camera privacy settings, restart your Surface Pro and open the camera app again to see if it is now working properly. If not, move on to the next troubleshooting step.
Disable and Enable the Camera
If your Surface Pro camera is still not working, you can try disabling and then re-enabling it. This process can help reset any issues with the camera driver or software.
Follow these steps to disable and enable the camera:
- Swipe in from the right edge of the screen or select the “Start” button.
- Select “Settings” and then click on “Devices.”
- In the left-hand menu, select “Camera.”
- Under the “Camera” section, toggle off the switch for “Let apps use my camera.”
After disabling the camera, wait for a few seconds and then toggle the switch back on.
Next, open the camera app or any other app that uses the camera, and check if the camera is now functioning properly. If the issue persists, proceed to the next troubleshooting step.
Note: Disabling and enabling the camera essentially restarts the camera driver and can resolve minor software glitches. If this step does not resolve the problem, move on to the next troubleshooting method.
Update Your Surface Pro
If your Surface Pro camera is still not working, it’s crucial to ensure that your device is running the latest system software. Updating your Surface Pro can fix any bugs or compatibility issues that may be affecting the camera’s functionality.
Follow these steps to update your Surface Pro:
- Swipe in from the right edge of the screen or select the “Start” button.
- Select “Settings” and then click on “Update & Security.”
- In the left-hand menu, select “Windows Update.”
Your Surface Pro will automatically check for available updates. If there are updates available, click on the “Download” button and wait for the updates to be downloaded and installed.
Once the updates are installed, restart your Surface Pro and check if the camera is now functioning properly. If not, proceed to the next troubleshooting step.
Note: Updating your Surface Pro ensures that you have the latest drivers and software, which can often resolve camera issues. If updating the system software does not fix the problem, continue with the next troubleshooting method.
Check for Windows Updates
In addition to updating your Surface Pro, it’s essential to check for and install any available Windows updates. Windows updates often include fixes and improvements that can address camera issues and enhance overall system performance.
Here’s how you can check for Windows updates:
- Swipe in from the right edge of the screen or select the “Start” button.
- Select “Settings” and then click on “Update & Security.”
- In the left-hand menu, select “Windows Update.”
- Click on the “Check for updates” button, and Windows will search for available updates.
If there are any updates available, click on the “Download” button and wait for the updates to be downloaded and installed on your Surface Pro.
After the updates are installed, restart your device and check if the camera is now working properly. If the issue persists, proceed to the next troubleshooting step.
Note: Installing the latest Windows updates ensures that you have the most recent security patches and system enhancements, which can often resolve camera-related problems. If checking for Windows updates does not fix the issue, move on to the next troubleshooting method.
Reset the Camera App
If your Surface Pro camera is still not working, resetting the camera app can help resolve any software-related issues that may be causing the problem. Resetting the app will restore it to its default settings, potentially fixing any misconfigurations.
Follow these steps to reset the camera app:
- Swipe in from the right edge of the screen or select the “Start” button.
- Select “Settings” and then click on “Apps.”
- In the left-hand menu, select “Apps & features.”
- Scroll down the list of installed apps and locate the camera app.
- Click on the camera app and select “Advanced options.”
- In the Advanced options menu, scroll down and click on the “Reset” button.
- Confirm the reset by clicking on the “Reset” button again when prompted.
Once the camera app is successfully reset, restart your Surface Pro and open the camera app to check if the camera is now functioning properly. If not, proceed to the next troubleshooting step.
Note: Resetting the camera app will remove any personalized settings or configurations, so you may need to reconfigure the camera app after the reset. If resetting the camera app does not resolve the issue, continue with the next troubleshooting method.
Uninstall and Reinstall the Camera Driver
If your Surface Pro camera is still not working, it’s possible that the camera driver has become corrupted or outdated. Uninstalling and reinstalling the camera driver can help resolve any driver-related issues that may be causing the problem.
Follow these steps to uninstall and reinstall the camera driver:
- Swipe in from the right edge of the screen or select the “Start” button.
- Select “Device Manager” to open the Device Manager window.
- Expand the “Cameras” or “Imaging devices” category to display the installed camera devices.
- Right-click on the camera device and select “Uninstall device” from the drop-down menu.
- Click “Uninstall” again to confirm the uninstallation of the camera driver.
- Once the driver is uninstalled, restart your Surface Pro to allow the system to reinstall the driver automatically.
After the restart, open the camera app or any other app that uses the camera to check if the camera is now working properly. If the issue persists, proceed to the next troubleshooting step.
Note: Uninstalling and reinstalling the camera driver ensures that you have a fresh installation of the driver, which can help resolve driver-related conflicts. If uninstalling and reinstalling the camera driver does not fix the problem, continue with the next troubleshooting method.
Run the Camera Troubleshooter
If you’re still experiencing issues with your Surface Pro camera, running the built-in Camera Troubleshooter can help diagnose and resolve the problem. The troubleshooter can identify and automatically fix common camera-related issues.
Follow these steps to run the Camera Troubleshooter:
- Swipe in from the right edge of the screen or select the “Start” button.
- Select “Settings” and then click on “Update & Security.”
- In the left-hand menu, select “Troubleshoot.”
- Scroll down and click on “Camera.”
- Click on the “Run the troubleshooter” button.
The Camera Troubleshooter will now scan your Surface Pro for any camera-related issues and attempt to fix them automatically. Follow the on-screen instructions provided by the troubleshooter.
After completing the troubleshooting process, restart your Surface Pro and open the camera app to check if the camera is now working properly. If the issue persists, proceed to the next troubleshooting step.
Note: The Camera Troubleshooter is a convenient tool designed to automatically detect and resolve camera problems. If running the Camera Troubleshooter does not fix the issue, continue with the next troubleshooting method.
Check for Hardware Issues
If none of the previous troubleshooting steps have resolved the issue with your Surface Pro camera, it’s possible that there may be a hardware problem. Checking for hardware issues can help identify any physical or connectivity problems that could be the cause.
Follow these steps to check for hardware issues with your Surface Pro camera:
- Ensure that your camera lens is clean and free from any dirt or obstruction. Use a soft, lint-free cloth to gently wipe the lens.
- Inspect the camera cable to make sure it is securely connected to the device and not damaged or frayed.
- If you are using an external camera, check the connection between the camera and your Surface Pro. Ensure that all cables are securely plugged in.
- Try connecting the camera to a different USB port or using a different cable to rule out any port or cable issues.
- If possible, test the camera on another device to determine if the issue is specific to your Surface Pro.
- If you have access to another camera, such as an external webcam, try connecting it to your Surface Pro and check if it works properly. This can help determine if the issue is with the camera itself or with the Surface Pro.
If you have followed all the above steps and still cannot resolve the camera issue, it is recommended to contact Microsoft Support or seek assistance from a professional technician. They can provide further guidance and perform more advanced troubleshooting steps to diagnose and rectify any hardware-related problems.
Note: Checking for hardware issues is crucial when all other software-based troubleshooting methods fail to resolve the camera problem. Seeking professional support can help get to the root cause of the issue and provide a suitable solution.
Contact Microsoft Support
If you have tried all the previous troubleshooting steps and are still unable to resolve the issue with your Surface Pro camera, it is time to reach out to Microsoft Support for further assistance. They have dedicated support channels to help users resolve technical problems and provide guidance specific to your device.
Here is how you can contact Microsoft Support:
- Visit the Microsoft Support website (support.microsoft.com) on a separate device.
- Select the “Contact us” or “Get help” option.
- Choose your specific Surface Pro model and the category of your issue, which in this case would be “Camera.”
- Microsoft Support offers various contact options, including phone support, live chat, or even scheduling an appointment at a nearest Microsoft Store if available.
- Follow the provided instructions to get in touch with a Microsoft Support representative.
Make sure to provide them with all necessary information about the steps you’ve taken to troubleshoot the camera issue. This will help them understand the problem better and provide you with more accurate assistance.
The Microsoft Support team is trained to handle technical issues and offer solutions tailored to your specific situation. They may guide you through additional troubleshooting steps or provide instructions for obtaining a repair or replacement if necessary.
Note: Contacting Microsoft Support is recommended when all other troubleshooting steps have been exhausted. They can provide professional assistance and find the most suitable resolution for your Surface Pro camera problem.