
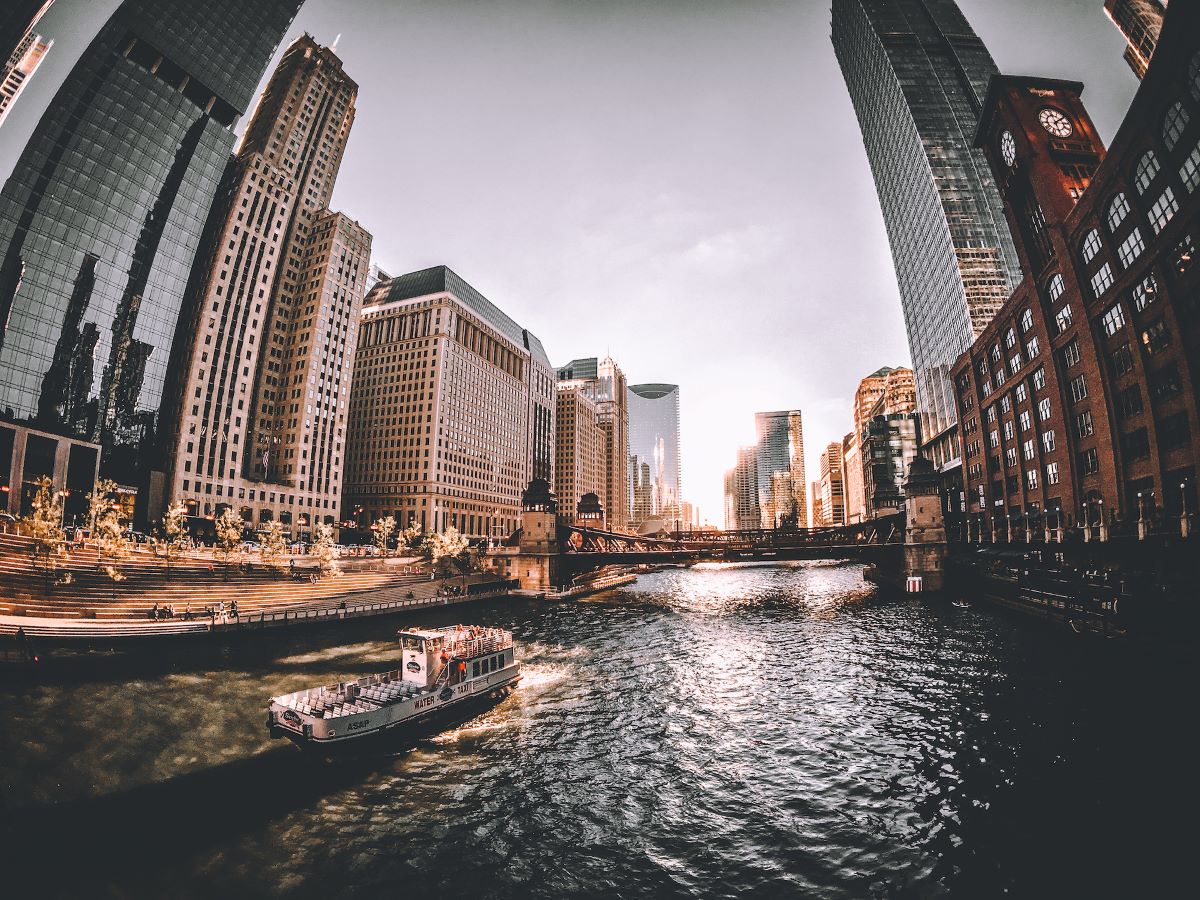
What is Barrel Distortion?
Barrel distortion is a common optical aberration that occurs in photography, where straight lines of a subject appear to curve outward, giving a barrel-like or fisheye effect. This distortion is more noticeable towards the edges of the image, while the center remains relatively unaffected. It is caused by the lens’s inability to accurately project light onto the camera’s sensor or film.
The main cause of barrel distortion is the shape and design of the camera lens. In most wide-angle lenses, the lens elements near the edges of the lens are shaped in a way that causes light to be refracted more strongly than in the center, resulting in a bulging effect. This can become more pronounced when shooting at close distances or using low-quality lenses.
Barrel distortion can distort the proportions of a subject, making straight lines appear curved or objects at the edges of the frame appear larger than they actually are. While it may be desirable in some artistic or creative expressions, it can be a significant problem in situations where accuracy and realism are important, such as architectural or product photography.
It’s worth noting that barrel distortion is not limited to wide-angle lenses. It can also occur in zoom lenses with a wide focal range, especially when shooting at the extreme ends of the zoom range.
Fortunately, barrel distortion can be corrected both in-camera and during post-processing. In the next sections, we will explore how to recognize and fix barrel distortion using software and techniques.
Understanding the Causes of Barrel Distortion
To effectively tackle and correct barrel distortion in photography, it is crucial to have a good understanding of its underlying causes. By grasping the factors that contribute to this optical aberration, you’ll be better equipped to adopt appropriate solutions to minimize its impact.
One of the primary causes of barrel distortion is the lens design itself. Wide-angle lenses, in particular, are more prone to this distortion due to their construction. The shape of the lens elements near the edges causes light rays to be refracted differently than those passing through the center of the lens. This variation in refraction leads to the curved appearance of straight lines in the final image.
The degree of barrel distortion can vary based on multiple factors, such as the lens focal length and the distance between the lens and the subject. Wide-angle lenses with shorter focal lengths tend to exhibit more pronounced barrel distortion, especially when shooting subjects at close distances.
Another contributor to barrel distortion is the lens optics. Lens manufacturers strive to minimize the effect, but cheaper or older lenses may have suboptimal optical elements, leading to more noticeable distortion. Prime lenses, known for their superior optical quality compared to zoom lenses, often exhibit less barrel distortion, especially at wider apertures.
Additionally, the camera sensor size can influence the appearance of barrel distortion. Cameras with smaller sensors, such as those found in most smartphones and compact cameras, may exhibit more significant distortion compared to cameras with larger sensors. This is because the lens’s projection is designed to cover the larger sensor area, and when used on a smaller sensor, it can result in more pronounced distortion effects.
It is important to note that barrel distortion is not always considered undesirable. In fact, some photographers deliberately use wide-angle lenses with pronounced barrel distortion for creative purposes, visually exaggerating certain scenes or subjects.
In the next sections, we will delve deeper into how to recognize barrel distortion in your photos and explore various techniques to correct it both in post-processing and in-camera.
How to Recognize Barrel Distortion in Your Photos
Recognizing barrel distortion in your photos is essential to identify when and how much correction is needed. By being able to identify this optical aberration, you can take appropriate steps to address it and achieve more accurate and visually pleasing images.
One of the primary indicators of barrel distortion is the presence of curved lines in your photos. Straight lines that should appear parallel or perpendicular in the scene will exhibit a bulging effect, appearing curved or bent outward towards the edges of the frame. Pay close attention to structures such as buildings, horizons, or man-made objects with straight lines.
Another telltale sign is the distortion of objects or subjects at the edges of the frame. These objects might appear stretched, elongated, or larger than they actually are due to the curvature introduced by barrel distortion. Look out for any noticeable abnormalities or disproportionate shapes in the peripheral areas of your images.
Barrel distortion can also manifest in the form of a lack of sharpness or blurring towards the edges of the frame. If you notice a significant decrease in image clarity or loss of detail in these areas, it may be an indication of barrel distortion affecting the overall image quality.
When photographing patterns or grids, you may observe a distortion in the regularity and uniformity of these elements. Straight horizontal and vertical lines can appear curved or warped, breaking the expected symmetrical pattern.
It’s important to note that barrel distortion may be more apparent at certain focal lengths, aperture settings, and shooting distances. Experimenting with different settings and subject distances can help you identify the specific conditions under which barrel distortion becomes more noticeable.
Reviewing your photos on a larger monitor or zooming in on the image during post-processing can often reveal barrel distortion that may not be readily noticeable on the camera’s LCD screen or in smaller previews.
By having a keen eye for curved lines, distorted objects, decreased sharpness, and irregular patterns, you can effectively recognize barrel distortion and take appropriate steps to correct it in your photos.
Using Lens Correction in Post-Processing Software
Post-processing software provides powerful tools to correct barrel distortion in your photos. One of the most common methods is using lens correction features available in popular software applications such as Adobe Photoshop, Lightroom, and Capture One.
To start with, import your image into the post-processing software of your choice. Navigate to the lens correction or distortion correction tool, usually found in the settings or adjustment panels.
The lens correction feature typically includes a database or profile of various lenses with known distortion characteristics. Select the appropriate lens profile that matches the lens you used to capture the image. This will allow the software to apply the necessary adjustments based on the specific lens’s distortion pattern.
Most lens correction tools have an automatic correction function that can analyze the image and apply the necessary corrections. Simply click on the “Enable Profile Corrections” or similar option, and the software will apply the recommended adjustments automatically. Do keep in mind that these automatic corrections might not always be perfect, especially in challenging cases or with older lenses.
If you find that the automatic correction doesn’t fully correct the distortion, you can manually adjust the correction parameters. Most software provides sliders or numerical values to control the amount of distortion correction, allowing you to fine-tune the adjustments to your preference.
In addition to barrel distortion correction, lens correction tools often provide options for other types of lens aberrations such as chromatic aberration and vignetting. These additional adjustments can help improve the overall image quality and address any other optical issues present in your photos.
After applying the necessary corrections, carefully evaluate the image to ensure that the distortion has been effectively reduced without introducing any unwanted artifacts or distortion in other areas. It’s always a good idea to compare the corrected image with the original to assess the effectiveness of the corrections.
Lastly, make sure to save your corrected image in a suitable file format and resolution to preserve the changes for future use or printing.
Using lens correction in post-processing software provides a convenient and effective method for correcting barrel distortion and enhancing the overall quality of your images. Experiment with different correction settings to find the optimal balance between distortion correction and maintaining the desired visual impact of your photos.
Manually Correcting Barrel Distortion in Adobe Photoshop
Adobe Photoshop offers advanced tools for manually correcting barrel distortion in your photos, providing you with the flexibility and precision to fine-tune the corrections according to your specific needs. Here’s how you can manually correct barrel distortion using Adobe Photoshop:
Step 1: Open your image in Adobe Photoshop and duplicate the background layer to work on a non-destructive copy.
Step 2: Go to “Filter” in the top menu and choose “Lens Correction” to open the lens correction tool. A new dialog box will appear.
Step 3: In the Lens Correction dialog box, navigate to the “Custom” tab, where you can manually adjust the distortion correction.
Step 4: Locate the “Geometric Distortion” section and adjust the “Distortion” slider to reduce the barrel distortion effect. Dragging the slider to the left will decrease the distortion, while moving it to the right will increase it. You can also input specific numerical values for more precise adjustments.
Step 5: Preview the changes in real-time by checking the “Preview” box. This will display the corrected image in the main Photoshop window.
Step 6: Fine-tune the correction by adjusting the “Scale” and “Vertical Perspective” sliders, if necessary. These adjustments can help further refine the image and correct any remaining distortion artifacts.
Step 7: Once you are satisfied with the corrections, click “OK” to apply the changes and exit the lens correction tool.
Step 8: Carefully evaluate the image to ensure that the barrel distortion has been effectively reduced. Zoom in and inspect the details to check for any unwanted artifacts or distortion introduced by the correction process.
Step 9: If needed, make further adjustments using other tools and features in Adobe Photoshop, such as the Transform or Perspective Warp tools, to refine the composition and ensure straight lines appear natural and undistorted.
Step 10: Save your corrected image in your desired file format and resolution.
Manually correcting barrel distortion in Adobe Photoshop allows you to have precise control over the adjustments, ensuring the distortion is effectively reduced while preserving the desired aesthetics of your image. Experiment with different correction settings and evaluate the results to achieve the best possible outcome for your photographs.
Correcting Barrel Distortion in Lightroom
Lightroom, a popular post-processing software developed by Adobe, offers a straightforward method for correcting barrel distortion in your photos. With its intuitive interface and powerful editing capabilities, Lightroom provides an efficient solution for addressing lens distortions. Here’s how you can correct barrel distortion in Lightroom:
Step 1: Import your image into Lightroom and select the photo you want to correct for barrel distortion.
Step 2: Switch to the “Develop” module, located at the top right of the interface, to access the editing tools.
Step 3: In the “Lens Corrections” panel on the right-hand side, click on the “Profile” tab.
Step 4: Enable the “Enable Profile Corrections” checkbox. Lightroom will attempt to automatically detect and apply the appropriate lens profile based on the metadata of your image.
Step 5: Check the preview in the main editing window to see the applied correction. Lightroom should have reduced the barrel distortion based on the lens profile it detected. Fine-tune the correction if necessary by adjusting the “Distortion” slider.
Step 6: Use the “Constrain Crop” checkbox if you want to automatically crop the image to remove any empty or distorted areas at the edges resulting from the distortion correction.
Step 7: If Lightroom was unable to detect the correct lens profile or if you are using a manual lens, you can manually select the lens profile from the “Profile” dropdown menu.
Step 8: Adjust the other sliders in the “Lens Corrections” panel, such as “Vignette” or “Chromatic Aberration,” to further refine the image if needed.
Step 9: Observe the changes in the preview and evaluate the correction by zooming in and examining the details of the image.
Step 10: Once you’re satisfied with the correction, you can make additional adjustments using other Lightroom tools, such as exposure, contrast, or color balance, to further enhance the overall appearance of the image.
Step 11: Finally, export your corrected image in the desired file format and resolution to save the changes.
Lightroom’s lens correction tools make it easy to correct barrel distortion in your photos. By utilizing the lens profile detection and manual adjustment options, along with other editing capabilities, you can achieve visually pleasing and distortion-free images with ease.
Using Specialized Software to Fix Barrel Distortion
While post-processing software like Adobe Photoshop and Lightroom provide effective tools for barrel distortion correction, there are dedicated software options available specifically designed to handle lens distortions. These specialized software programs offer advanced algorithms and features tailored specifically to address barrel distortion. Here’s how you can use specialized software to fix barrel distortion:
Step 1: Locate and install specialized software designed for barrel distortion correction. Examples of popular options include DxO OpticsPro, PTLens, and LensFix CI.
Step 2: Import your image into the specialized software. Most programs allow you to open individual files or entire folders for batch processing.
Step 3: Navigate to the lens correction or distortion correction tool within the software. The exact location and interface may vary depending on the program you are using.
Step 4: If the software has a lens database, select the appropriate lens profile that matches the lens used to capture the image. This helps the software accurately apply the necessary corrections based on the specific distortion characteristics of that particular lens.
Step 5: Adjust the correction settings to reduce the barrel distortion effect. This may involve dragging sliders, inputting numerical values, or utilizing advanced algorithms provided by the software.
Step 6: Preview the corrected image to assess the effectiveness of the adjustments. Zoom in and inspect the details to ensure that the distortion has been successfully reduced without introducing unwanted artifacts.
Step 7: Fine-tune the correction settings if needed. Specialized software often provides additional options for fine adjustments, allowing you to achieve the desired level of distortion correction.
Step 8: Once you are satisfied with the corrections, save the image in the desired file format and resolution.
Specialized software dedicated to barrel distortion correction can provide more precise and efficient solutions, yielding exceptional results. These programs often offer a range of advanced features and optimized algorithms specifically designed for handling various types of distortions, including barrel distortion.
Remember to explore and experiment with different software options to find the one that best suits your specific needs and provides the desired level of control and correction for your barrel distortion issues.
Avoiding Barrel Distortion In-Camera
While post-processing software and specialized tools can help correct barrel distortion, it’s always best to minimize or prevent it in the first place. Here are some techniques you can employ to avoid barrel distortion in-camera:
Use a Lens with Minimal Distortion: When selecting a lens, opt for one that is known for its low distortion characteristics. Wide-angle prime lenses or high-quality zoom lenses designed for architectural or professional use often have less barrel distortion compared to consumer-grade or wide-angle zoom lenses.
Avoid Extreme Focal Lengths: Barrel distortion tends to be more pronounced at the extreme ends of a lens’s focal length range. Avoid using lenses at their widest or longest focal lengths, as this can exaggerate distortion effects.
Shoot at Optimal Aperture: Different lenses have a sweet spot where they perform best in terms of image quality and distortion control. Experiment with different aperture settings to find the optimal aperture range for your lens, which usually falls in the middle range (around f/8 to f/11).
Watch Your Distance: Barrel distortion can become more noticeable when shooting subjects at close distances. If possible, try to maintain a moderate to far distance between your camera and the subject to minimize the distortion effect.
Pay Attention to Composition: Be mindful of the placement of straight lines within the frame. Position them towards the center of the image, where distortion tends to be less pronounced. Avoid placing important elements near the edges of the frame where distortion is more evident.
Consider Tilt-Shift Lenses: Tilt-shift lenses offer specialized control over perspective and distortion. These lenses allow you to correct for perspective distortion in-camera, which can help minimize or eliminate barrel distortion. However, tilt-shift lenses can be expensive and require practice to master.
Perform Test Shots: Before capturing important images, do a few test shots to assess any potential distortion present in the scene. Review the test shots on a larger screen to check for any signs of barrel distortion, and adjust your composition or camera position accordingly.
Use Corrective Filters and Accessories: Some lens filters and lens accessories, such as neutral density filters or lens adapters, can introduce distortion. Be aware of how these accessories may affect the overall image quality and consider removing them if distortion becomes an issue.
By being mindful of the lens you choose, shooting at optimal apertures, minding your distance, and carefully composing your shots, you can minimize or avoid barrel distortion in-camera, resulting in images that require less correction and post-processing.
Choosing Lenses with Less Barrel Distortion
When it comes to avoiding or minimizing barrel distortion in your photography, the lens you choose plays a crucial role. Opting for lenses with lower distortion characteristics can significantly reduce the amount of barrel distortion you encounter. Here are some aspects to consider when selecting lenses with less barrel distortion:
Prime Lenses: Prime lenses, also known as fixed focal length lenses, tend to exhibit less distortion compared to zoom lenses. These lenses are designed with a fixed focal length and optimized optics, resulting in lower barrel distortion. If image quality and minimal distortion are important to you, consider investing in prime lenses.
Professional-Grade Lenses: Higher-end lenses, especially those designed for architectural or professional use, often have superior optical engineering and precision in their construction. These lenses are typically designed to minimize distortions, including barrel distortion, and provide high-quality image output.
Wide-Angle Prime or Zoom Lenses: While wide-angle lenses are more prone to barrel distortion, some wide-angle lenses are specifically designed to minimize this issue. Look for wide-angle lenses with built-in distortion control or those that have been widely acclaimed for their control over barrel distortion.
Research Lens Reviews: Before purchasing a lens, do some research and read reviews from reputable sources. Lens reviews often mention the distortion characteristics of different lenses, allowing you to make an informed decision. Look for lenses with positive feedback regarding their distortion performance.
Manufacturer Lens Profile Corrections: Some lens manufacturers provide built-in lens profile corrections in-camera or through post-processing software. These profiles can automatically correct barrel distortion when using the lens with specific camera models or software, further minimizing the impact of distortion.
Test Lenses Before Buying: If possible, try out lenses before making a purchase. Renting or borrowing lenses can give you firsthand experience with the distortion performance of different lenses. Take test shots of scenes with straight lines and evaluate the resulting images for barrel distortion.
Customer Feedback: User reviews and feedback can provide valuable insights into lens distortions, including barrel distortion. Browse photography forums, online communities, and review websites to learn from the experiences of other photographers who have used specific lenses.
By opting for lenses with better distortion control, such as prime lenses, higher-end lenses, or those specifically designed to minimize barrel distortion, you can ensure that your images are captured with minimal distortions and require less correction in post-processing.