
Restart Your Laptop
Restarting Your Laptop to Fix Keyboard Issues
If your HP laptop keyboard is not working properly, one of the simplest and most effective solutions is to restart your device. Restarting your laptop can help clear any temporary software or hardware glitches that may be causing the keyboard malfunction. This process is quick and can often resolve the issue without any further troubleshooting.
Here’s how you can restart your HP laptop:
- Save any open work and close all programs.
- Click on the “Start” menu located at the bottom-left corner of your screen.
- Click on the power icon and select “Restart” from the drop-down menu.
- Wait for your laptop to shut down and reboot.
Once your laptop restarts, check if the keyboard is now functioning properly. Try typing on different applications to ensure that all the keys are responding as they should. If the issue persists, proceed to the next troubleshooting step.
It’s important to note that restarting your laptop is not a guaranteed fix for every keyboard issue. If the problem persists even after restarting, you can move on to other methods to troubleshoot and fix the keyboard problem on your HP laptop.
Next, we’ll explore updating your keyboard driver, as this can often resolve software-related keyboard problems.
Update Your Keyboard Driver
Updating Your Keyboard Driver to Resolve Issues
If your HP laptop keyboard is still not working properly after restarting, the next step you can take is to update your keyboard driver. A keyboard driver is a software component that allows your operating system to communicate with your keyboard hardware. Outdated or incompatible keyboard drivers can cause various issues, including unresponsive or malfunctioning keys.
Updating your keyboard driver can be done in the following steps:
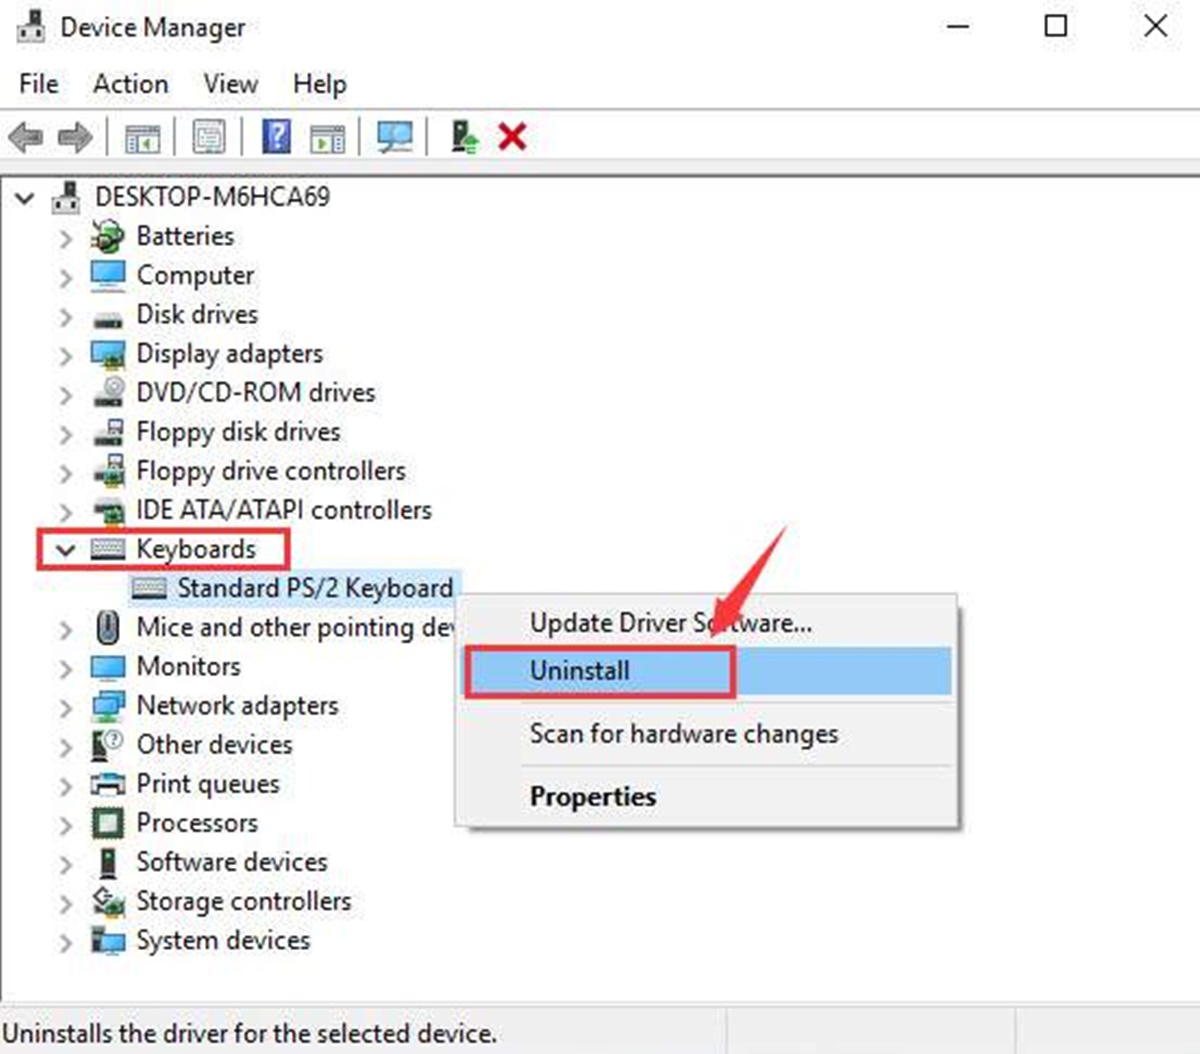
- Open the Start menu and search for “Device Manager.”
- Click on the “Device Manager” from the search results to open the Device Manager window.
- Expand the “Keyboards” category by clicking on the arrow next to it.
- Right-click on your keyboard device and select “Update driver.”
- In the next window, select the option to search automatically for updated driver software. This will allow your computer to search for the latest driver version and install it if available.
- Follow the on-screen instructions to complete the driver update process.
Once the driver update is complete, restart your laptop and check if the keyboard is functioning correctly. If the issue persists, proceed to the next troubleshooting step.
If the automatic driver update does not find any updates or if the problem persists after updating, you can also try manually downloading and installing the latest keyboard driver from the manufacturer’s website. Make sure to select the driver that is compatible with your specific model and operating system.
In cases where updating the keyboard driver does not resolve the issue, further investigation is necessary. The next step will involve checking for any physical damage to the keyboard or its connections.
Check for Physical Damage
Examining Your HP Laptop Keyboard for Physical Damage
If your HP laptop keyboard is still not functioning properly, it’s important to inspect the keyboard for any physical damage that may be causing the issue. Physical damage can include spilled liquids, loose connections, debris lodged between keys, or worn-out keys. Identifying and addressing any physical damage can often resolve keyboard problems.
Here’s how you can check for physical damage on your HP laptop keyboard:
- Inspect the keyboard visually for any signs of liquid spills or visible damage. If you notice any liquid or physical damage, it is essential to address it before proceeding.
- If there are no visible signs of damage, gently press each key on the keyboard to check for any stuck or non-responsive keys. Pay attention to any keys that feel loose, sticky, or do not spring back properly.
- If you detect any stuck or non-responsive keys, you can try carefully removing the affected keycap using a keycap puller or a paperclip. Clean the area underneath the keycap using compressed air or a soft brush to remove any debris or dust that may be obstructing the key’s movement.
- Once you have cleaned the affected key, carefully reattach the keycap by aligning it with the corresponding switch and pressing it down gently until it clicks into place.
- If you notice any loose or worn-out keys, you may need to consider contacting HP support or a professional technician to determine if a replacement keyboard is necessary.
After checking for physical damage, test the keyboard to see if the issues have been resolved. If the keyboard is still not working correctly, proceed to the next troubleshooting step.
Next, we’ll explore how to clean your HP laptop keyboard, as accumulated dirt and debris can also cause keyboard malfunctions.
Clean Your Keyboard
Keeping Your HP Laptop Keyboard Clean and Functional
If your HP laptop keyboard is not working properly, it could be due to dirt, dust, or debris that has accumulated between or underneath the keys. Cleaning your keyboard regularly can help maintain its functionality and prevent issues caused by build-up.
Follow these steps to clean your HP laptop keyboard:
- Turn off your laptop and disconnect it from any power source to ensure your safety.
- Hold your laptop at a slight angle or place it upside down to prevent any loose particles from falling further inside the laptop.
- Use a can of compressed air to blow out any dust or debris from between the keys. Be sure to keep the can upright and use short bursts of air to minimize moisture accumulation.
- Gently wipe the surface of the keys and the keyboard frame with a soft microfiber cloth dampened with a mild cleaning solution or isopropyl alcohol. Avoid using excessive liquid and ensure the cloth is only slightly damp to prevent any moisture from seeping into the keyboard.
- Pay extra attention to any sticky or stubborn areas, and use a cotton swab dipped in isopropyl alcohol to clean those specific spots.
- Allow the keyboard to dry completely before turning on your laptop and using it again.
Regularly cleaning your keyboard can help prevent dirt and debris from hindering the functionality of the keys. It is recommended to clean your keyboard every few months or as needed.
If cleaning the keyboard does not resolve the issue, you can try resetting the keyboard settings on your HP laptop.
Reset the Keyboard Settings
Resetting Keyboard Settings on Your HP Laptop
If your HP laptop keyboard is still not working properly, you can try resetting the keyboard settings to their default configuration. Resetting the keyboard settings can help resolve any software-related issues or conflicts that may be causing the keyboard malfunction.
Here are the steps to reset the keyboard settings on your HP laptop:
- Open the Start menu and search for “Control Panel.”
- Click on “Control Panel” from the search results to open the Control Panel window.
- Select the “Keyboard” or “Hardware and Sound” option, depending on your Control Panel view.
- In the keyboard settings, click on the “Hardware” tab and select your keyboard from the list of devices.
- Click on the “Properties” button located at the bottom right of the window.
- In the Properties window, click on the “Driver” tab and then select the “Uninstall” or “Roll Back Driver” option. Note that the exact wording may vary depending on your operating system.
- Follow the on-screen instructions to complete the driver uninstallation or rollback process.
- Restart your laptop to apply the changes.
- Once your laptop restarts, the keyboard settings will be reset to their default configuration.
After resetting the keyboard settings, test the keyboard to see if the issue has been resolved. If the problem persists, proceed to the next troubleshooting step.
In some cases, the Filter Keys feature in Windows can cause keyboard issues. In the next section, we will discuss how to disable the Filter Keys feature to potentially resolve the problem.
Disable the Filter Keys Feature
Disabling the Filter Keys Feature to Fix Keyboard Problems
If you are experiencing keyboard issues on your HP laptop, such as slow or unresponsive keys, the Filter Keys feature in Windows may be the culprit. Filter Keys is an accessibility feature designed to ignore brief or repeated keystrokes to assist users with motor disabilities. However, it can sometimes interfere with regular keyboard functionality.
Here is how you can disable the Filter Keys feature on your HP laptop:
- Open the Start menu and click on the “Settings” icon (represented by a gear).
- In the Settings menu, click on “Ease of Access.”
- From the left-hand sidebar, select “Keyboard.”
- Under the Filter Keys section, toggle the switch to “Off” to disable the feature.
Now, test your keyboard to see if the issue has been resolved. Check if the keys are responsive and functioning as expected. If the problem persists, you can try performing a system restore to restore your laptop to a previous functioning state.
Please note that disabling the Filter Keys feature may not address all keyboard problems. If your HP laptop keyboard continues to malfunction, it’s important to explore other troubleshooting methods or contact HP support for further assistance.
In some cases, using an external keyboard can be a temporary solution while you address the issue with your laptop’s built-in keyboard. We will cover this option in the following section.
Perform a System Restore
Using System Restore to Resolve Keyboard Issues
If you are still experiencing keyboard problems on your HP laptop, performing a system restore can help revert your laptop’s settings and software to a previous state, potentially resolving any software-related conflicts or issues that may be causing the keyboard malfunction.
Here’s how you can perform a system restore on your HP laptop:
- Save any open work and close all programs to prevent data loss.
- Click on the “Start” menu and search for “System Restore.”
- Open the System Restore tool from the search results.
- Click on “Next” to proceed with the restoration process.
- Select a restore point that predates the occurrence of the keyboard issues. It’s recommended to choose a restore point where your laptop was functioning properly.
- Review the selected restore point and click on “Next” to confirm.
- Read the warning message and make sure you understand that System Restore will affect system settings and installed applications.
- Click on “Finish” to initiate the system restore process.
- Wait for the system restore process to complete. Your laptop will restart during this process.
After the system restore is finished and your laptop restarts, test your keyboard to see if the issues have been resolved. Check if all the keys are working correctly and if the keyboard is functioning as expected.
If the keyboard problems still persist, it is recommended to proceed with caution and consider contacting HP support for further assistance. In the next section, we will discuss an alternative option to temporarily resolve your keyboard issues, which involves using an external keyboard.
Use an External Keyboard
Using an External Keyboard as a Temporary Solution
If you have tried all the previous troubleshooting steps and are still facing keyboard issues on your HP laptop, using an external keyboard can be a temporary solution while you address the problem with your laptop’s built-in keyboard. By connecting an external keyboard, you can continue using your laptop without being hindered by keyboard malfunctions.
Here’s how you can set up and use an external keyboard with your HP laptop:
- Purchase an external keyboard that is compatible with your HP laptop. Ensure that it uses a connection type (e.g., USB, Bluetooth) that your laptop supports.
- Connect the external keyboard to your laptop. If it is a USB keyboard, simply plug it into an available USB port. If it is a Bluetooth keyboard, follow the manufacturer’s instructions to pair it with your laptop.
- Your laptop should automatically detect the external keyboard and switch to using it as the primary input device. If not, you may need to adjust the settings manually.
- Start using the external keyboard to type and perform tasks on your laptop. It should function as a regular keyboard, providing a temporary solution until you can resolve the issues with your built-in keyboard.
While using an external keyboard can provide a temporary workaround, it is important to address the underlying issue with your laptop’s keyboard for a long-term solution. You can reach out to HP support or consult a professional technician to diagnose and repair any hardware or software problems with your built-in keyboard.
Remember to keep the external keyboard clean and well-maintained to ensure its proper functioning. If you encounter any issues with the external keyboard, consult the manufacturer’s documentation or seek support.
In the event that the external keyboard does not resolve the issue or is not a suitable option for your needs, it is recommended to contact HP support for further assistance.
By following these troubleshooting steps, you can attempt to resolve keyboard issues on your HP laptop and restore its functionality. If the problem persists, it is advisable to seek professional help to diagnose and rectify any underlying issues.
Contact HP Support
Seeking Assistance from HP Support for Keyboard Issues
If you’ve tried all the troubleshooting steps mentioned above and are still unable to resolve the keyboard problems on your HP laptop, it’s time to seek further assistance from HP support. HP’s customer support team is well-equipped to handle hardware and software-related issues and can provide expert guidance to fix your keyboard problems.
Before contacting HP support, make sure you have the following information ready:
- The model and serial number of your HP laptop. This information is usually located on a sticker on the bottom of your device or underneath the battery.
- Details about the keyboard issues you are facing. Be prepared to provide specific information on the symptoms, when the problem started, and any troubleshooting steps you have already attempted.
- Any error messages or codes that have appeared related to the keyboard malfunction.
To contact HP support, you can utilize one of the following methods:
- Visit the HP Support website and navigate to the support section for your specific product. From there, you can find instructions on how to contact HP support via email, chat, or phone.
- Call the HP support phone number provided on the HP website. This allows you to speak directly with a support representative who can guide you through the troubleshooting process.
When you reach out to HP support, describe your issue in detail and provide the requested information. The support representative will likely ask additional questions and provide step-by-step instructions tailored to your specific situation.
It’s important to remain patient and cooperative throughout the troubleshooting process. Follow the instructions provided by the support representative and provide any requested information promptly. By working together with HP support, you can effectively diagnose and resolve the keyboard problems on your HP laptop.
Remember that HP support is there to assist you, and they have the knowledge and expertise to address various hardware and software issues. Utilize their resources and guidance to ensure a successful resolution to your keyboard problems.
By following these steps and contacting HP support, you can receive professional assistance to resolve the keyboard issues on your HP laptop and get back to using your device smoothly.