
Choosing the Correct Length for Your Light Strip Extension
Extending your Philips Hue light strip allows you to illuminate more areas and create stunning lighting effects. However, choosing the correct length for your light strip extension is crucial to ensure a seamless and effective installation. Here are some factors to consider when deciding on the length:
- Area coverage: Assess the area where you want to install the extended light strip. Measure the length of the surface or object you plan to illuminate to determine the appropriate length needed. It’s always better to have a longer extension cable to avoid any strain or pulling during installation.
- Flexibility: Consider the flexibility of your light strip installation. If you plan to bend or curve the strip around corners or irregular surfaces, you may need to account for additional length to accommodate these curves.
- Design preferences: Think about the desired lighting design or pattern you want to achieve. If you prefer a continuous and uninterrupted glow, choose a length that allows for seamless transitions between the light strip and the extension. If you prefer distinct sections of lighting, consider shorter extensions for more flexibility in placement.
It’s important to note that Philips Hue light strips come in various lengths, typically ranging from one meter (3.3 ft) to five meters (16.4 ft). When extending the light strip, you can choose from extension cables available in one-meter (3.3 ft) and two-meter (6.6 ft) lengths. Make sure to select the extension cable that best suits your installation needs.
By carefully considering the area coverage, flexibility, and design preferences, you can choose the perfect length for your light strip extension. This will ensure a seamless and visually appealing installation that enhances the ambiance of your space.
Gathering the Necessary Tools and Materials
Before extending your Philips Hue light strip, it’s important to gather the necessary tools and materials to ensure a smooth and hassle-free installation process. Here is a list of items you will need:
- Philips Hue light strip: Ensure that you have the main light strip that you want to extend. This will serve as the foundation for adding the extension cable.
- Extension cable: Purchase the appropriate extension cable length depending on your desired extension distance. Philips Hue offers extension cables in one-meter (3.3 ft) and two-meter (6.6 ft) lengths.
- Scissors or wire cutter: You will need a tool to cut the light strip if necessary. Make sure to have a pair of scissors or wire cutters that can safely trim the strip without damaging it.
- Power adapter (if needed): If your extended light strip requires additional power, ensure that you have the necessary power adapter. This will depend on the length and number of light strips connected.
- Connectors and clips: Depending on the specific light strip model and extension cable, you may need connectors and clips to secure the extension to the main light strip. Check the Philips Hue manual or packaging to see if any additional connectors or clips are required.
- Instructions manual: Keep the Philips Hue instructions manual handy for reference. It will provide detailed guidance on how to properly connect and extend the light strip.
Make sure you have all the tools and materials listed above before starting the installation process. This will help you complete the extension smoothly and avoid any interruptions or delays. By being prepared, you can ensure that the extended light strip operates as desired and enhances the lighting in your space.
Connecting the Extension Cable to the Light Strip
Once you have gathered all the necessary tools and materials, you can proceed with connecting the extension cable to your Philips Hue light strip. Follow these steps to ensure a proper connection:
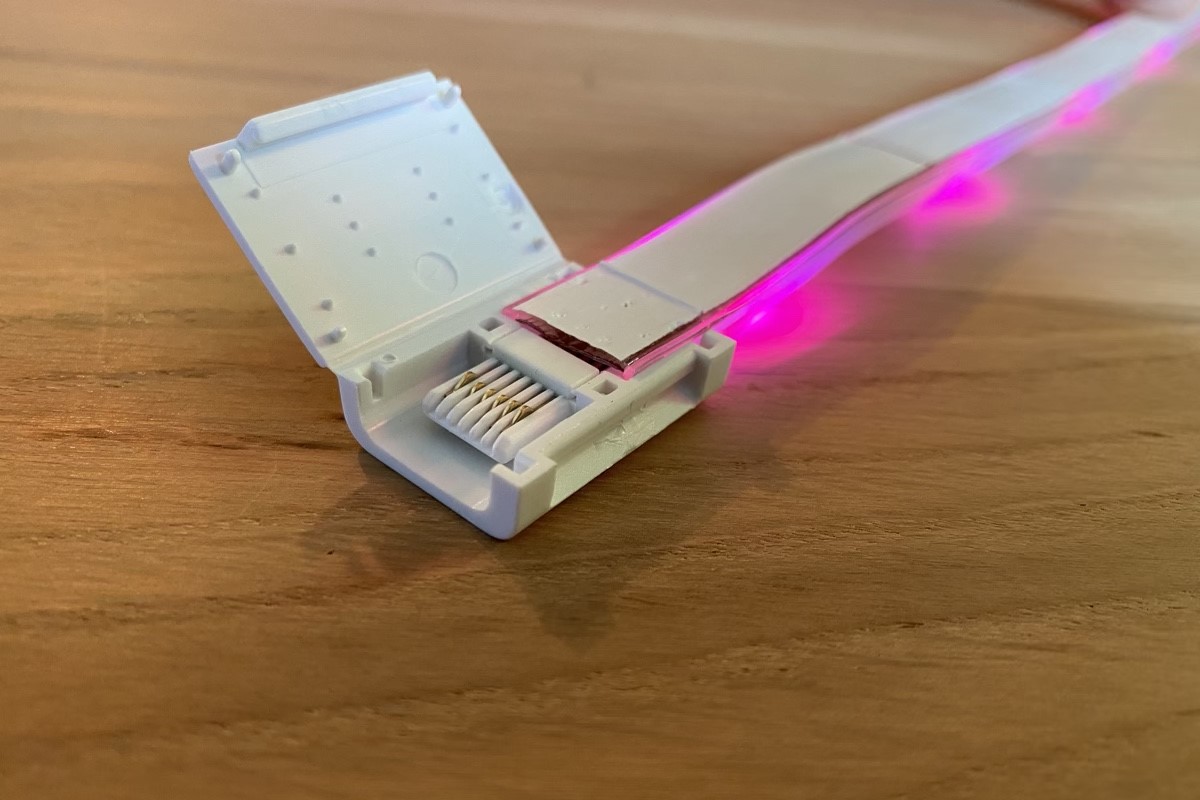
- Prepare the light strip: If your main light strip already has a connector at the end, remove it by gently pulling it apart. This will expose the copper pads beneath.
- Prepare the extension cable: Take the extension cable and locate the connector at one end. Carefully align the copper pads on the extension cable with the copper pads on the main light strip.
- Secure the connection: Once aligned, gently press the extension cable’s connector onto the main light strip’s copper pads. Make sure they are firmly connected and there are no loose connections.
- Test the connection: Plug in the power adapter and switch on the lights to test the connection. Ensure that the extended light strip is functioning properly and emitting the desired lighting effects.
- Secure the connection: If provided with connectors or clips, secure the extension cable to the main light strip to ensure a stable and secure connection. Follow the instructions provided by Philips Hue for the specific connectors or clips you have.
It’s important to handle the light strip and extension cable with care during the connection process. Avoid bending or twisting the cables excessively to prevent any damage. If you encounter any difficulties during the connection, refer to the instructions manual or consult the Philips Hue website for troubleshooting tips.
By following these steps, you can successfully connect the extension cable to your Philips Hue light strip. This will allow you to extend the reach of your lighting system and enjoy enhanced illumination in your space.
Securing the Extension Cable to Ensure a Stable Connection
Once you have connected the extension cable to your Philips Hue light strip, it is essential to secure the connection to ensure a stable and reliable installation. Follow these steps to secure the extension cable:
- Inspect the connection: Before proceeding with securing the extension cable, visually examine the connection between the extension cable and the main light strip. Ensure that the connectors are properly aligned and securely fastened.
- Use connectors or clips (if available): Philips Hue may provide connectors or clips that are designed to secure the extension cable to the main light strip. If these accessories are included, carefully follow the instructions to attach them to the connection point.
- Apply adhesive: In some cases, additional adhesive may be needed to provide extra stability to the connection. Depending on the surface you are mounting the light strip on, you can use double-sided adhesive tape or mounting brackets to secure the extension cable along with the light strip.
- Avoid strain or tension: Ensure that there is no strain or tension on the extension cable or the main light strip. Excessive pulling or bending of the cables can weaken the connection and lead to performance issues. Use cable management tools like clips or clamps to keep the cables organized and prevent any unnecessary stress.
- Regularly check the connection: It’s important to periodically check the connection between the extension cable and the light strip. Over time, vibrations or movements in the surrounding environment may loosen the connection. Verify that the connectors are still aligned and secure, making any necessary adjustments as needed.
By taking the time to secure the extension cable, you can ensure a stable and reliable connection for your Philips Hue light strip. This will prevent any interruptions in the lighting system and lead to a more enjoyable and consistent lighting experience in your space.
Testing the Extended Light Strip
After connecting and securing the extension cable to your Philips Hue light strip, it’s important to test the extended light strip to ensure that it’s functioning correctly. Follow these steps to conduct a proper test:
- Power on the lights: Plug in the power adapter and switch on the lights to activate the extended light strip. Ensure that the power supply is stable and that all connected components are receiving power.
- Check for proper illumination: Observe the extended light strip to ensure that it illuminates as expected. Verify that the brightness, color, and effects are consistent with the main light strip. If there are any noticeable differences or issues, double-check the connections and the setup to troubleshoot the problem.
- Test various lighting features: Philips Hue light strips offer a range of lighting features such as dimming, color-changing, and synchronization with music or other smart devices. Test these features to ensure that they are fully functional with the extended light strip as well. Experiment with different settings and effects to achieve the desired ambiance.
- Inspect for any issues: Carefully inspect the entire length of the extended light strip for any signs of faulty connection, flickering lights, or uneven illumination. Address any issues promptly to avoid further complications. Refer to the troubleshooting section in the instructions manual or seek assistance from Philips Hue support if necessary.
- Adjust and fine-tune: Depending on your preferences, make any necessary adjustments to the placement or alignment of the extended light strip. This may involve repositioning or securing any loose sections or ensuring that the lighting is evenly distributed across the extended strip.
It’s important to thoroughly test the extended light strip to ensure that it meets your expectations and functions properly. Taking the time to conduct a comprehensive test will help you identify any issues early on and make necessary adjustments for optimal performance.
Troubleshooting Common Issues with Extending Philips Hue Light Strips
While extending Philips Hue light strips can greatly enhance your lighting setup, you may encounter some common issues along the way. Here are a few troubleshooting tips to help you resolve these issues:
- Connection problems: If your extended light strip is not lighting up or is experiencing intermittent illumination, check the connections between the main light strip and the extension cable. Ensure that they are securely and properly connected. If necessary, disconnect and reconnect the cables, making sure the copper pads are aligned correctly.
- Inconsistent lighting: If you notice variations in brightness or color between different sections of the extended light strip, it could be due to power limitations. Check if the power adapter can provide enough power for the entire length of the extended strip. Consider using additional power adapters or splitting the extended strip into multiple shorter sections if needed.
- Flickering lights: Flickering lights can occur if the extension cables are not firmly connected or if there is a loose connection. Double-check all the connections and ensure they are secure. If the issue persists, try cleaning the copper pads on both the extension cable and the main light strip using a soft cloth to remove any dust or debris.
- Uneven illumination: If you notice sections of the extended light strip that are significantly brighter or dimmer than others, it could be due to poor alignment or a loose connection. Verify that the extension cable is properly aligned and securely connected to the main light strip. Adjust the placement of the extended strip if necessary to achieve more balanced and even lighting.
- Compatibility issues: Ensure that the extension cable you are using is compatible with your specific Philips Hue light strip model. Refer to the Philips Hue documentation or website for information on compatible cables. Using incompatible cables may result in compatibility or performance issues.
If you have followed these troubleshooting tips and are still encountering issues with your extended light strip, consider reaching out to Philips Hue customer support. They can provide further assistance and guidance to help resolve any persistent problems you may be facing.
Exploring Creative Ways to Use Your Extended Light Strip
Extending your Philips Hue light strip opens up a world of creative possibilities for enhancing the ambiance and aesthetic appeal of your space. Here are a few ideas to inspire you:
- Accent lighting: Use the extended light strip to highlight architectural features, artwork, or decorative elements in your home. Place the extended strip along bookcases, cabinets, or shelves to create a stylish and eye-catching display.
- Under-cabinet lighting: Extend the light strip underneath kitchen cabinets to provide practical and atmospheric lighting for your countertop workspace. This can add both functionality and a touch of modern elegance to your kitchen.
- Cove lighting: Install the extended light strip in a recessed area, such as a ceiling or wall cove, to create a soft and indirect lighting effect. This can add a welcoming and cozy ambiance to any room.
- Backlighting: Attach the extended light strip behind a TV or computer monitor to create a captivating backlighting effect. This not only enhances the visual appeal but can also reduce eye strain during extended screen time.
- Outdoor illumination: Extend the light strip outdoors to brighten up your patio, deck, or garden. Create a magical atmosphere for evening gatherings or use the lights to accentuate landscaping features or pathways.
- Colorful accent wall: Place the extended light strip vertically along the edge of an accent wall to add a vibrant burst of color. Set the lights to match your mood or create a dynamic and ever-changing light show.
- Mood lighting: Utilize the full range of colors and effects available with your Philips Hue light strip to set the perfect ambiance for any occasion. Create a cozy and warm atmosphere for a movie night or a lively and energetic ambiance for a party.
- Smart automation: Integrate your extended light strip with a smart home system or voice assistant for enhanced convenience and control. Schedule the lights to turn on/off at specific times, or sync them with music or other smart devices to create immersive experiences.
Let your imagination run wild and explore different ways to incorporate your extended light strip into your home decor. The versatility and flexibility of Philips Hue lighting systems allow you to transform any space into a personalized and captivating environment.
Tips for Maintaining and Cleaning Your Extended Light Strip
To keep your extended Philips Hue light strip in optimal condition and preserve its longevity, it’s important to follow these maintenance and cleaning tips:
- Regular dusting: Dust can accumulate on the surface of the light strip, affecting its brightness and overall performance. Use a soft, dry cloth or a feather duster to gently dust the light strip regularly. This will help maintain optimal illumination.
- Avoid excessive bending: While the light strip is flexible, excessive bending or twisting can damage the internal components. When installing or adjusting the extended light strip, handle it with care and avoid putting undue stress on the cables or the strip itself.
- Keep away from moisture: Ensure that the extended light strip is not exposed to excessive moisture or water. Philips Hue light strips are not waterproof, so it’s important to avoid placing them in areas prone to moisture, such as bathrooms or outdoor spaces without proper protection.
- Avoid direct sunlight: Prolonged exposure to direct sunlight can cause discoloration or fading of the light strip. Install the extended strip in areas where it will not be directly exposed to sunlight to maintain the vibrancy of the colors.
- Inspect and replace damaged cables: Regularly inspect the extension cables for any signs of damage or wear. If you notice any frayed wires, exposed copper, or other visible issues, replace the damaged cables promptly to prevent electrical hazards and ensure proper functionality of the light strip.
- Unplug during cleaning: When cleaning the light strip, always unplug it from the power source to avoid any potential electrical accidents. This will ensure your safety and prevent damage to the light strip.
- Avoid harsh chemicals: When cleaning the light strip or cables, refrain from using harsh chemicals or solvents. These can cause damage to the materials or compromise the adhesive properties of the strip. Instead, opt for mild soap and water solution or specialized electronics cleaning products.
- Follow manufacturer guidelines: Refer to the Philips Hue instructions manual or the official website for specific maintenance instructions and any additional recommendations. Adhering to the manufacturer guidelines will help you properly care for and extend the lifespan of your light strip.
By following these maintenance and cleaning tips, you can ensure that your extended Philips Hue light strip remains in optimal condition, providing you with beautiful and reliable lighting for years to come.