
What is XMP?
Xtreme Memory Profile, or XMP, is an overclocking feature built into the BIOS (Basic Input Output System) of many motherboards. It is designed to unleash the true potential of your computer’s memory modules, allowing them to operate at higher frequencies and lower latencies than their default settings. XMP was introduced by Intel to simplify the process of configuring memory settings for optimal performance.
By enabling XMP, you can take advantage of the high-performance capabilities of your RAM and achieve faster data transfer rates, reduced load times, and an overall boost in system responsiveness. XMP makes it easier for users to optimize their system’s memory without having to manually adjust multiple settings in the BIOS.
With XMP, overclocking RAM has become more accessible for both novice and advanced users. Traditionally, modifying memory timings and voltages required extensive knowledge and experience, often resulting in instability or compatibility issues. XMP solves these challenges by providing pre-programmed profiles that automatically adjust the necessary settings for optimal performance.
It is important to note that XMP is primarily intended for gamers, content creators, and enthusiasts who demand the highest performance from their systems. For everyday tasks such as web browsing and word processing, the difference in performance may not be as noticeable. However, for power users who regularly run resource-intensive applications or play demanding games, enabling XMP can provide a noticeable improvement in overall system performance.
Furthermore, XMP is not limited to a specific brand of memory module. It is a standardized feature that works with a wide range of DDR3 and DDR4 RAM modules from different manufacturers. This means that as long as your motherboard and RAM support XMP, you can enjoy the benefits of enhanced performance regardless of the specific brand or model of memory you have installed.
In the next sections, we will explore how to check compatibility, access BIOS settings, locate the XMP profile, enable XMP, verify the settings, and troubleshoot any potential issues that may arise during the process.
Benefits of Enabling XMP
Enabling XMP can unlock several important benefits for your computer’s memory performance. Let’s take a closer look at some of the advantages you can expect to enjoy:
- Improved Speed: XMP allows your RAM to operate at higher frequencies than the default settings, resulting in faster data transfer rates. This can lead to reduced loading times in applications, faster file transfers, and smoother overall system performance.
- Optimized Latency: XMP also enables your memory modules to utilize lower latencies, ensuring quicker response times between the CPU and RAM. This can reduce the delay in accessing data, resulting in snappier application launches and improved multitasking capabilities.
- Enhanced Gaming Performance: Gamers often benefit the most from XMP. By unleashing the full potential of your memory modules, XMP can provide a boost in frames per second (FPS) and reduce stuttering during gameplay, resulting in a smoother and more immersive gaming experience.
- Improved Content Creation: Content creators who work with resource-intensive tasks such as video editing, rendering, and 3D modeling can benefit from the increased memory performance provided by XMP. Faster memory speeds allow for quicker data processing, reducing the time required for complex tasks and boosting productivity.
- Compatibility: Memory modules often come with XMP profiles that are specifically optimized for compatibility with various motherboards. By enabling XMP, you ensure that your memory is running at its intended speeds and timings, reducing the chances of compatibility issues.
- Easy Setup: XMP simplifies the process of overclocking your RAM. Instead of manually adjusting various memory settings in the BIOS, XMP provides pre-configured profiles that automatically apply the optimal settings for your memory modules. This makes it more accessible for users, even those who may not have extensive knowledge of overclocking.
Overall, enabling XMP can provide a noticeable performance boost across various tasks and applications, making it a worthwhile step for those seeking to maximize their computer’s memory performance. Now that you understand the benefits of enabling XMP, let’s move on to the next section, where we will check the compatibility of your system and RAM with XMP.
Checking Compatibility
Before enabling XMP, it’s important to ensure that your system and memory modules are compatible with this feature. Here are a few steps you can take to check compatibility:
- Check Motherboard Support: First, determine if your motherboard supports XMP. Most modern motherboards, especially those designed for gaming or high-performance systems, have built-in XMP support. You can check the specifications of your motherboard on the manufacturer’s website or refer to the motherboard’s user manual.
- Verify CPU Compatibility: While XMP is primarily a motherboard-level feature, it’s worth verifying if your CPU supports XMP as well. In most cases, if your motherboard supports XMP, your CPU should be compatible. However, it’s a good practice to double-check the specifications of your CPU to ensure compatibility.
- Confirm RAM Compatibility: Check if your RAM modules are XMP-compatible. This information can usually be found on the product packaging or in the specifications provided by the manufacturer. It’s important to note that XMP is specific to DDR3 and DDR4 memory modules, so if you have older DDR2 memory, XMP might not be available.
- Check XMP Profiles: Some memory modules come with different XMP profiles. These profiles offer different levels of performance optimization. Consider reviewing the specifications or product details of your RAM to confirm the available XMP profiles and their supported speeds and timings.
- Consult Motherboard and RAM Documentation: If you’re still unsure about compatibility, consult the documentation provided with your motherboard and RAM modules. They often contain information on XMP compatibility or any known issues or limitations.
By performing these checks, you can ensure that your system, motherboard, CPU, and RAM are compatible with XMP. Compatibility is crucial to ensure that XMP can be successfully enabled and that your memory modules can operate at their intended speeds and timings.
Once you’ve confirmed compatibility, you’re ready to proceed to the next step: accessing the BIOS settings. In the next section, we’ll guide you through the process of accessing the BIOS and locating the XMP profile.
Accessing BIOS Settings
In order to enable XMP, you’ll need to access the BIOS (Basic Input Output System) settings of your computer. The BIOS is a firmware interface that allows you to configure various hardware settings, including memory options. Here’s how you can access the BIOS settings:
- Restart your computer: Start by restarting your computer. As it boots up, look for a message on the screen indicating the key or keys you need to press to enter the BIOS. Common keys include F2, Del, Esc, or F10. The specific key varies depending on your motherboard manufacturer.
- Enter the BIOS: Once you’ve identified the correct key, press it repeatedly during the boot process to enter the BIOS settings. Make sure to press the key at the right time – too early or too late may cause your computer to boot normally instead of entering the BIOS.
- Navigate the BIOS menu: Once you’ve entered the BIOS, you will be presented with a text-based or graphical interface. Use the arrow keys on your keyboard to navigate through the menu options. Look for options related to memory, overclocking, or performance settings. The exact location and wording may vary depending on your motherboard manufacturer and BIOS version.
- Save any necessary changes: Before making any modifications in the BIOS, it’s important to note that incorrect changes can potentially cause system instability. Therefore, it’s recommended to proceed with caution. Most modern BIOS interfaces provide the option to save and exit or discard changes. If you make any changes, make sure to save them before exiting the BIOS.
It’s worth noting that accessing the BIOS may differ slightly depending on your computer’s manufacturer and motherboard model. If you’re unsure about the specific steps for your system, refer to the user manual or the manufacturer’s website for detailed instructions.
Once you’ve successfully accessed the BIOS, you can now proceed to the next step, which is locating the XMP profile. In the following section, we’ll guide you through the process of finding the XMP profile and enabling it.
Locating XMP Profile
Once you have accessed the BIOS settings, the next step is to locate the XMP profile. The XMP profile contains the optimized settings for your memory modules, allowing them to operate at higher frequencies and lower latencies. Here’s how you can find the XMP profile:
- Navigate to the memory settings: In the BIOS menu, look for options related to memory settings or memory overclocking. These settings vary depending on your motherboard manufacturer and BIOS version.
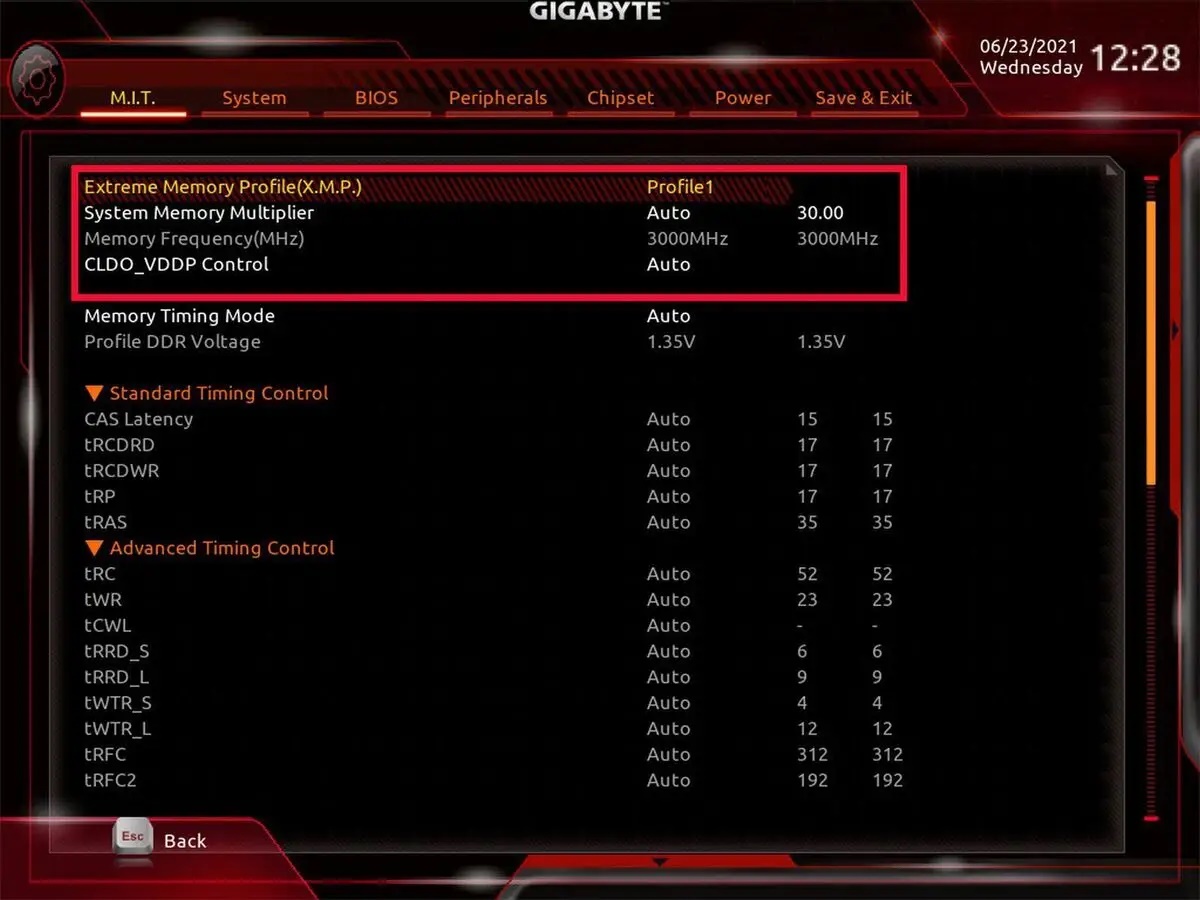
- Locate the XMP option: Within the memory settings, you should find an option labeled “XMP,” “Memory Profile,” or a similar term. Select this option to access the XMP profile settings.
- Check for multiple XMP profiles: Some motherboards and memory modules may offer multiple XMP profiles. These profiles provide different performance levels, allowing you to choose the one that best suits your needs. If multiple XMP profiles are available, you can select the desired profile based on the intended performance boost.
- Review the XMP settings: Once you’ve selected the XMP option, the BIOS will display the specific settings associated with the XMP profile. These settings may include memory frequency, timings, and voltage. Take a moment to review these settings to ensure they align with the specifications of your memory modules.
- Save the changes: If you are satisfied with the XMP profile settings, save the changes in the BIOS before exiting. The BIOS will apply the selected XMP profile, and your memory modules will now operate at the optimized settings.
It’s important to note that the exact location of the XMP profile and the wording used may vary depending on your motherboard manufacturer and BIOS version. If you are having trouble locating the XMP profile in the BIOS, consult the motherboard’s user manual or the manufacturer’s website for specific instructions.
With the XMP profile located and selected, you are now ready to enable XMP and unleash the full potential of your memory modules. In the next section, we will guide you through the process of enabling XMP in the BIOS settings.
Enabling XMP
Now that you have located the XMP profile in the BIOS settings, it’s time to enable it and unleash the full performance potential of your memory modules. Here’s how you can enable XMP:
- Select the XMP profile: In the BIOS settings, navigate to the XMP profile option that you located in the previous section. Select the desired XMP profile that best matches your memory modules and performance requirements.
- Enable XMP: Once you have selected the XMP profile, look for an option to enable or activate it. This option may be labeled as “Enable XMP,” “Enable Memory Profile,” or similar. Enable the XMP feature to apply the optimized settings.
- Save and exit: After enabling XMP, make sure to save the changes in the BIOS settings before exiting. This will ensure that the XMP profile is applied and your memory modules are now running at the optimized settings.
- Restart your computer: After saving the changes and exiting the BIOS, your computer will restart. During the boot process, your memory modules will start operating at the frequencies and timings specified in the XMP profile.
It’s important to note that enabling XMP may cause the system to become unstable if the memory modules are pushed beyond their capabilities. If you encounter any stability issues after enabling XMP, such as system crashes or blue screens, you may need to revisit the BIOS settings and try a different XMP profile or manually adjust the settings to find a stable configuration.
Once you have successfully enabled XMP, you can enjoy the improved performance and responsiveness offered by your memory modules. However, it is advisable to monitor system temperatures and stability after enabling XMP, especially if you engage in heavy usage or overclock other components.
In the next section, we will discuss the importance of verifying the XMP settings to ensure they have been applied correctly and are functioning as intended.
Verifying XMP Settings
After enabling XMP in the BIOS settings, it is crucial to verify that the XMP profile has been applied correctly and that your memory modules are running at the optimized settings. Here’s how you can verify the XMP settings:
- Check system information: Once your computer has restarted, you can check the system information within your operating system to see if the XMP settings have been applied. On Windows, you can use tools like CPU-Z or HWiNFO to view the memory frequency, timings, and voltage settings. These tools provide detailed information about your system’s hardware configuration.
- Confirm memory performance: After verifying the XMP settings in the system information, you can put your memory modules to the test to ensure they are running at the expected levels of performance. Running benchmarking software or stress tests can help evaluate the memory performance and compare it to the default settings.
- Monitor system stability: It’s essential to monitor your system’s stability after enabling XMP. Pay attention to any unusual behavior, such as system crashes, application errors, or instability during heavy usage. If you encounter any issues, it may indicate that the XMP profile is not compatible with your specific hardware configuration or that the memory modules are not capable of running at the chosen settings.
- Adjust XMP settings if needed: If you experience stability issues or encounter errors after enabling XMP, you may need to adjust the XMP settings. This can involve trying a different XMP profile if available or manually tweaking the memory frequency, timings, or voltage settings to find a stable configuration. However, it’s important to proceed with caution and make incremental changes to avoid causing additional problems.
Verifying the XMP settings and ensuring system stability is crucial to ensure that your memory modules are running optimally. Keep in mind that while XMP provides significant performance improvements, it also involves pushing the memory modules beyond their default specifications. As a result, there may be some trial and error involved in finding the perfect balance between performance and stability.
In the next section, we will explore some common troubleshooting steps to address potential issues that may arise when enabling XMP and adjusting memory settings.
Troubleshooting XMP Issues
Enabling XMP and adjusting memory settings can occasionally result in stability issues or compatibility problems. If you encounter any issues after enabling XMP, here are some troubleshooting steps you can take:
- Reset BIOS settings: If your system becomes unstable or fails to boot after enabling XMP, you can reset the BIOS settings to their default values. Refer to your motherboard’s user manual or manufacturer’s website for instructions on how to reset the BIOS. This will revert any changes you made, including the XMP profile, and allow you to start fresh.
- Update BIOS and firmware: Updating your motherboard’s BIOS and other hardware firmware can often address compatibility issues and provide better support for XMP. Check the manufacturer’s website for the latest BIOS and firmware updates, and follow their instructions to install them properly.
- Try a different XMP profile: If the stability issues persist, try selecting a different XMP profile, if available. Some memory modules come with multiple profiles that offer different levels of performance. Switching to an alternative profile may help resolve compatibility issues or provide a more stable configuration.
- Manually adjust memory settings: If the XMP profiles continue to cause issues, you can manually adjust the memory settings in the BIOS. Start by disabling XMP, then manually modify the frequency, timings, and voltage settings to conservative values. Gradually increase the settings and test for stability until you find a configuration that works reliably.
- Check for hardware issues: Occasionally, stability problems can be caused by faulty hardware. Ensure that all memory modules are properly seated in their slots and that there are no physical defects. You can also try testing each memory module individually to determine if a specific module is causing the problem.
It’s important to note that tinkering with BIOS settings and memory frequencies carries some risk, so proceed with caution and make incremental changes. Additionally, it’s advisable to maintain proper system cooling to ensure that the memory modules don’t overheat under the increased load caused by overclocked settings.
If you encounter persistent issues or are unsure about making changes yourself, seeking assistance from a knowledgeable technician or contacting the manufacturer’s support team can provide valuable guidance and help resolve any XMP-related problems.
With these troubleshooting steps, you can address potential issues that may arise when enabling XMP and adjusting memory settings. Remember, finding the right balance between performance and stability may require some trial and error, but with patience and thorough testing, you can unlock the full potential of your memory modules.