
What is USB Debugging Mode?
USB Debugging Mode is an advanced feature built into the Android operating system that allows users to establish a direct connection between their Android device and a computer via a USB cable. When USB Debugging Mode is enabled, it enables the Android device to communicate with the computer while running debugging tools or executing commands from the computer. This mode provides developers and advanced users with increased control and access to their Android device, facilitating tasks such as installing custom ROMs or debugging applications.
USB Debugging Mode enables the transfer of data between the Android device and the computer, allowing developers to monitor and troubleshoot apps, view logs, and test new features and functionalities. It provides a bridge for software development and testing, giving developers the ability to deploy and test their applications directly on the device, which helps in identifying and fixing any issues or bugs.
By enabling USB Debugging Mode, users gain access to various advanced features and tools, such as Android Debug Bridge (ADB) commands, which allow for the installation of apps from the computer, accessing the device’s shell, capturing screenshots, recording screen activity, and much more. This mode is particularly useful for developers, software testers, and enthusiasts who want to explore and modify the inner workings of their Android device.
It is important to note that USB Debugging Mode should only be enabled when necessary, as it grants elevated privileges and access to sensitive data on the device. Therefore, it is recommended to disable USB Debugging Mode once the required tasks are completed or when not needed to ensure the security and privacy of the device.
Why Enable USB Debugging Mode?
Enabling USB Debugging Mode on your Android device has several benefits and can be extremely useful for various scenarios. Whether you are a developer, a tech-savvy user, or someone who loves to explore the capabilities of their Android device, USB Debugging Mode opens up a whole new world of possibilities.
One of the primary reasons to enable USB Debugging Mode is for app development and testing purposes. As a developer, debugging and troubleshooting applications directly on your Android device becomes much easier with USB Debugging Mode enabled. You can connect your device to your computer and use debugging tools like Android Debug Bridge (ADB), which allows you to monitor logs, execute commands, and install or uninstall apps directly from your computer.
For Android enthusiasts, enabling USB Debugging Mode provides them with the ability to customize their devices to their heart’s content. With this mode enabled, you can install custom ROMs, enable root access, and modify various system settings to personalize your Android device. It opens doors to a vast array of customizations and tweaks that can enhance the device’s performance and user experience.
If you encounter any issues or bugs with your Android device, enabling USB Debugging Mode is essential for troubleshooting. By connecting your device to a computer with USB Debugging Mode enabled, you can access debugging tools to identify the root cause of the problem and find potential solutions.
Another advantage of enabling USB Debugging Mode is the ability to take screenshots, record screen activity, and screen mirroring. This is particularly useful for creating tutorials, demos, or showcasing your device’s functionality to others.
It’s important to note that enabling USB Debugging Mode does have some security implications. Allowing an external device to access the inner workings of your Android device can pose risks if not used responsibly. Therefore, it is recommended to enable USB Debugging Mode only when necessary and with caution. Additionally, keep in mind that some actions, such as installing custom ROMs or modifying system settings, can void your device’s warranty.
Overall, USB Debugging Mode is a powerful feature that grants users increased control and access to their Android devices. It is a gateway to advanced functionalities, app development, customization, and troubleshooting. However, it should be used responsibly while considering the potential risks and implications.
Steps to Enable USB Debugging Mode on Android
Enabling USB Debugging Mode on your Android device is a straightforward process. The steps may vary slightly depending on the version of Android you are using, but the general process remains the same across most devices.
Here is a step-by-step guide to help you enable USB Debugging Mode on your Android device:
- Unlock your Android device and go to the “Settings” menu.
- Scroll down and tap on “About phone” or “About device”.
- Look for the “Build number” or “Build version” option and tap on it seven times. This will enable the “Developer options” on your device.
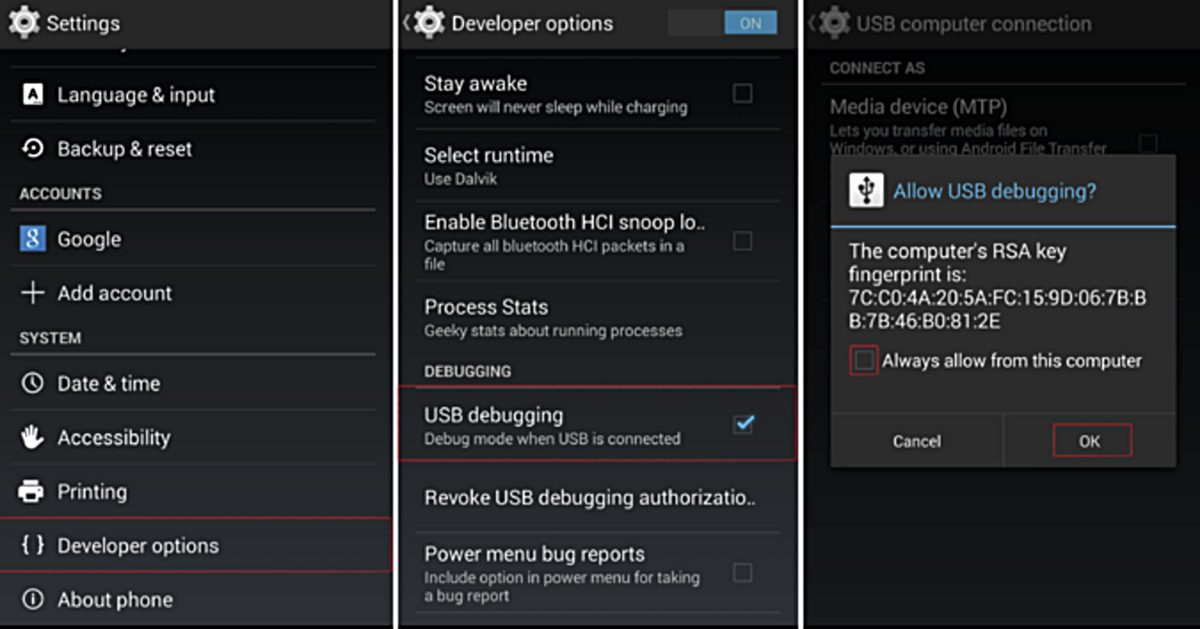
- Go back to the main “Settings” menu and you should now see “Developer options” listed.
- Tap on “Developer options” to open the menu.
- Scroll down and find the “USB debugging” option.
- Toggle the switch next to “USB debugging” to enable it. You may be prompted with a warning message; click “OK” to proceed.
- Connect your Android device to your computer using a USB cable.
- A notification may appear on your device asking for permission to allow USB debugging. Confirm and grant permission by tapping on “OK” or “Allow”.
- Once enabled, you will see a small debugging icon in the notification bar, indicating that USB Debugging Mode is active.
That’s it! You have successfully enabled USB Debugging Mode on your Android device. You can now use debugging tools, access the Android Debug Bridge (ADB), and perform various advanced tasks and functions.
It’s worth mentioning that the steps outlined above are generally applicable to Android devices running newer versions of the operating system, such as Android 4.2 and newer. If you are using an older version of Android, the process might differ slightly.
If you’re still having trouble enabling USB Debugging Mode, refer to your device’s user manual or perform an online search for specific instructions tailored to your device model and Android version.
Enabling Developer Options
Before you can enable USB Debugging Mode on your Android device, you need to enable Developer Options. Developer Options is a hidden settings menu that provides additional features and customization options for advanced users and developers.
Enabling Developer Options is a simple process. Here’s how you can do it:
- Open the “Settings” menu on your Android device.
- Scroll down and tap on “About phone” or “About device”.
- Look for the “Build number” or “Build version” option.
- Tap on the “Build number” or “Build version” option repeatedly, typically around seven times. Keep tapping until you see a message indicating that you are now a developer.
- Once you see the message, you have successfully enabled Developer Options on your Android device.
Now that Developer Options is enabled, you can access it from the main Settings menu. It should be located either at the bottom of the Settings menu or under the “System” or “Advanced” category, depending on the device.
Note that enabling Developer Options does not automatically enable USB Debugging Mode. You will still need to follow the steps outlined in the previous section to enable USB Debugging Mode specifically.
It’s important to exercise caution when accessing and modifying settings in Developer Options, as making incorrect changes can have unintended consequences on your device’s performance. Only make changes if you are familiar with the options or if you have specific instructions from a reliable source.
Once you have enabled Developer Options, you gain access to various additional settings and features that can enhance your Android experience. These options can vary depending on the device and Android version, but common features include adjusting animation scales, enabling USB debugging, tweaking system performance, and enabling OEM unlocking.
Remember, Developer Options is intended for advanced users and developers who understand the potential implications of the changes they make. If you are uncertain about a specific setting or its impact on your device, it is best to research or seek guidance before making any modifications.
Enabling USB Debugging Mode on Android 4.2 and newer versions
If you are using Android 4.2 Jelly Bean or a newer version of the operating system, the steps to enable USB Debugging Mode are slightly different compared to older versions. Here’s how you can enable USB Debugging Mode on Android 4.2 and newer:
- Unlock your Android device and go to the “Settings” menu.
- Scroll down and tap on “About phone” or “About device”.
- Scroll down again and find the “Build number” or “Build version” option.
- Tap on the “Build number” or “Build version” option seven times. You will see a message indicating that you are now a developer.
- Return to the main “Settings” menu and you should now see “Developer options” listed.
- Tap on “Developer options” to open the menu.
- Scroll down and find the “USB debugging” option.
- Toggle the switch next to “USB debugging” to enable it. You may see a warning message; click “OK” to proceed.
- Connect your Android device to your computer using a USB cable.
- When prompted on your device, allow USB debugging by tapping on “OK” or “Allow”.
- You will see a small debugging icon in the notification bar, indicating that USB Debugging Mode is active.
Once USB Debugging Mode is enabled, you can use various debugging tools, such as Android Debug Bridge (ADB), to perform tasks like installing and debugging applications, accessing the device’s shell, and capturing logs. This mode provides developers and advanced users with increased control over their Android device and facilitates testing and troubleshooting.
Remember to disable USB Debugging Mode when you no longer need it, as it grants elevated privileges and access to sensitive data on your device. This will help ensure the security and privacy of your device.
If you encounter any issues enabling USB Debugging Mode or have trouble establishing a connection with your computer, make sure you have the necessary drivers installed and that the USB cable you are using is in good condition. Additionally, verify that your computer recognizes the Android device and that the USB Debugging Mode is enabled on the device.
Following these steps, you can easily enable USB Debugging Mode on Android 4.2 and newer versions, unlocking advanced features and functionalities for development and customization.
Enabling USB Debugging Mode on Android 4.1 and older versions
If you are using an Android device running Android 4.1 Jelly Bean or an older version of the operating system, enabling USB Debugging Mode might be slightly different compared to newer versions. Here’s how you can enable USB Debugging Mode on Android 4.1 and older:
- Unlock your Android device and go to the “Settings” menu.
- Scroll down and tap on “Developer options”.
- If you don’t see “Developer options” listed, go to the next step. If you see “Developer options”, skip to step 6.
- If “Developer options” is not listed, go back to the main “Settings” menu and scroll down to find “About phone” or “About device”.
- Scroll down again and find the “Build number” or “Build version” option.
- Tap on the “Build number” or “Build version” option seven times. This will enable “Developer options”.
- Return to the main “Settings” menu and tap on “Developer options”.
- Scroll down and find the “USB debugging” option.
- Toggle the switch next to “USB debugging” to enable it. You may see a warning message; click “OK” to proceed.
- Connect your Android device to your computer using a USB cable.
- If prompted on your device, allow USB debugging by tapping on “OK” or “Allow”.
- A small debugging icon will appear in the notification bar, indicating that USB Debugging Mode is active.
With USB Debugging Mode enabled, you can now utilize various debugging tools like Android Debug Bridge (ADB) to manage and control your Android device from your computer. This mode provides advanced users and developers with the ability to sideload applications, access the device’s shell, and examine system logs.
Remember to disable USB Debugging Mode when it is no longer needed. Leaving it enabled can pose potential security risks, as it grants elevated access and privileges to your device. Disabling USB Debugging Mode ensures the privacy and security of your Android device.
If you encounter any issues enabling USB Debugging Mode or establishing a connection with your computer, make sure you have the appropriate drivers installed for your device and that the USB cable you are using is in good condition. Additionally, check that your computer recognizes the Android device and that USB Debugging Mode is enabled.
By following these steps, you can easily enable USB Debugging Mode on Android 4.1 and older versions, unlocking advanced capabilities for debugging, development, and customization.
Verifying USB Debugging Mode is Enabled
Once you have enabled USB Debugging Mode on your Android device, it is important to verify that it is properly enabled. This verification step ensures that your device is ready for debugging and other advanced tasks. Here are a few ways to verify if USB Debugging Mode is enabled:
- USB Debugging Icon: Check the notification bar on your Android device. If you see a small debugging icon, typically depicted as an Android bug or a bug-like symbol, it indicates that USB Debugging Mode is active.
- Developer Options: Open the “Settings” menu on your Android device and go to “Developer options”. If the “USB debugging” option is toggled on or enabled, it confirms that USB Debugging Mode is properly enabled.
- USB Connection Pop-up: When you connect your Android device to a computer via USB while USB Debugging Mode is enabled, a pop-up notification may appear on your device. It will ask for permission to allow USB debugging in the connected computer. Confirming or allowing this pop-up verifies that USB Debugging Mode is enabled and functioning correctly.
It is important to note that the verification methods listed above may vary depending on the device model and Android version. However, the USB Debugging icon in the notification bar and the USB Debugging option in the Developer Options menu are commonly found across most Android devices.
If you do not see the USB Debugging icon or if the USB Debugging option is not enabled, double-check the steps to enable USB Debugging Mode on your specific Android device. Ensure that you followed the correct process and that the necessary settings are properly configured.
In some cases, restarting your Android device or reconnecting it to the computer via USB can help resolve any temporary issues or discrepancies in the USB Debugging Mode verification process.
Verifying that USB Debugging Mode is enabled is crucial before attempting any debugging tasks or advanced operations on your Android device. It ensures that your device is ready to communicate with the computer and allows you to make the most of the capabilities and features provided by USB Debugging Mode.
Disabling USB Debugging Mode
Once you have completed the tasks that require USB Debugging Mode on your Android device, it is important to disable it. Disabling USB Debugging Mode helps maintain the security and privacy of your device by revoking the elevated privileges and access granted to your computer. Here’s how you can disable USB Debugging Mode:
- Unlock your Android device and go to the “Settings” menu.
- Scroll down and tap on “Developer options”.
- Find the “USB debugging” option and toggle the switch to turn it off. You may see a confirmation dialog; tap “OK” to proceed.
Once you have disabled USB Debugging Mode, the connection between your Android device and your computer will no longer have the same level of access and control. This helps protect your device from potential threats and ensures that sensitive data remains secure.
Disabling USB Debugging Mode is particularly important if you share your device with others, or if you are concerned about unauthorized access or potential data breaches. It is a good practice to disable USB Debugging Mode when it is not required or when you have completed the necessary tasks.
If you cannot find the “Developer options” menu to disable USB Debugging Mode, it is likely that you have not enabled Developer Options in the first place. In such cases, you can skip this step, as USB Debugging Mode will automatically be disabled.
Remember that disabling USB Debugging Mode does not delete or remove any previously installed apps or modifications on your Android device. It simply prevents further debugging and prevents unauthorized access from connected computers.
If you need to re-enable USB Debugging Mode in the future, you can follow the steps outlined in the previous sections to quickly enable it again.
By disabling USB Debugging Mode when not needed, you ensure the security and privacy of your Android device, and you can have peace of mind knowing that your device is protected from potential risks and unauthorized access.