
What is UPnP?
Universal Plug and Play (UPnP) is a set of networking protocols that allow devices on a local network to discover and communicate with each other seamlessly. It simplifies the process of connecting and configuring devices, making it easier for users to set up their home networks.
UPnP enables devices, such as computers, routers, printers, media servers, and smart TVs, to automatically discover and establish connections with each other for sharing data, streaming media, and performing various tasks. It eliminates the need for manual network configuration, making it convenient for non-technical users to connect devices and enjoy their functionalities.
With UPnP, devices can dynamically obtain IP addresses, configure port forwarding, and establish secure connections without any user intervention. It uses protocols like Simple Service Discovery Protocol (SSDP) and Internet Gateway Device Protocol (IGDP) to facilitate automatic device discovery and management.
One of the main advantages of UPnP is its ability to simplify media sharing within a network. Devices such as media servers can automatically make their content available to other devices, such as smart TVs or game consoles, without requiring manual configuration. This enables seamless streaming of movies, music, and photos across different devices in the network.
UPnP also plays a significant role in home automation by allowing devices like smart thermostats, security cameras, and lighting systems to communicate with each other. This integration enables users to control and monitor their devices through a centralized interface or mobile app.
It is important to note that UPnP is designed for use within private, trusted networks. It is not intended to be used over the internet or in public networks due to potential security risks. However, with proper configuration and caution, UPnP can contribute to a more connected and efficient home network.
Why Enable UPnP on a Router?
Enabling UPnP on a router offers several benefits for home network users, simplifying the connectivity and functionality of devices. Here are some key reasons why you should consider enabling UPnP on your router:
- Automatic device discovery: With UPnP enabled, devices on your network can automatically discover and connect to each other without manual configuration. This means that you don’t have to manually enter IP addresses or set up port forwarding rules for each device, saving you time and effort.
- Easier media sharing: By enabling UPnP, you can effortlessly share media files, such as movies, music, and photos, across different devices in your network. Whether you want to stream a movie from your computer to your smart TV or listen to music on your smartphone from a network-attached storage (NAS) device, UPnP simplifies the process by automatically making the content available to compatible devices.
- Improved gaming experience: Gamers can benefit from enabling UPnP on their routers. Many online multiplayer games require certain ports to be open for seamless communication between players. UPnP can automatically handle the port forwarding required for these games, ensuring a smoother gaming experience by eliminating the need for manual configuration.
- Enhanced home automation: With the proliferation of smart devices in modern homes, enabling UPnP can facilitate seamless communication between these devices. For example, you can control your smart thermostat using your smartphone or have your security cameras send alerts to your smart TV. UPnP enables easy integration and interoperability between various smart devices, making your home automation system more efficient and convenient.
- Simplified network management: Enabling UPnP can make managing your home network a breeze. Instead of manually setting up rules for each device, UPnP allows your devices to communicate with each other and the internet seamlessly. This plug-and-play functionality reduces the complexity of network management and ensures that connected devices can easily interact with each other.
Overall, enabling UPnP on your router can simplify the setup and usage of devices in your home network, allowing for seamless device discovery, media sharing, gaming, home automation, and network management. However, it’s crucial to be aware of the potential security risks associated with UPnP and take necessary precautions to protect your network from unauthorized access.
How to Check If Your Router Supports UPnP?
Before enabling UPnP on your router, it’s important to check if your router supports this feature. Here are a few methods to determine if your router has UPnP capability:
- User Manual: Consult the user manual or documentation that came with your router. Look for information about UPnP support or any related features. The user manual should provide specific instructions on how to enable or disable UPnP if it is supported.
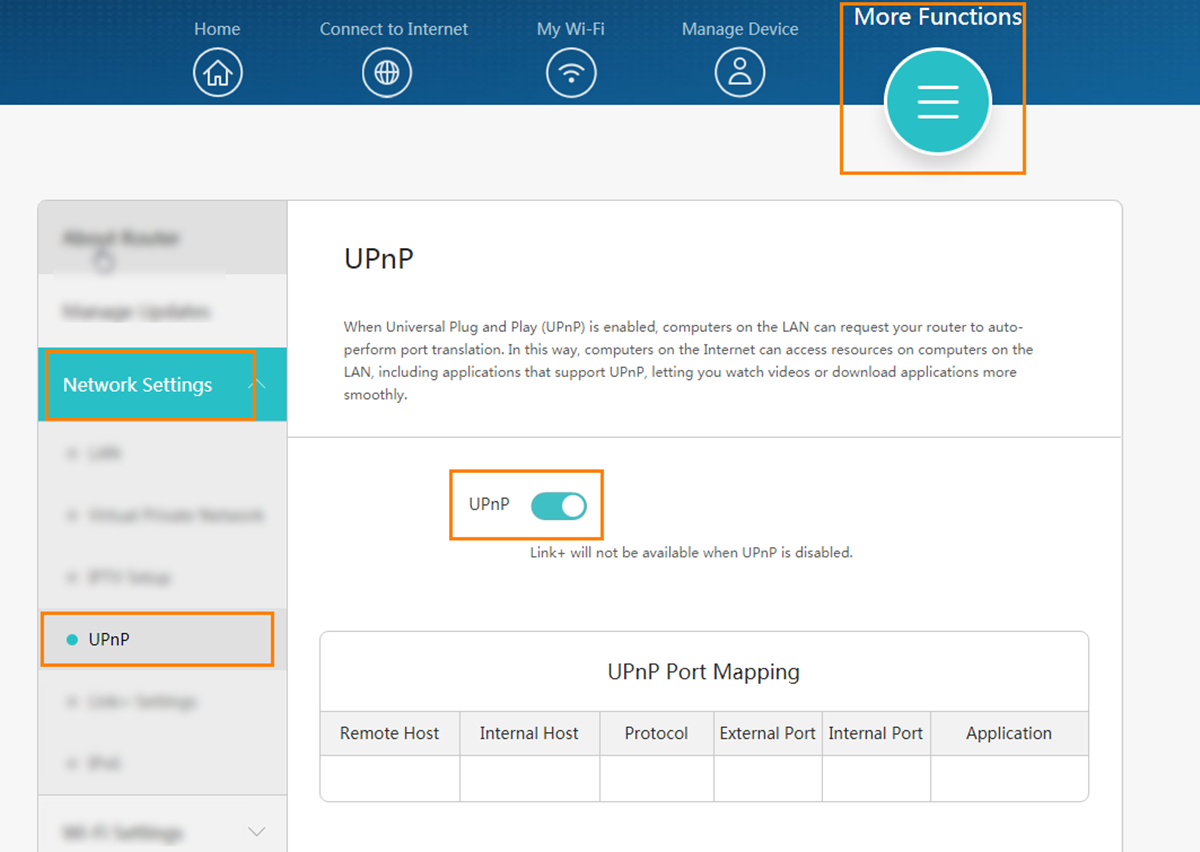
- Router Configuration Interface: Access your router’s configuration interface through a web browser. Open a browser and enter the router’s IP address in the address bar (common addresses are 192.168.0.1 or 192.168.1.1). Log in using the router’s administrator credentials. Once logged in, navigate through the settings or advanced options to locate the UPnP or Universal Plug and Play section. If you find UPnP settings, it indicates that your router supports UPnP.
- Router Manufacturer’s Website: Visit the website of the manufacturer that produced your router. Look for the specific model of your router and search for its specifications or features. The manufacturer’s website should provide details about UPnP support for your router model.
- Third-Party Router Checker Tools: Some online tools can scan your network and provide information about your router’s capabilities. These tools can detect if UPnP is supported on your router and may provide additional information about its configuration status and security. Examples of such tools include “UPnP Router Checker” and “GRC Shield’s UPnP Exposure Test”.
- Online Community Forums: Join online forums or communities dedicated to networking and router discussions. Post a question about your router model and ask if it supports UPnP. Members of the community, including experienced users or experts, may provide valuable insights and information about your router’s UPnP compatibility.
By using these methods, you can determine if your router supports UPnP. Once you confirm that your router has UPnP capability, you can proceed with enabling it to take advantage of the benefits that UPnP offers for your home network.
Enabling UPnP on a Windows Computer
If you’re using a Windows computer and want to enable UPnP, follow these steps:
- Step 1: Press the Windows key and R simultaneously to open the Run dialog box.
- Step 2: Type “control” into the Run dialog box and click OK. This will open the Control Panel.
- Step 3: In the Control Panel, select “Network and Internet”.
- Step 4: Click on “Network and Sharing Center”.
- Step 5: In the left sidebar, click on “Change adapter settings”.
- Step 6: Right-click on the network connection you want to enable UPnP for (e.g., Wi-Fi or Ethernet) and select “Properties” from the context menu.
- Step 7: In the Properties window, scroll down and locate “Internet Protocol Version 4 (TCP/IPv4)” or “Internet Protocol Version 6 (TCP/IPv6)” depending on the type of connection you are using.
- Step 8: Select the appropriate protocol version and click on the “Properties” button.
- Step 9: In the Properties window, click on the “Advanced” button.
- Step 10: In the Advanced TCP/IP Settings window, navigate to the “Options” tab.
- Step 11: Under the “Options” tab, check the box next to “Enable Universal Plug and Play (UPnP)” and click OK to save the changes.
Once you have completed these steps, UPnP will be enabled on your Windows computer. This allows your computer to interact with UPnP devices on your network and enables seamless device discovery, media sharing, and other UPnP functionalities.
Note that the steps provided may vary slightly depending on your version of Windows. However, the general process should be similar across different versions.
Enabling UPnP on a Mac Computer
If you’re using a Mac computer and want to enable UPnP, follow these steps:
- Step 1: Click on the Apple menu in the top-left corner of your screen and select “System Preferences”.
- Step 2: In the System Preferences window, click on “Network”.
- Step 3: Select the network connection you want to enable UPnP for (e.g., Wi-Fi or Ethernet) from the list on the left side of the Network window.
- Step 4: Click on the “Advanced” button at the bottom-right corner of the Network window.
- Step 5: In the Advanced settings, navigate to the “TCP/IP” tab.
- Step 6: Under the “TCP/IP” tab, look for the “Configure IPv4” or “Configure IPv6” dropdown menu, depending on the type of connection you are using.
- Step 7: Select “Using DHCP with manual address” from the dropdown menu.
- Step 8: Below the dropdown menu, you will see a list of settings. Click on the “+” button to add a new setting.
- Step 9: In the new setting, enter the following details:
- IPv4 Address: Leave this field blank.
- Subnet Mask: Leave this field blank.
- Router: Leave this field blank.
- Step 10: Click on the “OK” button to save the new setting.
- Step 11: Click on the “Apply” button to apply the changes.
Once you have completed these steps, UPnP will be enabled on your Mac computer. This allows your computer to interact with UPnP devices on your network and enables seamless device discovery, media sharing, and other UPnP functionalities.
Please note that the steps provided may vary slightly depending on your version of macOS. However, the general process should be similar across different versions.
Enabling UPnP on a Linux Computer
If you’re using a Linux computer and want to enable UPnP, follow these steps:
- Step 1: Open a terminal window on your Linux computer. You can do this by pressing Ctrl+Alt+T simultaneously or by searching for “Terminal” in the application launcher.
- Step 2: In the terminal window, enter the following command to install the necessary package:
- Step 3: After the installation is complete, open the configuration file for the UPnP daemon by entering the following command:
- Step 4: In the configuration file, locate the following line:
- Step 5: Enter the network interface you want to enable UPnP for after the equal sign. For example, if you want to enable UPnP for the eth0 interface, the line should look like this:
- Step 6: Save the changes by pressing Ctrl+O and then exit the nano editor by pressing Ctrl+X.
- Step 7: Restart the UPnP daemon by entering the following command:
sudo apt-get install miniupnpd
sudo nano /etc/miniupnpd/miniupnpd.conf
upnp_interfaces=
upnp_interfaces=eth0
sudo service miniupnpd restart
Once you have completed these steps, UPnP will be enabled on your Linux computer. This allows your computer to interact with UPnP devices on your network and enables seamless device discovery, media sharing, and other UPnP functionalities.
Please note that the steps provided may vary slightly depending on your specific Linux distribution and version. However, the general process should be similar across different distributions. If you encounter any issues, consult your distribution’s documentation or online resources for more specific instructions.
Enabling UPnP on a Mobile Device
If you want to enable UPnP on your mobile device, follow these general steps:
- Step 1: Open the Settings app on your mobile device.
- Step 2: Look for the “Network” or “Wi-Fi” option, depending on your device and operating system.
- Step 3: Tap on the name of your Wi-Fi network to bring up its settings.
- Step 4: In the network settings, search for an option related to advanced settings or advanced options.
- Step 5: Within the advanced settings, look for an option related to UPnP or Universal Plug and Play.
- Step 6: Toggle the UPnP or Universal Plug and Play option to “On” or “Enabled”.
- Step 7: Save the settings and exit the network configuration menu.
Please note that the steps provided above are a general guideline and may vary slightly depending on your device manufacturer and operating system version. Different devices may have different menu layouts or terminologies.
If you encounter any difficulties enabling UPnP on your mobile device, consider referring to the device’s user manual or searching for specific instructions online. You can also reach out to the device manufacturer’s support or community forums for further assistance tailored to your specific device.
Enabling UPnP on a PlayStation Console
If you want to enable UPnP on your PlayStation console, follow these steps:
- Step 1: Turn on your PlayStation console and navigate to the main menu.
- Step 2: Scroll to the right and select “Settings”.
- Step 3: In the settings menu, select “Network Settings”.
- Step 4: Choose your network connection, either Wi-Fi or Ethernet.
- Step 5: Select “Custom” to manually configure network settings.
- Step 6: At the IP Address Settings prompt, choose “Automatic”.
- Step 7: At the DHCP Host Name prompt, select “Do Not Specify”.
- Step 8: At the DNS Settings prompt, choose “Automatic”.
- Step 9: At the MTU Settings prompt, select “Automatic”.
- Step 10: At the Proxy Server prompt, choose “Do Not Use”.
- Step 11: At the UPnP prompt, select “Enabled”.
- Step 12: Confirm your settings and complete the network setup process.
Once you have completed these steps, UPnP will be enabled on your PlayStation console. This allows your console to interact with UPnP devices on your network and enables seamless device discovery, media sharing, and other UPnP functionalities.
Please note that the steps provided above may slightly differ depending on your PlayStation console model and firmware version. However, the general process should be similar across different PlayStation models.
If you encounter any difficulties enabling UPnP on your PlayStation console, consult the PlayStation user manual or documentation for more specific instructions. You can also reach out to PlayStation support for further assistance tailored to your specific console.
Enabling UPnP on an Xbox Console
If you want to enable UPnP on your Xbox console, follow these steps:
- Step 1: Power on your Xbox console and navigate to the main menu.
- Step 2: Press the Xbox button on your controller to open the guide menu.
- Step 3: Navigate to the “Profile & system” tab.
- Step 4: Select “Settings” from the options.
- Step 5: Choose “General” from the settings menu.
- Step 6: Scroll down and select “Network settings”.
- Step 7: Choose “Advanced settings”.
- Step 8: In the Advanced settings menu, select “Alternate MAC address”.
- Step 9: Choose “Clear”, and then select “Restart” to reboot your console.
- Step 10: After the restart, return to the “Advanced settings” menu.
- Step 11: Select “DNS settings”.
- Step 12: Choose “Automatic” to let the Xbox automatically obtain DNS settings.
- Step 13: Return to the “Advanced settings” menu again.
- Step 14: Select “Network settings” one more time.
- Step 15: Choose “Test network connection” to verify the UPnP status.
- Step 16: If the test indicates that UPnP is not enabled, select “Keep current settings” and proceed to step 17.
- Step 17: If UPnP is not enabled, choose “Manual”.
- Step 18: At the Manual configuration screen, locate the UPnP setting and toggle it to “Enabled”.
- Step 19: Save the settings and go back to the main menu.
Once you have completed these steps, UPnP will be enabled on your Xbox console. This allows your console to interact with UPnP devices on your network and enables seamless device discovery, media sharing, and other UPnP functionalities.
Please note that the steps provided above may slightly differ depending on your Xbox console model and software version. However, the general process should be similar across different Xbox models.
If you encounter any difficulties enabling UPnP on your Xbox console, consult the Xbox user manual or online documentation for more specific instructions. You can also reach out to Xbox support for further assistance tailored to your specific console.
Potential Security Risks of UPnP
While UPnP offers convenience and seamless device connectivity, it also introduces potential security risks that users should be aware of. Here are some of the risks associated with UPnP:
- Unauthorized Access: Enabling UPnP allows devices on your network to automatically open ports and create connections with external devices. This can potentially lead to unauthorized access to your network or devices if proper security measures are not in place.
- Malware and Exploits: UPnP can potentially be exploited by malware or attackers to discover and compromise vulnerable devices on your network. If one device with UPnP enabled becomes infected, it may allow the malware to spread and gain control over other devices.
- UPnP Amplification Attacks: UPnP can be exploited to launch amplification attacks, where an attacker can send a small request to a UPnP device, which then responds with a larger amount of data, overwhelming the target device or network with an excessive amount of traffic.
- Device Vulnerabilities: Some UPnP devices may have security vulnerabilities or outdated firmware that can be exploited by attackers. If these devices are connected to your network, they can serve as entry points for unauthorized access or attacks.
- Privacy Concerns: UPnP can potentially expose sensitive information about your network and devices, making it easier for hackers to gather information and target specific vulnerabilities.
- Network Congestion: Improperly configured or misbehaving UPnP devices can cause network congestion or disruptions, affecting the performance and stability of your network.
To mitigate these security risks, consider taking the following measures:
- Regular Firmware Updates: Keep your devices up to date with the latest firmware or software updates to address security vulnerabilities and improve overall device security.
- Disable UPnP: If you don’t require UPnP functionality, consider disabling it on your router or individual devices to minimize potential risks. This may require manual configuration of port forwarding rules for specific applications or services.
- Secure Configurations: Configure your devices with strong passwords, change default usernames, and disable any unnecessary features or services that may introduce security vulnerabilities.
- Network Segmentation: Consider segmenting your network to isolate UPnP devices from critical systems or sensitive information. This can help contain any potential security breaches and limit the impact on your network.
- Network Monitoring: Regularly monitor your network for any suspicious activities or unexpected behaviors from devices with UPnP enabled. Implement intrusion detection systems or network monitoring tools to detect and mitigate potential threats.
- Educate Users: Educate users on your network about the potential risks and best practices for maintaining a secure network environment. Encourage them to be cautious when enabling UPnP and to regularly update their devices with the latest security patches.
By being aware of these potential security risks and implementing appropriate security measures, you can minimize the vulnerabilities associated with UPnP and ensure the protection of your network and devices.
Troubleshooting Common Issues with UPnP
While UPnP is designed to simplify device connectivity and configuration, it can sometimes encounter issues that may disrupt its functionality. If you are experiencing problems with UPnP, here are some common issues and troubleshooting steps:
- Device Recognition: If devices on your network are not being recognized or are unable to establish connections with each other, ensure that UPnP is enabled on all devices. Check the settings or configuration menus of each device to verify that UPnP is enabled.
- Network Firewall: If you have a firewall enabled on your network or router, it may be blocking UPnP connections. Check the firewall settings and ensure that the necessary ports and protocols for UPnP are allowed through the firewall.
- Router Compatibility: Not all routers fully support UPnP or may have limited functionality. If you are experiencing issues, confirm that your router supports UPnP and is running the latest firmware. Some routers may require a firmware update to resolve compatibility issues.
- Network Configuration: Ensure that your network is properly configured for UPnP. Double-check that your router’s UPnP settings are enabled and that your devices are connected to the same network. If you have multiple routers or network segments, ensure that UPnP is enabled on all relevant devices.
- Device Firmware Updates: Firmware updates for your devices can introduce bug fixes and improvements that can resolve UPnP-related issues. Check for firmware updates for your devices and ensure they are up to date with the latest software versions.
- Restart Devices: Sometimes, a simple restart can resolve connectivity issues. Try restarting your router, modem, and devices to refresh the network connections and establish proper UPnP communication.
- UPnP Service Restart: If UPnP is not functioning correctly on a specific device, restarting the UPnP service or application on that device can help resolve the issue. Look for the UPnP service in the device’s settings or services menu and restart it.
- Reset Router to Factory Defaults: As a last resort, you can reset your router to its factory default settings. Be cautious as this will erase all custom settings and configurations. After resetting, reconfigure your router and enable UPnP again.
If you have exhausted these troubleshooting steps and are still experiencing issues with UPnP, it may be helpful to consult the support documentation or seek assistance from the manufacturer or service provider of your devices or router. They can provide specific guidance and help resolve any further technical problems.
Remember, UPnP is a helpful feature when properly configured and used in a trusted network environment. However, it’s crucial to be vigilant and regularly update your devices and network security measures to mitigate potential risks and ensure a smooth UPnP experience.