
Step 1: Gather the necessary materials
Before you begin to draw an animation character sheet, it is essential to gather all the necessary materials. Having the right tools in hand will ensure a smooth and enjoyable drawing process. Here’s a list of materials you’ll need:
- Pencil: Start with a good quality pencil that allows you to make light lines for sketching and darker lines for defining the character’s features.
- Sketchbook or Drawing Paper: Choose a sketchbook or drawing paper that suits your preferences. It should have enough pages to accommodate multiple character designs and allow room for revisions.
- Eraser: Have a good quality eraser to correct any mistakes or make changes to your sketches without damaging the paper.
- Reference Images: Find reference images of the type of character you want to draw. These can be images from movies, cartoons, or even real-life references. They will help you understand the anatomy and proportions of the character.
- Ruler: A straight edge ruler or a T-square will come in handy for drawing straight lines and maintaining symmetry in your character’s design.
- Coloring Materials (optional): If you plan to add color to your character, gather colored pencils, markers, or watercolor paints that you’re comfortable using. This will give your character sheet a vibrant and lively look.
Having these materials ready will ensure that you can focus on the creative process without any interruptions. It’s always helpful to keep your workspace organized and have everything within reach.
Now that you have gathered all your materials, let’s move on to the next step: starting with a basic sketch.
Step 2: Start with a basic sketch
To create an animation character sheet, it’s important to begin with a basic sketch. This serves as the foundation for developing the character’s overall design and proportions. Here’s how you can start:
- Define the shape: Begin by sketching a rough oval or circle to establish the head shape. This will determine the overall proportions of the character.
- Add the construction lines: Using light, dashed lines, sketch vertical and horizontal lines to divide the head into halves and quarters. These lines will help you establish the positioning of facial features and maintain symmetry.
- Establish the body: Beneath the head, sketch a line for the character’s spine. From there, draw simple shapes to represent the torso, limbs, and joints. Use light, fluid lines to maintain flexibility during the sketching process.
- Add simple shapes: Based on the character’s design, add simple shapes to represent key features such as hands, feet, and other defining characteristics. These shapes will act as a framework to build upon in the next steps.
- Refine the details: Now that you have the basic structure in place, start refining the details of the character. Sketch in the facial features, defining the eyes, nose, mouth, and any unique characteristics that make your character stand out.
Remember, this step is all about creating a rough outline of your character’s design. Don’t worry about perfection; the goal is to capture the essence of your character and establish a solid foundation for the next steps.
Once you are satisfied with the basic sketch, it’s time to move on to Step 3: defining the character’s proportions.
Step 3: Define the character’s proportions
Defining the proportions of your character is crucial in creating a well-balanced and visually appealing animation character sheet. This step involves establishing the ideal measurements and ratios for different body parts. Here are some tips to help you define your character’s proportions:
- Use the head as a reference: Divide the height of your character into sections, with one section being equal to the size of the character’s head. This will give you a guide to determine the relative sizes of other body parts.
- Balance the body: Ensure that the body parts are proportionate to one another. For example, the length of the arms should be around two and a half times the length of the head, while the legs should be approximately three heads in length. Play around with these measurements to achieve the desired look for your character.
- Consider the style: Depending on the animation style you’re aiming for, you may need to exaggerate certain proportions. For instance, in a more cartoony style, you might want to elongate the limbs or enlarge the head for comedic effect. Experiment with different proportions to find what works best for your character.
- Acknowledge variations: Keep in mind that variations in body proportions can add interest and uniqueness to your character. Not everyone has perfectly symmetrical body parts, and these imperfections can add character and realism. Embrace these variations while maintaining overall visual harmony.
It’s important to sketch lightly and make adjustments as needed throughout this process. Take the time to analyze and compare the proportions with your reference images or style references. Don’t be afraid to make changes if something doesn’t look quite right. Remember, this step sets the foundation for the character’s visual appeal.
Once you are satisfied with the defined proportions, you can proceed to Step 4: adding details and features to bring your character to life.
Step 4: Add details and features
Now that you have established the proportions of your character, it’s time to add the finer details and features that will bring your animation character sheet to life. Adding these elements will help define the character’s personality, traits, and overall visual appeal. Here’s what you need to do:
- Facial features: Start by refining the facial features. Add eyes, eyebrows, eyelashes, and irises. Experiment with different shapes and sizes to convey the desired expression and emotion. Don’t forget to add a nose, mouth, and ears, ensuring they are proportionate to the character’s head.
- Hairstyle and head accessories: Decide on a hairstyle that complements your character’s personality. Whether it’s short, long, curly, or straight, make sure it fits the overall design. Consider adding head accessories such as hats, headbands, or hair clips to further enhance the character’s uniqueness.
- Clothing: Sketch in the character’s clothing, taking into account their style, occupation, or backstory. Consider the material, patterns, and any accessories like belts, buttons, or jewelry. Keep in mind the character’s proportions and how the clothing drapes over their body.
- Unique features: Add any distinctive features that make your character stand out. This could include scars, tattoos, freckles, or birthmarks. These details not only add visual interest but also contribute to the character’s backstory and individuality.
- Expression and body language: Experiment with different facial expressions to demonstrate various emotions. Additionally, explore different poses and body language to express your character’s personality and attitude. This will help you when creating animation frames later on.
Throughout this step, pay attention to small details and take the time to refine and polish your character’s features. It’s important to strike a balance between adding enough detail to make the character visually interesting, without overwhelming the design.
With the details and features added, your character is truly starting to come to life. In the next step, Step 5, you’ll learn how to outline your character’s clothing and accessories.
Step 5: Outline the character’s clothing and accessories
Now that you’ve defined the character’s features, it’s time to focus on outlining their clothing and accessories. The attire and accessories you choose will not only contribute to the character’s style but also provide important visual cues about their personality, occupation, or role in your animation. Follow these guidelines to effectively outline the character’s clothing and accessories:
- Research and reference: Before diving into the details, gather references or research similar clothing styles, historical costumes, or fashion trends. This will help you understand how different fabrics drape, folds occur, and accessories are worn.
- Establish the outfit: Start by sketching the overall shape and silhouette of the character’s clothing. Consider the character’s body proportions and the movement and activity they will be engaged in within your animation. Pay attention to how the clothing flows and expands as the body moves.
- Add details: Once you have the basic clothing outline, begin adding details such as collars, sleeves, buttons, pockets, or any other distinctive features specific to the outfit. Take your time to capture the different textures, patterns, and materials of the clothing.
- Accessories: Explore the addition of accessories like belts, hats, scarves, or jewelry. These can enhance the character’s style and provide extra visual interest. Ensure that the accessories complement the overall design and do not overpower the character or distract from their features.
- Consistency: As you outline different outfits or variations of the character’s attire, ensure there is consistency in the design. The outfits should reflect the character’s personality and align with their overall story or role. Consistency will help viewers easily recognize the character across different scenes or animations.
Remember, the clothing and accessories should not only be visually appealing but also reflect the character’s background, culture, or environment. These elements contribute to the character’s storytelling and help to create a more immersive and believable animation.
Once you’ve outlined the character’s clothing and accessories, you can move on to Step 6, which involves drawing the character in various poses to capture their versatility and range of movement.
Step 6: Draw the character in various poses
Now that you have established the character’s design and outlined their clothing, it’s time to bring them to life by drawing the character in various poses. This step is essential in showcasing the character’s versatility and range of movement. Here’s what you need to do:
- Start with basic poses: Begin by sketching the character in simple, relaxed poses to get a sense of their natural stance. This will help you understand how their body weight is distributed and how different body parts move in relation to one another.
- Experiment with dynamic poses: Progress to more dynamic and action-oriented poses to convey the character’s energy, agility, or strength. Explore different angles, foreshortening, and exaggerated poses to push the character’s physical capabilities and showcase their unique abilities or personality traits.
- Consider the character’s story: Think about the character’s backstory and the purpose of their animation. Tailor the poses to align with their narrative. For instance, if your character is a superhero, emphasize heroic poses that exude confidence and power. If your character is whimsical or comedic, focus on poses that evoke humor or playfulness.
- Pay attention to the details: While posing the character, ensure that the clothing and accessories align with the movement and gravity. Think about how the fabric drapes, wrinkles form, or how the accessories hang or sway. Consider the character’s proportions and how the different body parts interact with one another.
- Create a variety of poses: Aim to create a collection of poses that showcase different emotions, actions, and attitudes that your character may encounter throughout their animation. This will give you a diverse range of references to work from when animating your character in the future.
Take the time to explore various poses, and don’t be afraid to experiment. Play around with expressions, gestures, and body language to bring out the essence of your character. Variation in poses will add depth and dimension to your animation character sheet.
Once you have a collection of poses that accurately portray your character, you can move on to Step 7, where you will add color and shading to further enhance your character’s appearance.
Step 7: Add color and shading to bring your character to life
Adding color and shading to your character is a crucial step in bringing them to life on your animation character sheet. Color not only adds visual appeal but also contributes to the character’s personality and story. Shading, on the other hand, adds depth and dimension to the character’s features. Here’s how you can add color and shading effectively:
- Select a color palette: Choose a color palette that reflects the mood, personality, and environment of your character. Consider the character’s story and the emotions you want to convey through the colors. It’s helpful to create a color swatch or reference sheet to ensure consistency throughout the character sheet.
- Color the base: Begin by filling in the base colors for different parts of the character, such as the skin, hair, clothing, and accessories. Use solid colors initially to establish the overall color scheme and composition.
- Add shading and highlights: To create depth and make your character’s features visually appealing, add shading and highlights. Consider the direction and source of light in your composition. Shade areas that would naturally be darker, such as creases, folds, or areas in shadow. Add highlights to areas that would catch and reflect light.
- Blend and layer colors: Use blending techniques such as blending modes, gradients, or layering to create smooth transitions between colors and add texture to the character’s design. Experiment with different brushes and tools to achieve the desired effect.
- Pay attention to details: Add small details and textures like patterns, fabric textures, or small design elements that enhance the character’s appearance. These details can contribute to the character’s story and provide visual interest.
Color and shading can significantly enhance the character’s design and help viewers connect with the character on a deeper level. Take your time during this step to ensure that the colors and shading accurately represent your character’s intended look and feel.
Once you’ve added color and shading to your character, you can continue to Step 8, where you will create a facial expression chart to capture the character’s range of emotions.
Step 8: Develop a facial expression chart
Creating a facial expression chart is a crucial step in developing your animation character sheet. Facial expressions play a vital role in conveying emotions and bringing your character to life. By creating a facial expression chart, you can capture the full range of emotions your character can portray. Here’s how you can develop a facial expression chart:
- Identify key emotions: Begin by identifying a range of key emotions that you want your character to express throughout your animation. Consider emotions such as happiness, sadness, anger, surprise, fear, and excitement. These emotions will provide the foundation for your facial expression chart.
- Break down the facial features: Study how different emotions affect the various facial features. Pay attention to the eyes, eyebrows, mouth, and overall expression. Each emotion will have distinct changes in these features, such as raised eyebrows for surprise or a downturned mouth for sadness.
- Sketch the expressions: Using your reference images or imagination, sketch out the different facial expressions for each emotion. Focus on capturing the unique characteristics of your character while still conveying the intended emotion. Experiment with different variations of each expression to find the most effective ones.
- Add details and nuances: Add details to enhance the facial expressions, such as wrinkles, dimples, or variations in skin texture. These details will add realism and make your character’s facial expressions more engaging and relatable.
- Label and organize: Label each expression on your facial expression chart to clearly identify the corresponding emotion. Organize the chart in a logical order, making it easy to reference and use as a guide for your animation process.
A well-developed facial expression chart will serve as a valuable reference when animating your character. It will help you maintain consistency and accurately portray the character’s emotions throughout different scenes and interactions.
With the completion of your facial expression chart, you can now move on to Step 9, which involves creating a turnaround for your character to showcase them from every angle.
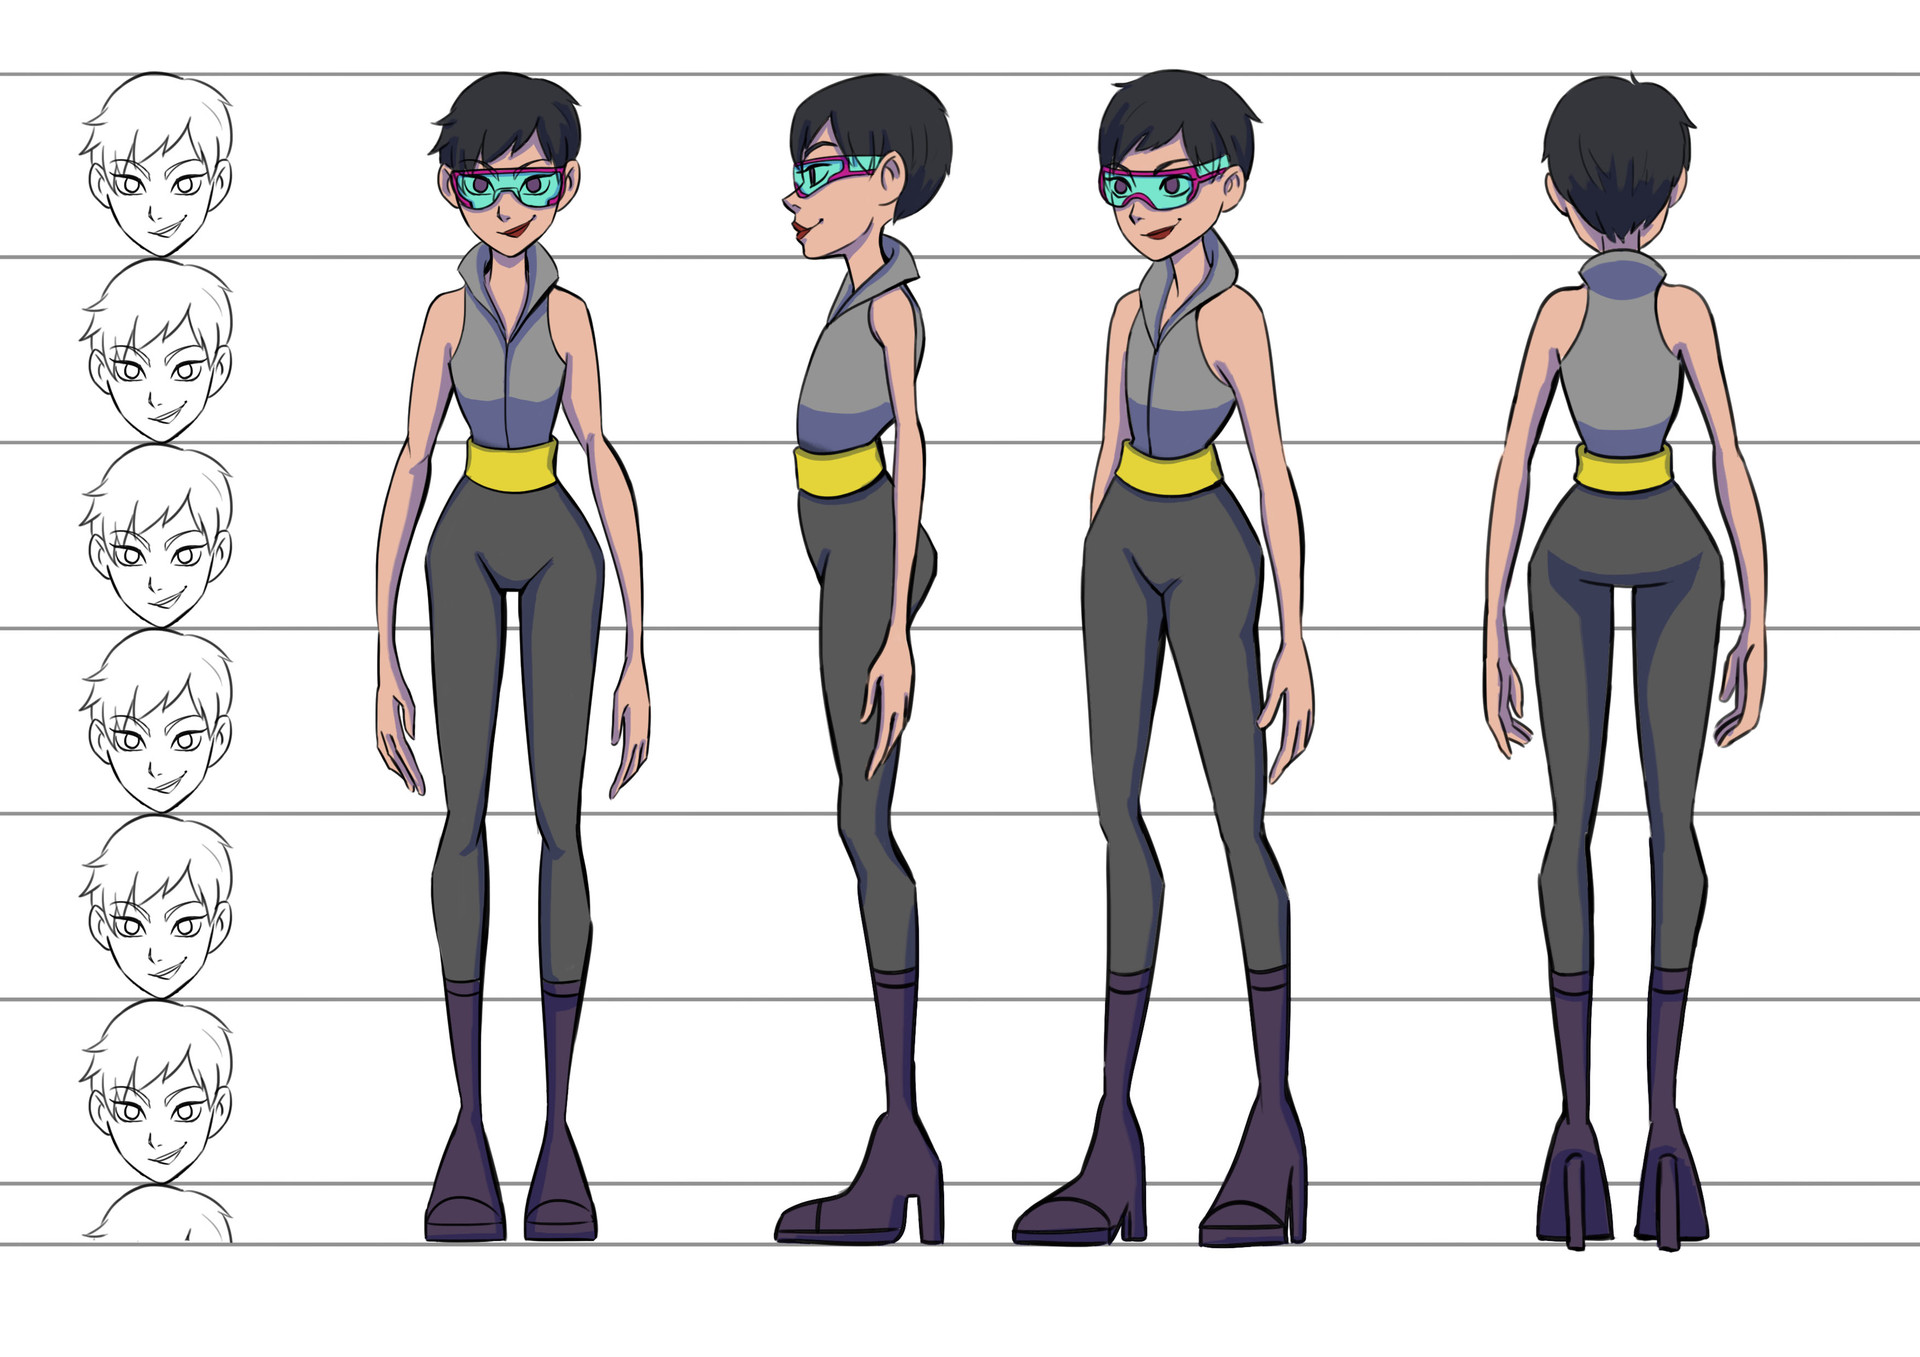
Step 9: Create a turnaround for your character
Creating a turnaround for your character is an essential step in your animation character sheet. A turnaround is a set of drawings that showcase the character from multiple angles, allowing you to understand their three-dimensional form and design. Here’s how you can create a turnaround for your character:
- Choose the number of angles: Decide how many angles you want to include in your turnaround. Typically, a turnaround consists of front, back, and side views. You can also include three-quarter views or other angles that best represent your character.
- Establish the key poses: Start by sketching the basic outline of your character in each angle. Focus on maintaining consistent proportions and silhouette across the different views. These will act as the key poses for your turnaround.
- Add details and features: Once you have the key poses, begin adding details and features to each view. Pay attention to how the details align and overlap in different angles. Consider elements like clothing folds, hair placement, and appendages such as wings or tails.
- Fill in the gaps: After finalizing the key poses, fill in the gaps between them by gradually rotating the character. This will create a smooth transition, showing how the character looks when viewed from different angles.
- Refine and clean up: Once you have the complete turnaround, take the time to refine and clean up the drawings. Ensure that the lines are crisp and precise, making the character easily recognizable from all perspectives.
- Include notes and labels: To provide additional clarity, consider including notes and labels on important details, angles, or characteristics of your character. This information will be valuable when it comes to animating your character and maintaining consistency in their design.
A well-executed turnaround allows animators to accurately portray the character from all angles, providing a comprehensive view of their design. It serves as a valuable resource during the animation process, ensuring that the character maintains their distinct features and proportions consistently.
With the completion of your character’s turnaround, you can now move on to Step 10, where you will include notes and labels for important details on your animation character sheet.
Step 10: Include notes and labels for important details
As you finalize your animation character sheet, it’s crucial to include notes and labels for important details. These notes serve as annotations and provide valuable information about specific features, characteristics, or elements of your character. Here’s how you can effectively include notes and labels:
- Annotate unique features: Identify any distinct or unique features of your character and annotate them. This could include specific markings, scars, tattoos, or any defining characteristics that contribute to their visual identity.
- Label clothing and accessories: Provide labels for various parts of the character’s clothing and accessories. This ensures clarity and helps others understand the purpose and function of each item. It also assists animators when animating different movements or removing/adding clothing and accessories in various scenes.
- Highlight important proportions: Use arrows or lines to highlight important proportions or measurements of your character. This can include the length of limbs, head size, or any other aspects that contribute to their distinct proportions and design.
- Explain key expressions or poses: If your character has specific facial expressions or poses that are crucial to their personality or narrative, add notes explaining their significance. These notes will guide animators in capturing the essence of the character during the animation process.
- Provide additional guidance: Include any additional notes that may be helpful for understanding the character or their story. This could include personality traits, backstories, or specific instructions that need to be considered during the animation process.
Adding clear and informative notes and labels to your animation character sheet ensures that the important details are properly communicated and understood by others who may work with or reference your character in the future. It streamlines the animation process and helps maintain consistency in the character’s design and portrayal.
With the inclusion of notes and labels, your animation character sheet is almost complete. Now it’s time to finalize the sheet in Step 11 and ensure that all details are polished and ready for presentation or further animation development.
Step 11: Finalize your animation character sheet
In the final step of creating your animation character sheet, it’s time to review and polish all the details to ensure that your character is presented in the best possible way. Paying attention to the finishing touches will make your character sheet professional and ready for sharing or further animation development. Here’s how you can finalize your animation character sheet:
- Review and refine: Take a step back and review the entire character sheet. Look for any areas that may need refinement or improvement. Make necessary adjustments to ensure consistency in proportions, style, and overall design.
- Clean up lines and colors: Ensure that all lines are clean and well-defined. Remove any stray or unnecessary lines. Check the coloring and shading to ensure smooth transitions and appropriate representation of materials and textures.
- Organize and label: Arrange your character sheet in a clear and organized manner. Label different sections, such as the character’s name, turnaround views, and facial expressions chart. This will help others navigate and understand your character sheet with ease.
- Consider presentation: Think about how you want to present your animation character sheet. Consider creating a digital version that can be easily shared or printed. You may also want to add a brief caption or description to provide context or highlight key features.
- Validate the HTML: If your character sheet is in HTML format, make sure to validate the code to ensure it meets proper HTML standards and is error-free.
By finalizing your animation character sheet, you’re ensuring that your character is accurately represented and presented in a professional manner. It allows others to understand your character’s design, proportions, and range of expressions, enhancing collaboration and communication during the animation process.
With your animation character sheet finalized, you’re now ready to share it with others or use it as a reference as you bring your character to life through animation.