
Benefits of Understanding and Utilizing Your Camera Diopter
The camera diopter is a valuable tool that can greatly enhance your photography experience by helping you achieve sharper and clearer images. Understanding how to properly use the diopter can make a significant difference, especially if you wear glasses or have visual impairments. Here are some key benefits of understanding and utilizing your camera diopter:
- Improved focus: The main advantage of using a camera diopter is that it allows you to adjust the focus of your camera’s viewfinder according to your specific vision needs. This means you can see the scene clearly and accurately, resulting in sharper and more focused images.
- No need to rely on autofocus: While autofocus is a great feature, there may be situations where it doesn’t perform optimally, such as in low light conditions or when shooting subjects with low contrast. By using the camera diopter to adjust the viewfinder to your eyesight, you can rely on manual focus and have more control over the sharpness of your shots.
- Faster and more accurate composition: By properly adjusting the camera diopter to match your eyesight, you can compose your shots more efficiently. This is particularly useful in fast-paced situations where you need to capture the moment quickly and accurately.
- Reduced eyestrain and fatigue: When you use a camera diopter that aligns with your vision, it reduces the strain on your eyes caused by constantly squinting or straining to see through the viewfinder. This leads to a more comfortable and enjoyable photography experience, allowing you to shoot for longer periods without becoming fatigued.
- Enhanced creative control: By fine-tuning the focus through the camera diopter, you can achieve unique creative effects in your photography. For example, setting the diopter to intentionally blur the background can help draw attention to the subject and create a sense of depth in your images.
Understanding and utilizing your camera diopter can greatly improve the quality of your photos, maximize your creative control, and make the overall shooting experience more enjoyable. Taking the time to learn how to adjust the diopter to your vision will yield better results and allow you to fully utilize the capabilities of your camera.
How a Camera Diopter Works
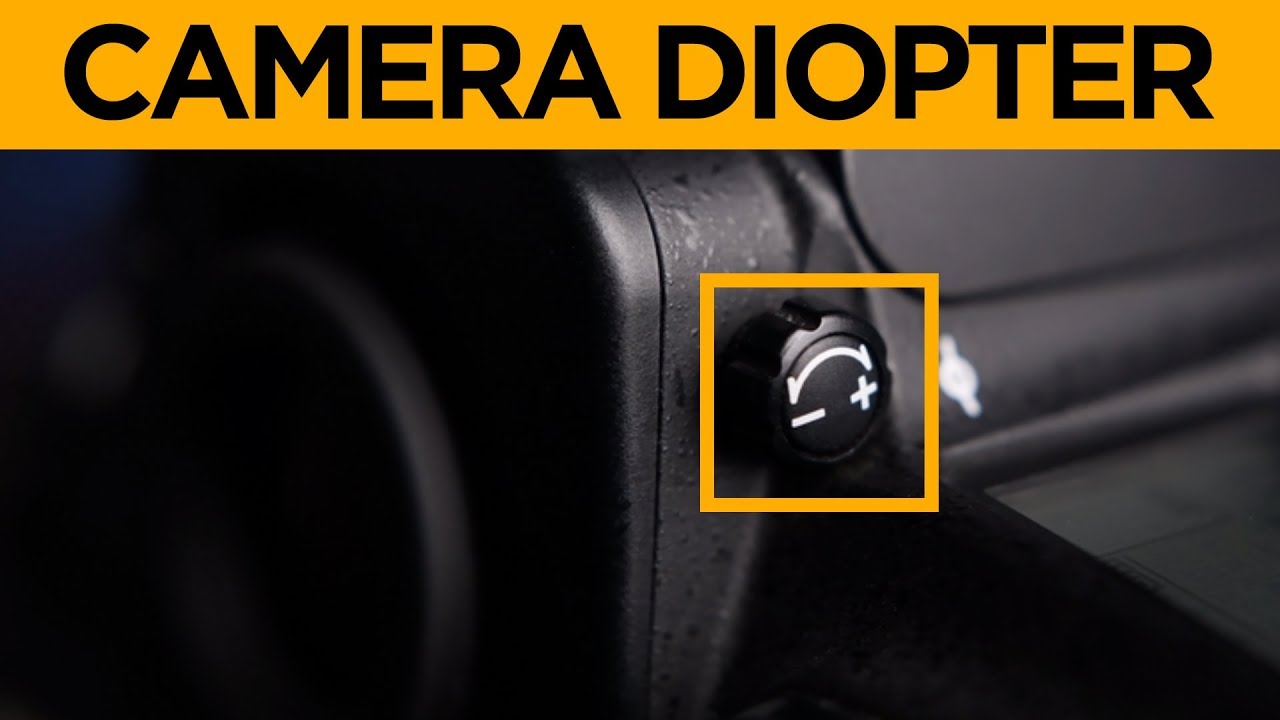
A camera diopter is a small adjustment located on the viewfinder of your camera that helps compensate for different levels of eyesight. It is especially useful for individuals who wear glasses or have visual impairments. Understanding how a camera diopter works can help you make the necessary adjustments to ensure a clear and accurate view of your subject.
The camera diopter works by modifying the focus point of the viewfinder optics to match your eyesight. When you look through the viewfinder, the image you see is actually a representation of what the camera’s lens sees. By adjusting the diopter, you can align the focus of the viewfinder with your vision, allowing you to see the scene in focus.
The diopter adjustment typically consists of a small dial or slider located near the viewfinder. By rotating or sliding the adjustment, you can increase or decrease the diopter strength, bringing the image into sharp focus for your particular eyesight.
It’s essential to note that the camera diopter adjustment only affects the viewfinder image, not the actual captured image. It allows you to see the scene with clarity, helping you compose and focus accurately before taking the shot. Therefore, even if you have perfect vision, it’s still worth checking and adjusting the diopter to ensure optimal viewing conditions.
Typically, most cameras have a range of diopter adjustments from -3 to +3. The minus (-) values are for nearsighted individuals, while the plus (+) values are for farsighted individuals. By turning the diopter dial to the appropriate value, the viewfinder will compensate for your eyesight, allowing you to see the scene sharply.
It’s important to calibrate the camera diopter correctly to avoid any misconceptions about the sharpness of your images. A good practice is to adjust the diopter while looking at a well-focused subject, fine-tuning until it appears crystal clear through the viewfinder.
Understanding how a camera diopter works empowers you to make the necessary adjustments to achieve accurate and sharp focusing through your viewfinder. By taking the time to calibrate the diopter to your eyesight, you’ll ensure that you always have a clear and precise view of your subject, leading to better composition and sharper images.
Adjusting the Diopter for Your Vision
Adjusting the camera diopter to match your vision is a crucial step in ensuring clear and accurate images. Here’s a step-by-step guide on how to adjust the diopter for your specific eyesight:
- Find a well-lit area: Start by finding a location with good lighting conditions. This will make it easier to see the details in the viewfinder.
- Remove any existing eyepiece accessories: If you have any eyecups or attachments on your camera’s viewfinder, remove them to have direct access to the diopter adjustment.
- Look through the viewfinder: Position your eye to the viewfinder and look at a well-focused subject. Make sure the image appears blurred at this stage.
- Identify the diopter adjustment: Locate the diopter adjustment dial or slider near the viewfinder. It is typically marked with plus (+) and minus (-) values.
- Start with the middle setting: Begin by setting the diopter adjustment to the middle value (0). This creates a baseline from which you can fine-tune the focus.
- Rotate or slide the diopter: While looking through the viewfinder, slowly rotate or slide the diopter adjustment to increase or decrease the focus until the image appears as sharp as possible.
- Check from different angles: To ensure accuracy, check the sharpness of the image from different angles and distances. Adjust the diopter if needed to achieve the clearest view in all scenarios.
- Lock the diopter adjustment: Once you have found the optimal diopter setting, lock it in place to prevent accidental changes while shooting. Refer to your camera’s manual for instructions on how to lock the diopter.
Keep in mind that the correct diopter setting may vary depending on factors such as the lighting conditions, your specific eyesight, and whether you are wearing glasses. It’s a good idea to periodically recheck and readjust the diopter if you notice any changes in your vision or if you switch between different eyewear.
By taking the time to adjust the camera diopter for your vision, you’ll ensure that the viewfinder displays a clear and accurate representation of the scene. This allows for precise focusing, composition, and ultimately, better-quality images.
Different Types of Diopters
Camera diopters come in various strengths, allowing you to customize the focus of your viewfinder to match your eyesight. Understanding the different types of diopters can help you choose the right one for your specific needs. Here are the main types of diopters commonly available:
- Positive diopters: Positive diopters have a “+” sign and are used for individuals who are farsighted or have trouble seeing close objects. They help bring near objects into focus and compensate for any difficulty in focusing on objects that are nearby. The strength of positive diopters usually ranges from +0.5 to +3.0, with higher numbers indicating stronger magnification.
- Negative diopters: Negative diopters have a “-” sign and are designed for individuals who are nearsighted or have difficulty seeing distant objects clearly. These diopters compensate for the inability to focus on objects that are far away, helping to bring distant subjects into sharper focus. Negative diopters typically range from -0.5 to -3.0, with higher numbers indicating stronger magnification.
- Variable diopters: Variable diopters are adjustable diopters that allow you to fine-tune the focus according to your specific eyesight. They provide flexibility by allowing you to select the desired magnification strength within a certain range. Variable diopters are particularly useful if your eyesight falls between the standard positive or negative diopter strengths.
- Multi-coated diopters: Multi-coated diopters have special anti-reflective coatings that reduce glare and improve the clarity of the viewfinder image. These coatings minimize unwanted reflections and maximize the amount of light transmitted through the optics, resulting in a brighter and clearer view. Multi-coated diopters are a great choice if you want to enhance your viewing experience and achieve more accurate focusing.
It’s important to consider your specific eyesight and any visual impairments you may have when selecting a diopter. If you wear prescription glasses, you may need to factor in their effects when choosing a diopter strength. It’s always recommended to try out different diopter strengths to find the one that provides the clearest and most comfortable view through the viewfinder.
Consulting with a professional or optometrist can also be beneficial in determining the appropriate diopter strength for your eyesight. They can recommend the ideal diopter based on your prescription and visual needs.
Understanding the different types of diopters available can help you make an informed decision when it comes to selecting the right one. By choosing the appropriate diopter, you can ensure that the viewfinder displays a clear and accurate representation of the scene, enabling you to focus more effectively and capture stunning images.
Using Diopters for Macro Photography
Diopters can be powerful tools for macro photography as they allow you to get up close and capture intricate details of small subjects. Here are some ways to effectively use diopters for macro photography:
- Enhanced close focusing: The primary benefit of using diopters for macro photography is their ability to enhance your camera’s close focusing capabilities. By attaching a diopter to your lens, you can reduce the minimum focusing distance, allowing you to get closer to your subject and fill the frame with incredible detail.
- Increased magnification: Diopters add a magnifying effect to your lens, allowing you to capture tiny details that may not be visible to the naked eye. This increased magnification can reveal intricate textures, patterns, and fine details, resulting in stunning macro images.
- Affordable alternative to dedicated macro lenses: Diopters are a more cost-effective option compared to purchasing a dedicated macro lens. They can provide comparable results and expand the capabilities of your existing lenses, allowing you to delve into the world of macro photography without breaking the bank.
- Experiment with different diopter strengths: Diopters come in various strengths, and experimenting with different levels of magnification can yield different visual effects. Lower strength diopters may provide a subtle magnifying effect, while higher strength diopters can dramatically increase the level of detail. Play around with different strengths to achieve the desired magnification and creative impact in your macro shots.
- Combine with extension tubes or teleconverters: For even greater magnification, you can combine diopters with other accessories like extension tubes or teleconverters. Extension tubes help to further increase the distance between the lens and the subject, while teleconverters can multiply the magnification factor. By combining these tools, you can achieve extreme close-up images with impressive detail.
- Pay attention to depth of field: When using diopters for macro photography, keep in mind that the depth of field becomes very shallow, especially at closer focusing distances. This means that only a small portion of your subject will be in focus. To counter this, use smaller apertures (higher f-numbers) to increase the depth of field and ensure more of the subject is in focus.
Using diopters for macro photography opens up a world of possibilities for capturing mesmerizing close-up images. With their ability to enhance close focusing, increase magnification, and offer an economical alternative to dedicated macro lenses, diopters are valuable tools for any photographer looking to explore the intricate world of macro photography.
Using Diopters for Telephoto Photography
Diopters can also be utilized effectively for telephoto photography by providing additional magnification and improving close-up focusing abilities. Here are some ways to make the most out of diopters for telephoto photography:
- Magnifying distant subjects: One of the main benefits of using diopters for telephoto photography is their ability to enhance the magnification of distant subjects. By attaching a diopter to your telephoto lens, you can bring distant objects closer, allowing you to capture finer details that might otherwise be difficult to see or photograph.
- Close-up focusing: Diopters can improve the close focusing abilities of telephoto lenses, enabling you to capture close-up shots of subjects that are not necessarily macro-sized. With a diopter, you can focus on subjects that are closer to the lens than the lens’ minimum focal distance, expanding your creative options for photographing small or detailed subjects.
- Increasing subject isolation: Diopters can help to isolate your subject from its surroundings by creating a shallower depth of field, even with telephoto lenses. This can be particularly useful when photographing wildlife, birds, or other subjects at a distance, as it allows you to separate the subject from any distracting backgrounds and emphasize its details.
- Filling the frame: Diopters help you fill the frame with your subject, even when shooting at a distance. This is especially advantageous when photographing skittish or elusive animals, as it allows you to capture their details without having to get too close and risk disturbing or scaring them away.
- Experimenting with different diopter strengths: Just like in macro photography, different diopter strengths can produce varying levels of magnification and creative effects in telephoto photography. It’s worth experimenting with different strengths to achieve the desired level of magnification and visual impact for your specific subjects and compositions.
- Pay attention to image quality: While using diopters can provide additional magnification, it’s important to be mindful of potential image quality issues, such as increased chromatic aberration or loss of sharpness. To mitigate these effects, consider using high-quality diopters that are specifically designed to minimize aberrations and ensure optimal image quality.
Using diopters for telephoto photography can enhance your ability to capture distant subjects with greater detail and magnification. By increasing subject isolation, filling the frame, and experimenting with different diopter strengths, you can elevate your telephoto photography and expand your creative possibilities.
Experimenting with Different Diopter Strengths
When using diopters, one of the exciting aspects is the ability to experiment with different strengths to achieve varying levels of magnification and creative effects. Here’s how you can make the most of your photography by exploring different diopter strengths:
- Understanding diopter strength: Diopter strength is measured in increments of + or – units, indicating the degree of magnification. Higher positive diopter values increase magnification for close focusing, while higher negative diopter values increase magnification for distant subjects. Familiarize yourself with the available diopter strengths and their impact on your desired outcome.
- Start with a baseline: Begin your experimentation by using a diopter strength that aligns with your typical close focusing or telephoto needs. This will serve as your baseline for comparisons, allowing you to observe the effects of different diopter strengths on your subjects.
- Gradually increase or decrease diopter strength: To explore the full range of possibilities, try incrementally increasing or decreasing the diopter strength from your baseline. This allows you to observe the impact on magnification, subject isolation, depth of field, and overall image quality.
- Focus on specific subjects: To better understand the effects of different diopter strengths, focus on specific subjects during your experimentation. Capture a variety of subjects such as flowers, insects, textures, or distant landscapes, and assess how different diopter strengths enhance or alter the details and overall visual impact.
- Pay attention to image quality: As you experiment with different diopter strengths, closely observe the resulting image quality. Some lower quality or cheaper diopters may introduce unwanted artifacts, distortion, or loss of sharpness. Consider investing in high-quality diopters that are specifically designed to maintain image quality while providing increased magnification.
- Explore creative effects: Diopters can also be used to achieve creative effects beyond simple magnification. Experiment with different diopter strengths to intentionally blur the background while maintaining sharpness on the subject, creating a shallow depth of field effect. This can help draw attention to specific details or isolate the subject from distracting elements in the frame.
- Consider combinations with other accessories: Don’t hesitate to combine diopters with other accessories like extension tubes or teleconverters for even greater magnification and creative possibilities. These combinations can yield unique results and further expand your experimentation with different diopter strengths.
Through experimentation with different diopter strengths, you will gain a deeper understanding of their impact on magnification, subject isolation, and overall image quality. This exploration allows you to unleash your creativity, capture unique perspectives, and elevate your photography to new levels.
Tips for Getting the Best Results with a Diopter
Using a diopter can greatly enhance your photography by allowing for precise focus and magnification. To ensure you get the best results with a diopter, consider the following tips:
- Clean your lens: Before attaching a diopter, make sure your lens is free from dust, smudges, and fingerprints. Any imperfections on the lens surface can negatively impact image quality, so always keep your lens clean for optimal results.
- Use a stable platform: When using high magnification diopters, even the slightest camera movement can lead to blurred images. To counter this, use a tripod or stable surface to minimize camera shake. This ensures sharpness and clarity in your images, allowing you to capture the full potential of the diopter’s magnification.
- Focus manually: While autofocus can be convenient, manually focusing with a diopter can yield better results. Take your time to adjust the focus ring until the subject appears sharp and in focus through the viewfinder. This gives you greater control over the level of detail you capture and ensures accurate focusing.
- Pay attention to lighting: Adequate lighting is crucial when using a diopter. Proper illumination helps to maximize image quality and minimize potential issues like flare or loss of contrast. Consider using external sources of light or positioning yourself in well-lit areas to ensure optimal results.
- Experiment with aperture settings: Adjusting your aperture settings can significantly impact the depth of field when using a diopter. Smaller apertures (higher f-numbers) increase the depth of field, bringing more of the subject into focus. Larger apertures (lower f-numbers) create a shallow depth of field, isolating the subject and blurring the background. Experiment with different aperture settings to achieve the desired effect and make your subject stand out.
- Be patient and practice: Getting the best results with a diopter may require patience and practice. Take your time to fine-tune the focus, experiment with different shooting techniques, and review your images to learn from each shot. With practice, you’ll become more comfortable and proficient in using the diopter, resulting in consistently impressive results.
- Protect your diopter: Diopters are delicate optical accessories. When not in use, always store them in a protective case or pouch to prevent scratches or damage. Avoid touching the glass elements with your fingers, as oils and smudges can affect image quality. Proper care and maintenance will maximize the lifespan and performance of your diopter.
By following these tips, you can ensure that you get the best results when using a diopter. Taking the time to clean your lens, using stable support, manually focusing, and paying attention to lighting conditions will help you capture sharp and detailed images. Experimenting with aperture settings, being patient, and protecting your diopter will further enhance your overall experience and produce outstanding photographs.
Creative Effects with a Diopter
A diopter is not only a tool for achieving sharper focus and magnification; it can also be used to create unique and artistic effects in your photography. By experimenting with different techniques and diopter strengths, you can add a creative touch to your images. Here are some creative effects you can achieve with a diopter:
- Selective focus: Use a diopter with a shallow depth of field to intentionally blur the background while keeping your main subject sharp. This technique can create a captivating bokeh effect, isolating the subject and drawing attention to its details.
- Enhanced textures and patterns: The increased magnification provided by a diopter allows you to capture intricate textures and patterns with more detail. This is particularly useful when photographing subjects like flowers, fabrics, or architectural details, as it distills their unique visual qualities.
- Emphasizing details: By using a diopter, you can highlight specific details within a larger scene. Magnify and focus on a small portion of the subject, such as an eye, a petal, or an interesting texture, and let it become the focal point of the image.
- Abstract and close-up photography: Get up close to everyday objects and explore their abstract qualities. The magnifying effect of a diopter can unveil fascinating details and patterns that are usually unnoticed by the naked eye.
- Miniature effect: With a diopter, you can simulate the look of a miniature scene. By using a shallow depth of field and focusing on a specific subject or area, the rest of the background will appear blurred, giving the illusion of a miniature model.
- Reflections and refractions: Experiment with shooting through transparent or reflective surfaces with a diopter. The magnification can intensify the effect of reflections or refractions, creating stunning and abstract compositions.
- Explore different angles: Use a diopter to capture unique perspectives and angles. Get down low or find interesting viewpoints to capture your subject with a fresh and innovative approach.
- Experiment with multiple diopters: Combining multiple diopters of different strengths can result in even more unique effects and levels of magnification. This allows for more creative possibilities and can lead to images with a truly distinctive look.
Getting creative with a diopter opens up endless possibilities for artistic expression. By being adventurous and trying different techniques, diopter strengths, and subjects, you can bring a new level of creativity to your photography, resulting in visually captivating and engaging images.
Troubleshooting Common Issues with Diopters
While diopters can be immensely useful tools for improving focus and magnification, they may occasionally present some challenges. Understanding and troubleshooting these common issues can help you overcome any obstacles and achieve the best results with your diopter. Here are some common problems that may arise and their potential solutions:
- Limited depth of field: One challenge when using a diopter is dealing with a shallow depth of field, especially when working with high magnification. To address this, consider using smaller apertures (higher f-numbers) to increase the depth of field and ensure a larger portion of your subject is in focus.
- Image distortion or aberrations: Cheaper or lower quality diopters may introduce image distortion, chromatic aberrations, or loss of sharpness. To mitigate this, invest in high-quality diopters specifically designed to minimize these issues. Research and choose diopters that have positive reviews for their optical performance.
- Image quality degradation: If you notice a significant decrease in overall image quality when using a diopter, make sure the diopter is clean and free from smudges or scratches. Additionally, ensure that your lens is clean and properly aligned with the diopter. Proper maintenance and alignment can prevent image quality degradation.
- Limited working distance: Using a diopter decreases the working distance between the camera and the subject. This can lead to challenges when photographing subjects that require close proximity. To overcome this, consider using extension tubes or teleconverters in conjunction with the diopter for increased working distance while maintaining magnification.
- Difficulty focusing: Achieving precise focus can be a challenge when using a diopter, especially when working with high magnification or fast-moving subjects. Take your time and practice manual focus techniques to ensure accurate focusing. Consider using a tripod or stabilizing your camera to minimize camera shake and improve focus precision.
- Incorrect diopter strength: Selecting the right diopter strength is crucial for achieving optimal focus and magnification. If you find that the diopter you are using is not providing the desired results, experiment with different strengths to find the one that best suits your needs. Consulting with a professional or optometrist can also be helpful in determining the appropriate strength based on your individual eyesight.
Troubleshooting common issues with diopters requires patience, practice, and attention to detail. By understanding the potential challenges and implementing the appropriate solutions, you can overcome obstacles and achieve the best results when using a diopter in your photography.
Alternatives to Using a Diopter
While diopters can be highly beneficial for improving focus and magnification, there are alternative methods you can explore if you don’t have access to or prefer not to use a diopter. These alternatives offer different approaches to achieving similar results. Here are some alternatives to consider:
- Macro extension tubes: Macro extension tubes are hollow tubes that fit between your camera body and lens, allowing for closer focusing distances and increased magnification. By extending the distance between the lens and the camera’s sensor, macro extension tubes enable you to capture close-up images without the need for a diopter.
- Close-up filters: Close-up filters are similar to diopters but are separate glass filters that screw onto the front of your lens like a regular filter. They function by providing additional magnification and reducing the minimum focusing distance of your lens. Close-up filters are available in different strengths, allowing you to achieve various levels of magnification without compromising image quality.
- Reversing rings: Reversing rings allow you to mount your lens backward on your camera body, effectively turning it into a macro lens. This method can provide extreme magnification and preserve image quality. However, it may require manual focusing and aperture control, and the aperture may be fixed at its widest setting.
- Telephoto lenses: If your primary goal is magnification rather than close focusing, telephoto lenses can be a viable alternative. They offer a longer focal length, which can bring distant subjects closer and provide impressive details. While telephoto lenses may not achieve the same extreme magnification as macro lenses or diopters, they can still capture captivating details in subjects from a distance.
- Cropping and post-processing: If the goal is to achieve magnification in the final image, consider capturing a larger scene and cropping the image during post-processing. While this method doesn’t provide the same level of detail as using a diopter or macro lens, it can still result in compelling close-up shots of subjects by utilizing the sensor’s resolution and refining the composition in editing software.
- Focus stacking: Focus stacking is a technique that involves capturing multiple images at different focus distances and blending them together in post-processing. This method is particularly useful for achieving greater depth of field in macro photography, allowing you to capture sharp details throughout the entire subject. While focus stacking requires more time and post-processing work, it can deliver exceptional results when capturing intricate subjects.
Exploring these alternatives provides flexibility in achieving magnification and close-up photography without relying solely on a diopter. Each method offers unique advantages and considerations, allowing you to choose the approach that best suits your needs, preferences, and equipment.