
Setting up Automation in Pro Tools
Automation is a powerful feature in Pro Tools that allows you to control and manipulate various parameters over time. Whether you want to add volume fades, adjust panning, or create intricate effects, understanding how to set up automation is essential for a smooth and professional workflow.
To begin, you’ll first need to enable automation for the track you want to work with. Simply click on the automation mode selector located in the track header and choose the desired automation mode. Pro Tools offers several automation modes, including Read, Write, Touch, Latch, and Trim. Each mode serves a specific purpose, so it’s important to familiarize yourself with their functions.
Once you’ve selected the automation mode, you can start recording automation in real time. This allows you to manually move faders, pan pots, and tweak other parameters while Pro Tools captures your movements. It’s a great way to add dynamic changes to your mix and give it a natural, human feel.
If you prefer a more precise approach, the Draw tool comes in handy. With this tool, you can create automation breakpoints and draw smooth curves to shape your automation data. This level of control is perfect for intricate automation tasks and allows you to achieve precise adjustments to your mix.
Editing automation is also a breeze in Pro Tools. You can easily move, delete, or copy automation data to fine-tune your mix. Additionally, Pro Tools offers automation lanes, which allow you to organize and view multiple automation parameters simultaneously. This feature simplifies complex automation tasks and streamlines your workflow.
When working with MIDI tracks, you can convert MIDI data into automation to control various parameters like volume, pan, and plugin settings. This integration between MIDI and automation provides endless possibilities for creative manipulation.
Once you’ve set up your automation, it’s important to be aware of automation playlists. These playlists allow you to create alternate versions of your automation data, giving you the flexibility to experiment and choose the best version for your mix.
Lastly, Pro Tools offers useful features like Automation Preview Mode and Automation Follows Edit. The former allows you to preview automation changes without actually committing them, ensuring you make the right adjustments. The latter automatically adjusts existing automation data when you make edits to your audio or MIDI regions, saving you time and effort.
To sum it up, setting up automation in Pro Tools is a crucial step in the mixing process. By understanding and utilizing the various automation modes and tools available, you can enhance your mix with precise and dynamic changes. Take advantage of Pro Tools’ automation features and experiment with different techniques to bring your mix to life.
Understanding Automation Modes
Automation modes in Pro Tools are essential for determining how automation data is recorded, played back, and edited. Each mode offers a unique functionality to suit different automation needs. Understanding these modes will help you harness the full power of automation in your Pro Tools projects.
The Read mode is the default automation mode. In this mode, Pro Tools reads and plays back automation data without allowing any changes to be recorded or edited. It’s useful when you want to listen to previously recorded automation or when you want to make sure your automation settings remain unchanged.
Write mode enables you to record new automation data as you modify parameters in real time. Any changes you make during playback will be recorded as automation, overwriting any existing automation data on the track. This mode is perfect for capturing live parameter adjustments during a performance or mix.
The Touch mode is similar to Write mode but with a slight difference. When you touch a parameter control, Pro Tools will write automation data for that parameter only while keeping the other existing automation data intact. As soon as you release the control, Pro Tools switches back to the previous automation data. It’s a great mode for making specific adjustments without affecting the rest of the automation data.
In Latch mode, automation data is recorded only when you touch a parameter control and remains in that state until you manually overwrite it by touching a different control. It’s useful when you want to capture specific automation changes over an extended period without needing to hold down a control.
Trim mode is primarily used for making level adjustments to existing automation. In this mode, the fader or knob acts as a relative level control that adds or subtracts gain from the existing automation data. It allows you to precisely fine-tune the levels of your automation without modifying the actual automation data.
Understanding the different automation modes and when to use them is crucial for efficient and accurate automation work in Pro Tools. Each mode serves a specific purpose, providing you with the flexibility and control necessary to achieve the desired automation results.
Remember to experiment with these automation modes in different scenarios to enhance your mixing process. Whether you want to capture real-time adjustments, make incremental changes, or fine-tune existing automation, utilizing the appropriate automation mode will make your workflow more intuitive and efficient.
Recording Automation in Real Time
Recording automation in real time is a powerful feature in Pro Tools that allows you to capture live parameter adjustments during a performance or mix. This functionality gives your mix a dynamic and natural feel, as you can manually control various parameters while Pro Tools records your movements.
To begin recording automation in real time, make sure the desired track is set to Write automation mode. This mode enables Pro Tools to record any adjustments you make to parameters in real time. Once you’ve set the automation mode, start playback and make the desired parameter changes using faders, knobs, or control surfaces.
As you make adjustments, Pro Tools will automatically record the changes as automation data for the selected track. This can include volume changes, panning adjustments, plugin parameter movements, and more. The recorded automation data will be stored and can be further edited and refined later.
Real-time automation recording allows you to bring a sense of expression and creativity to your mix. You can add dynamic volume fades, create intricate panning movements, and experiment with various plugin settings to achieve the desired sound. It’s a great way to add a human touch and dynamic changes to your mix.
When recording automation in real time, remember to focus on the musical and artistic aspects of your mix. Make sure your movements and adjustments align with the overall vision and emotion of the song. It’s important to listen and respond to the music as you make changes, adding depth and emotion to the mix.
Furthermore, take advantage of control surfaces, such as MIDI controllers or motorized faders, to enhance your real-time automation recording experience. These devices provide a tactile interface, allowing you to physically interact with the parameters and produce smooth and accurate automation movements.
After recording automation in real time, you can go back and further refine and edit the automation data. Pro Tools provides various tools, such as the Draw tool and automation curves, to precisely shape and polish the recorded automation. This editing stage gives you the flexibility to fine-tune your mix and make adjustments with precision.
Writing Automation with the Draw Tool
When it comes to creating precise automation in Pro Tools, the Draw tool is your go-to option. This powerful tool allows you to manually draw automation breakpoints and curves, giving you complete control over the changes you want to make to your mix.
To start using the Draw tool, select the desired track and set it to Write automation mode. This enables Pro Tools to record the automation changes you make using the Draw tool. Once in Write mode, locate the Draw tool in the Pro Tools toolbar or press the corresponding shortcut key.
With the Draw tool selected, you can now begin drawing automation breakpoints on the track. Simply click on the track where you want to add a breakpoint, and Pro Tools will create a point that represents a specific value for that parameter at that moment in time. You can add as many breakpoints as you need to create the desired automation shape.
Once you’ve added the breakpoints, you can adjust their positions by clicking and dragging them to the desired values and positions. This allows you to create smooth curves and intricate shapes for your automation. You can also adjust the slope of the curves by clicking and dragging the handles that appear on the breakpoints.
The Draw tool provides flexibility and precision in shaping your automation. You can create gradual fades, dramatic volume changes, intricate panning movements, and more. The ability to manually control the automation breakpoints and curves gives you complete creative freedom to achieve the desired effect in your mix.
In addition to drawing automation for volume and panning, the Draw tool can also be used to automate plugin parameters. This allows you to create dynamic changes in your mix by adjusting parameters such as EQ settings, reverb levels, and plugin bypass controls. The Draw tool can be a game-changer for adding depth and character to your mix.
When using the Draw tool, it’s important to zoom in on the automation lane to ensure accuracy and precision. This helps you draw and position breakpoints with greater detail, resulting in smoother automation transitions. Additionally, using larger grid settings can assist in creating more defined and structured automation shapes.
Remember to experiment and explore different automation shapes and techniques using the Draw tool. It’s a powerful tool that allows you to add a personalized touch to your mix and create captivating automation movements. With practice, you’ll be able to master the art of writing automation with the Draw tool in Pro Tools.
Editing Automation
Editing automation is a crucial step in the mixing process, as it allows you to refine and fine-tune the automation data for a polished and professional sound. In Pro Tools, there are various tools and techniques you can use to edit automation and make precise adjustments to achieve the desired mix.
One of the most common editing techniques is moving automation breakpoints. By selecting and dragging a breakpoint, you can easily change its position and thus alter the automation value at that specific point in time. This is useful for adjusting volume levels, panning positions, and other parameters throughout the mix.
In addition to moving breakpoints, you can also delete unwanted automation data. Simply select the breakpoint or range of breakpoints you want to remove and press the delete key. This allows you to clean up your automation and eliminate any unnecessary changes or mistakes.
Copying and pasting automation is another handy editing technique in Pro Tools. This allows you to duplicate automation data from one section to another, saving you time and effort. Simply select the desired range of automation data, copy it, and then paste it where you want it to be applied.
To further refine your automation, Pro Tools provides automation curves. Curves offer a way to create smooth and gradual transitions between automation breakpoints. By adjusting the slope and shape of the curves, you can achieve seamless transitions in volume or any other parameter you are automating. This adds a dynamic and natural feel to your mix.
When dealing with MIDI tracks, you can convert MIDI data to automation for even more control. This enables you to manipulate MIDI parameters, such as velocity or modulation, as if they were regular automation data. Converting MIDI data to automation expands the creative possibilities and allows for intricate automation shaping.
Automation lanes are another helpful editing feature in Pro Tools. They allow you to organize and view multiple automation parameters simultaneously, making it easier to edit and navigate through complex automation data. Automation lanes enhance your workflow and provide a clear overview of the automation changes within your mix.
Lastly, it’s crucial to be mindful of automation on plugin parameters. Many plugins in Pro Tools allow you to automate their controls, such as EQ settings, plugin bypass, or effect parameters. By automating plugin parameters, you can add creative depth and movement to your mix, enhancing the overall sound.
Editing automation in Pro Tools gives you the ability to refine and shape your mix with precision. Whether you’re making subtle adjustments or creating dramatic changes, the editing tools and techniques in Pro Tools empower you to achieve the desired automation results and take your mix to the next level.
Using Automation Curves for Precision
Automation curves in Pro Tools offer a powerful tool for creating precise and smooth transitions between automation breakpoints. By manipulating automation curves, you can achieve a high level of precision and control when shaping automation data.
When working with automation curves, it’s important to understand their structure. Automation curves consist of line segments that connect breakpoints, with the shape of the curve determined by the slopes of these line segments. By adjusting the slopes, you can create gradual fades, gentle sweeps, or sharp transitions in your automation data.
To start using automation curves, select the desired automation breakpoints along the timeline of your track. These breakpoints act as anchor points for the curve segments. By default, Pro Tools will create straight line segments between each breakpoint, resulting in linear automation changes.
To introduce curvature to the automation, select a breakpoint and drag the handles that appear on either side. Moving the handles up or down changes the slope of the line segments and introduces curvature to the curve. This allows you to create smooth transitions and precise adjustments in your automation data.
For more intricate adjustments, you can add additional breakpoints to the curve and adjust their handles individually. This allows for even greater control over the shape of the curve and the precision of your automation changes.
Automation curves are particularly useful when working with volume automation. They allow you to create gradual fades in and out, resulting in smooth and natural transitions between different sections of your mix. By carefully shaping the automation curve, you can achieve a polished and balanced sound that dynamically supports the music.
In addition to volume automation, you can use automation curves for other parameters, such as panning, plugin parameters, or any other automated control in Pro Tools. The precision offered by automation curves allows you to shape and manipulate these parameters with finesse, adding depth and movement to your mix.
Remember to experiment and listen closely to the changes in your mix as you adjust automation curves. Small adjustments in the slope of a curve can have a significant impact on the overall sound. Trust your ears and use your creative intuition to find the perfect curve shape that complements the musical elements of your mix.
Automation curves are a powerful tool that give you the ability to achieve precise and dynamic automation changes in your mix. By leveraging the control and flexibility they offer, you can add a professional touch to your mix and elevate the overall listening experience.
Copying and Pasting Automation
Copying and pasting automation in Pro Tools is a convenient and efficient way to replicate automation data from one section to another. This feature saves you time and effort by allowing you to duplicate automation settings and apply them to different parts of your mix.
To copy automation data, select the range of automation breakpoints or the entire automation lane that you want to duplicate. You can do this by clicking and dragging the mouse cursor over the desired region or by selecting the entire automation lane with a single click.
Once the automation data is selected, simply use the standard copy function (Ctrl+C or Command+C) to copy the data to your clipboard. Pro Tools stores the selected automation data in the clipboard for later use.
Next, navigate to the section of your mix where you want to paste the copied automation data. Ensure that the track is set to the appropriate automation mode, such as Write or Touch, to enable pasting of the automation data.
Then, use the standard paste function (Ctrl+V or Command+V) to paste the copied automation data. Pro Tools will apply the pasted automation settings to the selected region, duplicating the automation data from the original section.
Copying and pasting automation is particularly useful when you want to create repetitive patterns or apply similar automation settings to multiple sections of your mix. It is especially beneficial in situations where you need to maintain consistent volume levels, panning positions, or plugin parameter settings across different sections.
When copying and pasting automation, it’s important to consider the overall coherence and flow of your mix. Make sure that the pasted automation accurately captures the intended dynamics and movement. You may need to make slight adjustments after pasting to ensure a seamless transition between the copied and existing automation data.
In addition to duplicating automation within the same track, you can also copy and paste automation data across different tracks. This allows you to apply similar automation settings to multiple tracks simultaneously, maintaining consistency across your mix.
Another useful feature is the ability to paste automation as new or alternate versions. This creates separate playlists of automation data, allowing you to easily toggle between different versions and experiment with different automation settings while keeping the original automation intact.
Copying and pasting automation in Pro Tools is a valuable technique for streamlining your workflow and maintaining consistency in your mix. By leveraging this feature, you can save time, enhance productivity, and achieve a cohesive and professional sound in your music productions.
Converting MIDI Data to Automation
In Pro Tools, the ability to convert MIDI data to automation opens up a world of possibilities for manipulating various parameters with precision. This powerful feature allows you to take advantage of MIDI performances and transform them into automation data, giving you greater control and flexibility over your mix.
To convert MIDI data to automation, start by selecting the MIDI track containing the desired MIDI data. Then, navigate to the Edit window and locate the “Event Operations” menu. From there, choose the option to convert MIDI data to automation.
Once the conversion process is complete, you’ll have the option to select which MIDI parameters you want to convert to automation. This can include parameters such as volume, pan, modulation, pitch bend, and more. Select the desired parameters, and Pro Tools will generate corresponding automation data based on the MIDI performance.
Converting MIDI data to automation opens up a wide range of creative possibilities. You can now manipulate parameters like volume and pan for greater control and precision. For example, if a MIDI performance contains a dynamic range of velocities, converting the MIDI’s velocity data to automation gives you the ability to shape the volume levels of your instrument’s track.
Additionally, converting MIDI data to automation allows you to automate other plugin parameters. This means that MIDI data controlling a plugin’s parameters, such as cutoff frequency or resonance, can be transformed into automation for detailed control and shaping of your sound.
Converting MIDI data to automation is particularly useful when working with virtual instruments or MIDI-triggered effects. It enables you to refine and enhance the recorded performance, adding depth, expression, and nuances to your mix.
When using this feature, it’s important to be mindful of the MIDI data you’re converting to automation. Ensure that the MIDI performance captures the intended musical expression before converting it to automation. This will allow for a more accurate translation of the performance into automation data.
Experiment with different MIDI performances and automation conversions to explore the creative potential of this feature. MIDI data can be a valuable source of inspiration when crafting automation, enabling you to add unique movements and articulations to your mix.
By converting MIDI data to automation, you can take your mix to new heights, adding dynamic and precise control to various parameters. Embrace the versatility of this feature and let your MIDI performances shape the automation data that showcases the true essence of your music.
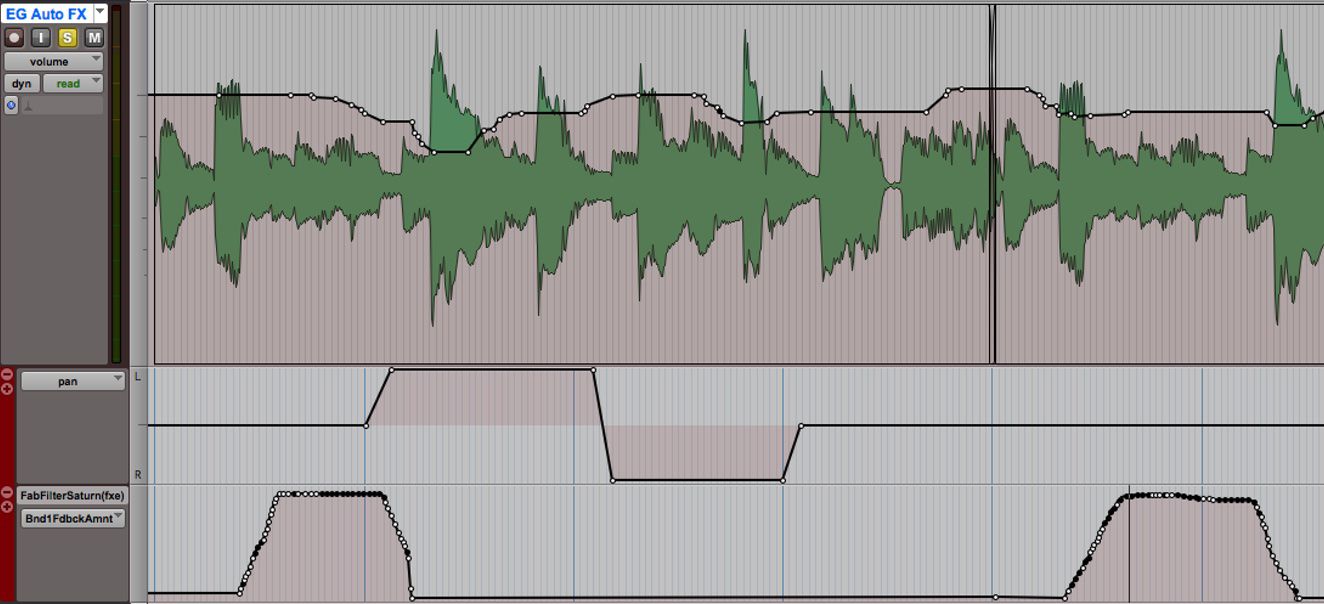
Using Automation Lanes for Organization
In Pro Tools, automation lanes are a powerful tool that allow you to organize and view multiple automation parameters simultaneously. By utilizing automation lanes, you can significantly improve your workflow and maintain better organization and clarity in your mix.
Automation lanes provide a dedicated space for each automation parameter, allowing you to isolate and focus on specific aspects of your mix. Rather than having all automation data stacked on a single track, automation lanes offer a vertical arrangement of parameters, making it easier to navigate and edit your automation.
To access automation lanes, simply click on the arrow or triangle icon located on the left side of the track’s automation lane. This expands the lane and reveals additional automation parameters that can be displayed in parallel to the main automation.
By default, Pro Tools displays volume and pan automation parameters in the main automation lane. However, you can add or remove parameters according to your specific needs. This allows you to view and edit other automation data such as plugin parameters, EQ settings, send levels, and more, in their own dedicated lanes.
Using automation lanes is particularly helpful when dealing with complex mixes that require precise control over multiple parameters. The visual separation of automation data allows you to focus on specific details without clutter, making it easier to fine-tune and adjust different aspects of your mix.
In addition to providing organization, automation lanes offer a clear visual representation of how different automation parameters interact with each other. You can easily identify any overlaps or conflicts in automation data, ensuring that your mix is well-balanced and free from unwanted clashes.
Automation lanes also provide streamlined editing capabilities. You can make adjustments to specific parameters within their respective lanes without affecting others, simplifying the editing process. This level of control helps you maintain consistency in your mix while honing in on the fine details.
Another advantage of using automation lanes is the ability to solo or mute specific parameters. This allows you to focus solely on a particular automation parameter while temporarily muting others, providing a distraction-free working environment and enabling you to make precise edits without interference.
By utilizing automation lanes, you can be more productive and organized in your mixing process. This feature optimizes your workflow, making it easier to navigate through complex automation data, maintain a systematic approach, and achieve a polished and professional mix.
Experiment with different automation lane arrangements to find the most effective view for your specific project. Take advantage of the clarity and organization offered by automation lanes to take full control of your mix and unleash your creativity.
Deleting and Clearing Automation
In Pro Tools, the ability to delete and clear automation data is essential for refining your mix and making precise adjustments. Whether you want to remove specific automation breakpoints or clear an entire automation lane, these editing techniques allow you to maintain control over your mix and ensure a clean and accurate sound.
To delete individual automation breakpoints in Pro Tools, simply select the desired breakpoint or range of breakpoints and press the delete key. This removes the selected automation data, allowing you to make targeted adjustments without affecting the surrounding automation.
If you want to clear an entire automation lane, right-click on the automation lane and choose the “Clear” option from the context menu. This clears all automation data from the selected lane, giving you a blank canvas to work with.
Deleting and clearing automation data can be useful in various scenarios. For example, if you’ve made a mistake while recording automation in real time, deleting the incorrect adjustments allows you to start fresh and re-record the automation accurately.
In addition, clearing an automation lane can be beneficial when you want to make a substantial change to a parameter’s automation across an entire track. By clearing the automation and starting from scratch, you can ensure consistency and precision in your mix.
It’s worth noting that deleting or clearing automation is permanent, so it’s essential to exercise caution and double-check your actions before proceeding. It’s a good practice to create backups or save multiple versions of your project to avoid irreversible mistakes.
When deleting or clearing automation, it’s important to consider the impact on the overall mix. Removing automation can result in sudden level changes, abrupt panning shifts, or other unintended consequences. Take the time to listen to your mix and make additional adjustments as needed to maintain a balanced and cohesive sound.
Moreover, Pro Tools provides undo/redo functionality, allowing you to revert any unintended deletion or clearing of automation. If you accidentally delete or clear automation and want to restore it, simply use the undo command (Ctrl+Z or Command+Z) to bring back the removed automation data.
Deleting and clearing automation in Pro Tools is a valuable editing technique that gives you control over your mix and allows for precise adjustments. By utilizing these functions thoughtfully and strategically, you can refine your automation and create a polished and professional sound.
Using Automation Trim to Adjust Levels
Automation Trim is a powerful feature in Pro Tools that allows you to make precise level adjustments to your automation data. With Automation Trim, you can fine-tune volume levels and control the overall balance in your mix with ease.
To utilize Automation Trim, select the desired track and make sure it is in Trim automation mode. This mode allows you to add or subtract gain from your existing automation data, leaving the actual automation intact. In other words, you can adjust the overall level without modifying the shape of the automation curves.
Once in Trim mode, you can use the fader, knob, or other assignable controls to make level adjustments. Moving the control up adds gain, while moving it down subtracts gain. Pro Tools dynamically adjusts the automation data based on these changes, raising or lowering the overall level of the track while maintaining the integrity of the automation moves.
Automation Trim is particularly useful when you want to make subtle changes to the volume levels of specific sections within your mix. It allows you to make fine adjustments without altering the existing automation data, ensuring a seamless and natural transition between different automation moves.
Another benefit of Automation Trim is its non-destructive nature. Since Trim mode only affects the overall level, you can easily revert to the original automation settings at any time. This flexibility allows you to experiment with different levels and instantly switch back to the original automation if desired.
Using Automation Trim can save you valuable time during the mixing process. Instead of manually adjusting each individual automation breakpoint, you can quickly make precise level changes across entire sections of automation data. This speeds up your workflow and enhances your productivity.
When using Automation Trim, it’s important to listen attentively and make adjustments based on the musical context and aesthetic preferences. Use your ears as a guide to find the perfect balance and ensure that the automation trim changes contribute positively to the overall mix.
Additionally, keep in mind that Automation Trim affects the entire track, including all automation parameters. If you only want to adjust specific automation parameters, consider using other automation editing techniques, such as drawing or moving automation breakpoints, to target those parameters directly.
Automation Trim is a valuable tool that enhances your control over the levels in your mix. By utilizing this feature thoughtfully, you can achieve the perfect balance and precision in your automation, resulting in a professional and polished sound.
Automating Plug-in Parameters
Automating plug-in parameters in Pro Tools is a powerful method for adding movement, creativity, and depth to your mix. By automating parameters within your plugins, you have fine-grained control over effects, EQ settings, dynamics, and other processing elements, allowing you to shape and sculpt your sound with precision.
To begin automating plug-in parameters, select the desired track and make sure it’s in Write automation mode. This enables Pro Tools to record and capture your adjustments to the plug-in parameters in real time. Once in Write mode, access the plug-in’s automation controls, typically located within the plug-in’s graphical interface or automation bar.
Within the automation controls, you’ll find a list of available parameters that you can automate. These could include parameters such as cutoff frequency, resonance, attack time, release time, mix levels, and more, depending on the specific plug-in you’re using. Select the parameter you want to automate and proceed to make adjustments using the on-screen controls or assigned hardware.
As you manipulate the parameter, Pro Tools will record the changes as automation data, reflecting your adjustments in real time. This creates a dynamic automation track that precisely controls the plug-in parameter, allowing you to achieve intricate effects, smooth transitions, and nuanced variations throughout your mix.
Automating plug-in parameters adds an extra layer of creativity and expressiveness to your mix. You can automate parameters to create sweeping filter effects, modulate the intensity of a reverb tail, automate EQ boosts/cuts for tonal shaping, or introduce dynamic changes to a compressor or limiter, among countless other possibilities.
Once your automation data is recorded, you can further edit and refine it using Pro Tools’ powerful automation editing tools. You can adjust the timing, smoothness, and overall shape of the automation curves to shape the behavior and impact of the automated plug-in parameter.
Through automating plug-in parameters, you can achieve precise control over specific elements of your mix. Whether you’re looking to add subtle enhancements or dramatic transformations, automated plug-in parameters enable you to bring your creative vision to life.
It’s important to experiment with different automation techniques and variations to find the right balance and enhance the overall musicality of your mix. Let your ears guide your automation decisions and trust your instincts to shape the sound you envision.
Automating plug-in parameters gives you the power to infuse your mix with movement, excitement, and sonic character. The ability to control and manipulate various plug-in parameters allows for endless possibilities and contributes to a captivating and professional end result.
Creating Automation Playlists
In Pro Tools, automation playlists are a powerful feature that allows you to create and manage multiple versions of automation data for a track. They provide flexibility and versatility in experimenting with different automation settings and variations while maintaining the ability to revert to previous versions if needed.
To create an automation playlist, start by selecting the track you want to work with. Then, access the automation view for that track and locate the automation playlist selector. This will typically be displayed as a drop-down menu or a series of tabs.
By default, you’ll see the “Main” playlist, which contains the original automation data. To create a new playlist, click on the “+” button or select “New Playlist” from the automation playlist selector. This will generate a blank playlist for you to work with.
Once you have multiple playlists, you can switch between them seamlessly to compare and audition different versions of automation data. This allows you to experiment with alternative automation moves, different parameter settings, or even entirely new ideas while retaining the original automation as a reference point.
When making changes to an automation playlist, make sure the track is set to the appropriate automation mode, such as Write or Touch, to enable recording of the new automation data. This allows you to make adjustments to that specific playlist while leaving the automation in other playlists unaltered.
Automation playlists are particularly useful when you want to explore creative options and make iterative changes to your mix. They provide a safe environment to experiment without permanently affecting the original automation or risking losing previous automation moves.
Automation playlists can also be used for different sections within a song. For instance, you can create separate playlists for the verses, chorus, and bridge, each containing unique automation moves tailored to the specific parts of the song. This helps maintain organization and streamlines the editing process.
In addition to creating new playlists, you can copy automation data from one playlist to another. This allows you to duplicate specific automation moves across different playlists, saving you time and effort while maintaining consistency in your automation across various parts of your mix.
Lastly, automation playlists provide a convenient way to showcase different mix options to clients or collaborators. You can create alternate playlists with variations and present them for feedback and decision-making. This flexibility helps streamline the collaborative process and allows for efficient exploration of different creative directions.
Creating automation playlists in Pro Tools empowers you to explore, experiment, and refine your mix with ease and confidence. By leveraging this feature, you gain the freedom to iterate and innovate while preserving the ability to revert or compare different automation versions, ultimately enhancing the quality and creativity of your mix.
Using Automation Preview Mode
Automation Preview Mode in Pro Tools is a helpful feature that allows you to preview automation changes without actually committing them. It provides a convenient way to audition and fine-tune your automation moves before applying them permanently to your mix.
To access Automation Preview Mode, start by selecting the track you want to work with. Then, enable Automation Preview Mode either by clicking on the “Automation Preview” button in the automation view or by using the assigned shortcut key.
Once in Automation Preview Mode, any adjustments you make to automation parameters will be applied only temporarily and will not affect the actual automation data. This allows you to hear the changes in real time without committing to them, giving you the opportunity to make confident decisions before permanently altering your automation.
Automation Preview Mode is particularly useful when you’re experimenting with new automation moves or trying out different parameter settings. It enables you to audition the changes within the context of your mix and assess their impact without any permanent modifications.
While in Automation Preview Mode, you can toggle back and forth between the previewed automation and the original automation. This comparison allows you to evaluate the differences and determine which version works best for your mix.
During the preview process, you can also make additional adjustments to the automation parameters to fine-tune and optimize the automation data further. This iterative process allows for more precise control and refinement in your mix.
Utilizing Automation Preview Mode can save you valuable time and streamline your workflow. Instead of having to undo and redo changes you’re uncertain about, you can preview them first and decide if they complement your mix or need further adjustments.
This feature is especially beneficial during the editing phase, where you’re making critical decisions on automating levels, panning, or plugin parameters. Automation Preview Mode gives you the freedom to explore various creative options while maintaining an efficient workflow.
Remember that Automation Preview Mode only applies the changes temporarily and doesn’t modify the actual automation data. To commit the changes and apply them permanently, simply exit Automation Preview Mode, and the previewed automation will replace the existing data.
By using Automation Preview Mode in Pro Tools, you can confidently experiment and refine your automation moves, ensuring that they enhance your mix before making any permanent alterations. This feature empowers you to make informed decisions and create a professional and polished sound.
Using Automation Follows Edit
Automation Follows Edit is a valuable feature in Pro Tools that automatically adjusts existing automation data when edits are made to your audio or MIDI regions. This dynamic functionality allows your automation to seamlessly follow any changes you make to your edits, ensuring that your automation remains in sync with the edited material.
By enabling Automation Follows Edit, you can focus on editing your audio or MIDI regions without having to manually update or re-record your automation. Whenever you cut, paste, trim, or move regions on your tracks, the automation data associated with those regions will adjust accordingly.
To activate Automation Follows Edit, go to the Options menu and select Automation Follows Edit. You can also use the corresponding shortcut key to toggle this feature on and off.
Automation Follows Edit works with various types of edits, including region-based edits and clip gain adjustments. When you perform these actions, Pro Tools automatically stretches or compresses the associated automation data, ensuring that the automation remains properly aligned with the edited regions and maintains its intended musical expression.
This feature is particularly advantageous when you’re working on complex mixes with intricate automation moves. By freeing yourself from the burden of manually updating automation after each edit, you can focus on the creative aspects of your mix and maintain a smooth and continuous workflow.
Automation Follows Edit provides precise automation synchronization, reducing the likelihood of errors or inconsistencies between your edited regions and automation data. It allows you to make changes with confidence, knowing that your automation will accurately follow your edits.
It’s worth noting that Automation Follows Edit doesn’t apply to every scenario. For example, if the automation data extends beyond the edited region, it won’t be affected by the edit. Additionally, any automation data placed on separate automation playlists will not be automatically adjusted.
To ensure optimal use of Automation Follows Edit, it’s essential to understand how it interacts with your specific edits. Familiarize yourself with the boundaries and limitations of this feature to make informed decisions and maximize its benefits in your mix.
Automation Follows Edit is a time-saving tool that enhances your editing efficiency and ensures that your automation remains in sync with your audio or MIDI edits. By enabling this feature in your Pro Tools sessions, you can confidently make edits and adjustments, knowing that your automation will adapt effortlessly to the changes.
Using Automation Window Views to Enhance Workflow
In Pro Tools, automation window views offer a powerful way to enhance your workflow and facilitate efficient automation editing and management. These views provide customizable and focused displays of your automation data, allowing you to closely analyze, edit, and manipulate automation with precision.
One of the key benefits of automation window views is their ability to declutter your workspace and provide a dedicated environment for working with automation. By isolating automation data in its own window, you can focus solely on shaping and refining automation without the distraction of other elements in your session.
To access automation window views, navigate to the Window menu and select Automation in the dropdown menu. From there, you can choose from various automation-specific windows, such as the Automation View, the Automation Gain View, or the Automation Lane View, depending on your specific needs.
The Automation View is the most comprehensive automation window, displaying all automation data for the selected track. It provides an overview of volume, pan, and all other automated parameters in a single, consolidated view. This allows for a holistic understanding of the automation across the entire track.
The Automation Gain View focuses specifically on automation data related to volume changes. It provides a detailed visualization of volume automation, enabling you to finely adjust levels and create smooth transitions. This view is especially useful when working with complex level changes in your mix.
The Automation Lane View takes a parameter-oriented approach, offering individual automation lanes for each parameter you’ve automated. This view can declutter the display by allowing you to focus on specific parameters, such as plugin parameters or panning, without overwhelming the screen with unnecessary information.
Automation window views provide various tools and editing capabilities tailored to automation management. You can create and delete breakpoints, adjust parameter values, draw and edit curves, and copy and paste automation data directly within these views. These features streamline your automation editing process and enable efficient workflow.
Another advantage of automation window views is their ability to display multiple tracks simultaneously. This is especially helpful when you need to compare and align automation data across multiple tracks. The side-by-side visualization allows you to maintain consistency and coherence in your automation moves.
Customization options within automation window views further enhance your workflow. You can choose which parameters to display, resize and rearrange tracks, and adjust the visibility of automation data to suit your specific needs. These customizable views help you work in a way that feels most intuitive and efficient for your unique mixing process.
Integration with other Pro Tools features, such as grouping tracks or linking automation, further amplifies the advantages of automation window views. You can group related tracks together, link their automation, and view and edit their automation data simultaneously, ensuring cohesion and consistency across your mix.
Incorporating automation window views into your Pro Tools workflow allows for greater focus, organization, and efficiency when working with automation. Whether you’re shaping volume, tweaking plugin parameters, or fine-tuning intricate automation moves, these views optimize your editing process and help you achieve a professional mix.
Tips and Best Practices for Automation in Pro Tools
Automation is a crucial aspect of the mixing process in Pro Tools, allowing you to add dynamics, movement, and expression to your tracks. To help you make the most of automation, here are some valuable tips and best practices to consider:
1. Plan and Experiment: Before diving into automation, have a clear vision of what you want to achieve. Experiment with different automation moves and techniques to find the best fit for your mix.
2. Work in Stages: Instead of automating all parameters simultaneously, take a phased approach. Focus on one aspect, such as volume or panning, then move on to other parameters. This helps maintain better control and organization.
3. Utilize Jumpcuts: Jumpcuts allow you to create sudden changes in automation, adding excitement and impact to your mix. Use them sparingly and strategically for maximum effect.
4. Use Trim Automation: Automation Trim enables you to make subtle adjustments to overall levels without altering the original automation. It allows for precise fine-tuning and ensures a smooth balance in your mix.
5. Draw Curves for Smooth Transitions: Utilize automation curves to create smoother transitions between breakpoints. This helps maintain a natural and seamless flow across your automation data.
6. Clean Up Unnecessary Automation: Regularly review your automation data and remove any unnecessary or unwanted automation. This declutters your mix and ensures that only essential changes are present.
7. Group Tracks: Grouping tracks with related automation allows you to simultaneously edit and adjust automation across multiple tracks. This helps maintain consistency and cohesion throughout your mix.
8. Use Keyboard Shortcuts: Familiarize yourself with keyboard shortcuts for automation tasks. This saves time and enhances your workflow, allowing for more fluid automation editing.
9. Save Multiple Versions: Save different versions of your session as you progress with automation. This provides a safety net and allows you to easily revert to previous automation versions if needed.
10. Listen and Refine: Continuously listen to your mix while working on automation. Trust your ears and make adjustments to ensure that automation enhances the musicality and emotion of your mix.
11. Collaborate Effectively: When working with others, clearly communicate your automation intentions and share session files with consolidated automation data to maintain consistency across different systems.
12. Save Regularly: Automation is a critical component of your mix. Ensure you save your session regularly to avoid the risk of losing any automation work.
By following these tips and best practices, you can harness the full power of automation in Pro Tools. Automation is a creative tool that brings your mix to life and adds a polished and professional touch to your music production.