
Choosing a Customizable iPhone Theme
Your iPhone’s theme defines the overall look and feel of your device. Fortunately, there are plenty of customizable options available to suit your personal style. Here are some tips to help you choose the perfect customizable theme for your iPhone.
1. Explore the Theme Store: Start by browsing the built-in Theme Store on your iPhone. You’ll find a variety of pre-designed themes to choose from. Simply tap on a theme to preview it and see how it will change the appearance of your iPhone’s interface.
2. Consider Your Preferences: Think about the colors, patterns, and overall aesthetic that you prefer. Do you want a minimalistic theme with clean lines and neutral colors, or do you prefer a bold and vibrant design? Consider your personal taste and choose a theme that reflects your style.
3. Check for Customization Options: Look for themes that offer customization options. Some themes allow you to change the wallpaper, icon styles, and fonts. Being able to tweak these elements will allow you to create a truly unique and personalized look for your iPhone.
4. Read User Reviews: Before selecting a theme, take the time to read user reviews and ratings. This will give you insights into the theme’s performance, stability, and overall user experience. Look for themes with positive feedback and avoid ones with frequent complaints or issues.
5. Consider Compatibility: Ensure that the theme you choose is compatible with the version of iOS running on your iPhone. Some themes may not work well with older software versions, resulting in glitches or compatibility issues.
6. Experiment and Have Fun: Don’t be afraid to experiment with different themes. You can easily switch between themes and customize your iPhone’s look whenever you want. Take the opportunity to have fun and create a visually pleasing interface that suits your unique style.
By considering your preferences, exploring customization options, and checking user reviews, you can choose a customizable iPhone theme that will transform your device and make it truly your own.
Customizing Your iPhone Wallpaper
Your iPhone’s wallpaper is the background image that appears behind the icons and widgets on your home screen. Customizing your wallpaper is a great way to add a personal touch to your device. Here are some tips to help you customize your iPhone wallpaper.
1. Choose a Wallpaper Option: There are several options for selecting a wallpaper on your iPhone. You can choose from the pre-installed wallpapers on your device, use your own photos, or download wallpapers from the internet or the App Store.
2. Use Built-In Wallpapers: To access the built-in wallpapers on your iPhone, go to Settings > Wallpaper > Choose a New Wallpaper. Here, you’ll find a variety of categories such as Dynamic, Stills, and Live. Browse through these options and select a wallpaper that appeals to you.
3. Use Your Own Photos: Another way to customize your wallpaper is to use your own photos. To do this, go to Settings > Wallpaper > Choose a New Wallpaper > Photos. Select the photo you want and adjust it to fit the screen by pinching in or out. You can even choose to have different wallpapers for your home screen and lock screen.
4. Download Wallpapers: If you want more options, you can download wallpapers from the internet or the App Store. There are many websites and apps that offer a wide range of wallpapers in different categories such as nature, abstract, or minimalistic. Find one that suits your style and download it to your device.
5. Adjust Perspective Zoom: When selecting a wallpaper, you have the option to enable or disable perspective zoom. Enabling this feature allows your wallpaper to subtly move as you tilt your phone, creating a dynamic effect. If you prefer a static wallpaper, disable this option.
6. Customize with Widgets: With iOS 14 or later, you have the option to add widgets to your home screen. You can customize your wallpaper to complement the widgets and create a cohesive and visually appealing layout. Experiment with different combinations to find the perfect balance.
Remember, your wallpaper is a reflection of your personal style and preferences. Choose an image that resonates with you and enhances your overall visual experience on your iPhone. Whether it’s a calming nature scene or a vibrant artwork, customizing your wallpaper can help make your iPhone truly your own.
Customizing iPhone App Icons
One of the best ways to personalize your iPhone is by customizing the app icons. By changing the appearance of the icons, you can give your device a unique and stylish look. Here are some methods to help you customize the app icons on your iPhone.
1. Built-in App Icon Customization: With the release of iOS 14, Apple introduced the ability to customize app icons using the Shortcuts app. To do this, go to the Shortcuts app, tap on the “+” icon, select “Add Action,” search for “Open App,” and then choose the app you want to customize. Tap on the three dots at the top-right corner, select “Add to Home Screen,” and finally, tap on the icon image to choose a new custom image from your photo library. This method allows you to create a shortcut with a custom icon for any app on your iPhone.
2. Third-Party Apps: If you prefer a more streamlined process, there are several third-party apps available on the App Store that specifically focus on app icon customization. These apps offer a wide range of pre-designed icons, themes, and styles to choose from. Simply select the app you want to customize and browse through the available options to find your desired icon.
3. Create Your Own Icons: If you have a creative side, you can design your own app icons using graphic design software or mobile apps. Use an image editing tool like Adobe Photoshop, Canva, or Procreate to create unique icons. Once you’ve created your icons, save them to your device and follow the instructions in the Shortcuts app as mentioned in method 1.
4. Icon Packs: Another way to customize your app icons is by using icon packs that are available online. Many websites offer collections of downloadable icon packs that include various styles and themes. These packs usually come with instructions on how to apply the icons to your apps using the Shortcuts app or other methods specific to the pack.
5. Organize Your Custom Icons: After you’ve customized your app icons, you may want to reorganize them on your home screen. Consider creating folders or using the App Library feature introduced in iOS 14 to keep your customized icons organized and easily accessible.
Customizing your iPhone app icons is a great way to express your individuality and make your device truly your own. Whether you choose to use the built-in customization options or explore third-party apps and icon packs, take the time to create a visually appealing and cohesive look that reflects your personal style.
Organizing Apps on Your iPhone Home Screen
Your iPhone’s home screen is where you access all your apps, and organizing them efficiently can greatly enhance your productivity and overall user experience. Here are some useful tips to help you organize your apps on the home screen.
1. Declutter Your Home Screen: Start by decluttering your home screen. Remove any unnecessary or rarely used apps by tapping and holding an app icon until it starts jiggling, then tapping the “x” button to delete it. This will create more space and a cleaner look.
2. Categorize Your Apps: Grouping similar apps together can make it easier to locate and access them. For instance, create folders for productivity apps, social media apps, entertainment apps, etc. To create a folder, tap and hold an app icon until it starts jiggling, then drag it onto another app to create a folder. Give the folder a relevant name to easily identify its contents.
3. Arrange Apps by Frequency of Use: Consider arranging your apps based on how frequently you use them. Place the most frequently used apps on the first page or the bottom dock, where they can be easily accessed with a single tap. Organize less-used apps into folders or move them to subsequent pages.
4. Utilize App Library: iOS 14 introduced the App Library, which automatically organizes your apps into categories. Swipe left on the home screen to access the App Library and find apps based on categories like Suggestions, Recently Added, Social, Productivity, etc. This feature eliminates the need for excessive home screen pages and offers a convenient way to find apps without cluttering your main screen.
5. Make Use of Search: If you have a large number of apps or struggle to locate specific apps, utilize the search feature. Swipe down on the home screen to access the search bar and enter the name of the app you want to open. This can save time and effort in manually searching for apps.
6. Customize Your App Icons: As mentioned in the previous section, you can customize app icons using the Shortcuts app or third-party apps. Customizing app icons can not only give your home screen a personalized look but also make it easier to recognize and locate specific apps.
Remember to regularly review and adjust your app organization based on your changing needs and app usage patterns. By organizing your apps in a logical and intuitive manner, you can navigate your iPhone home screen more efficiently and streamline your digital experience.
Adding Widgets to Your iPhone Home Screen
iOS 14 introduced a much-awaited feature that allows users to add widgets to their iPhone home screen. Widgets provide at-a-glance information and quick access to app features, enhancing the overall functionality and aesthetic appeal of your device. Here’s how you can add widgets to your iPhone home screen.
1. Access the Widget Gallery: To begin, press and hold on any empty space on your home screen until the app icons start jiggling. Tap the “+” button at the top left corner of the screen to open the Widget Gallery.
2. Choose a Widget Category: In the Widget Gallery, you’ll find a variety of widget categories to choose from, such as Weather, Calendar, Reminders, Photos, and more. Browse through the categories or use the search bar to find a specific widget. Tap on a category to view the available widget options.
3. Preview and Add Widgets: Within each category, you’ll see different widget sizes and layouts. Tap on a widget to preview it and swipe left or right to see additional options. Once you’ve found the widget you want to add, tap the “Add Widget” button below it.
4. Customize Widget Settings: After adding a widget to your home screen, many widgets offer customization options. Tap and hold a widget to enter the editing mode, where you can change the size, add or remove information, or edit the widget’s settings. Experiment with different customizations until you achieve the desired look and functionality.
5. Reorder and Remove Widgets: To reorder the widgets on your home screen, enter the editing mode by pressing and holding any widget, then drag the widget to a new location. You can also remove a widget by entering the editing mode, tapping the “-” button on the top left corner of the widget, and selecting “Remove.”
6. Stack Widgets: Another useful feature is widget stacking. Stacking allows you to group multiple widgets together in a single, space-saving widget. To create a stack, drag one widget on top of another and release it. To cycle through the stacked widgets, simply swipe up or down on the stack.
By adding widgets to your iPhone home screen, you can have quick access to important information, upcoming events, and frequently used app features without even opening the apps. Customize your widgets to fit your preferences and needs, and keep exploring new widgets as developers continue to release updates.
Customizing iPhone Control Center
The Control Center on your iPhone provides quick access to various settings and features, allowing you to easily control your device with just a swipe. Customizing the Control Center can help you personalize it to your needs and enhance your user experience. Here’s how you can customize the Control Center on your iPhone.
1. Open Control Center Settings: Go to the Settings app on your iPhone and tap on “Control Center.”
2. Add or Remove Controls: In the Control Center settings, you’ll see a list of available controls. To add a control, tap the green “+” icon next to it. Similarly, to remove a control, tap the red “-” icon. Customize the Control Center by adding the controls you frequently use and removing the ones you don’t need.
3. Rearrange Controls: You can also rearrange the order of the controls in the Control Center. On the Control Center settings page, tap and hold the three horizontal lines next to a control, then drag it up or down to the desired position.
4. Customize Control Options: Some controls in the Control Center settings have additional options that you can customize. For example, you can change the brightness level for the “Brightness” control or choose which devices to connect to for the “AirPlay” control. Tap on a control to access its customization options and make any desired changes.
5. Enable or Disable Control Center Access on Lock Screen: By default, the Control Center can be accessed even when your iPhone is locked. If you prefer additional security, you can disable Control Center access on the lock screen in the Control Center settings. This prevents anyone from making changes to your device without unlocking it first.
6. Use Control Center Shortcuts: In addition to the standard controls, you can also add shortcuts to certain app actions in the Control Center. For apps that support this feature, you can go to the Control Center settings, tap “Customize Controls,” and scroll down to find the “More Controls” section. Here, you can add shortcuts for actions such as taking a photo, starting a voice recording, or controlling smart home devices.
Customizing the Control Center allows you to streamline the settings and features that are most important to you. By adding, removing, and rearranging controls, as well as customizing their options, you can create a Control Center layout that aligns with your preferences and makes it more convenient to access the settings and features you use frequently.
Customizing iPhone Lock Screen
Your iPhone’s lock screen is the first thing you see when you wake up your device, and customizing it can add a personal touch and enhance functionality. Here are some tips on how to customize your iPhone lock screen.
1. Change Lock Screen Wallpaper: To customize your lock screen, start by changing the wallpaper. Go to the Settings app, tap “Wallpaper,” and then choose either “Choose a New Wallpaper” or “Choose a New Dynamic Wallpaper.” You can select an image from your photo library or browse through the built-in options. Pick an image that reflects your personality or suits your style.
2. Customize Notifications: Notifications on the lock screen provide a quick glance at important updates and messages. To customize how notifications appear on your lock screen, go to Settings > Notifications. From here, you can adjust their size, choose to show or hide previews, or customize the order in which they appear.
3. Enable Lock Screen Widgets: With iOS 14, you can now add widgets to your lock screen. It allows you to have a preview of useful information, such as weather updates, calendar events, or news headlines. To add widgets to the lock screen, swipe right on the lock screen or home screen to access the Today View, scroll to the bottom, and tap “Edit” to customize the widgets that appear on your lock screen.
4. Control Lock Screen Access: It’s important to strike a balance between convenience and security when customizing your lock screen. You can customize how much access is available on the lock screen by going to Settings > Face ID & Passcode (or Touch ID & Passcode on older devices). From here, you can choose whether to enable or disable features like Today View, Notification Center, Control Center, or Siri on the lock screen.
5. Add Emergency Information: In case of emergencies, it’s helpful to have your emergency contact information readily available on the lock screen. On your iPhone, go to the Health app and tap on the “Medical ID” tab. From there, you can add essential medical information, emergency contacts, and pertinent details that can be accessed even when the device is locked.
6. Customize Lock Screen Shortcuts: iOS also allows you to add shortcuts to certain actions on the lock screen. For example, you can enable camera access or control certain smart home devices directly from the lock screen. To customize these shortcuts, go to Settings > Control Center and tap “Customize Controls” to add or remove actions.
Customizing your iPhone lock screen can help personalize your device and make it more functional to your needs. By changing the wallpaper, customizing notifications, enabling lock screen widgets, controlling lock screen access, adding emergency information, and customizing lock screen shortcuts, you can create a lock screen that is visually appealing, efficient, and tailored to your preferences.
Personalizing iPhone Notification Settings
Notifications on your iPhone keep you informed about important events, messages, and updates. However, an overwhelming influx of notifications can be distracting and disrupt your workflow. By personalizing your iPhone’s notification settings, you can better manage and prioritize the notifications that matter most to you. Here’s how you can personalize your iPhone notification settings.
1. Access Notification Settings: Open the Settings app on your iPhone and tap on “Notifications.” Here, you will find a list of all the apps installed on your device.
2. Prioritize Notifications: Review the list of apps and identify those that you want to prioritize. Tap on an app to access its notification settings and adjust the notification style, including banners, alerts, or none. Customize the alert sound, badges, and even enable the option to show previews or not.
3. Organize Notifications by App: To keep your notifications organized, you can opt to categorize them by the app from which they originate. In the “Notifications” settings, scroll down to “Notification Grouping” and select “By App” to have all notifications from an app grouped together rather than scattered individually.
4. Manage Lock Screen Notifications: Determine which notifications appear on your lock screen by going to the “Notifications” settings and selecting an app. From there, you can choose whether to show notifications on the lock screen, keeping your privacy in mind.
5. Customize Notification Center: The Notification Center is the area that collects all your notifications in one place. You can customize it by going to “Notifications” in the settings and selecting “Notification Center.” Here, you can decide how many notifications are visible and choose the app order based on your preferences.
6. Enable Do Not Disturb: When you need uninterrupted focus or a peaceful environment, enable the Do Not Disturb mode. You can schedule it to activate automatically during specific hours or turn it on manually from the Control Center. This mode temporarily silences incoming calls, alerts, and notifications.
7. Utilize Quiet Hours: To avoid unnecessary disruptions during specific times, take advantage of the silent hours feature. In the Do Not Disturb settings, enable “Scheduled” and set the quiet hours during which you do not want to receive notifications. This is useful during sleep hours or important meetings.
8. Optimize App-Specific Settings: Don’t forget to review the notification settings within individual apps. Many apps offer their own customization options, allowing you to tailor the notifications they send in more detail. This allows you to further refine your notification preferences based on the specific app’s features and your usage.
By personalizing your iPhone notification settings, you can control the flow of information and tailor it to your needs. Prioritizing notifications, managing lock screen notifications, customizing the Notification Center, utilizing Do Not Disturb and silent hours, and optimizing app-specific settings will help you create a more focused and organized notification experience on your iPhone.
Changing iPhone Ringtones and Alerts
Your iPhone comes with a default set of ringtones and alert sounds, but customizing them can add a personal touch and make your device stand out. Whether it’s for incoming calls, text messages, or various system alerts, here’s how you can change the ringtones and alerts on your iPhone.
1. Access Sound Settings: Open the Settings app on your iPhone and tap on “Sounds & Haptics.” Here, you’ll find a range of options to customize the audio settings for different aspects of your device.
2. Change Ringtone: To change the ringtone for incoming calls, tap on “Ringtone” under the “Sounds and Vibration Patterns” section. Choose from the list of available ringtones or tap on “Classic” to select from the traditional ringtones.
3. Customize Text Tone: If you want to change the sound for incoming text messages, go back to the “Sounds & Haptics” settings and tap on “Text Tone.” Similar to changing the ringtone, you can select from the predefined text message alert sounds or choose “Classic” for the traditional options.
4. Modify Other Alert Sounds: In addition to ringtones and text tones, you can customize other system alert sounds on your iPhone. Scroll through the settings and choose options such as New Mail, Calendar Alerts, or Reminders. Tap on each option to select a different sound from the available choices.
5. Set Custom Ringtones: If you want to use a custom ringtone or alert sound, you can do so by syncing your iPhone with your computer. Use the GarageBand app on your iPhone or an audio editing software on your computer to create or edit a sound file. Then, connect your iPhone to your computer using a USB cable, open iTunes, and select your device. Under the “Customize Settings” section, click on “Tones” and select the sound file you want to add. Click “Apply” to sync the custom tones to your iPhone.
6. Assign Specific Ringtones to Contacts: For further personalization, you can assign specific ringtones to individual contacts. This allows you to identify incoming calls without looking at your device. Open the Contacts app, select a contact, and tap “Edit.” Scroll down and tap on “Ringtone” to choose a custom sound for that particular contact.
7. Adjust Volume and Vibration: Along with customizing the sounds, you can control the volume and vibration settings for incoming calls, messages, and other alerts. Use the volume buttons on the side of your iPhone to adjust the overall sound volume, and toggle the “Vibrate on Ring” and “Vibrate on Silent” options to your preference.
By changing the ringtones and alerts on your iPhone, you can add a unique touch to your device and personalize the sounds to your liking. Whether you prefer a melodic ringtone or a subtle alert sound, take advantage of the settings available to create an auditory experience that suits your taste and style.
Customizing iPhone Keyboard Settings
The keyboard on your iPhone plays a crucial role in your overall typing experience. Apple offers various customization options to personalize the keyboard according to your preferences and typing style. Here’s how you can customize the keyboard settings on your iPhone.
1. Access Keyboard Settings: Open the Settings app on your iPhone and tap on “General.” From there, select “Keyboard” to access the keyboard customization options.
2. Enable or Disable Auto-Correction and Auto-Capitalization: Auto-correction and auto-capitalization features can help make typing more efficient. In the Keyboard settings, toggle the switches for “Auto-Correction” and “Auto-Capitalization” based on your preference.
3. Adjust Keyboards and Add New Keyboards: If you use multiple languages or prefer different keyboard layouts, you can add or remove keyboards in the Keyboard settings. Tap on “Keyboards” and then “Add New Keyboard” to select from a list of available keyboards. You can also remove unwanted keyboards by swiping left on them and tapping “Delete.”
4. Customize Keyboard Shortcuts: Keyboard shortcuts allow you to create and use abbreviations that expand to longer phrases or words. In the Keyboard settings, tap on “Text Replacement” to customize your shortcuts. Tap on the “+” button to add a new shortcut and enter the phrase and the corresponding shortcut. This can save you time when typing common phrases or lengthy words.
5. Enable One-Handed Keyboard: If you prefer typing with one hand, the iPhone offers a one-handed keyboard option. In the Keyboard settings, select “One-Handed Keyboard” and choose either the right or left-handed option. This feature makes it easier to reach all the keys with just one hand.
6. Adjust Keyboard Clicks and Character Preview: If you prefer auditory feedback while typing, you can enable keyboard clicks in the Keyboard settings. Toggle the “Keyboard Clicks” switch to hear a clicking sound with each keystroke. Additionally, you can enable/disable the character preview, which displays a magnified view of the pressed key, helping you visually confirm your keystrokes.
7. Customize Keyboard Language Order: In the Keyboard settings, tap on “Edit” next to the “Keyboard” section to rearrange the order of keyboard languages. By dragging the handles next to each language, you can change the order in which the keyboards appear when you tap the Globe icon on the keyboard.
8. Reset Keyboard Dictionary: If you encounter issues with autocorrect or your custom text replacements, you can reset the keyboard dictionary. In the Keyboard settings, tap on “Reset Keyboard Dictionary.” Remember that this will erase all personalized words you’ve added to the dictionary.
By customizing the keyboard settings on your iPhone, you can create a typing experience that is tailored to your preferences. Adjust auto-correction and auto-capitalization, add or remove keyboards, create keyboard shortcuts, enable one-handed keyboard, tweak sound and preview settings, customize the language order, and reset the keyboard dictionary as needed. Experiment with these settings to optimize your typing efficiency and comfort.
Creating iPhone Shortcuts and Automations
iPhone Shortcuts and Automations are powerful features that allow you to streamline and automate tasks on your device. Shortcuts, previously known as Workflow, enable you to create custom sequences of actions that can be triggered with a single tap or voice command. Automations, on the other hand, let you automate tasks based on certain conditions or events. Here’s how you can create and use shortcuts and automations on your iPhone.
1. Access Shortcuts App: Shortcuts are created and managed using the Shortcuts app, which is pre-installed on your iPhone. Open the app to get started or download it from the App Store if you don’t have it already.
2. Create a Shortcut: To create a new shortcut, tap on the “+” button in the top right corner of the Shortcuts app. You can choose from a list of suggested actions or explore different categories, such as Essentials, Home, or Productivity, to find the actions you want to include in your shortcut. Once you’ve selected an action, tap on it to add it to your shortcut. You can add multiple actions and customize each one as needed.
3. Customize Shortcut Details: After adding actions to your shortcut, you can customize the name, icon, and color to make it easier to recognize. Tap on the ellipsis (…) button to access additional options, such as adding parameters, enabling Siri voice commands, or running the shortcut from the widget or home screen.
4. Use Pre-Built Shortcuts: The Shortcuts app also offers a gallery of pre-built shortcuts created by Apple and other users. To explore these shortcuts, tap on “Gallery” at the bottom of the Shortcuts app. Here, you’ll find a variety of ready-to-use shortcuts for different purposes, ranging from productivity to health and shortcuts shared by the community. You can tap on a shortcut to preview it and add it to your collection if it meets your needs.
5. Automations: Automations in the Shortcuts app allow you to trigger shortcuts automatically based on various conditions or events. For example, you can create an automation to run a specific shortcut when you arrive at a certain location, when you connect to a specific Wi-Fi network, or when you receive a message from a particular contact. To create an automation, tap on “Automation” at the bottom of the Shortcuts app and follow the prompts to set up the desired trigger and action.
6. Use Siri Voice Commands: Shortcuts can be executed using Siri voice commands, making it even more convenient to trigger actions. You can assign a custom phrase to a shortcut and use it with Siri to run the shortcut hands-free. To enable Siri voice commands for a shortcut, go to the shortcut details and tap on the “Add to Siri” button.
7. Add Shortcuts to Home Screen or Widget: To make your frequently used shortcuts easily accessible, you can add them to your home screen or widget. Tap on the ellipsis (…) button in the shortcut details and select “Add to Home Screen” or “Add to Widgets.” This allows you to run the shortcut with a single tap or view it in the widgets area.
Customizing your iPhone with shortcuts and automations can significantly enhance your productivity and simplify your daily tasks. From creating custom shortcuts to automating actions based on specific conditions, Shortcuts and Automations offer endless possibilities to customize and streamline your iPhone experience.
Customizing iPhone Accessibility Settings
Your iPhone offers a wide range of accessibility features that can make it easier for individuals with disabilities or specific needs to use the device. These features can enhance usability, improve visibility, and provide additional support. Here’s how you can customize the accessibility settings on your iPhone.
1. Access Accessibility Settings: Open the Settings app on your iPhone and tap on “Accessibility.” Here, you’ll find a comprehensive list of accessibility features that you can customize to suit your specific needs.
2. Adjust Display and Text Size: In the Display & Text Size section, you can make text larger and easier to read by adjusting the Text Size slider. You can also enable Bold Text for better visibility. Moreover, you can activate Zoom for magnifying the screen content or invert colors under Display Accommodations.
3. Customize Display Accommodations: In addition to inverting colors, you can find options like Color Filters, which provides different color-blindness filters, and Reduce White Point, which reduces the intensity of bright colors. Experiment with these settings to find the combination that works best for you.
4. Enable VoiceOver: VoiceOver is an advanced screen-reading technology that provides spoken feedback to help individuals with visual impairments navigate their iPhone. You can enable VoiceOver in the Accessibility settings and adjust settings like speech rate, pronunciation, and verbosity to customize the voice guidance experience.
5. Use AssistiveTouch: AssistiveTouch is a feature that assists with physical and motor difficulties by providing a floating onscreen menu for easier navigation. It allows you to perform various tasks with gestures and taps. In the Accessibility settings, you can enable AssistiveTouch and customize the menu with different actions and shortcuts.
6. Customize Accessibility Shortcuts: Accessibility shortcuts allow you to quickly access specific features or functionality by triple-clicking the home button or side button. Customizable shortcuts, such as Zoom, VoiceOver, or Magnifier, can be enabled and adjusted to accommodate your specific needs in the Accessibility Shortcut settings.
7. Enable Hearing Accommodations: Under the Hearing section, you’ll find several features to enhance audio clarity for individuals with hearing impairments. Options like Live Listen, which uses the device as a microphone, or Sound Recognition, which alerts you to specific sounds, can be enabled and customized to suit your preferences.
8. Customize Switch Control: Switch Control is a powerful accessibility feature that allows individuals with limited mobility to control the device using external switches, buttons, or even head movements. In the Switch Control settings, you can customize the switches and gestures to perform specific actions or control various device functions.
By customizing the accessibility settings on your iPhone, you can tailor the device to your specific needs. Adjust the display and text size, enable VoiceOver, use AssistiveTouch, customize accessibility shortcuts, enable hearing accommodations, and configure switch control to create a personalized and inclusive user experience.
Exploring Third-Party Customization Apps for iPhone
In addition to the built-in customization options on your iPhone, there are also third-party apps available that can take your device customization to the next level. These apps offer a wide range of options to personalize your iPhone’s appearance, functionality, and user interface. Here’s a glimpse into the world of third-party customization apps for iPhone.
1. Launcher Apps: Launcher apps provide the ability to customize your home screen layout, app icons, and widgets. With these apps, you can create unique and visually appealing home screen designs by arranging app shortcuts, creating custom icons, and adding customized widgets. Some popular launcher apps include Nova Launcher, Smart Launcher, and Microsoft Launcher.
2. Icon Pack Apps: Icon pack apps allow you to completely transform the look of your app icons. These apps offer a collection of custom-designed icons in various styles, themes, and shapes. Whether you prefer minimalistic, retro, or vibrant icons, there are numerous icon pack apps available to choose from. Some popular options include Icon Themer, Linebit, and CandyCons.
3. Keyboard Apps: If you’re looking to enhance your typing experience, keyboard apps can offer a wide range of customization options. These apps provide different keyboard layouts, themes, and even unique features like swipe typing or predictive text capabilities. Popular keyboard apps include Gboard, SwiftKey, and Fleksy.
4. Wallpaper Apps: While the built-in wallpaper options on your iPhone are great, third-party wallpaper apps offer an extensive collection of high-quality wallpapers in various categories. From stunning nature landscapes to artistic illustrations, these apps give you access to a vast library of wallpapers to personalize your device. Popular wallpaper apps include Walli, Vellum, and Unsplash.
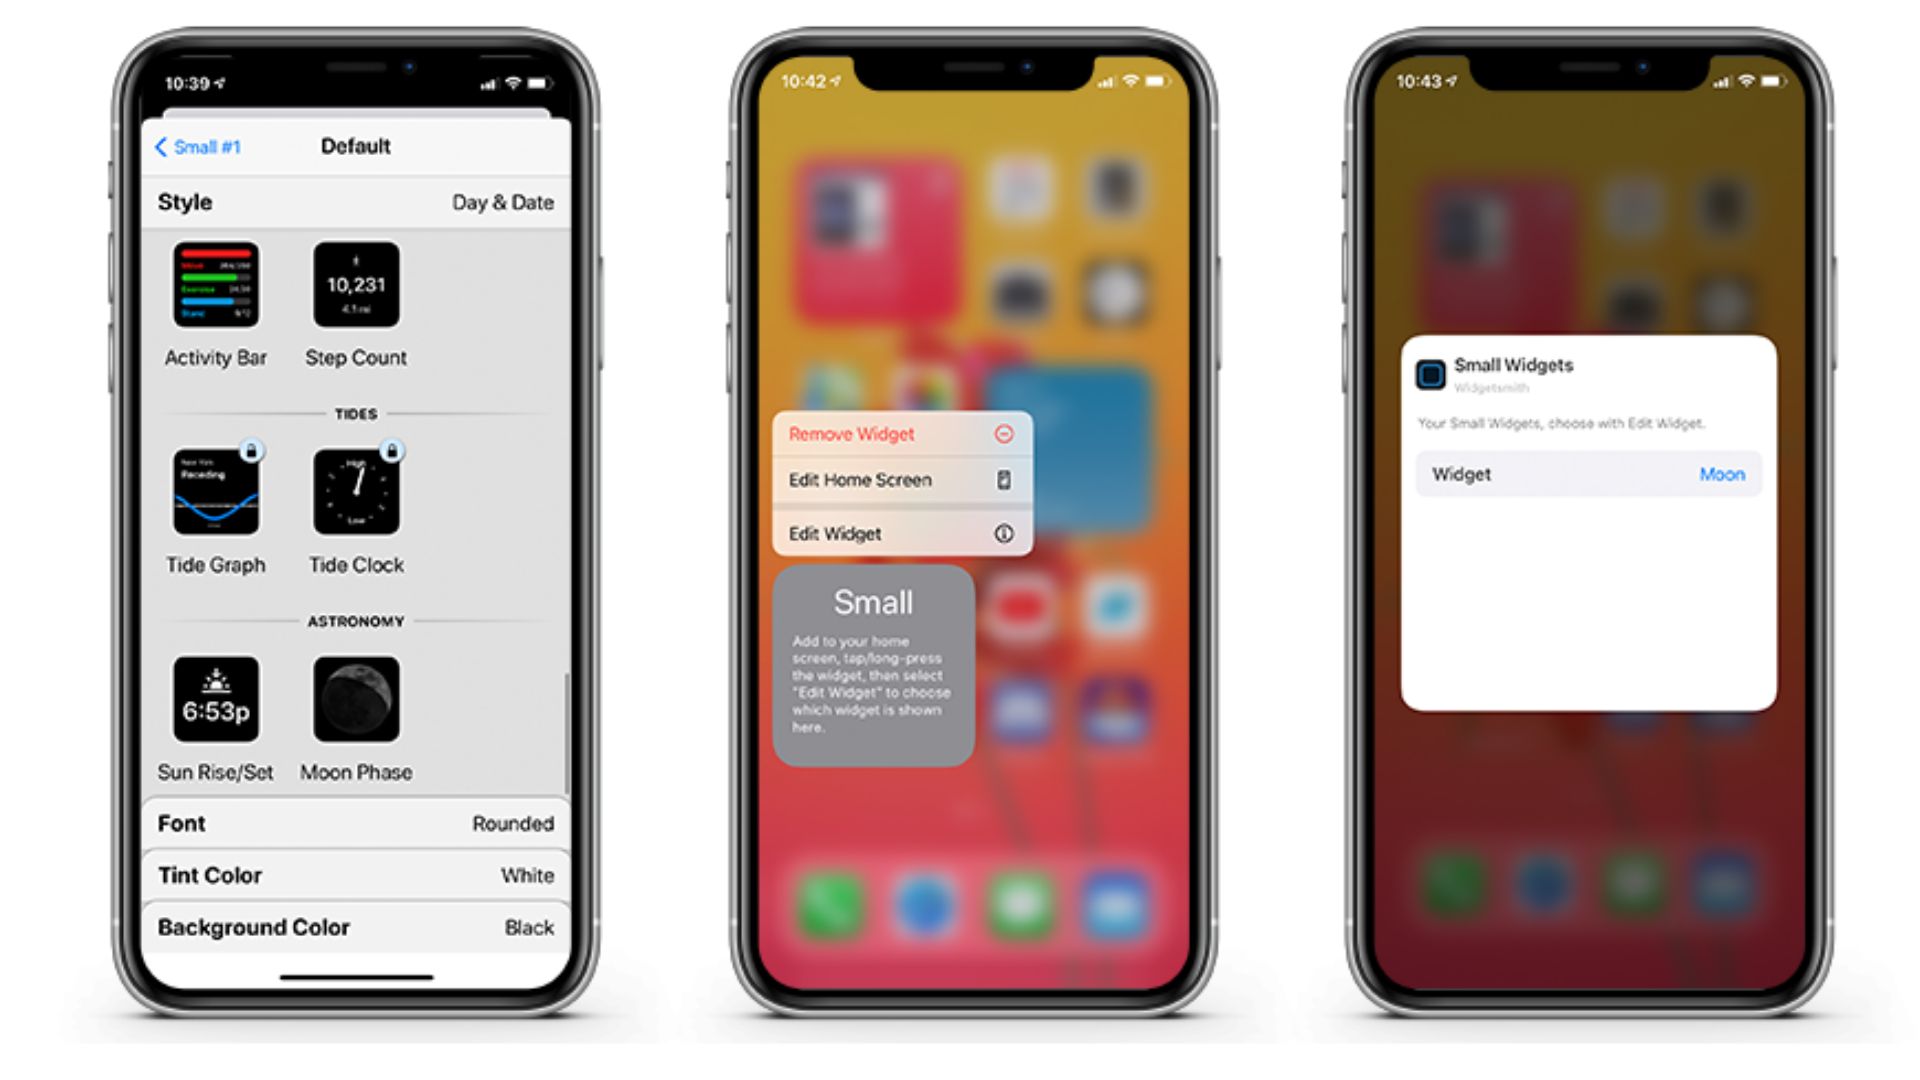
5. Widget Apps: Widget apps offer a plethora of customizable widgets beyond the built-in options. These apps provide different widget styles, sizes, and functions. You can add widgets for weather updates, calendars, to-do lists, and more. Popular widget apps include Widgetsmith, KWGT Kustom Widget Maker, and Color Widgets.
6. Customization Utility Apps: There are also all-in-one customization utility apps that provide a comprehensive suite of customization options. These apps offer features such as custom app icons, wallpapers, widgets, and even system-level changes like custom fonts or notification sounds. Some notable utility apps include Customize App, Themeboard, and iSkin.
When exploring third-party customization apps, be sure to read user reviews, choose reputable developers, and consider the performance and compatibility with your iPhone model and iOS version. Keep in mind that some customization apps may require additional setup or certain permissions to function and may impact system stability or battery life.
With third-party customization apps, you can go beyond the limitations of the built-in customization options and truly transform the look and functionality of your iPhone. Whether you want to create a unique home screen layout, customize your app icons, or personalize your keyboard experience, there’s an abundance of third-party customization apps available to cater to your specific preferences.
Tips and Tricks for iPhone Customization
Customizing your iPhone can be a fun and rewarding experience. It allows you to personalize your device and make it uniquely yours. To make the most out of your customization journey, here are some tips and tricks to consider:
1. Plan Your Customization: Before diving into customization, take some time to plan your desired look and functionality. Think about the overall theme, color scheme, and layout you want to achieve. Consider your personal style and the practicality of the customization choices you make.
2. Start with Wallpaper: Changing the wallpaper is one of the easiest ways to refresh the look of your iPhone. Experiment with different wallpapers, whether it’s a photo you capture yourself or one you find online. Choose high-resolution wallpapers that fit your device’s screen size to ensure the best visual experience.
3. Explore Built-in Customization Options: Make sure to acquaint yourself with the built-in customization options provided by iOS. Customize your home screen layout, adjust display settings, control sounds and notifications, and personalize Siri’s voice and accent. These options allow you to tailor your iPhone experience without the need for additional apps.
4. Experiment with Widgets: With the introduction of iOS 14, widgets have become a prominent feature. Take advantage of widgets to display essential information, such as weather updates, upcoming events, or fitness tracking. Arrange them creatively on your home screen to create a visually engaging and functional layout.
5. Customize Control Center: The Control Center offers quick access to various settings and features. Customize it by adding frequently used controls and rearranging them to suit your needs. Consider adding shortcuts to commonly used actions or enabling additional controls like screen recording or flashlight intensity.
6. Utilize Shortcuts and Automation: Shortcuts and automations can streamline tasks and save time. Create custom shortcuts for actions you perform frequently and automate tasks based on specific triggers or conditions. Leverage the power of Siri to run these shortcuts hands-free using voice commands.
7. Consider Third-Party Apps: Explore the wide array of third-party customization apps available on the App Store. From launcher apps to icon packs, keyboard apps, and widget apps, these tools offer a wealth of options to personalize your iPhone beyond what the built-in settings allow.
8. Embrace Regular Updates: Stay updated with the latest iOS versions and app updates. New system updates often bring new customization features and improvements. Keep an eye out for new customization options, themes, or functionalities that can enhance your iPhone experience.
Remember, customization is a personal preference, and what works for others may not necessarily work for you. Be open to experimenting and tweaking your customization choices until you achieve the desired look and functionality that truly reflects your individual style and enhances your overall iPhone experience.