
Why Customize Text Message Sounds?
Customizing the text message sounds on your iPhone offers a great opportunity to personalize your device and add a touch of uniqueness to your messaging experience. Instead of relying on the default sound that every iPhone user has, you can choose from a variety of options to suit your personal style and preferences. Whether you want a soothing melody or a fun sound effect, customizing text message sounds allows you to make your iPhone truly your own.
Additionally, customizing text message sounds can also enhance your productivity by enabling you to differentiate between important messages and less urgent notifications. By assigning unique sounds to specific contacts or groups, you can instantly recognize who is messaging you without even looking at your phone. This can be particularly useful in situations where you need to quickly prioritize and respond to messages.
Now that you understand the benefits of customizing text message sounds, let’s dive into the step-by-step process of how to do it on your iPhone.
Step 1: Accessing the Settings
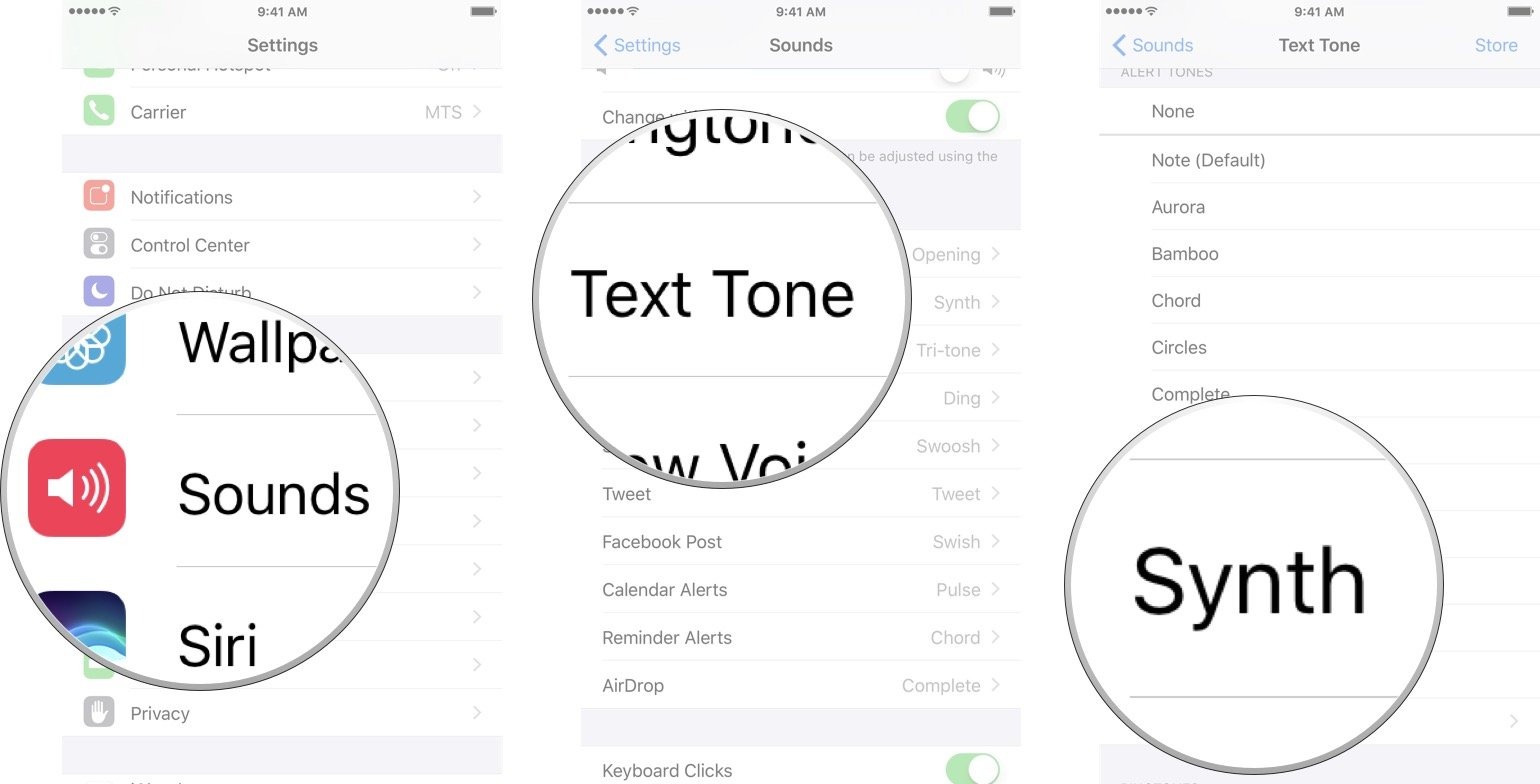
To customize your text message sounds on your iPhone, the first step is to access the Settings menu. The Settings icon looks like a gear and can be found on your home screen. Tap on it to open the Settings app.
Once you’re in the Settings app, you’ll see a list of options. Scroll down until you find the “Sounds & Haptics” option and tap on it. This will take you to the Sounds & Haptics settings, where you can manage various audio settings for your iPhone.
By accessing the Sounds & Haptics settings, you’ll be one step closer to customizing the text message sounds to your liking.
Note: If you have an older version of iOS, you may find the sound settings under “Sounds” instead of “Sounds & Haptics.”
Now that you’ve accessed the settings, let’s move on to step 2, where we’ll navigate to the appropriate option for customizing text message sounds.
Step 2: Navigating to Sounds & Haptics
After accessing the Settings app on your iPhone, the next step is to navigate to the “Sounds & Haptics” section. This is where you can customize various sound settings, including text message sounds.
Once you’re in the Settings app, you’ll see a list of options. Scroll down until you find the “Sounds & Haptics” option and tap on it. On some older versions of iOS, you may find the sound settings under “Sounds” instead of “Sounds & Haptics.”
By tapping on “Sounds & Haptics,” you’ll be taken to a screen where you can modify the sound settings for different aspects of your iPhone, such as ringtone, notifications, and alarms.
Now that you’ve successfully navigated to the Sounds & Haptics section, let’s move on to step 3, where we’ll explore the specific option for customizing text message sounds.
Step 3: Selecting the Text Tone Option
Once you’ve reached the “Sounds & Haptics” section in the Settings app on your iPhone, it’s time to select the option for customizing text message sounds. Specifically, we’ll be focusing on the “Text Tone” option.
On the “Sounds & Haptics” screen, you’ll notice a list of different sound settings for various functions of your iPhone. Look for the “Text Tone” option, which is specifically designed for customizing the sound of incoming text messages.
Tap on the “Text Tone” option to proceed to the next step.
Within the “Text Tone” section, you’ll find a variety of pre-installed text message sound options to choose from. These options range from simple and subtle tones to more vibrant and attention-grabbing sounds.
Now that you’ve selected the “Text Tone” option, let’s move on to step 4, where we’ll explore the different ways you can customize the text message sound on your iPhone.
Step 4: Choosing a Default Sound
After selecting the “Text Tone” option in the “Sounds & Haptics” section of the Settings app on your iPhone, you have the option to choose a default sound for your text messages. This will be the sound that plays every time you receive a new text message, unless you further customize it for specific contacts or groups.
Within the “Text Tone” section, you’ll see a list of pre-installed sound options. To choose a default sound, simply tap on one of the options to preview it. As you tap on each sound, you’ll hear a short snippet to help you decide which one you prefer.
If none of the pre-installed options suit your taste, you can also tap on the “Classic” category at the top of the screen to explore more traditional text message sounds. These classic options offer a nostalgic touch for those who prefer a more retro feel.
Additionally, if you have purchased and downloaded custom text message sound effects from the App Store, you may find them in the “Purchased” category. This gives you even more options to choose from, allowing for a truly unique and personalized text message sound.
Once you’ve found a default sound that you like, simply tap on it to select it. Your chosen sound will be applied as the default text message sound for your iPhone.
Now that you’ve chosen a default sound for your text messages, let’s move on to step 5, where we’ll explore how to customize the text message sound for specific contacts or groups.
Step 5: Customizing the Text Message Sound
Customizing the text message sound for specific contacts or groups on your iPhone allows you to personalize your messaging experience even further. By assigning unique sounds to individual contacts or groups, you’ll be able to differentiate between different messages without even looking at your phone.
To customize the text message sound for a specific contact or group, follow these steps:
- Open the “Contacts” app on your iPhone and select the desired contact or group.
- Tap on “Edit” in the top-right corner of the contact or group’s profile.
- Scroll down and tap on “Text Tone.”
- Similar to selecting a default sound, you’ll see a list of pre-installed text message sound options. Tap on one to preview it.
- If you prefer, you can choose a sound from the “Classic” or “Purchased” categories as well.
- Once you’ve chosen a sound, tap on “Save” to apply it to the contact or group.
Now, whenever you receive a text message from that specific contact or group, your customized sound will play, allowing you to instantly recognize who the message is from.
Repeat these steps for any other contacts or groups you wish to customize.
Customizing the text message sound for specific contacts or groups can add a fun and personalized touch to your messaging experience. It’s a great way to instantly know who’s reaching out to you, even before you check your phone.
Now that you know how to customize the text message sounds for specific contacts or groups, let’s move on to step 6, where we’ll explore how to download text message sound effects.
Step 6: Using Customized Sounds for Specific Contacts
Using customized sounds for specific contacts on your iPhone allows you to personalize your messaging experience even further. By assigning unique sounds to individual contacts, you can instantly identify who is messaging you without having to check your phone.
To use customized sounds for specific contacts, follow these steps:
- Open the “Contacts” app on your iPhone and select the contact you want to customize.
- Tap on “Edit” in the top-right corner of the contact’s profile.
- Scroll down and tap on “Text Tone.”
- In the “Text Tone” section, you will find a list of pre-installed text message sounds. Tap on one to preview it.
- You can also choose a sound from the “Classic” or “Purchased” categories.
- Once you’ve chosen a sound, tap on “Save” to apply it to the contact.
Now, whenever you receive a text message from that specific contact, their customized sound will play, making it easy to identify who the message is from, even if your phone is in your pocket or across the room.
Repeat these steps for any other contacts you want to customize.
Using customized sounds for specific contacts adds a personal touch to your messaging experience and allows you to quickly prioritize and respond to important messages. It’s especially helpful when you’re in a busy environment or need to stay focused on other tasks.
Now that you know how to use customized sounds for specific contacts, let’s move on to step 7, where we’ll explore how to download additional text message sound effects for your iPhone.
Step 7: Downloading Text Message Sound Effects
If you want to go beyond the pre-installed text message sound options on your iPhone, you have the option to download additional text message sound effects from the App Store. This allows you to further customize your messaging experience and find the perfect sound that fits your personality and preferences.
To download text message sound effects, follow these steps:
- Open the App Store on your iPhone.
- Tap on the “Search” tab at the bottom of the screen.
- Type in “text message sound effects” or related keywords into the search bar.
- Browse the available apps and choose one that offers the text message sound effects you’re interested in.
- Tap on the app to view its details and reviews.
- If the app meets your requirements, tap on the “Get” or “Buy” button to download and install it.
- Follow the on-screen prompts, if any, to complete the installation process.
Once you have downloaded the app, open it and explore the available text message sound effects. Many of these apps offer a wide range of options, from whimsical and funny sounds to elegant and soothing melodies.
Choose the sound effect you want to use as your text message sound by following the instructions provided by the app. They may vary depending on the specific app you have downloaded.
After selecting your desired text message sound effect, make sure to grant the necessary permissions for the app to access your text message notifications. This will allow the app to replace the default sound for text messages with your chosen sound effect.
Please note that some text message sound effect apps may require a one-time purchase or offer in-app purchases for additional sound packs. Make sure to check the app’s details and offerings before making a purchase.
Now that you know how to download text message sound effects, let’s continue to step 8, where we’ll learn how to assign a custom sound effect to your text messages.
Step 8: Assigning a Custom Sound Effect to Text Messages
After downloading and installing a text message sound effect app from the App Store, you can now assign a custom sound effect to your text messages. This allows you to personalize your messaging experience even further with unique and distinctive sounds.
To assign a custom sound effect to your text messages, follow these steps:
- Open the text message sound effect app that you downloaded.
- Explore the available sound options and choose the one you want to use for your text messages.
- Follow the instructions provided by the app to set the chosen sound effect as your text message sound.
- Grant any necessary permissions for the app to access your text message notifications.
- Once the sound effect is assigned, exit the app and return to your main screen.
Now, whenever you receive a text message, your custom sound effect will play, adding a unique and personalized touch to your messaging experience.
Remember that this customization may vary depending on the specific text message sound effect app you have downloaded. Some apps offer more advanced customization options, allowing you to assign different sounds for different contacts or groups.
Enjoy the freedom to choose from a wide range of custom sound effects and make your text messages truly stand out.
Now that you’ve assigned a custom sound effect to your text messages, let’s move on to step 9, where we’ll learn how to test and check your sound settings.
Step 9: Testing and Checking Sound Settings
Once you have customized and assigned text message sounds on your iPhone, it’s important to test and check your sound settings to ensure everything is working as expected. This step will allow you to verify that the correct sounds are playing for your text messages and make any necessary adjustments.
To test and check your sound settings, follow these steps:
- Send a test text message to yourself or ask a friend to send you a message.
- Listen for the sound to play when you receive the text message.
- If the assigned sound effect plays, then your customized text message sound settings are working correctly.
- If the sound doesn’t play, check the following:
- Ensure that your iPhone’s volume is turned up and not set to silent mode.
- Double-check that you have correctly assigned the desired text message sound effect.
- Make sure that you have granted any necessary permissions for the sound effect app to access your notifications.
- If you need to make adjustments, revisit the appropriate settings sections, such as “Sounds & Haptics” or the text message sound effect app, to modify your preferences.
- Repeat the test by sending or receiving a text message to confirm that the changes have taken effect.
By regularly testing and checking your sound settings, you can ensure that your customized text message sounds are functioning correctly and that you’re enjoying the personalized messaging experience you desire.
Now that you’ve tested and checked your sound settings, let’s move on to step 10, where we’ll explore how to troubleshoot common issues that may arise when customizing text message sounds on your iPhone.
Step 10: Troubleshooting Common Issues
Customizing text message sounds on your iPhone can sometimes come with a few challenges. If you are encountering any issues or experiencing unexpected behavior, follow these troubleshooting steps to resolve common problems:
- Check your volume settings: Ensure that the volume on your iPhone is turned up and not muted or set to silent mode. You can adjust the volume by using the volume buttons on the side of your device.
- Verify the sound source: Make sure that the sound file you selected for your text message sound is still available and accessible on your iPhone. If the sound file was deleted or moved, the assigned sound may not play.
- Restart your iPhone: A simple restart can often resolve various software-related issues. Press and hold the power button until the “Slide to power off” slider appears. Slide it to turn off your iPhone and then press the power button again to restart it.
- Update your iOS: Outdated software can sometimes cause compatibility issues. Check if there are any available software updates for your iPhone and install them by going to “Settings” > “General” > “Software Update.”
- Reinstall the sound effect app: If you have downloaded a text message sound effect app and are experiencing issues, try uninstalling and reinstalling the app. This can fix any potential glitches or conflicts with the app.
- Reset all settings: If none of the above solutions work, you can try resetting all settings on your iPhone. Go to “Settings” > “General” > “Reset” > “Reset All Settings.” Keep in mind that this will reset all your personalized settings, so make sure to back up your iPhone before proceeding.
- Contact Apple Support: If you’ve gone through all the troubleshooting steps and are still experiencing issues, it may be helpful to contact Apple Support for further assistance. They can provide personalized guidance and help address any underlying technical problems.
By following these troubleshooting steps, you should be able to overcome common issues when customizing text message sounds on your iPhone. Remember to be patient and thorough in your approach to ensure a smooth and satisfying messaging experience.
Congratulations! You have now successfully learned how to customize text message sounds on your iPhone and troubleshoot any issues that may arise. Enjoy your personalized messaging experience!